
Looking for a yarn?


Comments / Questions (113)
![]() Heidi Hammes wrote:
Heidi Hammes wrote:
Hallo, ich stricke grösse XL. Habe 96 maschen wie gewünscht nach den verkürzten Reihen. Nun soll ich 20 mal raglanzunahmen machen. 20 mal 8 maschen sind 160. Plus 96 maschen sind 256 maschen. Ich soll aber nur 240 maschen haben. Das verstehe ich nicht. Bitte um Rückmeldung. Danke LG Heidi Hammes
21.01.2025 - 14:17DROPS Design answered:
Liebe Frau Hammes, die Zunahmen bei den verkürzten Reihen sind in den 20 Mal gerechnet, so sollen Sie nach den verkürzten Reihen noch 18 Mal zunehmen = 20 Mal insgesamt vom Anfang an. Viel Spaß beim Stricken!
21.01.2025 - 17:01
![]() Karina wrote:
Karina wrote:
Het lijkt mij onlogisch om vlak voor de onderboord 30 steken te meerderen. Moet er niet na de splitsing van de mouwen gemeerderd worden?
10.01.2025 - 22:35
![]() Aurélie wrote:
Aurélie wrote:
Bonjour il n'est pas indiqué la taille de l'aiguille à utiliser pour l'échantillon. Que faut-il utiliser entre la taille 4,5 et la taille 6 s'il vous plaît ?
20.12.2024 - 17:00
![]() Aurélie wrote:
Aurélie wrote:
Bonjour il n'est pas indiqué la taille de l'aiguille à utiliser pour l'échantillon. Que faut-il utiliser entre la taille 4,5 et la taille 6 s'il vous plaît ?
20.12.2024 - 16:57DROPS Design answered:
Bonjour Aurélie, utilisez les aiguilles 6 pour l'échantillon ( ou bien adaptez la taille des aiguilles si besoin). Bon tricot!
02.01.2025 - 09:14
![]() Khadija wrote:
Khadija wrote:
Hello!What size is model wearing?
15.12.2024 - 20:08
![]() May Skovsgaard wrote:
May Skovsgaard wrote:
Hej Hvordan får jeg vende pindene til at stemme - de første to mærker sidder på ærmet, hvor jeg skal tage 4 masker ud og så vende - jeg får forhøjningen til at sidde på ærmet
01.12.2024 - 22:19DROPS Design answered:
Hei May. Du starter midt bak og strikker (fra retten) 3 masker forbi de 2 første merkene (merke 1 og merke 2). Snu og strikk 3 masker forbi det siste merke (først strikker du forbi merke 2, så merke 1, så merke 4 og det siste merket er da merke 3). Snu og strikk forbi merke 3, merke 4 merke 1 og merke 2 og 2 masker mer enn ved forrige vending. Snu og strikk forbi merke 2, merke 1, merke 4 og merke 3, og 2 masker mer enn ved forrige vending. Snu og strikk forbi merke 3 og merke 4 og strikk til midt bak. Du har nå strikket like mange pinner på hver side. Husk raglan økningene. mvh DROPS Design
02.12.2024 - 13:07
![]() Valdís Jakobsdóttir wrote:
Valdís Jakobsdóttir wrote:
Ég er að gera laskalínu og er búin að auka í 8 lykkjur 10 sinnum. Þá stendur í uppskriftinni " Haldið áfram í sléttprjóni og með útaukningufyrir laskalínu, en í annað vert skipti sem er aukiðút, aukið nú eingöngu út á fram- og bakstykki (4 lykkjur fleiri) Þ.e.a.s. aukið er út á fram- og bakstykki í annarri hverri umferð og á ermum í 4. hverri umferð.... Spurningin er hvað telst fram- og bakstykki og hvað ermar í laskalínunni?
21.11.2024 - 23:33DROPS Design answered:
Blessuð Valdís. Það kemur fram í uppskriftinni hvar fram- og bakstykki og ermar eru: Teljið 10-10-12-12-12-14 lykkjur (ca hálft bakstykki), setjið 1. prjónamerki í næstu lykkju, teljið 15 lykkjur (ermi), setjið 2. prjónamerki í næstu lykkju, teljið 17-19-21-23-23-25 lykkjur (framstykki), setjið 3. prjónamerki í næstu lykkju, teljið 15 lykkjur (ermi), setjið 4. prjónamerki í næstu lykkju, teljið 7-9-9-11-11-11 lykkjur (ca hálft bakstykki). Gangi þér vel.
22.11.2024 - 10:19
![]() Nana wrote:
Nana wrote:
Gibt es ein Video oder eine Anleitung, wie die neuen Maschen in der Strickarbeit für den Ärmel angeschlagen werden? Ich habe dort doch nur einen Faden. Vielen Dank!
16.11.2024 - 11:18DROPS Design answered:
Liebe Nana, ja, es gibt mehrere Möglichkeiten, die neuen Maschen anzuschlagen. Ein Beispiel dazu finden Sie auf unserer Seite unter diesem Link Dort ist der Vorgang Schritt für Schritt erklärt. Viel Erfolg beim Ausprobieren!
16.11.2024 - 12:51
![]() Hélène Hurteau wrote:
Hélène Hurteau wrote:
Bonjour merci pour votre réponse mais ça ne répond pas à ma question quel est le numéro du marqueur du 2 eme rang envers ? Merci
13.11.2024 - 11:30
![]() Helen wrote:
Helen wrote:
Bonjour Je ne comprends pas l’explication pour l’encolure Rang envers deux : quel marqueur ? C’est écrit « un marqueur » on ne sait pas lequel Les rangs raccourcis se font ils entre les raglans ? Merci
12.11.2024 - 23:36DROPS Design answered:
Bonjour Helen, il s'agit des marqueurs que vous avez placé juste à la fin du col, non les rangs raccourcis ne se font pas entre les marqueurs, il se font à partir de 3 mailles après la maille avec le marqueur 2 (côté gauche du devant, vu sur l'endroit) jusqu'à 3 mailles après la mailles avec le marqueur 3 (côté droit du devant, vu sur l'endroit) pour le 1er rang; cette vidéo devrait vous aider, nous y montrons comment réaliser ce type de rangs raccourcis. Bon tricot!
13.11.2024 - 08:03
|
|
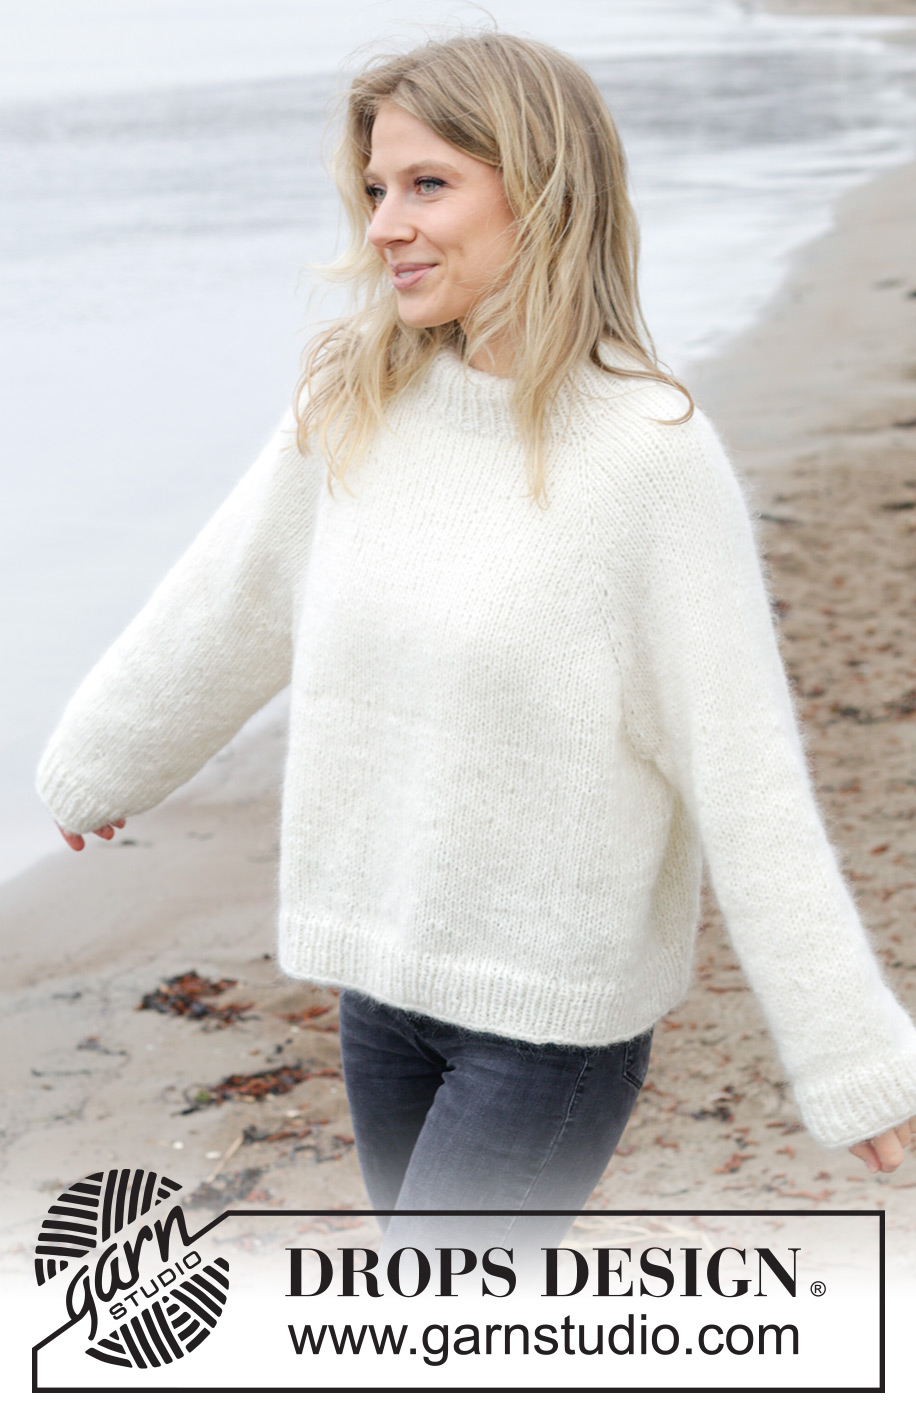
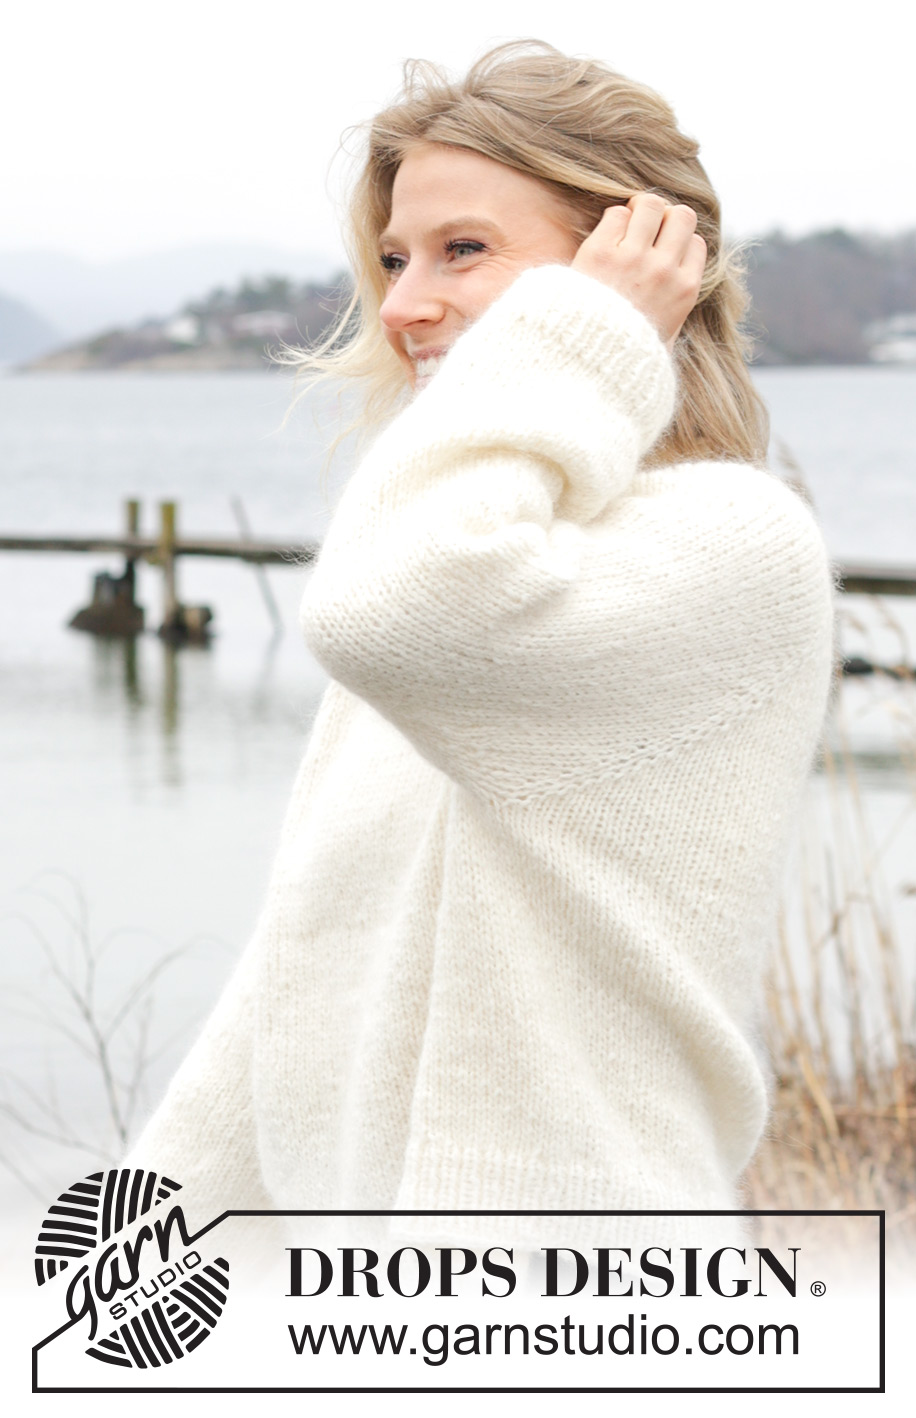
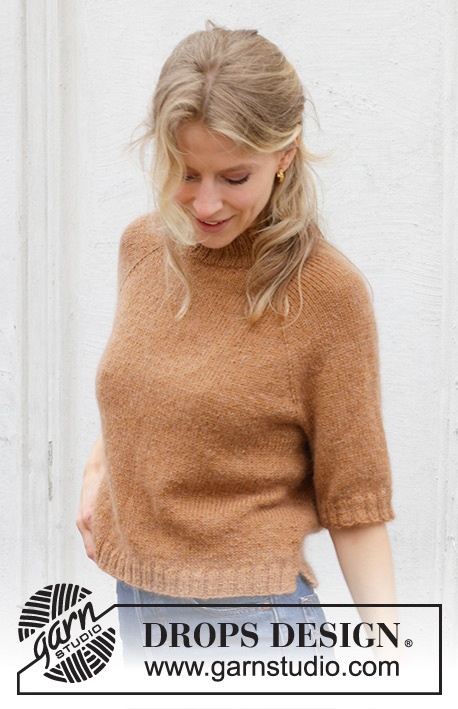
Sweet November#sweetnovembersweater |
|
 |
 |
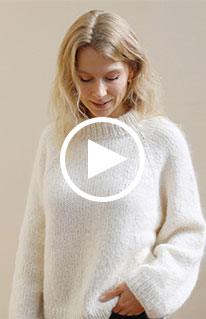
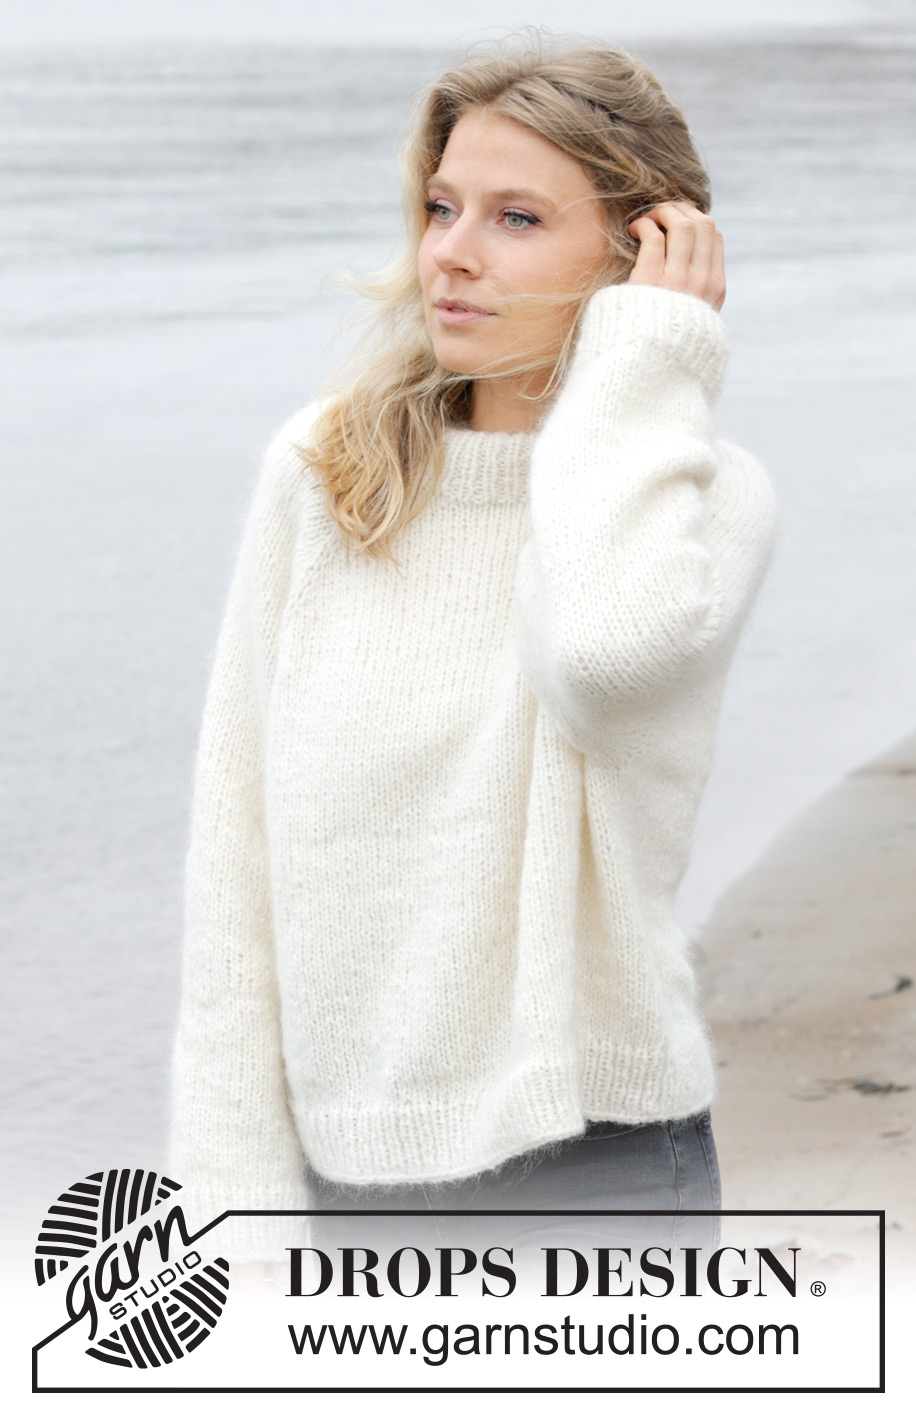
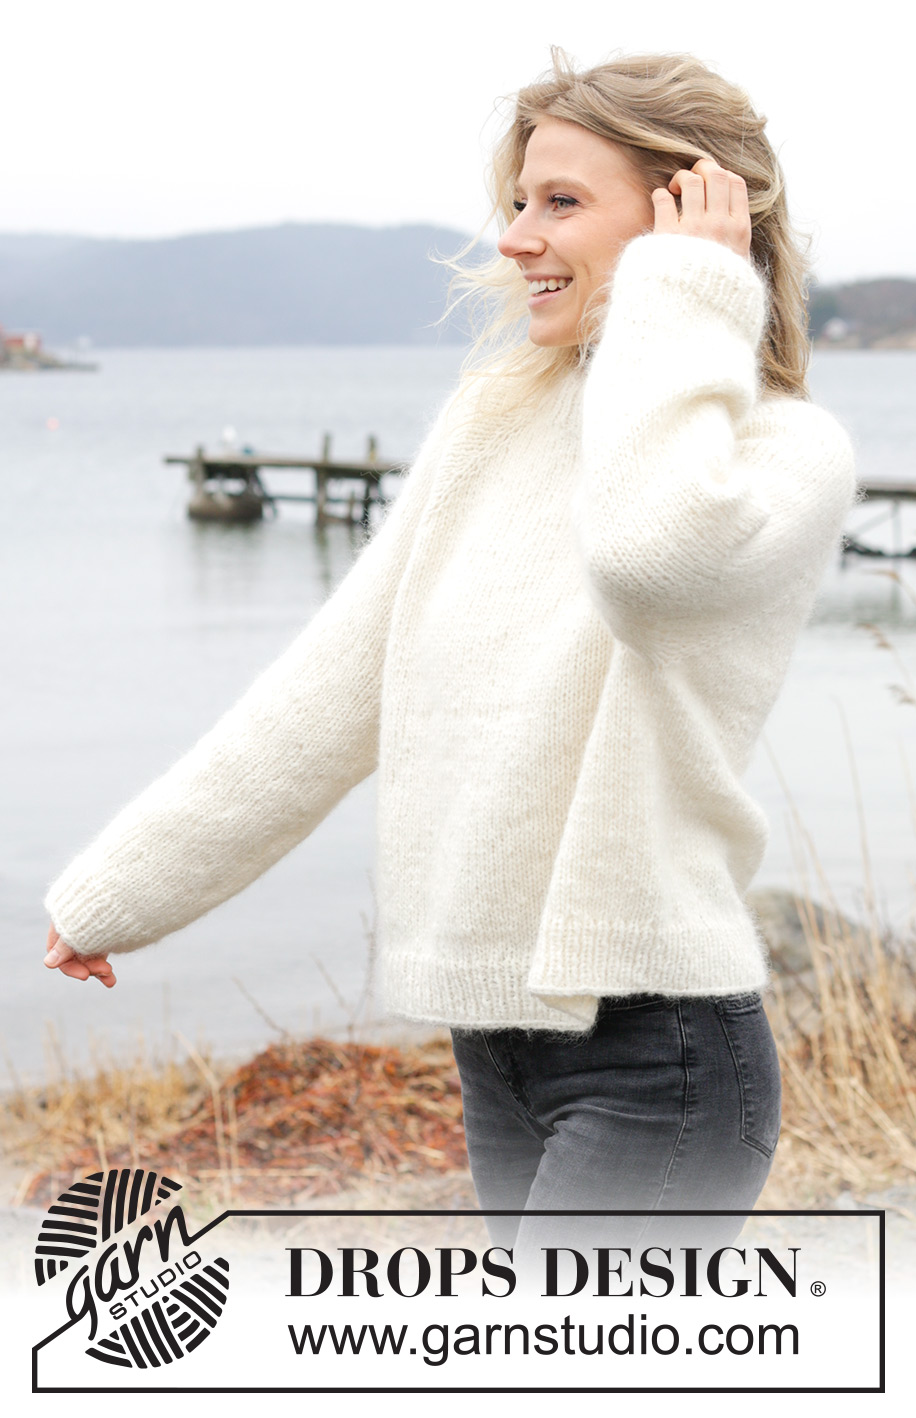
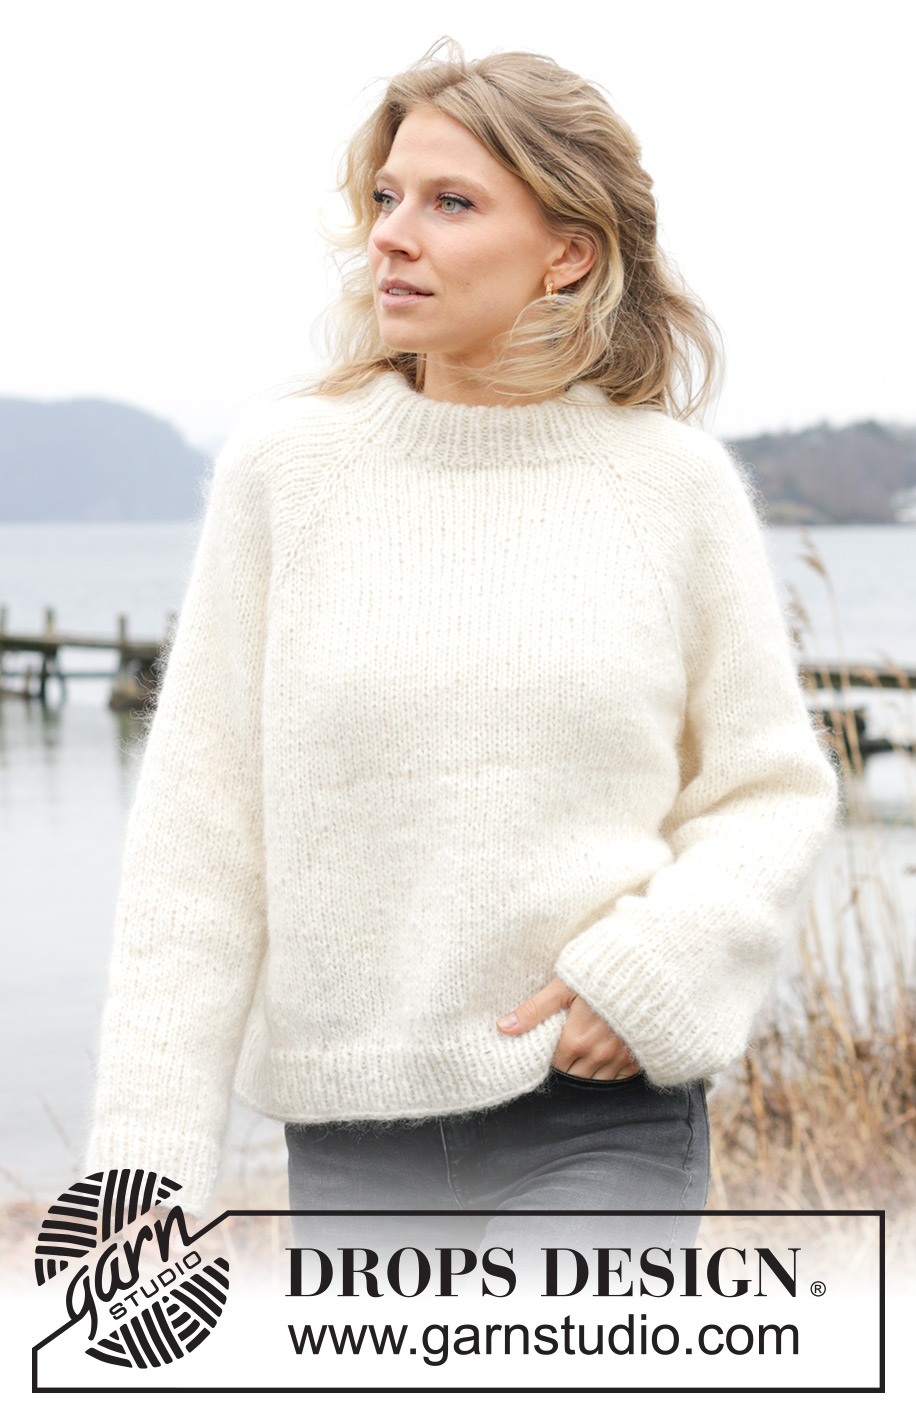
Knitted jumper in DROPS Air and DROPS Kid-Silk. The piece is worked top down with raglan. Sizes XS - XXL.
DROPS 243-13 |
|
|
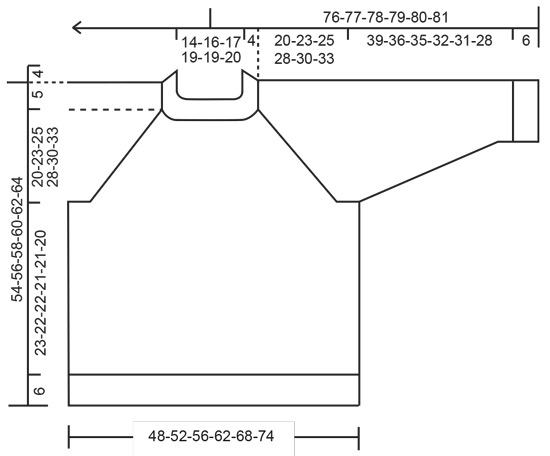
------------------------------------------------------- EXPLANATIONS FOR THE PATTERN: ------------------------------------------------------- RAGLAN: Increase 1 stitch before/after the marker-stitch, in each transition between the body and sleeves, by making 1 yarn over. When working back and forth the yarn overs are worked as follows from the wrong side: BEFORE MARKER: Purl the back loop = no hole. AFTER MARKER: Slip the yarn over and place it back on the left needle the other way round (insert the left needle through the back when replacing it). Purl the front loop = no hole. When working in the round the yarn overs are worked as follows on the next round: BEFORE MARKER: Slip the yarn over and place it back on the left needle the other way round (insert the left needle through the back when replacing it). Knit the front loop (stitch twists to the right) = no hole. AFTER MARKER: Knit the back loop (stitch twists to the left) = no hole. DECREASE TIP (for sleeves): Start 3 stitches before the marker-thread, knit 2 together, knit 2 (marker-thread sits between these 2 stitches), slip 1 stitch knit-wise, knit 1 and pass the slipped stitch over the knitted stitch. ------------------------------------------------------- START THE PIECE HERE: ------------------------------------------------------- JUMPER – SHORT OVERVIEW OF THE PIECE: The neck and yoke are worked in the round with circular needle, top down. The yoke is divided for body and sleeves and the body is continued in the round with circular needle. The sleeves are worked with short circular needle/double pointed needles. DOUBLE NECK: Cast on 68-72-76-80-80-84 stitches with 1 strand DROPS Air and 1 strand DROPS Kid-Silk using short circular needles size 4.5 and 6 mm held together. Remove the needle size 6 mm keeping the stitches on needle size 4.5 mm (this gives you an elastic cast-on edge). Work rib in the round (knit 1, purl 1) for 9 cm. Fold the neck double to the inside and work 1 more round of rib, working every 2nd stitch together with its corresponding stitch on the cast-on edge. You now have a double neck. Insert 4 markers without working the stitches and each marker being inserted in a knitted stitch (not between stitches). The markers are used when increasing for raglan. Insert 1 marker-thread at the beginning of the round = approx. mid-back. Count 10-10-12-12-12-14 stitches (approx. half back piece), insert marker-1 in the next stitch, count 15 stitches (sleeve), insert marker-2 in the next stitch, count 17-19-21-23-23-25 stitches (front piece), insert marker-3 in the next stitch, count 15 stitches (sleeve), insert marker-4 in the next stitch, count 7-9-9-11-11-11 stitches (approx. half back piece) NECKLINE: Change to circular needle size 6 mm and work short rows from mid-back as follows: ROW 1 (right side): Knit and increase for RAGLAN – read description above, on each side of the first 2 marker-stitches (4 stitches increased), turn when you have knitted 3 stitches past marker-stitch 2. ROW 2 (wrong side): Purl and turn when you have worked 3 stitches past the last marker-stitch. ROW 3 (right side): Knit and increase for raglan on each side of the all marker-stitches (8 stitches increased), turn when you have knitted 2 stitches past the previous turn. ROW 4 (wrong side): Purl and turn when you have purled 2 stitches past the previous turn. ROW 5 (right side): Knit and increase for raglan on each side of the first 2 marker-stitches (4 stitches increased), knit to mid-back. The short rows are finished and you have increased 2 times for raglan by each marker-stitch = 84-88-92-96-96-100 stitches. Knit 1 round. YOKE: Start mid-back and continue with stocking stitch in the round over all stitches. AT THE SAME TIME continue increasing for raglan every 2nd round a total of 8-10-12-14-20-22 times (including the increases on the short rows) = 132-152-172-192-240-260 stitches. Then continue increasing for raglan but every 2nd increase is only on the body (4 increased stitches) i.e., increase on the body every 2nd round and on the sleeves every 4th round. Increase like this 8-8-8-8-4-4 times on the body (4-4-4-4-2-2 times on the sleeves). You have increased a total of 16-18-20-22-24-26 times on the body and 12-14-16-18-22-24 times on the sleeves. There are 180-200-220-240-264-284 stitches and the yoke measures approx. 20-23-25-28-30-33 cm from mid-back (after neck edge). Continue working, if necessary, to the correct length. On the next round divide for the body and sleeves as follows: Knit 29-31-35-37-41-45 (approx. half back piece), place the next 35-39-43-47-51-55 stitches on a thread for the sleeve, cast on 12-12-12-14-14-16 stitches (in side under sleeve), knit 55-61-67-73-81-87 (front piece), place the next 35-39-43-47-51-55 stitches on a thread for the sleeve, cast on 12-12-12-14-14-16 stitches (in side under sleeve), knit the last 26-30-32-36-40-42 stitches (approx. half back piece). The body and sleeves are finished separately. The piece is now measured from here! BODY: = 134-146-158-174-190-206 stitches. Continue with stocking stitch in the round for a further 23-22-22-21-21-20 cm. Knit 1 round and increase 30-30-32-36-42-46 stitches evenly spaced = 164-176-190-210-232-252 stitches. Change to circular needle size 4.5 mm. Work rib (knit 1, purl 1) for 6 cm. Cast off. The jumper measures approx. 54-56-58-60-62-64 cm from the shoulder down. SLEEVES: Place the 35-39-43-47-51-55 stitches from the thread on the one side of the piece on short circular needle/double pointed needles size 6 mm and knit up 1 stitch in each of the new stitches cast on under the sleeve = 47-51-55-61-65-71 stitches. Insert a marker-thread in the middle of the 12-12-12-14-14-16 stitches under the sleeve. Allow the thread to follow your work onwards, it is used when decreasing under the sleeve. Start at the marker-thread and work stocking stitch in the round. When the sleeve measures 4 cm from division, decrease 2 stitches mid under sleeve – read DECREASE TIP. Decrease like this every 15-7-5½-3-2½-2 cm a total of 3-5-6-9-10-12 times = 41-41-43-43-45-47 stitches. Continue working until the sleeve measures 39-36-35-32-31-28 cm from the division. Knit 1 round and increase 7-7-7-9-9-9 stitches evenly spaced = 48-48-50-52-54-56 stitches. Change to double pointed needles size 4.5 mm and work rib (knit 1, purl 1) for 6 cm. Cast off. The sleeve measures approx. 45-42-41-38-37-34 cm from the division. Work the other sleeve in the same way. |
|
 |
|
Have you finished this pattern?Tag your pictures with #dropspattern #sweetnovembersweater or submit them to the #dropsfan gallery. Do you need help with this pattern?You'll find 31 tutorial videos, a Comments/Questions area and more by visiting the pattern on garnstudio.com. © 1982-2025 DROPS Design A/S. We reserve all rights. This document, including all its sub-sections, has copyrights. Read more about what you can do with our patterns at the bottom of each pattern on our site. |
|


With over 40 years in knitting and crochet design, DROPS Design offers one of the most extensive collections of free patterns on the internet - translated to 17 languages. As of today we count 320 catalogues and 12094 patterns translated into English (UK/cm). 12094
We work hard to bring you the best knitting and crochet have to offer, inspiration and advice as well as great quality yarns at incredible prices! Would you like to use our patterns for other than personal use? You can read what you are allowed to do in the Copyright text at the bottom of all our patterns. Happy crafting!
Post a comment to pattern DROPS 243-13
We would love to hear what you have to say about this pattern!
If you want to leave a question, please make sure you select the correct category in the form below, to speed up the answering process. Required fields are marked *.