
Popular categories
Looking for a yarn?


Comments / Questions (52)
![]() Theresa wrote:
Theresa wrote:
Hallo, Frage zur Passe. Vor der ersten Raglanzunahme soll man in der 2. Patentreihe die Markierer in Patentmaschen setzen, um dann in der 3. Patentreihe die erste Raglanzunahme zu stricken. Dann sind die Markierer aber nicht mehr in den Patentmaschen. Das verstehe ich nicht..
02.02.2025 - 16:29DROPS Design answered:
Liebe Theresa, am Anfang der Passe stricken Sie zuerst die 3 Runden für Patentmuster, nachdem die 3. Runde gestrickt wurde, setzen Sie die Markierer ein, dann stricken Sie Patentmuster weiter, dh stricken Side die 2. Runde vom Patentmuster, dann bei der nächsten 3. Runde Patentmuster beginnen die Raglanzunahmen (das 2. Mal die 3. Runde gestrickt wird). Die Markierer sollen nach den Zunahmen in die mittlere von den 5 Maschen beim jeden Raglan sein. Viel Spaß beim Stricken!
03.02.2025 - 09:51
![]() Cécile wrote:
Cécile wrote:
Bonjour Si on commence à tricoter A1 à partir de la flèche du diagramme, quand fait-on les 3 premières lignes? Merci pour vos éclaircissements.
07.11.2024 - 22:56DROPS Design answered:
Bonjour Cécile, le diagramme A.1 commence par le 3ème tour, les 2 tours précédents sont représentés pour bien vous montrer comment on va ensuite tricoter A.1 pour que les diminutions/augmentations soient au bon endroit. Bon tricot!
08.11.2024 - 07:57
![]() Benedikte wrote:
Benedikte wrote:
Hejsa, jeg skal til at starte på helpatent med omslag (det første i bærestykket) og vil gerne vide om den første maske på runden skal være ret eller vrang? Altså om jeg på den 1. Omgang skal; slå om, og så tage en ret- eller vrangmaske løst af. Vh Benedikte
30.04.2024 - 21:03DROPS Design answered:
Hej Benedikte, første omgang strikkes som 1.omgang i forklaringen "HELPATENT MED OMSLAG" du finder forklaringen længere oppe i opskriften :)
03.05.2024 - 13:39
![]() Lilian wrote:
Lilian wrote:
Jeg kan ikke finde ud af sidste pind i ryg/forstykke. Strik omslaget drejet vrang, 1 V og 1 R. Gentag. Men der er efter forrige pind en vrangmaske, der IKKE har et omslag Så hvordan skal jeg gøre. På forhånd tal Lilian
02.03.2024 - 12:12DROPS Design answered:
Hei Lilian. Husk å lese forklaringen til diagramikonet: ... men vær opmærksom på at på første omgang efter en omgang med udtagninger, strikkes vrangmaskerne i udtagningen vrang uden at de strikkes sammen med omslag, fordi omslaget ikke er lavet endnu. mvh DROPS Design
11.03.2024 - 07:38
![]() Katharina wrote:
Katharina wrote:
Hallo, ich versuche das Model in halbpatent, von unten zu Stricken, verstehe aber das Diagramm leider nicht! ist das Diagramm alle 10 Reihen verschoben? Wie stricke ich die Maschen in der zweiter Reihe? So wie die Maschen erscheinen?
26.01.2024 - 17:33DROPS Design answered:
Liebe Katarina, das Diagram macht ein kleines Muster mit Abnahmen/Zunahmen, so sieht das Muster etwast verschoben aber so wird es nicht, schauen Sie das 4. Foto oben, um das Ergebnis zu sehen. Viel Spaß beim stricken!
29.01.2024 - 11:25
![]() Caroline wrote:
Caroline wrote:
Ik heb de pas en het lijf perfect volgens de beschrijving kunnen breien. Bij de meerderingen voor de zijkant van het lijf kom ik echter uit op een totaal van 198 steken ipv 208. Ik begrijp niet waar ik die 10 extra meerderingen nog had moeten bijmaken?
03.07.2023 - 23:04DROPS Design answered:
Dag Caroline,
Er zijn 2 stukken waarover je over 40 steken, steeds de omslagen averecht breit. Hierdoor meerder je in die secties 20 steken, dus in totaal 40 steken.
06.07.2023 - 21:09
![]() Anne wrote:
Anne wrote:
Hej Jeg er ved at strikke de 19 cm på ryg/forstykke inden man skal strikke A1. Skal sidste række inden A1 være en 2. eller 3. omgang i helpatentmønsteret? Eller er det ligemeget? Hilsen Anne
07.05.2023 - 22:03DROPS Design answered:
Hei Anne. Når du skal starte å strikke A.1 må du avpasse slik at neste omgang (altså den omgangen du skal starte med er 3. omgang med forklaringen til HELPATENT MED KAST). Om du ser på forklaringen til 3. omgang og 1. rad i diagram A.1 er det lik forklaringen. Da får du en fin overgang fra helpatent med kast til diagram A.1. mvh DROPS Design
08.05.2023 - 13:59
![]() Emma Svensson wrote:
Emma Svensson wrote:
Jeg skal strikke den største størrelsen. Setter første merke i maske nr.17 og får da 15 masker igjen på pinnen når siste merke er satt på. Men så strikker jeg omg.2 i raglan for så å øke på 3 omg. Da sitter merket i en enkel maske uten kast. Hvordan få dette til å bli riktig? Setter ut markører etter en omg.3. Er det feil i beskrivelsen?
08.01.2023 - 13:52DROPS Design answered:
Hej Emma, du sætter først mærkerne når du har strikket 3. omgang. Næste gang du skal strikke 3.omgang starter udtagningerne. Se i videoen nederst hvordan du tager ud i retpatentmasken som forklaret i RAGLAN :)
10.01.2023 - 13:31
![]() Alanio wrote:
Alanio wrote:
J'ai compris. On marque la maille après la 14ème....
10.12.2022 - 18:12
![]() Evelyne Alanio wrote:
Evelyne Alanio wrote:
J'ai commencé le pull. Problème lors du partage dos, manches et devant J'ai 76 m à partager 14 demi dos, 9 manche, 27 devant, 9 manche, il me reste 17 au lieu de 13. Y a t il une solution ? Merci
09.12.2022 - 20:07DROPS Design answered:
Bonjour Mme Alanio, chacun des marqueurs doit être dans une maille, autrement dit, vous devez avoir: 14 m (1/2 dos), 1 m avec un marqueur, 9 m (manche), 1 m avec un marqueur, 27 m (devant), 1 m avec un marqueur, 9 m (manche), 1 m avec un marqueur, 13 m (demi-dos), soit: 14+1+9+1+27+1+9+1+13=76 mailles. Bon tricot!
12.12.2022 - 08:50
|
|||||||||||||||||||
Full Moon Festival#fullmoonfestivalsweater |
|||||||||||||||||||
 |
 |
||||||||||||||||||
Knitted jumper in DROPS Air. The piece is worked top down, with raglan and English rib. Sizes XS - XXL.
DROPS 223-15 |
|||||||||||||||||||
|
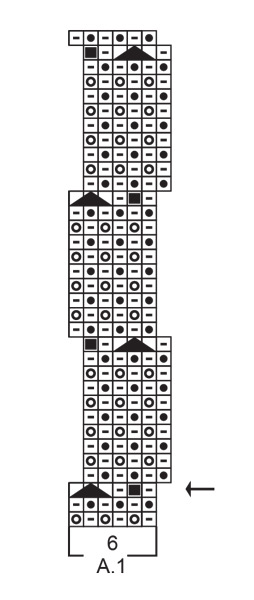
------------------------------------------------------- EXPLANATIONS FOR THE PATTERN: ------------------------------------------------------- PATTERN: See diagram A.1. INCREASE/DECREASE TIP (evenly spaced): To work out how to increase/decrease evenly, count the number of stitches to be increased/decreased over (e.g. 13 stitches), and divide by the number of increases/decreases to be made (e.g. 2) = 6.5. In this example, increase by making 1 yarn over after alternately each 6th and 7th stitch. On the next round work the yarn overs twisted to avoid holes. When decreasing, knit together alternately each 5th and 6th and each 6th and 7th stitch. ENGLISH RIB: ROUND 1: * Make 1 yarn over, slip 1 stitch as if to purl, knit 1 *, repeat from *-* to end of round. ROUND 2: * Purl together the yarn over and slipped stitch, make 1 yarn over, slip 1 stitch as if to purl *, repeat from *-* to end of round. ROUND 3: * Make 1 yarn over, slip 1 stitch as if to purl, knit together the yarn over and slipped stitch *, repeat from *-* to end of round. Repeat rounds 2 and 3 onwards. ENGLISH RIB STITCH: When counting the stitches the yarn overs are not included. RAGLAN: Increase 4 stitches in each marker-stitch (= 16 stitches increased on the round). All increases are worked on a round where the yarn overs and knitted stitches are knitted together (i.e. round 3 in the English rib). Increase as follows in the knitted stitch: Knit together the yarn over and knitted stitch, but do not slip the stitch from the left needle, make 1 yarn over the right needle, knit the yarn over and knitted stitch together again, move the marker to this stitch (= mid-stitch), make 1 yarn over the right needle, knit the yarn over and knitted stitch together again (= 3 stitches and 2 yarn overs), slip the stitch and yarn over off the left needle. On the next round work the new stitches in English rib, but note that on this first round after the increases, the purled stitches in the increases are purled without yarn overs because the yarn overs have not been made. The marker sits in the middle of the increased stitches (a knitted stitch). DECREASE TIP (for sleeves): Decrease 2 stitches on round 3 in the English rib as follows: Work until there are 2 stitches left before the marker-stitch (yarn overs not counted), slip the next stitch + yarn over as if to knit together, knit the next 2 stitches + yarn over together and pass the slipped stitch + yarn-over over these knitted together stitches (= 2 stitches decreased), move the marker to the next knitted stitch. CASTING-OFF TIP: To avoid the cast-off edge being tight you can cast off with a larger size needle. If the edge is still tight, make 1 yarn over after approx. each 4th stitch at the same time as casting off; the yarn overs are cast off as normal stitches. ------------------------------------------------------- START THE PIECE HERE: ------------------------------------------------------- JUMPER – SHORT OVERVIEW OF THE PIECE: The neck and yoke are worked in the round with circular needle, top down from mid back. The yoke is divided for body and sleeves and the body continued in the round with circular needle. The sleeves are worked in the round with short circular needle/double pointed needles, top down. NECK: Cast on 76-76-80-84-88-92 stitches with short circular needle size 4 mm and Air. Knit 1 round. Then work rib (knit 1, purl 1) in the round for 2 cm. The next round is worked as follows: Work rib as before over the first 13-13-15-15-15-17 stitches, knit 13-11-11-11-13-13 and decrease 4-2-2-2-4-4 stitches evenly over these stitches – read DECREASE TIP, work rib as before over the next 25-27-29-31-31-33 stitches, knit 13-11-11-11-13-13 and decrease 4-2-2-2-4-4 stitches evenly over these stitches – read DECREASE TIP, work rib as before over the last 12-14-14-16-16-16 stitches = 68-72-76-80-80-84 stitches. Change to circular needle size 6 mm. Insert 1 marker at the beginning of the round; the yoke is measured from this marker! YOKE: Now work ENGLISH RIB – read description above, the whole round. When round 3 has been completed, insert 1 marker in an ENGLISH RIB STITCH – read description above, in each transition between body and sleeves (= 4 markers) as follows: Marker 1: Skip 12-12-14-14-14-16 stitches, insert marker in the next stitch (= half back piece). Marker 2: Skip the next 9 stitches, insert marker in the next stitch (= sleeve). Marker 3: Skip the next 23-25-27-29-29-31 stitches, insert marker in the next stitch (= front piece). Marker 4: Skip the next 9 stitches, insert marker in the next stitch. There are 11-13-13-15-15-15 stitches left on the round. Continue in the round with English rib. AT THE SAME TIME, the next time you work round 3, begin to increase for RAGLAN – read description above. Increase like this every 8th round a total of 6-7-8-9-10-11 times = 164-184-204-224-240-260 stitches. REMEMBER THE KNITTING TENSION! Continue with English rib until the piece measures 21-21-23-24-26-28 cm from the marker on the neck – adjust so the next round is round 2 in the English rib. Now divide the piece for the body and sleeves on the next round as follows: Work the first 25-27-31-33-35-39 stitches (= ½ back piece), place the next 33-37-41-45-49-53 stitches on a thread for the sleeve, cast on 5-5-5-5-7-7 new stitches (= in side under sleeve), work the next 49-55-61-67-71-77 stitches (= front piece), place the next 33-37-41-45-49-53 stitches on a thread for the sleeve, cast on 5-5-5-5-7-7 new stitches (= in side under sleeve), work the last 24-28-30-34-36-38 stitches. Body and sleeves are finished separately. THE PIECE IS NOW MEASURED FROM HERE! BODY: = 108-120-132-144-156-168 stitches. Continue in the round with English rib as before. When the piece measures 17-19-19-20-20-20 cm from the division – adjust so the next round is round 3 in the English rib; there is 12 cm to finished length, try the jumper on and work to desired length. Work A.1 on the whole round. When there is 1 round left in the diagram, the piece measures approx. 26-28-28-29-29-29 cm from the division. On the next round (the last round in the diagram = round 2 in the English rib) increase stitches in the sides and insert 4 markers (which will be used when working rib) as follows: Half back piece: * Purl together the yarn over and slipped stitch, knit 1 *, work from *-* over the next 14-14-18-18-20-22 stitches. Insert a marker here. Side of body: * Purl the yarn over twisted (= 1 stitch increased), purl 1, knit 1 *, work from *-* over the next 26-28-30-34-36-40 stitches (= 13-14-15-17-18-20 stitches increased), insert a marker here. Front piece: * Purl together the yarn over and slipped stitch, knit 1 *, work from *-* over the next 28-32-36-38-42-44 stitches. Insert a marker here. Side of body: * Purl the yarn over twisted (= 1 stitch increased), purl 1, knit 1 *, work from *-* over the next 26-28-30-34-36-40 stitches (= 13-14-15-17-18-20 stitches increased), insert a marker here. Half back piece: * Purl together the yarn over and slipped stitch, knit 1 *, work from *-* over the next 14-18-18-20-22-22 stitches. There are 134-148-162-178-192-208 stitches on the needle. Change to circular needle size 4 mm and work rib as follows: (purl 1, knit 1) as far as the first marker, (purl 2, knit 1) as far as the next marker, (purl 1, knit 1) as far as the next marker, (purl 2, knit 1) as far as the next marker, (purl 1, knit 1) to end of round. Continue this rib for 3 cm. Cast off with knit over knit and purl over purl – read CASTING-OFF TIP. The jumper measures approx. 54-56-58-60-62-64 cm from the shoulder down. SLEEVES: Place the 33-37-41-45-49-53 stitches from the thread on the one side of the piece on short circular needle/double pointed needles size 6 mm and cast on 5-5-5-5-7-7 new stitches on the needle (= mid under sleeve) = 38-42-46-50-56-60 stitches. Continue in the round with the English rib as before – make sure you begin on the correct round in the pattern, round now starts with the 1st of the 5-5-5-5-7-7 new stitches that were cast on mid under sleeve. Sizes XS, S, M and L: go to ALL SIZES below. Sizes XL and XXL work as follows: Insert a marker in the middle stitch under the sleeve (= 1 knitted stitch in the English rib). Allow the marker to follow your work onwards; it is used when decreasing under the sleeve. When the sleeve measures 4 cm from the division – adjust so the next round is round 3 in the English rib, decrease under the sleeve – read DECREASE TIP (= 2 stitches decreased). Decrease like this every 8th round a total of 2-2 times = 52-56 stitches. ALL SIZES: Continue working until the sleeve measures 40-41-39-39-37-35 cm from the division (shorter measurements in larger sizes due to longer yoke). There is 4 cm to finished length, try the jumper on and work to desired length. The next round is worked as follows: * Knit together the yarn over and slipped stitch, purl 1 *, work from *-* to the end of the round. Change to double pointed needles size 4 mm and knit 1 round where you decrease 0-2-4-8-8-10 stitches evenly spaced = 38-40-42-42-44-46 stitches. Work rib (knit 1, purl 1) for 4 cm. Cast off with knit over knit and purl over purl – remember CASTING-OFF TIP. The sleeve measures approx. 44-45-43-43-41-39 cm from the division. Work the other sleeve in the same way. ASSEMBLY: Sew the openings under the sleeves. |
|||||||||||||||||||
Diagram explanations |
|||||||||||||||||||
|
|||||||||||||||||||
|
|||||||||||||||||||

|
|||||||||||||||||||
Have you finished this pattern?Tag your pictures with #dropspattern #fullmoonfestivalsweater or submit them to the #dropsfan gallery. Do you need help with this pattern?You'll find 24 tutorial videos, a Comments/Questions area and more by visiting the pattern on garnstudio.com. © 1982-2025 DROPS Design A/S. We reserve all rights. This document, including all its sub-sections, has copyrights. Read more about what you can do with our patterns at the bottom of each pattern on our site. |
|||||||||||||||||||


With over 40 years in knitting and crochet design, DROPS Design offers one of the most extensive collections of free patterns on the internet - translated to 17 languages. As of today we count 314 catalogues and 11820 patterns translated into English (UK/cm). 11820
We work hard to bring you the best knitting and crochet have to offer, inspiration and advice as well as great quality yarns at incredible prices! Would you like to use our patterns for other than personal use? You can read what you are allowed to do in the Copyright text at the bottom of all our patterns. Happy crafting!
Post a comment to pattern DROPS 223-15
We would love to hear what you have to say about this pattern!
If you want to leave a question, please make sure you select the correct category in the form below, to speed up the answering process. Required fields are marked *.