
Populära kategorier
Letar du efter ett garn?


Kommentarer / Frågor (102)
Carol skrev:
Why do you not have a video for the complete pattern.so we can look at the video like on youtube. Thank you.
26.07.2015 - 10:48DROPS Design svarede:
Dear Carol. It's not possible for us to publish videos of a complete pattern, we only make on techniques, stitches and pattern diagrams. If you need help with a specific part of the pattern, we will take a look at it.
27.07.2015 - 15:34
![]() Studer Brigitta skrev:
Studer Brigitta skrev:
Hallo, das Abnehmen auf der linken Seite ist nicht beschrieben! Wie muss das gemacht werden mit den Luftmaschen? Diese Anleitung ist recht spärlich beschrieben, könnte eine Auffrischung brauchen.
21.07.2015 - 06:54DROPS Design svarede:
Die Abnahmen werden beidseitig gemacht, d.h. immer am Anfang jeder R. Die Anleitung wurde neu übersetzt und ist nun hoffentlich etwas deutlicher, ansonsten fragen Sie gerne noch einmal nach. Gutes Gelingen!
28.07.2015 - 16:56
![]() Summer skrev:
Summer skrev:
How would you instead of having a button connect it in the back?
04.07.2015 - 04:56DROPS Design svarede:
Dear Summer, you can make 2 twisted strings or a ch and sew them at each end of piece then cross them and tie them with a knot. A button may be a good idea to hold both pieces tog. Happy crocheting!
04.07.2015 - 09:27
![]() Tam skrev:
Tam skrev:
I don't understand the part that inc 1 dc on each side every row 8 times . That mean I'm do inc 8 times the hold row 1 from beginning 1 the end and another 6 during the row ????
24.06.2015 - 18:27DROPS Design svarede:
Dear Tam, you inc 1 st at the beg + 1 st at the end of row (= 2 sts inc per row) for 8 rows (1st size) = you have a total of 145 sts on row 9. Happy crocheting!
25.06.2015 - 10:24
![]() Stephanie skrev:
Stephanie skrev:
After reading pattern and looking at the diagram for drops 65-13 pattern I don't understand the instructions right above the chart
04.06.2015 - 16:46DROPS Design svarede:
Dear Stephanie, you will find above measurement chart all diagram text, 1 symbol represent 1 st / 1 group of st - read more about diagrams here. Happy crocheting!
05.06.2015 - 09:48
![]() Pam skrev:
Pam skrev:
I have just got rolling with no problem.Rows 2 through 9-10-11-12: 1 dc in each dc from the previous row--at the same time, inc 1 dc on each side every row 8-9-10-11 times. What does 8-9-10-11 times mean. It doesn't make sense to me. Does it mean to increase row 3 through row 12 ? Maybe if you clear up if I am understanding this part I will be able to get through the decreasing also.
09.04.2015 - 07:50DROPS Design svarede:
Dear Pam, this refers to the size, eg in 1st size, you work rows 2 through row 9, inc every row 8 times (in 2nd size through row 10, inc 9 times etc..). Happy crocheting!
09.04.2015 - 09:56
![]() Kathy skrev:
Kathy skrev:
Hi, this is a beautiful pattern, I've been trying to do the math of the pattern in my head after reading through the comments below. From my understanding, to dec on both sides takes 2 rows (so for example: dec 4 dc, size S = 6 rows in total). But with that, there would be a total of 38 rows of dec yet the chart only shows 25 rows. What am doing wrong?
03.04.2015 - 04:32DROPS Design svarede:
Dear Kathy, you decrease at the beg and at the end of every row, ie to dec 4dc, work as stated under crocheting tip, (skip first 4 dc at beg of row ...) and at the end of same row, turn when 4 dc remain before the end of row = you have decreased 4 dc each side on the same row. Happy crocheting!
03.04.2015 - 09:22
![]() Maria skrev:
Maria skrev:
Thanks for you reply but I need further clarification. I'm crocheting size small, have completed the 145 dc's. According to the instructions I'm supposed to start decreasing on both sides on every row, meaning that I have to start decreasing 4 dc's at the beginning of the row by chaining 6 and starting working on the 5th chain, how do I decrease the 4 dc's at the end of the same row? If I do what you suggest in your answer I'll be only decreasing 4 dc's at only one end of the row.
24.03.2015 - 21:38DROPS Design svarede:
Dear Maria, (answer edited) to dec 4 dc work 1 row as stated: turn at the end of row, ch 6, skip 4 dc and work in 5th dc on row and work remaining sts on row until 4 sts remain (= you have decreased 4 dc each side), turn and work next decrease. Repeat how many times required in pattern (and continue same way (see crocheting tip) when dec 3 dc and 2 dc each side. Happy crocheting!
25.03.2015 - 09:01
![]() Maria skrev:
Maria skrev:
Beautiful pattern but need help to continue working on it. Would you please clarify the decreasing (dec) instructions. The pattern calls for dec on both sides of every row, but the directions under Crocheting tip refer only to the end of the row. The same doesn't work for the beginning of the row. Thanking you in advance, María
23.03.2015 - 23:27DROPS Design svarede:
Dear Maria, (answer edited) when you have worked the row with dec at the end of the first row, turn work when the number of sts remain before end of row. Happy crocheting!
24.03.2015 - 09:31
![]() Rebecca skrev:
Rebecca skrev:
Hi! Question- do you design all of the patterns on your website? I look forward to hearing from you :)
22.03.2015 - 07:41DROPS Design svarede:
Dear Rebecca, you are correct, we do. Happy crocheting!
23.03.2015 - 09:53
|
|||||||||||||
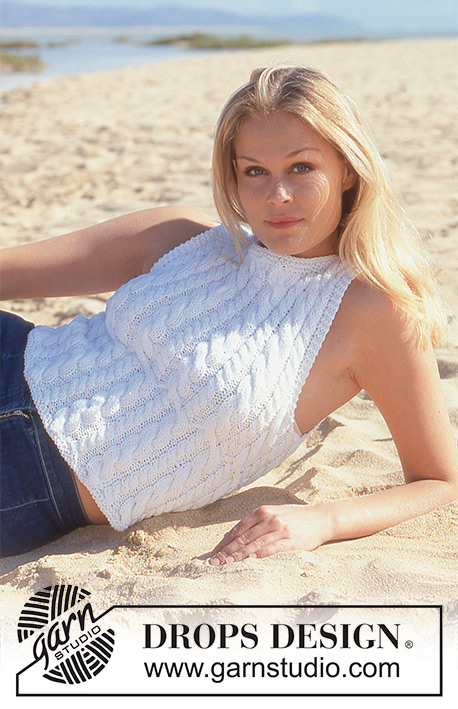
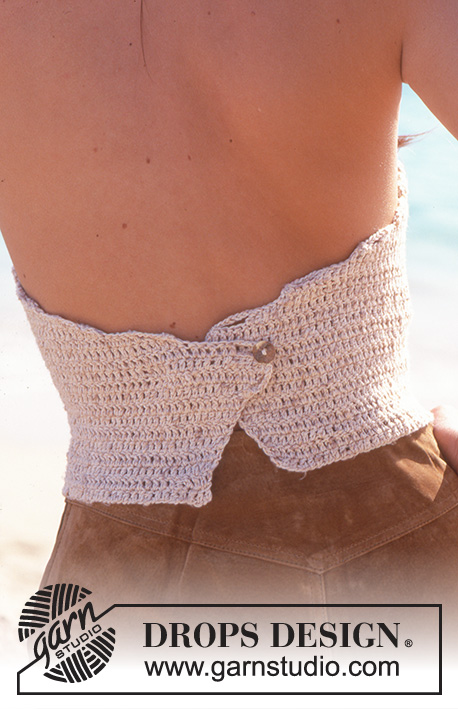
Mediterranean Love Top#mediterraneanlovetop |
|||||||||||||
 |
 |
||||||||||||
Virkad topp med bar rygg i DROPS Safran Mouliné eller Safran
DROPS 65-13 |
|||||||||||||
|
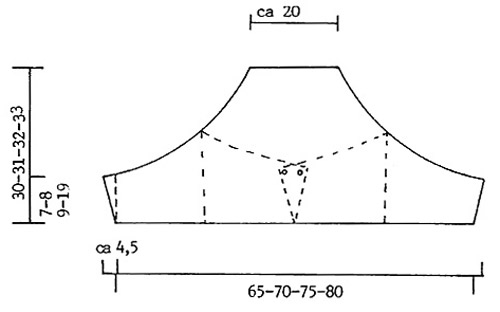
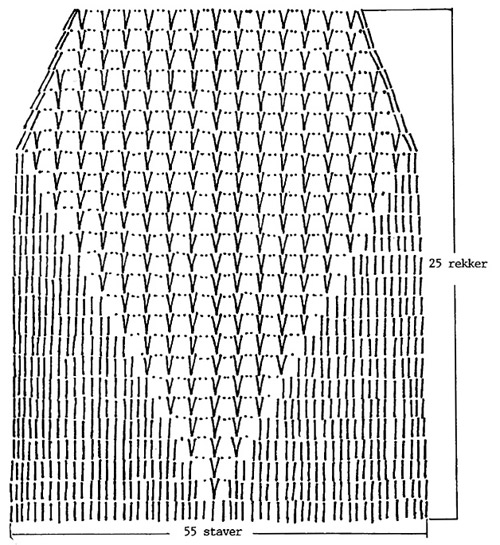
Virkfasthet: 20 st x 11 v med nål nr 3 = 10 x 10 cm. Kom ihåg att nr på virknål endast är vägledande! Mönster: Se diagram. Hela diagrammet virkas i alla stl. Virktips: När det minskas 4 stolpar: virka 6 luftm, hoppa över de nästa 4 stolparna, virka i den 5:e stolpen, fortsätt över varvet till det återstår 4 stolpar, vänd. När det minskas 3 stolpar: virka 5 luftm, hoppa över de nästa 3 stolparna, virka 1 stolpe i den 4:e stolpen, fortsätt över varvet till det återstår 3 stolpar, vänd. När det minskas 2 stolpar: virka 4 luftm, hoppa över de nästa 2 stolparna, virka 1 stolpe i den 3:e stolpen, fortsätt över varvet till det återstår 2 stolpar, vänd. Bålen: Virka ett v med 170-183-196-210 lm med nål 3 och beigemelerad. På nästa varv virkas det st över lm så här: 3 st (1a st ersätts med 3 lm), * hoppa över 1 lm, 3 st *. upprepa från *-* (det virkas alltså 3 st över 4 lm) tills det återstår 0-1-2-0 luftmaskor, virka 1 stolpe i varje luftmaska = 129-139-149-159 st. Kontrollera virkfastheten – det är mycket viktigt att det inte virkas för löst på ett åtsittande och litet plagg som detta. Sedan virkas det st över alla m samtidigt som det ökas 1 st i båda sidor på varje v, 8-9-10-11 ggr = 145-157-169-181 st. Nu mäter arb ca 7-8-9-10 cm. Vidare avm det i båda sidor på varje varv - se Virktips – samtidigt startar diagrammet - se till att diagrammet kommer mitt på arb - över de mittersta 55 st. Det avm i båda sidor så här: 4 st 2-3-6-8 ggr, 3 st 3-7-7-7 ggr, 2 st 14-9-6-5 ggr, härifrån virkas arb färdigt efter diagrammet. Efter diagrammet mäter arb ca 30-31-32-34 cm. Montering: Virka med nål nr 3 och beigemelerad 1 knapphålsögla överst i varje sida bak så här: 1 fm, 2 lm, hoppa över ½ cm, 1 fm. Prova toppen på för att se var knapparna skall sys i - 1 knapp på undersidan av vänster bakst och 1 knapp på översidan av höger bakst. Virka 3 stycken ca 1 meter långa lm-band. Fläta ihop dessa, knyt en knut i var ända och drag bandet genom det översta hålvarvet. |
|||||||||||||
Diagram förklaring |
|||||||||||||
|
|||||||||||||
 |
|||||||||||||
 |
|||||||||||||
Har du gjort detta mönster?Tagga då dina bilder med #dropspattern #mediterraneanlovetop eller skicka in de till #dropsfan galleriet. Behöver du hjälp med mönstret?Du hittar 4 instruktionsvideoer, kommentarer/frågor och mer i mönstret på www.garnstudio.com © 1982-2026 DROPS Design A/S. Alla rättigheter är reserverade. Detta dokument med tillhörande underdokument har copyright. Läs mer om vad du kan göra med våra mönster längst ner på vår hemsida. |
|||||||||||||


Med över 40 år i stick- och virkbranschen erbjuder DROPS Design en av de mest omfattande samlingarna av gratis mönster på internet - översatt till 17 språk. Per idag har vi 325 kataloger och 12298 mönster på och alla är översatta till Svenska.
Vi arbetar hårt för att kunna erbjuda det bästa inom stickning och virkning, inspiration och goda råd, men också kvalitetsgarn till fantastiska priser! Vill du använda våra mönster till annat än personligt användande? Du kan läsa om vilka regler som gäller i texten Copyright längst ner på sidan på alla våra mönster. Lycka till!
Kommentera mönster DROPS 65-13
Vi vill gärna ha din åsikt om denna modell!
Om du har en fråga kring den, kom ihåg att välja rätt kategori i menyn under, så får du snabbare svar! Obligatoriska fält är markerade med *.