
Populära kategorier
Letar du efter ett garn?


Kommentarer / Frågor (23)
![]() Leeanne skrev:
Leeanne skrev:
Addtnl. info for my last comments: I was confused by the first sentence in the short rows instructions stating to do 6 rows over all stitches. I thought that was part of the directions and the piece started with 6 rows before starting the short row repeat cycle but that is incorrect. This sentence is just telling you that there are 6 rows included in the short row instruction cycle that are not, in fact, short rows – 6 full rows and 2 short rows (not in that order) are listed in the row cycle.
06.09.2025 - 15:15
![]() Leeanne skrev:
Leeanne skrev:
(Cont. from previous two comments) next row starts with R3 and finishes with L3 and last row starts with L4 and finishes with R4. Then you start the cycle again with the first short row. So yes, the short row cycle is short row, full row, short row, full row, full row, full row, full row, full row as the pattern states (1 SR followed by 1 full row followed by 1 SR followed by 5 full rows). There are no edges in which you are not doing a picot edge instruction which allows for an even 8 row cycle
06.09.2025 - 15:08
![]() Leeanne skrev:
Leeanne skrev:
(continued from my previous comment) work the L2 row to the first marker and turn to work back to the “beginning” of the left side row, ending with L3, turn and start a new row with L4, working all the way across, ending with R4, (all the remaining rows in the cycle go all the way across – no more short rows) next row begins with R1 and goes all the way across to the last 4 stitches, ending in L1, turn and start with L2 and go all the way across to finish with R2, (cont. in next comment)
06.09.2025 - 15:03
![]() Leeanne skrev:
Leeanne skrev:
For anyone that needs it, here is the cycle of rows, combining picot edge with short rows instructions (it helps to draw this out on paper): start with right side 1 (R1) and work a short row (to first marker only, not all the way across), turn and work back to the beginning and knit the last four with R2, turn to start next row beginning with R3 and knit all the way across, ending this row with L1, then start the second short row with L2, (continued in next comment)
06.09.2025 - 14:58
![]() Leeanne skrev:
Leeanne skrev:
I figured it out! It is definitely not too complicated but they could have written this pattern differently so it wouldn’t take weeks or trial and error to figure out how to work the short rows in with the picot edge. Maybe we were just making it too complicated. I don’t have enough room to write the pattern in this comment so I’ll start a new one. It is easier to draw your lines and mark each end with the picot line number but I’ll try to write it here in my next comment.
06.09.2025 - 14:55
![]() Leeanne skrev:
Leeanne skrev:
I think I get it! I will test it in the morning and comment again trying to explain it for others if I have it right. My last two comments are wrong for sure. It helps to draw the rows as a picture on paper and mark the ends with the line number.
06.09.2025 - 05:10
![]() Leeanne skrev:
Leeanne skrev:
Revising my last comment: I now have it written as: short row, R1 &L1 on the same row, short row, R2 & L2, short row, R3 & L3, short row, R4 & L4. But this adds up to 8 rows on the sides and only 4 rows in the middle, not 6. Also not sure why the short rows directions refers to the middle stitches as being 70 (for the second size) when it’s only 30 (if excluding 25 on each end) or 72 (if excluding only the outermost 4 on each end).
06.09.2025 - 04:26
![]() Leanne skrev:
Leanne skrev:
The directions for the short rows are difficult to figure out. I’ve been working at this for a few weeks with my MIL, have restarted my project 7 times and we still don’t have it right. So we are alternating between right and left rows 1, 2, etc. when doing full rows? We are not doing any picot edge instructions when doing short rows, correct? To incoorporate the short rows, does it go: left row 1, right row 1, short row, left row 2, right row 2, short row, etc. through all four edge rows?
06.09.2025 - 02:40
![]() Leeanne skrev:
Leeanne skrev:
In addition to my last comment, I’m also confused because it says for garter stitch to knit two rows. The main directions says start with the right Picot edge, then knit the directions for garter stitch for the rest of the row, except for the last four and then knit the directions for the left edge on the last four. How do you knit two rows for the garter stitch directions in between doing the right and left edges?
14.07.2025 - 19:22DROPS Design svarede:
Dear Leeanne, the garter stitch structure is 2 knit rows. So whenever most of the stitches in the row are knitted, both from the right side and the wrong side, the resulting texture will be garter stitch. In the picot edges we are already using garter stitch, since all other stitches except for the 4 stitches on each side for the picot are knitted from the right side and the wrong side. So you just need to work as indicated; the edges will have the picot texture while the remaining stitches are knitted. Happy knitting!
19.07.2025 - 17:47
![]() Leeanne skrev:
Leeanne skrev:
A video of the actual pattern, please! This is so confusing. I’ve now learned how to do picot edges and short rows, but I can’t understand how to do both at the same time. How do you know which row of the picot edge you’re on if you’ve turned around and gone the other direction halfway through a row? And then when you start the next row do you count as if half the row is row 5 and half is row 6 or just continue with the next direction for that edge in sequence, ignoring row numbers?
14.07.2025 - 19:18DROPS Design svarede:
Dear Leeanne, please remember to mark your comments as questions so that we can see them and answer sooner. When you are combining the short rows and the picot edges, count only the rows where you reach the edges; those rows where you turn before reaching the edges are not taken into account for the picot edges on that side. Happy knitting!
19.07.2025 - 17:48
|
|
Berry Kiss#berrykissvest |
|
 |
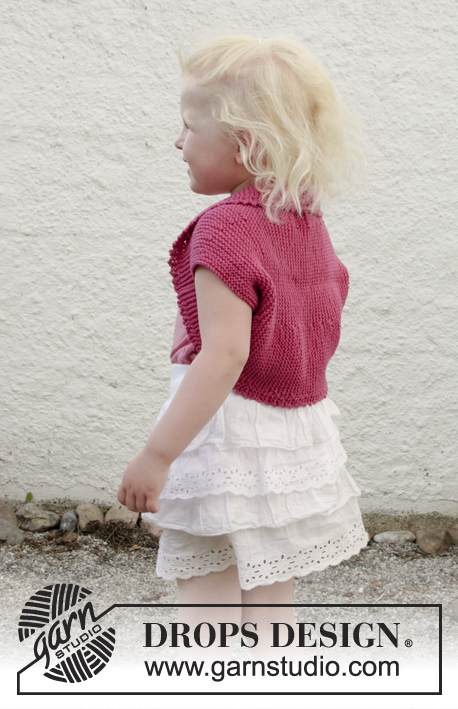 |
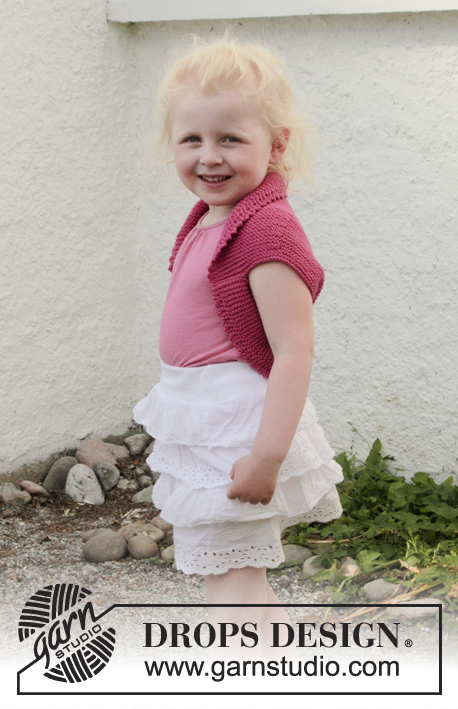
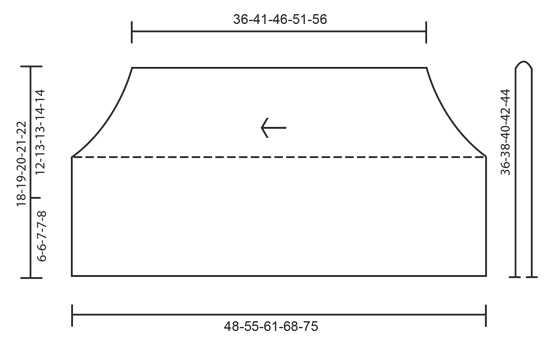
Stickad bolero med förkortade varv, picotkant och rätstickning i DROPS Cotton Merino. Till barn i storlek 3 - 12 år.
DROPS Children 28-7 |
|
|
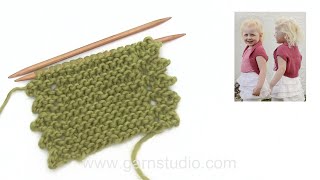
RÄTSTICKNING (stickas fram och tillbaka): Maskorna stickas räta på alla varv. PICOTKANT (fram och tillbaka på stickan): HÖGER SIDA: VARV 1 (= rätsidan): Stickas rätt. VARV 2 (= avigsidan): Sticka rätmaskor tills det återstår 4 maskor, dessa stickas så här: 2 maskor räta tillsammans, 1 omslag, i var och en av de 2 sista maskorna stickas det 2 maskor = 2 nya maskor på varvet. VARV 3 (= rätsidan): Lyft 1:a maskan som om den skulle stickas rät, 1 rätmaska, drag den lyfta maskan över, 1 rätmaska, och lyft den bakersta maskan på höger sticka över den främsta, 2 maskor har nu minskats - sedan stickas det rätmaskor varvet ut. VARV 4 (= avigsidan): Stickas rätt. Upprepa varv 1 till 4. VÄNSTER SIDA: VARV 1 (= rätsidan): Sticka rätmaskor tills det återstår 4 maskor, dessa stickas så här: 2 maskor räta tillsammans, 1 omslag, i var och en av de 2 sista maskorna stickas det 2 maskor = 2 nya maskor på varvet. VARV 2 (= avigsidan): Lyft 1:a maskan som om den skulle stickas rät, 1 rätmaska, drag den lyfta maskan över, 1 rätmaska, och lyft den bakersta maskan på höger sticka över den främsta, 2 maskor har nu minskats - sedan stickas det rätmaskor varvet ut. VARV 3 (= rätsidan): Stickas rätt. VARV 4 (= avigsidan): Stickas rätt. Upprepa varv 1 till 4. FÖRKORTADE VARV: Sticka 6 varv över alla maskor, * sticka 24-25-26-27-28 maskor (fram till den första markören), vänd, strama tråden och sticka varvet ut. Sticka 1 varv över alla maskor, vänd, sticka 24-25-26-27-28 maskor (fram till den andra markören), vänd, strama tråden och sticka varvet ut. Sticka 5 varv över alla maskor *, upprepa *-*. Dvs att det stickas 6 varv rätstickning över de mittersta 66-70-72-80-86 maskorna och 8 varv rätstickning över maskorna i varje sida i varje rapport. -------------------------------------------------------- BOLERO: Arbetet stickas sidledes fram och tillbaka på rundsticka från ärmhål till ärmhål. Sedan viks boleron dubbel och sidsömmarna sys. Lägg upp 76-80-84-88-92 maskor med Cotton Merino på rundsticka 4. Sätt 1 markör i arbetet 24-25-26-27-28 maskor in från varje sida (= 28-30-32-34-36 maskor mellan markörerna). Sticka så här – från rätsidan: PICOTKANT HÖGER SIDA, RÄTSTICKNING – se förklaring ovan, över de nästa 68-72-76-80-84 maskorna, PICOTKANT VÄNSTER SIDA över de sista 4 maskorna. KONTROLLERA STICKFASTHETEN! Fortsätt med rätstickning och picotkant över de yttersta 4 maskorna i varje sida, SAMTIDIGT stickas det FÖRKORTADE VARV – se förklaring ovan! När arbetet mäter ca 36-41-46-51-56 cm (mätt på det kortaste stället) maskas det av löst. MONTERING: Vik boleron dubbel – måttskissen visar arbetet när det är vikt. Sy ihop de nedersta 6-6-7-7-8 cm kant i kant i varje sida (= 12-13-13-14-14 cm ärmhål). |
|
 |
|
Har du gjort detta mönster?Tagga då dina bilder med #dropspattern #berrykissvest eller skicka in de till #dropsfan galleriet. Behöver du hjälp med mönstret?Du hittar 18 instruktionsvideoer, kommentarer/frågor och mer i mönstret på www.garnstudio.com © 1982-2026 DROPS Design A/S. Alla rättigheter är reserverade. Detta dokument med tillhörande underdokument har copyright. Läs mer om vad du kan göra med våra mönster längst ner på vår hemsida. |
|


Med över 40 år i stick- och virkbranschen erbjuder DROPS Design en av de mest omfattande samlingarna av gratis mönster på internet - översatt till 17 språk. Per idag har vi 324 kataloger och 12290 mönster på och alla är översatta till Svenska.
Vi arbetar hårt för att kunna erbjuda det bästa inom stickning och virkning, inspiration och goda råd, men också kvalitetsgarn till fantastiska priser! Vill du använda våra mönster till annat än personligt användande? Du kan läsa om vilka regler som gäller i texten Copyright längst ner på sidan på alla våra mönster. Lycka till!
Kommentera mönster DROPS Children 28-7
Vi vill gärna ha din åsikt om denna modell!
Om du har en fråga kring den, kom ihåg att välja rätt kategori i menyn under, så får du snabbare svar! Obligatoriska fält är markerade med *.