
Populära kategorier
Letar du efter ett garn?


Kommentarer / Frågor (117)
![]() Maya skrev:
Maya skrev:
Another question is why is there such a big decrease after the ribbing? It seems like that is a 15" decrease from the ribbing. Is that correct? Please advise. I'm confused about the sizing. Thanks!
03.02.2026 - 19:44DROPS Design svarede:
Hi Maya, the rib edge is more elastic and will contract slightly compared to, for example, stocking stitch. By decreasing after the rib edge, you avoid a visible difference in width between the rib edge and the rest of the body. Happy knitting!
07.04.2026 - 09:48
![]() Maya skrev:
Maya skrev:
I am about to start the sweater for my husband. His chest measures 44". I thought I would make him an XL, as it seems that would be a 4" ease. The schematic seems like that would be correct, but the number of stitches seems weird. After you decrease from the ribbing, you should have 221 stitches. 221 divided by 4.25 = 52" Is that correct? That would be an 8" ease, which seems like to much for my husband, and looking at the picture it doesn't seem like the model has that much of an ease.
03.02.2026 - 19:43DROPS Design svarede:
Hi Maya, how to choose your size you will find HERE. Happy knitting!
07.04.2026 - 09:53
![]() Silvia skrev:
Silvia skrev:
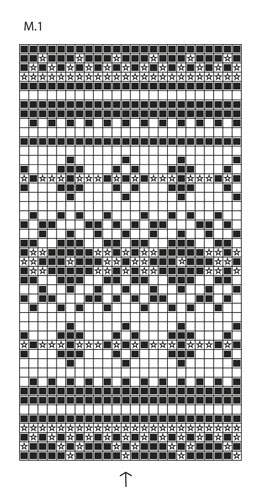
Ich verstehe nicht, wie ich das Muster für den Ärmel stricken soll. Ich beginne mit der äußeren Mitte des Ärmels und stricke nun die Symbole ab dem Pfeil in M1? Stricke ich das gesamte Muster ab Pfeil oder nur in der 1. Reihe? Und wie mache ich das mit den Zunahmen? Ich würde mich freuen wenn sie mir eine kleine Hilfestellung geben könnten. Q
27.01.2026 - 19:09DROPS Design svarede:
Liebe Silvia, Sie beginnen die Runde an der unteren Ärmelmitte, nicht an der oberen. Sie zählen aber ab der oberen Ärmelmitte das Muster ab, die Pfeil-Masche (= Mitte des Musters) muss an der oberen Ärmelmitte liegen. Sie müssen also die Maschenzahl, die Sie haben, von der unteren Ärmelmitte bis zur oberen Ärmelmitte abzählen und dann ausrechnen, mit welcher Masche das Muster an der unteren Ärmelmitte beginnt. Es wird an der unteren Ärmelmitte vermutlich nicht aufgehen. Sie beginnen das Muster mit der ersten Masche, von rechts gelesen. Die Zunahmen können Sie dann nach und nach in das Muster einarbeiten. Viel Spaß beim Weiterstricken!
28.01.2026 - 20:14
![]() Hennie Reiling skrev:
Hennie Reiling skrev:
Ik ben met bovenstaand patroon bezig. Nu zegt het patroon dat ik na de boord 69 steken moet minderen. Heb het idee dat het juist meerderen moet zijn, klopt dat. Vr gr Hennie
08.01.2026 - 13:08DROPS Design svarede:
Dag Hennie,
Het meerderen na de boord wordt gedaan om te voorkomen dat de boord het werk samentrekt.
10.01.2026 - 18:01
![]() Nikki skrev:
Nikki skrev:
Hi- I’m at the starting the button hole section- but I’m so confused. The ribbing looks like the collar, and how on earth does the collar get in between the two ‘sections’ of the button holes/buttons? And the measurements are just… I do not understand. I’ve knit a lot, but this is very confusing to me. Can someone explain it to me like I’m 5?
27.12.2025 - 00:15
![]() Kate skrev:
Kate skrev:
The ‘body’ section is for horizontal ribbing instead of vertical ribbing like in the photo!
24.12.2025 - 22:53
![]() Sarah skrev:
Sarah skrev:
I am trying to make a longer sleeve (for someone with longer than average arms). How do I make this adjustment to the sleeves?
21.11.2025 - 23:49DROPS Design svarede:
Dear Sarah, depending on how much cm you should add, you can add some extra cm before starting increasing, work some more rounds between each increase and/or divide piece mid under sleeve after the extra cm required. Happy knitting!
24.11.2025 - 08:23
![]() De Keyser Liesbet skrev:
De Keyser Liesbet skrev:
Kan dit op 2 nld worden gemaakt. Hoe is de verhouding dan?
21.11.2025 - 13:04
![]() De Keyser Liesbet skrev:
De Keyser Liesbet skrev:
Kan dit op gewone nld en de rug 246 st ik dat niveel voor xl
18.11.2025 - 10:51DROPS Design svarede:
Dag Liesbet,
De reden dat je op de rondbreinaald moet breien is omdat je veel steken op de naald hebt als je van midden voor naar midden voor breit.
Om een patroon aan te passen om op rechte naalden te breien hebben we een instructie gemaakt. Deze vind je hier.
22.11.2025 - 09:23
![]() Patrycja skrev:
Patrycja skrev:
Dziękuje za odpowiedź. Oczywiście że jasne . Jeszcze pytanie odnośnie żakardu. Liczba oczek musi być podzielna przez 12? Czy dobrze kombinuję? Pojedynczy motyw pojawi się w rozmiarze m 13 razy. Czyli 185 oczek odejmuje od tego 14 bo na listwy bo żeczne , zostaje mi 157. Nie bardzo to podzielę przez 12. Wychodzi 13 motywów i coś.
20.08.2025 - 14:21DROPS Design svarede:
Witaj Patrycjo, zobacz kurs DROPS TUTAJ, fragment zatytułowany 'Gdy liczba oczek nie zgadza się z liczbą powtórzeń schematu'. Pozdrawiam!
21.08.2025 - 12:22
|
||||||||||
Harald#haraldjacket |
||||||||||
 |
 |
|||||||||
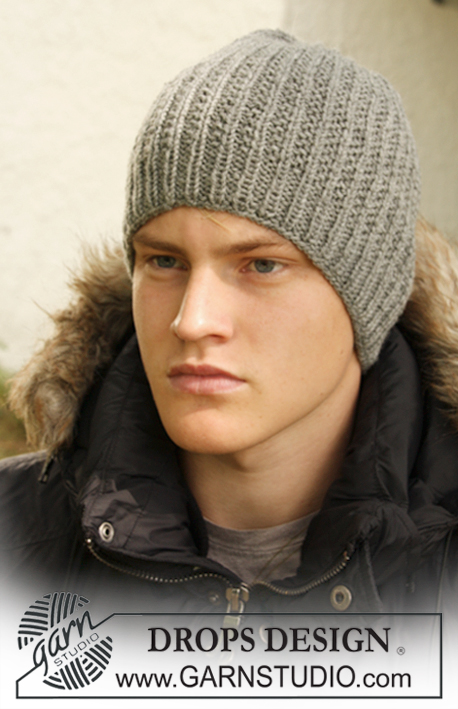
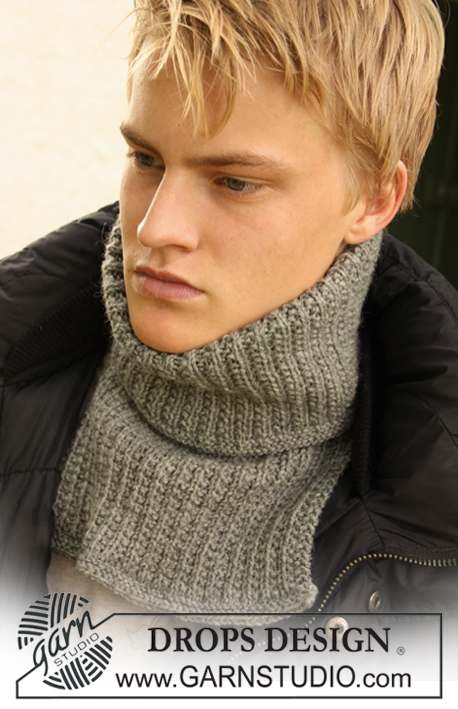
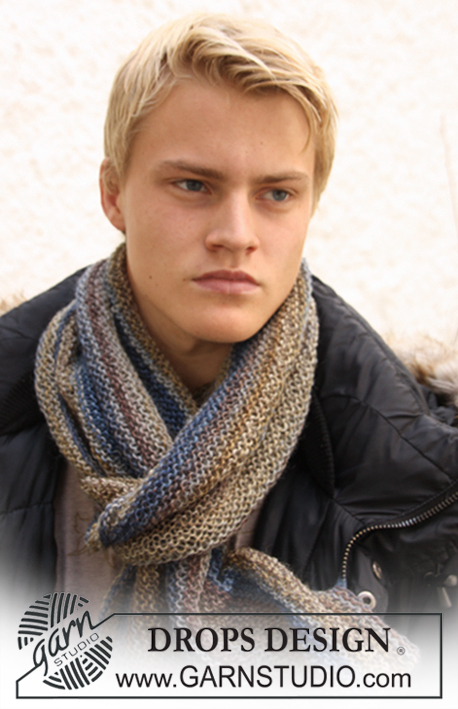
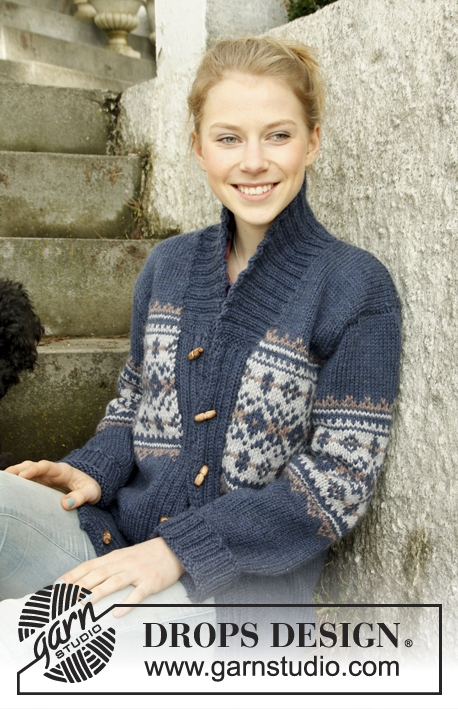
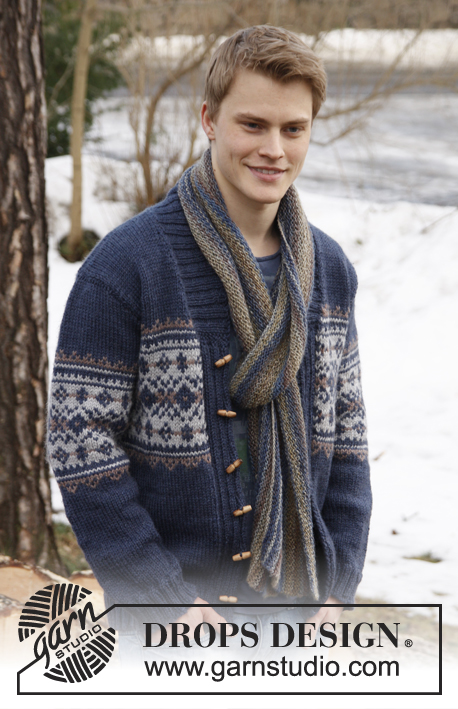
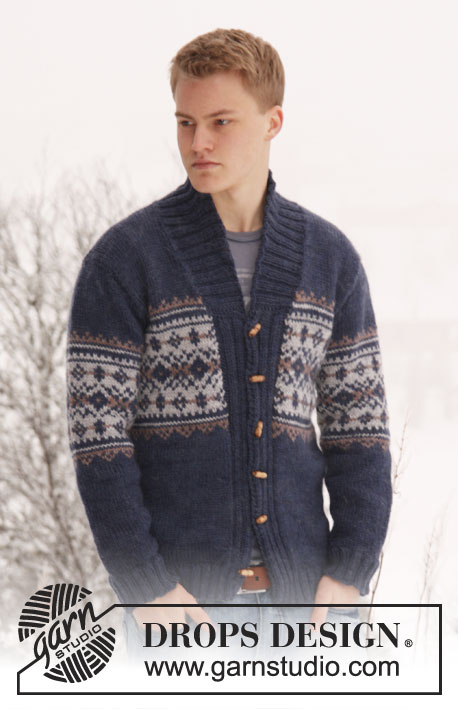
DROPS herrkofta i ”Alaska” med mönster och sjalkrage. Stl S – XXXL
DROPS Extra 0-813 |
||||||||||
|
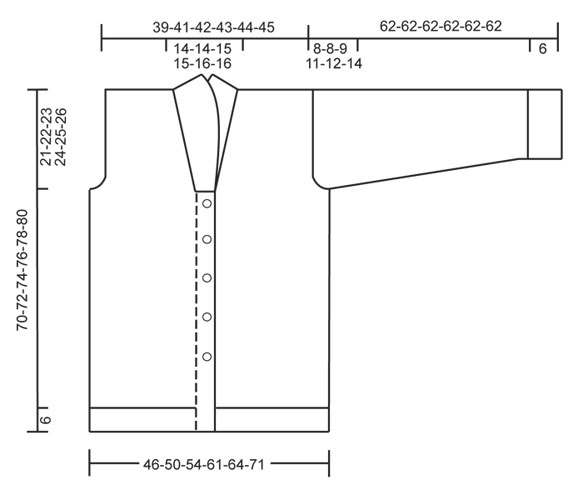
RÄTSTICKNING (fram och tillbaka på st): Maskorna stickas räta på alla varv. KNAPPHÅL: Det maskas av till knapphål på vänster framkant, alla avm görs från rätsidan. 1 knapphål = sticka 5:e och 6:e m från mitt fram aviga tills och gör 1 omsl. På nästa v stickas omsl rätt. Maska av till knapphål när arb mäter: Stl S: 6, 14, 23, 31, 40 och 48 cm Stl M: 6, 15, 24, 32, 41 och 49 cm Stl L: 6, 15, 24, 33, 42 och 50 cm Stl XL: 6, 13, 21, 28, 36, 43 och 51 cm Stl XXL: 7, 14, 22, 29, 37, 44 och 52 cm Stl XXXL: 7, 15, 22, 30, 37, 45 och 53 cm MÖNSTER: Se diagr M.1 – diagr visar 2 rapporter på bredden. Hela mönstret stickas i slätst. MINSKNINGSTIPS (gäller halsringningen fram): Det minskas på insidan av 1 rätst kantm. Alla minskn görs från rätsidan. Minska så här efter 1 kantm: Lyft 1 m som om den skulle stickas rät, 1 rm, drag den lyfta m över. Minska så här före 1 kantm: 2 rm tills. -------------------------------------------------------- FRAM- OCH BAKSTYCKE: Arb stickas fram och tillbaka på rundst från mitt fram. Lägg upp 226-246-262-286-302-330 m på rundst 4 med grå/blå Alaska. Sticka 1 v avigt från avigsidan. Sedan stickas nästa v så här från rätsidan: 2 RÄTSTICKADE kantm – se förkl ovan, * 2 rm, 2 am *, upprepa från *-* tills det återstår 4 m och avsluta med 2 rm och 2 RÄTSTICKADE kantm. Fortsätt resåren så här tills arb mäter 6 cm. SAMTIDIGT när arb mäter 6-6-6-6-7-7 cm börjar avm till KNAPPHÅL på vänster framkant- se förkl ovan. Efter resåren byts det till rundst 5 och nästa v stickas så här från rätsidan: 2 rätst m, 2 rm, 2 am, 2 rm, 2 am, 2 rm, 2 am (= 14 framkantsm), sticka slätst tills det återstår 14 m på st SAMTIDIGT som det minskas 53-61-65-65-69-73 m jämnt fördelat (det minskas inte över framkanterna), avsluta med 2 am, 2 rm, 2 am, 2 rm, 2 am, 2 rm och 2 rätst m = 173-185-197-221-233-257 m. Sätt 1 markör 47-50-53-59-62-68 m in från varje sida (= 79-85-91-103-109-121 m mellan markörerna på bakst). Sedan stickas det slätst med 14 framkantsm i varje sida mot mitt fram som förut. KONTROLLERA STICKFASTHETEN! När arb mäter 32-33-34-35-36-37 cm stickas M.1 så här: Sticka 14 framkantsm som förut med grå/blå, sticka M.1 tills det återstår 15 m, sticka 1:a m i M.1 (så att mönstret börjar och slutar lika på varje sida av framkanten) och avsluta med 14 framkantsm som förut med grå/blå. När arb mäter 49-50-51-52-53-54 cm stickas nästa v så här från rätsidan: Maska av de första 13 m, sätt 1 markör (denna visar var man ska börja att sticka upp kragen), sticka 31-34-37-42-45-51 m (= höger framst), maska av 6-6-6-8-8-8 m till ärmhål, sticka 73-79-85-95-101-113 m (= bakst), maska av 6-6-6-8-8-8 m till ärmhål och sticka v ut (= 44-47-50-55-58-64 m på vänster framst). Vänd och maska av de första 13 m, sätt 1 markör (denna visar var man ska sluta att sticka upp kragen), sticka v ut = 31-34-37-42-45-51 m. Varje del stickas färdig för sig. BAKST: = 73-79-85-95-101-113 m. Fortsätt M.1 (när M.1 har stickats 1 gang på höjden stickas det vidare med grå/blå till färdigt mått) – SAMTIDIGT maskas det nu av till ärmhål i början av varje v i varje sida: 3 m 0-0-0-1-1-2 gånger, 2 m 1-1-2-2-3-4 gånger och 1 m 1-3-3-4-4-4 gånger = 67-69-71-73-75-77 m kvar på st. När arb mäter 68-70-72-74-76-78 cm, maskas de mittersta 21-21-23-23-25-25 m av till hals. Sticka varje axel färdig för sig. Sedan maskas det av 1 m på nästa v från halsen = 22-23-23-24-24-25 m kvar på axeln. Maska av när arb mäter 70-72-74-76-78-80 cm. HÖGER FRAMST: = 31-34-37-42-45-51 m. Fortsätt M.1 som på bakst med 1 rätst kantm mot mitt fram. SAMTIDIGT maskas det av till ärmhål i sidan som på bakst. SAMTIDIGT när arb mäter 50-51-52-53-54-55 cm, minskas det 1 m mot halsen – LÄS MINSKNTIPS! Upprepa minskn vart 4:e totalt 3-3-4-4-6-6 gånger och sedan på vart 8:e v totalt 3-3-3-3-2-2 gånger. Etter alla minskn är det 22-23-23-24-24-25 m kvar på axeln. Maska av när arb mäter 70-72-74-76-78-80 cm. VÄNSTER FRAMST: Sticka som höger, men motsatt. ÄRM: Arb stickas runt på strumpst, byt till liten rundst när det behövs. Lägg upp 52-52-56-56-60-60 m på strumpst 4 med grå/blå. Sticka 1 v rätt, sedan stickas det resår = 2 rm, 2 am. När arb mäter 6 cm byts det till strumpst 5. Sticka 1 v rätt SAMTIDIGT som det minskas 11-9-11-11-13-13 m jämnt fördelat = 41-43-45-45-47-47 m. Sätt 1 markör i början av v (= mitt under ärmen). Sedan stickas det slätst. När arb mäter 7-7-7-7-9-10 cm ökas det 1 m på varje sida av markören mitt under ärmen. Upprepa ökningen totalt 11-13-14-16-17-19 gånger i Stl S: På vart 10:e v, St M: Vart 8:e v, Stl L: Vart 7:e v, Stl XL: Vart 6:e v, Stl XXL: Vart 5:e v och Stl XXXL: Vart 4:e v = 63-69-73-77-81-85 m. SAMTIDIGT när arb mäter 30-30-29-27-26-24 cm sätts det 1 markör i den mittersta m på v (= mitt på ärmen). Sticka M.1 – OBS: m markerad med pil i diagr ska stämma med m med markör i mitt på ärmen. När M.1 har stickats 1 gång på höjden fortsätts det med grå/blå till färdigt mått. SAMTIDIGT när arb mäter 54-54-53-51-50-48 cm (kortare mått i större stl pga längre ärmkulle och bredare axelvidd) maskas det av 6-6-6-8-8-8 m mitt under ärmen. Sedan stickas arb färdigt fram och tillbaka på st. SAMTIDIGT maskas det nu av till ärmkulle i början av varje v i varje sida: 2 m 3-3-3-3-3-4 gånger och 1 m 2-2-2-4-4-5 gånger. Sedan maskas det av 2 m i varje sida tills arb mäter 61 cm i alla stl, sedan maskas det av 3 m 1 gång i varje sida. Maska av de resterende m, arb mäter ca 62 cm i alla stl. MONTERING: Sy axelsömmarna. SJALKRAGE: Sticka upp m (på insidan av 1 kantm) på rundst 4 med grå/blå - börja mitt fram vid markören på höger framst: Sticka upp ca 34 till 44 m upp till axeln, sedan 22 till 28 m längs nacken, och 34 till 44 m ned längs vänster framst till markören = 90 till 116 m. Sticka 1 v rätt från avigsidan SAMTIDIGT som maskantalet ökas till 126-130-138-142-150-154 m. Sedan stickas det resår så här (sett från rätsidan): 2 rätst m, * 2 rm, 2 am *, upprepa från *-* och avsluta med 2 rm och 2 rätst m. Fortsätt så här tills kragen mäter ca 5 cm. Nu ökas det 1 m i vart och ett av de 12 mittersta aviga partierna, sett från rätssidan (= bak i nacken) = 138-142-150-154-162-166 m. Fortsätt med rm över rm och am över am tills kragen mäter ca 7 cm. Nu stickas det vidare så här: sticka 1 v som förut och sätt de första 10 m som stickades på 1 tråd, vänd arb, sticka v ut och sätt de första 10 m som stickades i början av v på 1 ny tråd. Vänd arb, sticka v ut och sätt de första 10 m som stickades i början av v på den första tråden, vänd arb, sticka v ut och sätt de första 10 m som stickades i början av v på den andra tråden. Fortsätt så tills det sitter totalt 40 m på trådarna i varje sida. Sedan sätts m från trådarna tillbaks på st och det stickas 1 v som förut över alla 138-142-150-154-162-166 m – OBS: För att undvika hål övergångarna där arb vändes sätts länken före nästa m vriden på st och stickas tills med första m på st. Maska sedan av med rm över rm och am över am. Sy fast kragen fint längst ner i varje sida mot framkanten – sy kant i kant så att det inte blir en tjock söm. MER MONTERING: Sy i ärmarna och knapparna. |
||||||||||
Diagram förklaring |
||||||||||
|
||||||||||
 |
||||||||||
 |
||||||||||
Har du gjort detta mönster?Tagga då dina bilder med #dropspattern #haraldjacket eller skicka in de till #dropsfan galleriet. Behöver du hjälp med mönstret?Du hittar 28 instruktionsvideoer, kommentarer/frågor och mer i mönstret på www.garnstudio.com © 1982-2026 DROPS Design A/S. Alla rättigheter är reserverade. Detta dokument med tillhörande underdokument har copyright. Läs mer om vad du kan göra med våra mönster längst ner på vår hemsida. |
||||||||||


Med över 40 år i stick- och virkbranschen erbjuder DROPS Design en av de mest omfattande samlingarna av gratis mönster på internet - översatt till 17 språk. Per idag har vi 324 kataloger och 12291 mönster på och alla är översatta till Svenska.
Vi arbetar hårt för att kunna erbjuda det bästa inom stickning och virkning, inspiration och goda råd, men också kvalitetsgarn till fantastiska priser! Vill du använda våra mönster till annat än personligt användande? Du kan läsa om vilka regler som gäller i texten Copyright längst ner på sidan på alla våra mönster. Lycka till!
Kommentera mönster DROPS Extra 0-813
Vi vill gärna ha din åsikt om denna modell!
Om du har en fråga kring den, kom ihåg att välja rätt kategori i menyn under, så får du snabbare svar! Obligatoriska fält är markerade med *.