
Beliebte Kategorien
Suchen Sie nach einem Garn?
















Kommentare / Fragen (164)
 Christina hat geschrieben:
As soon as I posted my last comment/ question the answer appeared below my original question. It definitely wasnt there before cos I looked carefully. Anyway thank you.
28.09.2026 - 22:06
Christina hat geschrieben:
Please could someone answer my question from the 23/9 as it doesnt say which size hook to use for the loops. Is it a 3mm or a 5mm. Really this pattern is not at all clear.
28.09.2026 - 22:03DROPS Design hat geantwortet:
Hi Christina, We have answered your question and you should have been notified via e mail. If you look at the comments and answers at the bottom of the page, you will see our answer - you work the loops with a 5 mm hook. Regards, Drops Team.
29.09.2026 - 06:12
Christina hat geschrieben:
I'm about to crochet the loops but it doesnt say what size hook to use. Is it the 3mm or 5mm hook. I take it that I use a 5mm for the ties in chain stitch as I did for the ties at the neck/shoulder.
23.09.2026 - 22:45DROPS Design hat geantwortet:
Hi Christina, Yes, the loops are worked using crochet hook size 5 mm. Regards, Drops Team.
24.09.2026 - 07:29
Christina hat geschrieben:
Ok, thanks. I just did slip stitches at the beginning of M2 to get to M3 and also slip stitches at each beginning row of M3 to decrease and for each new shorter row.Your previous reply on 10/9 said to turn when I have done M3. But then when should I do M4? I went straight from M3 to crochet halfway across M4 to the central point and then turned and went crocheted back across M4 and M3. I couldnt see any other way to do it.
23.09.2026 - 22:41
Christina hat geschrieben:
Ok, I'll work dble crochet AGAIN along the top of M2 to get to the start of M3 but this will be row 6 of M2. Why doesnt it show this on the graph? But then you say to turn after M3. Dont I have to work M4 after M3 to get to the halfway point. None of this makes any sense to me!
13.09.2026 - 01:17DROPS Design hat geantwortet:
Dear Christina, we don't show it in the chart because you can simply cut the thread and rejoin it in M.3. Otherwise, you could also work slip stitches, to avoid cutting the thread but still stitches small enough that it won't look as if M.2 has a 6th row. The M.3 after this first M.2 is worked as before; however, there is an M.3 which is worked before M.2, at the end of the row, previously. For this M.3, instead of working slip stitches, you simply turn the piece and leave unworked the stitches in the final M.2 (as opposed to the initial M.2, which was explained above). Happy crochetting!
14.09.2026 - 00:06
Christina hat geschrieben:
Thanks for your reply but I still dont understand. Im at ghe end of row5 so if I work a double crochet in each M2 stitch now, then I will have two rows of double crochet instead of one as shown on the pattern. It clearly says in the instructions that M2 has only 5 rows. How do I get to the start of M3 without doing another M2 row? There's nothing to say in the instructions.
09.09.2026 - 22:18DROPS Design hat geantwortet:
Dear Christina, at the beginning of the row you work M.2 = 1 dc in each st to the beg of M.3, then when you have done M.3, just turn leaving the last stitches M.2 unworked at the end of the row and continue with M.3 as shown in the diagram. Happy crocheting!
10.09.2026 - 09:45
Christina hat geschrieben:
I dont want to break and rejoin the yarn as that's a bit messy but the pattern doesn't show to do any slip stitches to make my way from the end of M2 to the beginning of row 6 of M3.
08.09.2026 - 01:18
Christina hat geschrieben:
I dont want to break and rejoin the yarn as that's a bit messy but the pattern doesn't show to do any slip stitches to make my way from the end of M2 to the beginning of row 6 of M3.
07.09.2026 - 22:52
Christina hat geschrieben:
Sorry didnt mean to send it twice. I thought it hadnt been sent
07.09.2026 - 22:49
Christina hat geschrieben:
I'm at the end of row 5 of M2. How to I get to the beginning of row 6 of M3 and M4? Do I have to break off the yarn and retie each time or can I slip stitch until I get to the start of M3? Also what do I do when I reach the middle of M4? Do I turn and work back and forth over that half and then crochet the other half separately.
07.09.2026 - 22:44DROPS Design hat geantwortet:
Dear Christina, work 1 double crochet (UK crochet terminology - see 2nd symbol under diagram text) in each stitch in M.2 to M.3 - when you reach the middle of M.4 you will finish each part separately, without breaking yarn just work one side to the end then join yarn again to finish the 2nd side. Happy crocheting!
08.09.2026 - 09:24
|
|||||||||||||
Sidney |
|||||||||||||
 |
 |
||||||||||||
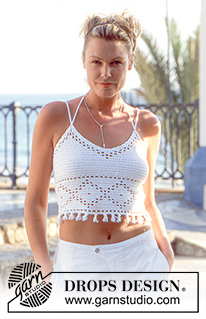
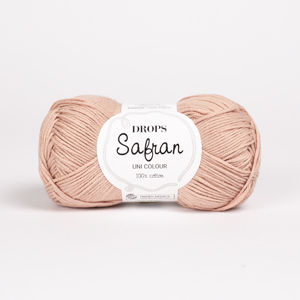
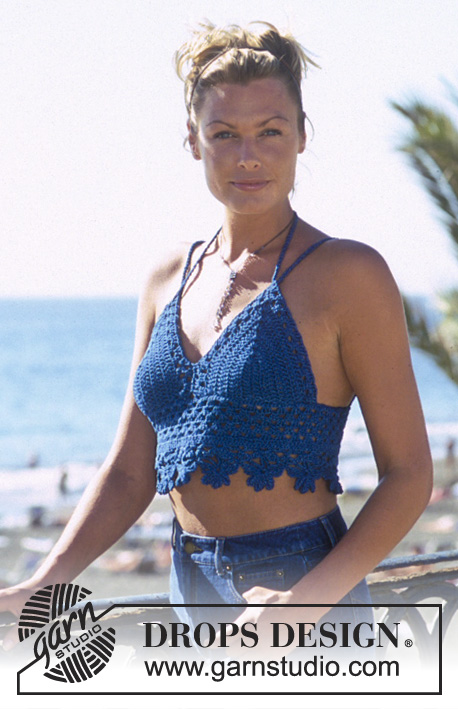
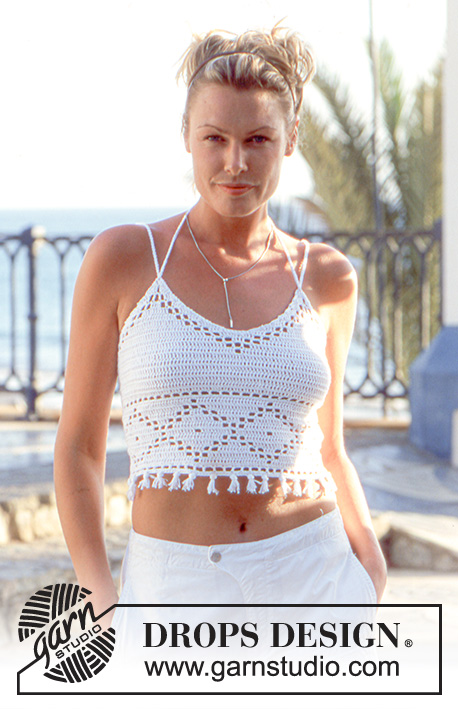
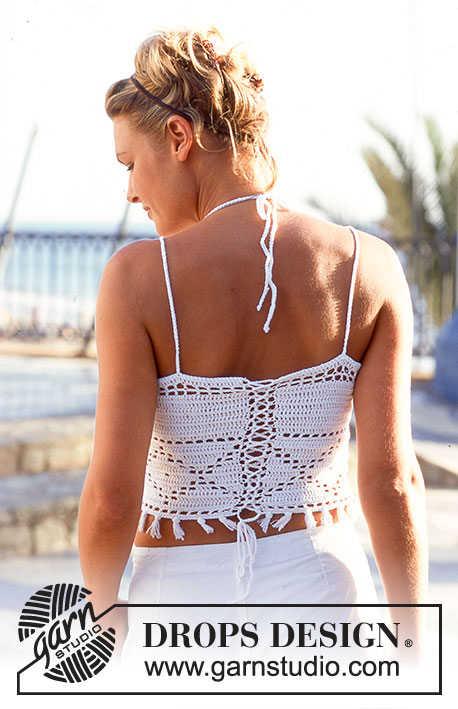
Gehäkeltes DROPS Oberteil in „Safran“
DROPS 69-1 |
|||||||||||||
|
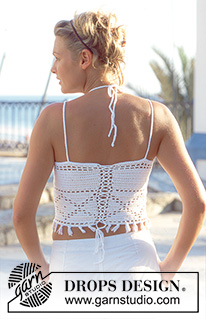
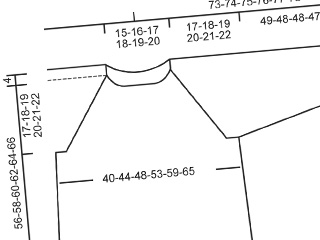
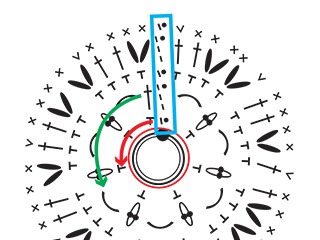
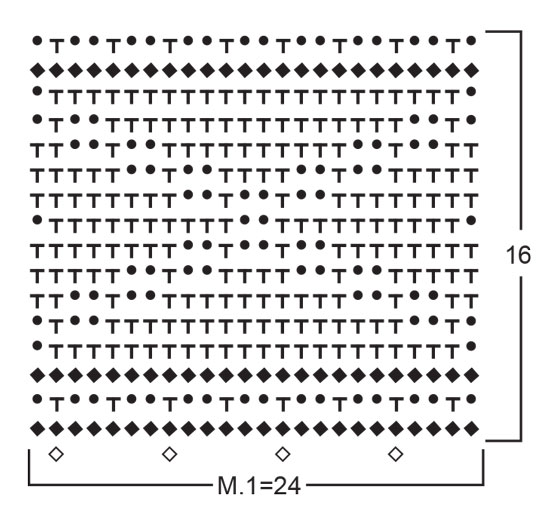
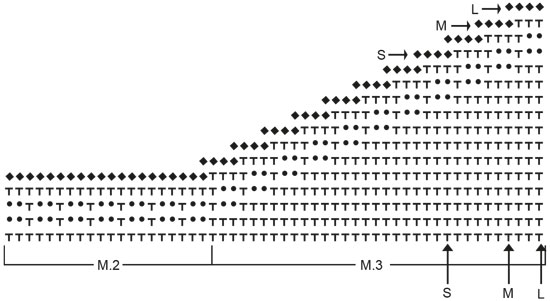
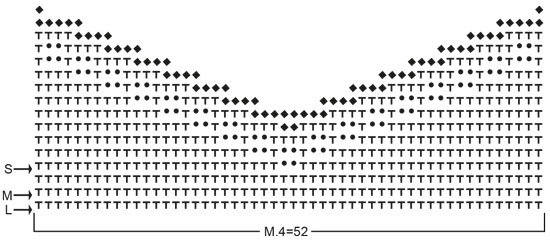
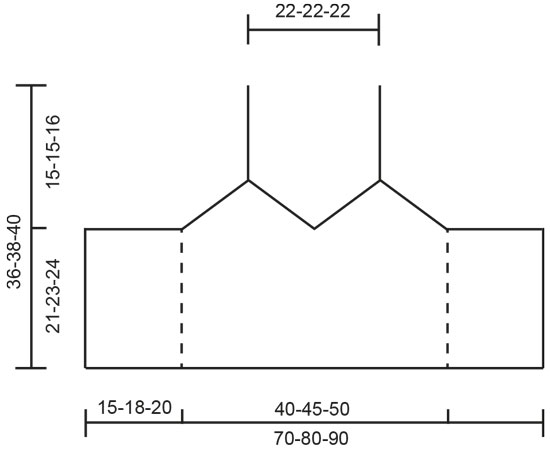
Muster: Siehe Diagramm - M1, M2, M3 und M4. Diagramm M1 und M2 = 1 Rapport Diagramm M3 und M4 werden in der entsprechenden Grösse gearbeitet. Tipp zum Häkeln: Die Arbeit wird wie folgt gedreht: 2 Lm ersetzen 1 Stb und 1 Lm ersetzt 1 fM. Oberteil: Mit Ndl. Nr. 3, 169-193-217 Lm häkeln (inkl. 1 Lm zum Drehen). Mit M1 weiterfahren – beachten Sie den Tipp zum Häkeln Nach M1 mit Stb weiterfahren und gleichzeitig bei der 1. R. gleichmässig verteilt aufnehmen/abnehmen: Bei Grösse S und M 4 M. aufnehmen. Bei Grösse L: 2 M. abn. = 172-196-214 M. Jetzt sind insgesamt 22-24-25 R. gehäkelt (inkl. M1) und die Arbeit misst ca. 18-20-21 cm. Wie folgt weiterfahren: M2 über 36-42-48 M. häkeln – das Diagramm wird von (unten) links nach rechts gelesen. M3 über 24-30-33 M. häkeln - das Diagramm wird von (unten) links nach rechts gelesen. M4 = 52-52-52 M., M3 über 24-30-33 M. häkeln – das Diagramm wird von rechts (beim Pfeil für die gewünschte Grösse) nach links gelesen. M2 über die letzten 36-42-48 M. häkeln – das Diagramm wird von rechts (beim Pfeil für die gewünschte Grösse) nach links gelesen. Mit dem Muster so weiterfahren. Nach 5 R. ist M2 fertig – mit M3 und M4 weiterfahren bis die Diagramme fertig sind. Zusammennähen: Träger: Die Träger werden wie folgt gehäkelt: Am Rückenteil ca. 9 cm von der Seite her, mit doppeltem Garn auf Ndl. Nr. 5 eine Lm-Schnur von ca. 90 cm häkeln. Den Träger vorne durch das Oberteil ziehen. Auf der anderen Seite wiederholen. Die Träger hinten im Nacken zusammenbinden. Ösen: Auf beiden Seiten der Arbeit (hinten in der Mitte) werden Ösen gehäkelt: * 1 fM, 3 Lm, 1 cm überspringen (nach unten) *, von *-* wiederholen. Eine ca. 150 cm lange Lm-Schnur häkeln und die Arbeit hinten, im Zick-Zack, zusammenbinden. Fransen: 1 Franse = 4 Fäden à 8 cm. Die Fäden doppelt legen und die Schlaufe durch die erste Lm Runde ziehen (sehen Sie Diagramm M1). Es werden total 28-32-36 Fransen angebracht. |
|||||||||||||
Erklärungen zum Diagramm |
|||||||||||||
|
|||||||||||||
 |
|||||||||||||
 |
|||||||||||||
 |
|||||||||||||
 |
|||||||||||||
Haben Sie diese Anleitung nachgearbeitet?Dann taggen Sie Ihre Fotos mit #dropspattern oder schicken Sie sie an die #dropsfan Galerie Brauchen Sie Hilfe bei dieser Anleitung?Sie finden 8 Videotutorials, einen Kommentar/Fragen-Bereich und vieles mehr, wenn sie die Anleitung bei garnstudio.com aufrufen. © 1982-2026 DROPS Design A/S. Wir besitzen alle Rechte. Dieses Dokument, einschließlich aller Untersektionen, hat Urheberrechte. Mehr dazu, was Sie mit unseren Anleitungen machen können, finden Sie ganz unten auf der Seite zu jeder Anleitung. |
|||||||||||||

Mit über 40 Jahren Tätigkeit im Entwerfen von Strick- und Häkelmustern bietet Ihnen DROPS Design eine der umfangreichsten Sammlungen von kostenlosen Anleitungen im Internet - in 17 Sprachen übersetzt. Zum jetzigen Zeitpunkt haben wir insgesamt 333 Handarbeitshefte und 12537 Anleitungen auf Deutsch. 12451
Unser Ziel ist es, Ihnen die besten Angebote zum Stricken und Häkeln, Inspirationen und Ratschläge sowie qualitativ hochstehende Garne zu unglaublichen Preisen zu bieten! Möchten Sie unsere Anleitungen nicht nur für den persönlichen Gebrauch nutzen? Unsere Copyright Bedingungen finden Sie bei allen unseren Anleitungen ganz unten auf der jeweiligen Seite. Viel Spaß beim Handarbeiten!
Kommentieren Sie die Anleitung DROPS 69-1
Wir würden gerne Ihre Meinung zu diesem Modell erfahren!
Wenn Sie eine Frage stellen möchten, prüfen Sie bitte, dass Sie die richtige Kategorie im unten stehenden Formular gewählt haben - so bekommen Sie schneller eine Antwort. Die obligatorischen Felder sind mit einem * gekennzeichnet.