
Beliebte Kategorien
Suchen Sie nach einem Garn?


Kommentare / Fragen (112)
![]() Deni hat geschrieben:
Deni hat geschrieben:
My question was how to work work increases and maintain double moss stitch
06.01.2021 - 09:07DROPS Design hat geantwortet:
Hi Deni, you will add 2 stitches in one side, so just adjust them accordingly, to maintain double moss stitch. Happy knitting!
06.01.2021 - 09:19
![]() Deni hat geschrieben:
Deni hat geschrieben:
I'm knitting size xl and is at 16 cm.can you tell me how to proceed with increasing.how to work yarn over through back loop in the next round (when to make purl when to make knit twisted)
06.01.2021 - 08:24DROPS Design hat geantwortet:
Hi Deni, please see the video HERE. Happy knitting!
06.01.2021 - 08:56
![]() Stephanie hat geschrieben:
Stephanie hat geschrieben:
I am not sure if I am working the side of the collar that I think I am...when being assembled, does the long side or the short side of the collar get sewn to the body of the sweater?
12.11.2020 - 00:17DROPS Design hat geantwortet:
Hi Stephanie, You will sew the shorter side of the collar to the yoke. Happy knitting!
12.11.2020 - 08:23
![]() Myriam Wittler hat geschrieben:
Myriam Wittler hat geschrieben:
Ich habe ein Männerpullover der Größe 48 stricken wollen und entsprechend die Anleitung mit anfänglichen 51cm verfolgt. Meine Umrechnung der Maschenprobe ergab dass für eine 10x10 cm. 17,25 M. notwendig waren. Diese Maschenprobe wurde \"fälschlicherweise\" glatt rechts gestrickt. Denn nun ist der gestrickte Pullover, da es ein sehr dehnbarer Muster hat, nicht 51 cm an der Basis sondern nur 48 cm. Dadurch dass es sehr dehnbar ist, kann ich auch 51 cm messen, aber wird es nicht zu eng?
15.10.2020 - 11:00DROPS Design hat geantwortet:
Liebe Frau Wittler, bei dieser Anleitung wird die Maschenprobe in der Breite gleich glatt rechts gestrickt und mit Doppeltem Perlmuster, dh nach Bündchen haben Sie in die 4. Größe 216 Maschen/2 Teilen = 108 M - mit 21 M = 10 cm sind diese 108 M ca 51 cm. Viel Spaß beim stricken!
15.10.2020 - 12:08
![]() Stephanie hat geschrieben:
Stephanie hat geschrieben:
What is the ease of the measurements? Is it positive or negative?
26.06.2020 - 22:08DROPS Design hat geantwortet:
Dear Stephanie, measure a similar garment you/he likes and compare the measurements to those in the chart to find out the best matching size - read more about sizing here. Happy knitting!
29.06.2020 - 07:30
![]() Toty hat geschrieben:
Toty hat geschrieben:
Cuando hago los dos aumentos a cada lado de los MP, al hacer el punto retorcido en ambas hebras igual me queda el espacio. No se cómo hacer ese par de aumentos sin que me quede ese espacio.
24.05.2020 - 02:56
![]() Kristina hat geschrieben:
Kristina hat geschrieben:
Denne oppskriften oppgir ikke riktig garnmengde. Jeg har vært sparsom med den lysegrå fargen og strikket stripene litt kortere enn anvist, likevel har jeg ikke nok til å gjøre ferdig den siste armen. Strikkefastheten stemmer så dette er en feil i mønsteret og utrolig kjedelig å oppdage mot slutten av prosjektet. Det er ikke lett å få tak i drops garn i butikk så da må jeg vel bestille et enkelt nøste og 3 ganger nøstes verdi i porto en gang til...
15.12.2019 - 12:48
![]() Rosa hat geschrieben:
Rosa hat geschrieben:
Buenas noches, me he quedado bloqueada en la parte de las sisas, no entiendo como y cuantos se menguan , me gustarían me aclarasen la explicación , gracias
06.11.2019 - 21:49DROPS Design hat geantwortet:
Hola Rosa. Para las sisas cerrar 3 puntos a cada lado de la espalda , después cerrar cada 2ª fila 2 puntos 0-1-2-4-6-8 veces ( el número de veces depende de la talla trabajada , es decir para la talla S no se cierran 2 puntos, para la talla M cerrar 2 puntos 1 vez, para la talla L - 2 veces etc.) . Después cerramos 1 pt 1-2-3-4-5-6 veces de la misma manera.
10.11.2019 - 17:29
![]() Isaline hat geschrieben:
Isaline hat geschrieben:
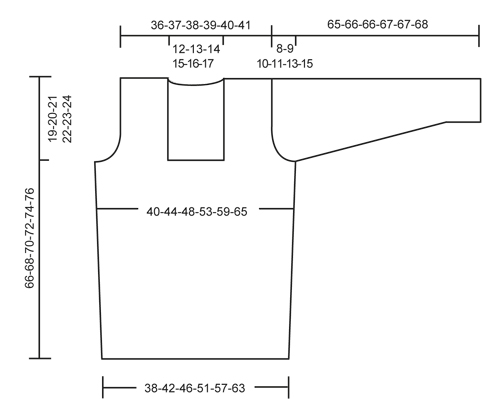
Bonjour, je ne comprends pas bien les mesures du diagramme. J'ai mesuré un bras de la personne pour qui je veux faire ce modèle, qui est un homme assez costaud et de taille moyenne. De l'épaule au poignet, son bras mesure 54 cm. Hors sur le diagramme, dans les mesures épaule-poignet, ça commence à 65 cm... Il y a quelque chose de pas logique il me semble... Merci !
15.08.2019 - 03:17DROPS Design hat geantwortet:
Bonjour Isaline, pour trouver la taille idéale, mesurez un pull similaire qui lui va et qu'il aime, vous pourrez ensuite ajuster si besoin les différentes longueurs. Votre magasin DROPS pourra volontiers vous assister, même par mail ou téléphone. Bon tricot!
15.08.2019 - 10:24
![]() Kathy hat geschrieben:
Kathy hat geschrieben:
Hola, necesito ayuda con el aumento que hay que hacer en el cuerpo. Entiendo que el la primera fila hago un aumento al principio y después de marcar ciertos números, pero en la segunda fila no entiendo bien a donde debo de hacer el aumento. Y luego dice terminar los aumentos dividir la pieza en los MP para continuar por separado.Gracias por su ayuda.
01.07.2019 - 16:12DROPS Design hat geantwortet:
Hola Kathy. Son los aumentos en los lados. Primero marcamos los lados con los marcapuntos (según la talla). Aumentamos (trabajando una lazada) a cada lado del marcapuntos. En total, se aumentan 4 puntos en la vuelta. los marcapuntos suben con la labor y los siguientes aumentos se trabajan de la misma manera (= 1 lazada a cada lado del marcapuntos) = 4 puntos aumentados en la vuelta en total.
10.07.2019 - 23:45
|
|
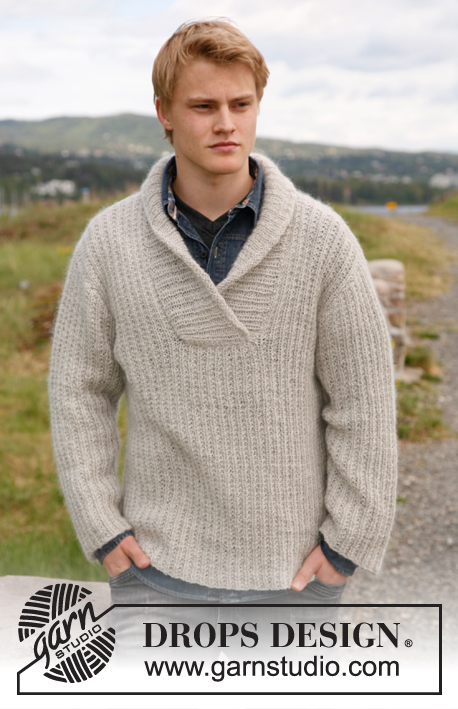
Limestone#limestonesweater |
|
 |
 |
Gestrickter Pullover mit Schalkragen für Herren in DROPS Karisma oder DROPS Merino Extra Fine. Größe S - XXXL
DROPS 135-1 |
|
|
-------------------------------------------------------- DOPPELTES PERLMUSTER: 1. Runde: *1 re., 1 li.*, von *-* wiederholen. 2. Runde: re. über re. und li. über li.. 3. Runde: *1 li., 1 re. *, von *-* wiederholen. 4. Runde: li. über li. und re. über re.. Die 1.- 4. Runde wiederholen. STREIFEN 1 (Vorder- und Rückenteil): Abwechslungsweise 11-11-11½-12-12-12½ cm mittelgrau oder hellgrau stricken (der erste Streifen wird von der Anschlagskante gemessen). STREIFEN 2 (gilt für die Ärmel): Abwechslungsweise 10 cm mittelgrau oder hellgrau stricken (der erste Streifen wird von der Anschlagskante gemessen). Zum Schluss mit mittelgrau fertig stricken. TIPP ZUM AUFNEHMEN: 1 Umschlag machen und diesen bei der nächsten R. verschränkt stricken (d.h. man sticht in das hintere Glied der Masche ein). MUSTER 1: 1. R. (= von der Vorderseite): re. 2. R. (= von der Rückseite): *1 re., 1 li.*, von *-* wiederholen. Die 1. und 2. R. wiederholen. KRAUSRIPPE (hin und zurück): 1 Krausrippe = 2 R. re. -------------------------------------------------------- VORDER- UND RÜCKENTEIL: Die Arbeit wird rund gestrickt. Mit hellgrau auf Rundnadel Nr. 3,5, 213-234-255-288-318-351 M. anschlagen und 4 cm Bündchen = 1 re., 2 li. stricken. Danach 1 R. re. stricken und GLEICHZEITIG gleichmässig verteilt 53-58-63-72-78-87 M. abn. (indem man ca. jede 3. und 4. M. zusammenstrickt) = 160-176-192-216-240-264 M. Danach zu Rundnadel 4 wechseln und das DOPPELTE PERLMUSTER und die STREIFEN 1 stricken - Siehe oben. STIMMT DIE MASCHENPROBE? Nach 15-15-16-16-17-17 cm die Arbeit am Anfang und nach 80-88-96-108-120-132 M. markieren (= Seiten). Bei der nächsten R. auf beiden Seiten der Markierungen je 1 M. aufnehmen - siehe oben TIPP ZUM AUFNEHMEN = + 4 M. Die neuen M. werden ins Muster eingestrickt. Die Aufnahme nach 30-30-32-32-34-34 cm wiederholen = 168-184-200-224-248-272 M. Nach 47-48-49-50-51-52 cm (nach einer 2. oder 4. Runde im Perlmuster) bei der Markierung teilen. RÜCKENTEIL: = 84-92-100-112-124-136 M. (1. R. = Vorderseite). Mit den STREIFEN 1 und dem DOPPELTEN PERLMUSTER weiterstricken und GLEICHZEITIG auf beiden Seiten bei jeder 2. R. für das Armloch abk.: 1 Mal 3 M., 0-1-2-4-6-8 Mal 2 M. und 1-2-3-4-5-6 Mal 1 M. = 76-78-80-82-84-86 M. Nach 64-66-68-70-72-74 cm die mittleren 24-26-28-30-32-34 M. für den Hals abk. Bei der nächsten R. 1 M. gegen den Hals abk. = 25 M. Nach 66-68-70-72-74-76 cm abk. VORDERTEIL: = 84-92-100-112-124-136 M. Mit den STREIFEN 1 und dem DOPPELTEN PERLMUSTER weiterstricken und wie am Rückenteil für das Armloch abk. GLEICHZEITIG vorne die mittleren 26-28-30-32-34-36 M. auf einen Hilfsfaden legen. Auf beiden Seiten wie am Rückenteil für das Armloch abk. Nach allen Abnahmen sind noch 25 M. auf der Nadel. Mit den STREIFEN 1 und dem DOPPELTEN PERLMUSTER weiterstricken und nach 66-68-70-72-74-76 cm locker abk. ÄRMEL: Die Arbeit wird rund gestrickt. Mit hellgrau auf Nadelspiel Nr. 3,5, 63-66-69-72-75-78 M. anschlagen und 4 cm Bündchen = 1 re., 2 li. stricken. Danach 1 R. re. stricken und GLEICHZEITIG gleichmässig verteilt 15-16-17-18-19-20 M. abn. (indem man ca. jede 3. und 4. M. zusammenstrickt) = 48-50-52-54-56-58 M. Zu Nadelspiel 4 wechseln und den Anfange der Runde markieren. Mit den STREIFEN 2 und dem DOPPELTEN PERLMUSTER weiterstricken - siehe oben. Nach 8-8-7-7-8-7 cm auf beiden Seiten der Markierung je 1 M. aufnehmen = + 2 M. Total 10-11-13-15-17-18 Mal alle 4-3½-3-2½-2-2 cm = 68-72-78-84-90-94 M. Nach 57-57-56-56-54-53 cm (Auf Grund der breiteren Schultern sind die Ärmel bei den grossen Grössen kürzer) unter dem Ärmel 6 M. abk. (d.h. je 3 M. auf beiden Seiten der Markierung abk.) beidseitig, am Anfang der R. für die Armkugel abk.: 2-2-3-3-5-5 Mal 2 M., und danach 3-4-4-5-5-6 Mal 1 M., weiter auf beiden Seiten je 2 M. abk. bis die Arbeit 64-65-65-66-66-67 cm, misst. Danach auf beiden Seiten je einmal 3 M. abk. Nach ca. 65-66-66-67-67-68 cm alle M. locker abk. ZUSAMMENNÄHEN: Die Schulternaht zusammennähen. Die Ärmel einnähen. RECHTER KRAGE: Der Kragen wird auf einer Nadel Nr. 4 mit mittelgrau gestrickt: auf der Rückseite der Arbeit in jeder M. vom Hilfsfaden 1 M. aufnehmen (die M. auf dem Hilfsfaden liegen lassen) = 26-28-30-32-34-36 M. Bei der nächsten R. von der Vorderseite mit dem Muster 1 anfangen - siehe oben – und den Schluss der ersten Reihe von der Vorderseite markieren. Nach 19-20-21-22-23-24 cm Krausrippe stricken und gleichzeitig von der Vorderseite wie folgt verkürzte Reihen stricken: * 2 R. über alle M. stricken, 2 R. nur über die äussersten 20 M. stricken *, von *-* wiederholen bis die Arbeit 8-9-9-10-10-11 cm misst (von der Markierung an der kurzen Seite gemessen. Danach abk. LINKER KRAGE: Die M. vom Hilfsfaden hinter dem rechten Kragen auf eine Nadel legen (der linke Kragen liegt unter dem rechten Kragen). Wie der rechte Kragen stricken. ZUSAMMENNÄHEN: Den Kragen am Vorderteil annähen. Den Kragen danach hinten zusammennähen und am Halsausschnitt annähen. KOPFLOCHER: 1 Schlaufe wie folgt: 2 Fäden mittelgrau à 40 cm abschneiden und doppelt legen. 2 Schlaufen machen und diese von der unteren Kante nach ca. 4 und 11 cm am rechten Kragen annähen (ca. 1 cm von der Kante). Die Knöpfe ca. 2 und 4 cm von der Halskante annähen. |
|
 |
|
Haben Sie diese Anleitung nachgearbeitet?Dann taggen Sie Ihre Fotos mit #dropspattern #limestonesweater oder schicken Sie sie an die #dropsfan Galerie Brauchen Sie Hilfe bei dieser Anleitung?Sie finden 17 Videotutorials, einen Kommentar/Fragen-Bereich und vieles mehr, wenn sie die Anleitung bei garnstudio.com aufrufen. © 1982-2026 DROPS Design A/S. Wir besitzen alle Rechte. Dieses Dokument, einschließlich aller Untersektionen, hat Urheberrechte. Mehr dazu, was Sie mit unseren Anleitungen machen können, finden Sie ganz unten auf der Seite zu jeder Anleitung. |
|


Mit über 40 Jahren Tätigkeit im Entwerfen von Strick- und Häkelmustern bietet Ihnen DROPS Design eine der umfangreichsten Sammlungen von kostenlosen Anleitungen im Internet - in 17 Sprachen übersetzt. Zum jetzigen Zeitpunkt haben wir insgesamt 324 Handarbeitshefte und 12285 Anleitungen auf Deutsch. 12197
Unser Ziel ist es, Ihnen die besten Angebote zum Stricken und Häkeln, Inspirationen und Ratschläge sowie qualitativ hochstehende Garne zu unglaublichen Preisen zu bieten! Möchten Sie unsere Anleitungen nicht nur für den persönlichen Gebrauch nutzen? Unsere Copyright Bedingungen finden Sie bei allen unseren Anleitungen ganz unten auf der jeweiligen Seite. Viel Spaß beim Handarbeiten!
Kommentieren Sie die Anleitung DROPS 135-1
Wir würden gerne Ihre Meinung zu diesem Modell erfahren!
Wenn Sie eine Frage stellen möchten, prüfen Sie bitte, dass Sie die richtige Kategorie im unten stehenden Formular gewählt haben - so bekommen Sie schneller eine Antwort. Die obligatorischen Felder sind mit einem * gekennzeichnet.