
Beliebte Kategorien
Suchen Sie nach einem Garn?


Kommentare / Fragen (142)
![]() Esther Oz hat geschrieben:
Esther Oz hat geschrieben:
So I finished the increases in M2. What does it mean work 4 rounds see above- on 7 sts mod front, with remaining sts as before
15.10.2020 - 05:19DROPS Design hat geantwortet:
Dear Mrs Oz, you will now work the next 4 rounds as before with M.2 and stocking stitch but over the middle 7 sts on mid front you will work garter stitch instead of M.2, this means you will work them alternately knit and purl (as for garter st in the round explained at the beg of the pattern). Happy knitting!
15.10.2020 - 09:13
![]() Esther Oz hat geschrieben:
Esther Oz hat geschrieben:
Do I start each round 19 stockinette or just the first round?
12.10.2020 - 17:56DROPS Design hat geantwortet:
Dear Mrs Oz, you will now always work this way: 19 sts stocking st, M.2 over the next 25 sts, stocking st to the end of the round - repeating M.2 from row 7 to 22 and starting to increase at the same time on 4th of these round . When piece measures 67 cm you will work the 7 middle sts on front piece in garter st for 2 ridges (= 4 rounds) and cast off for armholes on each side. Happy knitting!
13.10.2020 - 10:54
![]() Esther Oz hat geschrieben:
Esther Oz hat geschrieben:
When you say in you first sentence of answer, “On next row”,do you mean next round? When I’m counting 25 sts for mid front am I repeating row for 25 sts (each row is 16 so do I do row 7 for 16 sts then repeat row 7 for 9 more sts or do I start row 8 for 9 sts and then next round do the remainder of row 8 and part of row 9 for remainder of round?
12.10.2020 - 13:49DROPS Design hat geantwortet:
Dear Mrs Oz, yes sorry I meant "round" - I'm not sure what you mean here, after you have worked M.2 one time in height over all stitches, continue in stocking stitch with only the 25 sts on mid front with M.2 working one row in diagram after the other as you worked before (except that all other sts will be worked in stocking stitch and not in lace pattern anymore). Starting with row 7 in diagram to row 22 (= end of diagram) and repeat these rows 7 to 22. Hope this helps :)
12.10.2020 - 16:21
![]() Esther Oz hat geschrieben:
Esther Oz hat geschrieben:
Finally understood the one vertical repeat in M2 means do each row for an entire round (I was doing just 16 sts then going to next row). Now I’m starting 19 stockinette, and my question is the next 25 sts is from row 7 then back to stockinette, when I get to next round after the next 19 stockinette, do I start on the pattern where I left off? This would mean I would be on row 2 of M2 in knit for 7 sts, then go to next row for 18 sts. Correct?
11.10.2020 - 15:03DROPS Design hat geantwortet:
Dear Mrs Oz, on next row (= 8th row in diagram), you continue working the other stitches in stocking stitch as before and row 8th row in diagram over the 25 sts, then work row 9 in M.2 and always stockinette over remaining sts. ie only the 25 sts will be worked as shown in the diagram, all other will be worked in stockinette. Happy knitting!
12.10.2020 - 08:26
![]() Esther Oz hat geschrieben:
Esther Oz hat geschrieben:
Not sure what you mean by “working ball”. What I have when I complete 1 vertical repeat is I have 28 sts until I get to marker 3. What do I do with these . I know when I get to marker I do 19 stockinette, but I don’t know what to knit with the 28 sts remaining BEFORE I get to first side. Do I go back to beginning of M2 for these 28 sts, then start 19 stockinette followed by M2 (starting from row7) for 25 sts?
07.10.2020 - 06:58DROPS Design hat geantwortet:
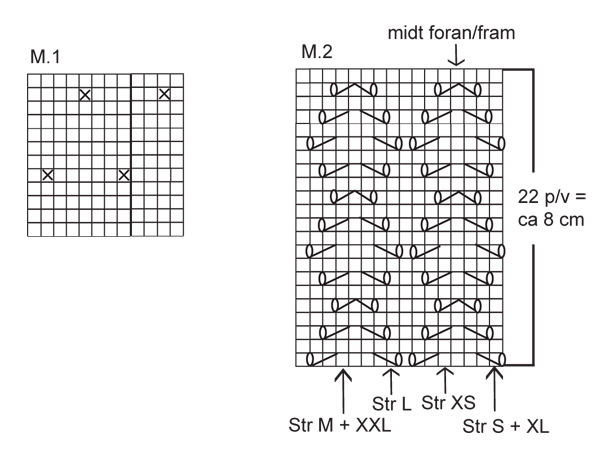
Dear Mrs Oz, it looks like the rounds do not start on the side and it's a bit tricky to find out where you should then start the round, try to put the dress flat (as ready to wear), with sides on each side and try to find the middle 25 sts on front piece. You could show your work to your store, it might be easier for them to help you (even with a picture). You can see on the 2nd picture the M.2 lace will be worked (row 7 to 22) over the middle 25 sts on fronot piece. Hope this helps. Happy knitting!
07.10.2020 - 08:40
![]() Esther Oz hat geschrieben:
Esther Oz hat geschrieben:
So if I have 12 sts before the the beginning of the round after I did 19 stockinette, what do I do with the extra 12 sts? Did I screw something up by not ending the first 22 rows of the M2 pattern at the start of the round? I am not starting exactly at the side?
06.10.2020 - 13:47DROPS Design hat geantwortet:
Dear Mrs Oz, I'm not sure what you mean with the 12 sts before the beg of the round - the beg of the round is on the side of the dress from the begining of the pattern, this means if you put the work flat, you should have the working ball on the side and the 3rd marker + 6th marker (in M.1) on each side of piece. M.2 will be now worked over the middle 25 sts on mid front - try to adjust your number of sts so that M.2 will be centered (with the previous 3rd and 6th markers on each side of piece). Hope it helps. Happy knitting!
06.10.2020 - 15:08
![]() Esther Oz hat geschrieben:
Esther Oz hat geschrieben:
I completed 1 vertical of all 22 rows, and I did 19 stockinette. Before I start from row 7, I see I am 12 sts before first side marker, so if I start 25 sts, 12 will be from one side and 12 from front middle. I thought 25 has to be front center. Did I do something wrong?
05.10.2020 - 23:55DROPS Design hat geantwortet:
Dear Mrs Oz, after the 22 rows of M.2 start next round (as before = on the side) and work from the side (as before): 19 sts stocking st, 25 sts in M.2, and continue in stocking st to the end of the round as before. But your rounds are starting from the side, as from the beginning of the dress. Happy knitting!
06.10.2020 - 11:11
![]() Esther Oz hat geschrieben:
Esther Oz hat geschrieben:
I think I understand and I will try. Thank you so much for all your help. So appreciated.
05.10.2020 - 17:06
![]() Esther Oz hat geschrieben:
Esther Oz hat geschrieben:
I want to do the first M2 in height first. Do I start xs only in first round or do I start in xs the whole time for the entire height. Then after I complete full M2 in height, I do 19 stockinette then 25 sts in M2 starting from row 7 and then the remaining 84 sts (19+25=44 and 128-44= 84)? And when I finish round of 128 sts, do I start where I left off from starting at row 7?
05.10.2020 - 16:14DROPS Design hat geantwortet:
Dear Mrs Oz,then you work: M.2 from the arrow to the end = 12 sts), then repeat the 16 sts in M.2 from the beg (from the right towards the left) a total of 7 times in width (= over the next 112 sts) and finish with the first 4 sts in diagram (the 4 sts before first arrow) = 12 + 16*7 + 4= 128 sts. After the 22 rows work: 19 sts in stocking stitch, the next 25 sts in M.2 as before but from row 7 and the remaining sts in stocking st = 19 + 25 + 84 = 128 sts. Hope this helps :)
05.10.2020 - 16:27
![]() Esther Oz hat geschrieben:
Esther Oz hat geschrieben:
I took out M2 in height cause I wasn’t sure if for each row I start at xs or just first row of pattern and the rest of height I start from beginning of pattern? Also. After I do height, and start row 7, if I follow pattern, will this mean I’m working front by just working pattern (I don’t have to figure out when I’m at 25 front)?
05.10.2020 - 13:29DROPS Design hat geantwortet:
Dear Mrs Oz, it will look somewhat different as in the foto without the first pattern all the round, but then you work M.2 only on mid front: 19 sts stocking st, 25 sts in M.2 (= whole diagram one time in width (= 16 sts) then work the first 9 sts in diagram = 25 sts) and work rest of front piece + back piece in stocking st. The lace pattern M.2 will be only worked over the middle 25 sts on front piece.Happy knitting!
05.10.2020 - 15:43
|
||||||||||||||||
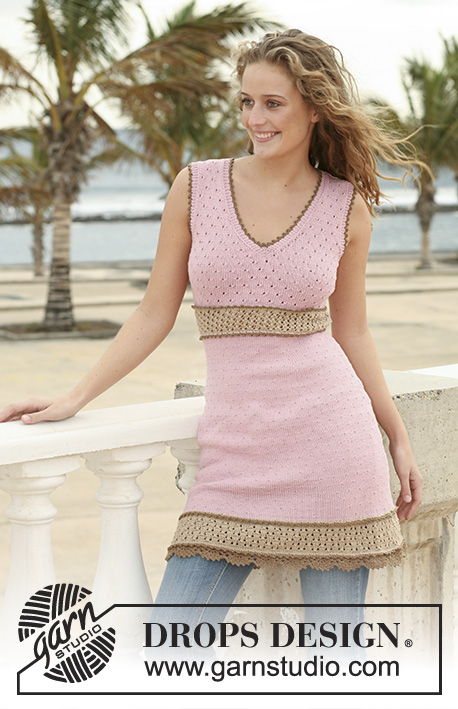
Endless Summer#endlesssummerdress |
||||||||||||||||
|
|
||||||||||||||||
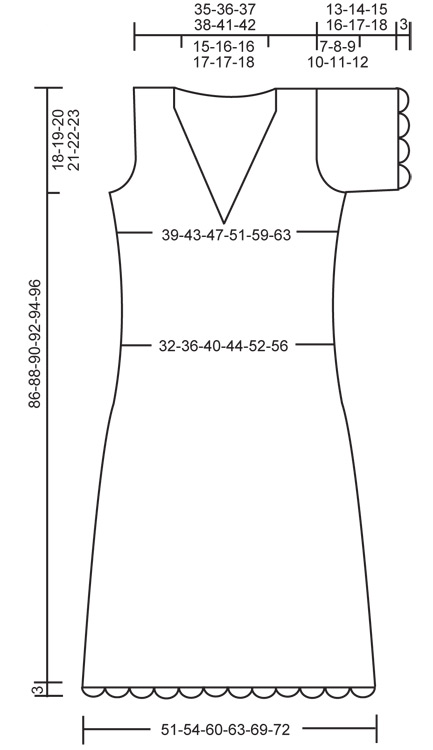
DROPS Kleid mit Lochmuster in ”Muskat”. Grösse XS bis XXL.
DROPS 111-4 |
||||||||||||||||
|
KRAUSRIPPE (hin und zurück): 1 Krausrippe = 2 R. re. KRAUSRIPPE (auf Rundstricknadel) 1 Krausrippe = 2 Runden. 1. R.: li., 2. R.: re. MUSTER: Siehe Diagramm M1 und M2. Das Diagramm zeigt das Muster von der rechten Seite. TIPP ZUM ABNEHMEN-1: VOR dem Markierungsfaden: 2 re. zusammen. NACH dem Markierungsfaden: 1 M. re. abheben, 1 re., die abgehobene über die gestrickte ziehen. Bitte beachten Sie: Die li.-Maschen in M1 dürfen sich nicht verschieben. TIPP ZUM ABNEHMEN-2: Alle Abnahmen werden von der rechten Seite gemacht. Vor oder nach 9 M. Muster und 3 M. Kraussrippe abn. = 12 M. VOR 12 M.: 2 re. zusammen. NACH 12 M.: 1 M. re. abheben, 1 re., die abgehobene über die gestrickte ziehen. TIPP ZUM AUFNAHMEN: Auf beiden Seiten der Markierungsfäden aufnehmen indem man 1 Umschlag macht – damit es kein Loch gibt wird der Umschlag bei der nächsten R. verschränkt gestrickt (d.h. man sticht in das hintere Glied der Masche ein). ---------------------------------------------------------- ---------------------------------------------------------- KLEID: Die Arbeit wird rund gestrickt. Mit Muskat auf Rundstricknadel Nr. 4,5, 204-216-240-252-276-288 M. anschlagen. 1 R. li., 1 R. re. und 1 R. li. stricken. Danach mit M1 weiterfahren. STIMMT DIE MASCHENPROBE? Nach 18-18-18-20-22-26 cm wie folgt 6 Markierungsfäden einziehen: 32-34-38-40-44-46 M. stricken, Markierungsfaden-1 einziehen, 37-39-43-45-49-51 M. stricken, Markierungsfaden-2, 33-35-39-41-45-47 M. stricken, in die letzte gestrickte M. Markierungsfaden-3 einziehen (= Seite), 32-34-38-40-44-46 M. stricken, Markierungsfaden-4 einziehen, 37-39-43-45-49-51 M. stricken, Markierungsfaden-51 einziehen, 33-35-39-41-45-47 M. stricken, Markierungsfaden-6 in die letzte gestrickte M. ziehen (= Seite). Bei der nächsten R. auf beiden Seiten des Markierungsfadens 3 und 6 (in den Seiten) je 1 M. abn. SIEHE TIPP ZUM ABNEHMEN-1. Diese Abnahmen bei jeder 6. R. total 13-12-14-13-11-10 Mal wiederholen. GLEICHZEITIG bei der 8.-7.-9.-8.-6.-5. Abnahme bei den 4 anderen Markierungsfäden wie folgt: NACH dem 1. und 4. Markierungsfaden und VOR dem 2. und 5. Markierungsfaden abn – SIEHE TIPP ZUM ABNEHMEN-1. Diese Abnahmen bei jeder 6. R. (gleichzeitig mit den Seiten) total 6 Mal wiederholen. Nach allen Abnahmen sind noch 128-144-160-176-208-224 M. auf der Nadel. Mit M1 weiterfahren bis die Arbeit ca. 47-48-49-50-51-52 cm misst – nach mindestens 2 R. glatt. Die Markierungsfäden 1., 2., 4. und 5. herausziehen. M2 stricken – damit das Muster vorne aufgeht beim richtigen Pfeil unten im Diagramm anfangen (vordere Mitte, siehe Pfeil oben im Diagramm). Nachdem M2 einmal in der Höhe gestrickt ist, die nächste R. wie folgt: 19-23-27-31-39-43 M. glatt, M2 über die mittleren 25 M. vorne (von der 7. R. im Diagramm stricken und von der 7.-22. R. wiederholen), und die restlichen M. glatt. GLEICHZEITIG bei der 4. R. glatt auf beiden Seiten der Markierungsfäden je 1 M. aufnehmen – TIPP ZUM AUFNAHMEN! Die Aufnahmen bei jeder 4. R. total 7 Mal wiederholen = 156-172-188-204-236-252 M. Nach ca. 67-68-69-70-71-72 cm (die nächste R. wird mit Umschlägen gestrickt) über die mittleren 7 M. vorne in der Mitte 2 KRAUSSRIPPEN stricken. Die restlichen M. wie gehabt. Bei der nächsten R. vorne die mittlere M. abk. Bei der gleichen R. auf beiden Seiten je 7 M. für das Armloch abk. (d.h. die M. mit dem Markierungsfaden und je 3 M. auf beiden Seiten). Jetzt jede Seite einzeln fertig stricken. LINKES VORDERTEIL: = 35-39-43-47-55-59 M. Mit je 3 Kraussrippen gegen die Mitte, 9 M. M2 und die restlichen M. glatt weiterstricken. GLEICHZEITIG gegen den Hals und für das Armloch abk. HALS: Nach 12 M. 1 M. abn. – SIEHE TIPP ZUM ABNEHMEN-2, die Abnahmen bei jeder 2. R. total 9-10-10-10-10-11 Mal und danach bei jeder 4. R. 5-5-5-6-6-6 Mal wiederholen. ARMLOCH: Bei jeder R. gegen die Seite abk.: 3 M. 0-0-1-1-2-2 Mal, 2 M. 0-1-1-2-3-4 Mal und 1 M. 1-2-2-3-3-4 Mal. Nach allen Abnahmen sind 20-20-21-21-24-24 M. auf der Nadel. Nach 86-88-90-92-94-96 cm abk. RECHTES VORDERTEIL: Wie das linke Vorderteil nur spiegelverkehrt. RÜCKENTEIL: = 71-79-87-95-111-119 M. Glatt weiterstricken und auf beiden Seiten wie am Vorderteil für das Armloch abk. = 69-71-73-75-81-83 M. Nach 83-85-87-89-91-93 cm über die mittleren 35-37-37-39-39-41 M. 2 Kraussrippen stricken (die restlichen M. werden glatt gestrickt), danach die mittleren 29-31-31-33-33-35 M. für den Hals abk. Jetzt jede Seite einzeln fertig stricken. Mit 3 M. Kraussrippe gegen den Hals weiterstricken bis die Arbeit 86-88-90-92-94-96 cm misst und danach abk. ÄRMEL: Die Arbeit wird auf einer Rundstricknadel hin und zurück gestrickt. Mit Muskat auf Nadel Nr. 4,5, 62-62-68-68-74-80 M. anschlagen (inkl. 1 Randm auf beiden Seiten. 2 Kraussrippen stricken. Danach mit M1 mit je 1 Randm auf beiden Seiten stricken. Nach 2 cm auf beiden Seiten je 1 M. aufnehmen und bei jeder 2. R. total 2-4-3-5-5-4 Mal wiederholen. Die neuen M. werden glatt gestrickt = 66-70-74-78-84-88 M. Nach 6 cm auf beiden Seiten gegen die Armkugel abk.: 4 M. 1 Mal, 2 M. 3 Mal und 1 M. 1-2-4-5-6-8 Mal. Weiter auf beiden Seiten 2 M. abk. bis die Arbeit 12-13-14-15-16-17 cm misst. Danach 4 M. 1 Mal abk. Die restlichen M. abk. Die Arbeit misst ca. 13-14-15-16-17-18 cm. ZUSAMMEN: Die Schulternaht zusammennähen. Die Ärmelnaht zusammennähen und die Ärmel einnähen. HÄKELKANTE: Am Ärmel und am Vorder- und Rückenteil mit Muskat auf Nadel Nr. 4 eine Kante häkeln: 1. R.: 1 fM in die erste M., * 4 Lm, 2 M. überspringen, 1 fM in die nächste M. *, von *-* wiederholen und mit 1 Kettm in die erste fM abschliessen. 2. R.: Kettm bis in die Mitte des ersten Lm-Bogens, 1 fM in den Lm-Bogen, * 2 Lm, 1 fM in den nächsten Lm-Bogen, 5 Lm, 1 fM in den nächsten Lm-Bogen *, von *-* wiederholen und mit 1 Kettm in die erste Fm abschliessen. 3. R.: In jeden der grossen Lm-Bogen: 1 fM, 5 Stb und 1 fM, in die kleinen Lm-Bogen fM, nach dem letzten grossen Lm-Bogen 3 Lm. Rund um den Hals mit Muskat auf Nadel Nr. 4 – hinten in der Mitte anfangen: 1 fM in die erste M., * 1 Picot (= 4 Lm, 1 Stb in die erste Lm), ca. 1½ cm überspringen, 1 fM in die nächste M. *, von *-* wiederholen und mit 1 Kettm in die erste fM abschliessen. |
||||||||||||||||
Erklärungen zum Diagramm |
||||||||||||||||
|
||||||||||||||||
 |
||||||||||||||||
 |
||||||||||||||||
Haben Sie diese Anleitung nachgearbeitet?Dann taggen Sie Ihre Fotos mit #dropspattern #endlesssummerdress oder schicken Sie sie an die #dropsfan Galerie Brauchen Sie Hilfe bei dieser Anleitung?Sie finden 27 Videotutorials, einen Kommentar/Fragen-Bereich und vieles mehr, wenn sie die Anleitung bei garnstudio.com aufrufen. © 1982-2026 DROPS Design A/S. Wir besitzen alle Rechte. Dieses Dokument, einschließlich aller Untersektionen, hat Urheberrechte. Mehr dazu, was Sie mit unseren Anleitungen machen können, finden Sie ganz unten auf der Seite zu jeder Anleitung. |
||||||||||||||||


Mit über 40 Jahren Tätigkeit im Entwerfen von Strick- und Häkelmustern bietet Ihnen DROPS Design eine der umfangreichsten Sammlungen von kostenlosen Anleitungen im Internet - in 17 Sprachen übersetzt. Zum jetzigen Zeitpunkt haben wir insgesamt 324 Handarbeitshefte und 12290 Anleitungen auf Deutsch. 12202
Unser Ziel ist es, Ihnen die besten Angebote zum Stricken und Häkeln, Inspirationen und Ratschläge sowie qualitativ hochstehende Garne zu unglaublichen Preisen zu bieten! Möchten Sie unsere Anleitungen nicht nur für den persönlichen Gebrauch nutzen? Unsere Copyright Bedingungen finden Sie bei allen unseren Anleitungen ganz unten auf der jeweiligen Seite. Viel Spaß beim Handarbeiten!
Kommentieren Sie die Anleitung DROPS 111-4
Wir würden gerne Ihre Meinung zu diesem Modell erfahren!
Wenn Sie eine Frage stellen möchten, prüfen Sie bitte, dass Sie die richtige Kategorie im unten stehenden Formular gewählt haben - so bekommen Sie schneller eine Antwort. Die obligatorischen Felder sind mit einem * gekennzeichnet.