DROPS Air
DROPS Air
65% Alpaca, 28% Polyamide, 7% Wool
from 4.80 £ /50g
Get the yarn to make this pattern from 48.00£.

The yarn cost is calculated from the pattern’s smallest size and the yarn’s cheapest product type. Looking for an even better price? You might find it on the DROPS Deals!

DROPS SS24

Mistletoe Kisses

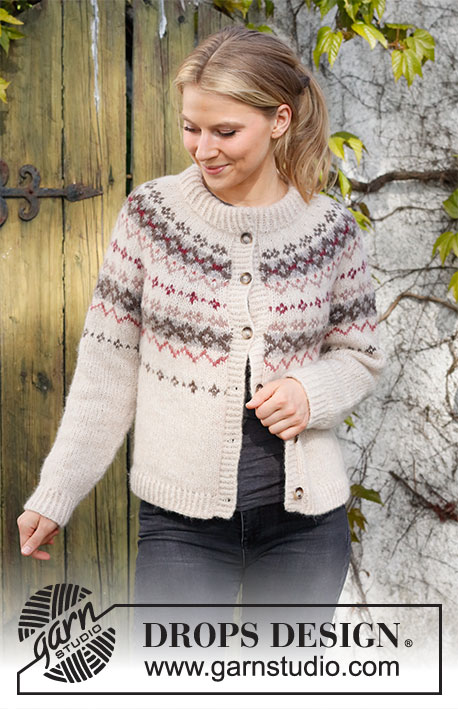
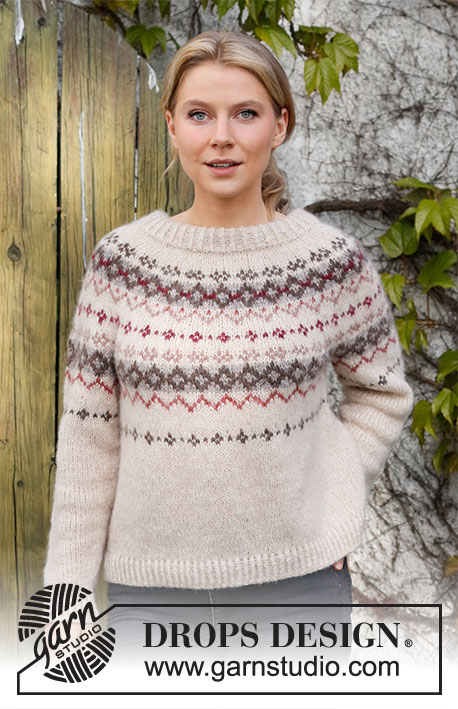
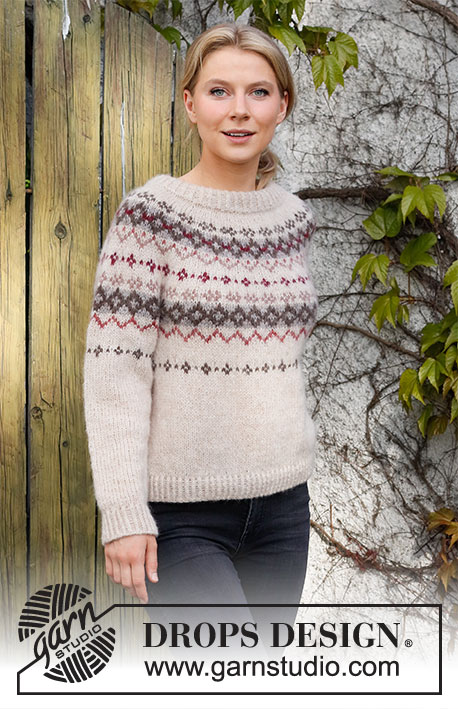
Knitted jumper in DROPS Air. The piece is worked top down with round yoke, Nordic pattern and double neck. Sizes S - XXXL.

DROPS 217-7
DROPS Design: Pattern no ai-312
Yarn group C or A + A
-------------------------------------------------------

SIZES: 
S - M - L - XL - XXL - XXXL

MATERIALS: 
DROPS AIR from Garnstudio (belongs to yarn group C)
250-250-300-300-350-350 g colour 02, wheat
50-50-50-50-50-50 g colour 05, brown
50-50-50-50-50-50 g colour 26, beige
50-50-50-50-50-50 g colour 07, ruby red
50-50-50-50-50-50 g colour 28, red brick
50-50-50-50-50-50 g colour 29, old pink

KNITTING TENSION:
16 stitches in width and 20 rows in height with stocking stitch/Nordic pattern = 10 x 10 cm.

NEEDLES:
DROPS DOUBLE POINTED NEEDLES SIZE 5.5 MM.
DROPS CIRCULAR NEEDLE SIZE 5.5 MM: Length 40 cm and 80 cm for stocking stitch/Nordic pattern.
DROPS DOUBLE POINTED NEEDLES SIZE 4.5 MM.
DROPS CIRCULAR NEEDLE SIZE 4.5 MM: Length 40 cm and 80 cm for rib.
Needle size is only a guide. If you get too many stitches on 10 cm, change to a larger needle size. If you get too few stitches on 10 cm, change to a smaller needle size.

-------------------------------------------------------

Alternative Yarn – See how to change yarns here
Yarn Groups A to F – Use the same pattern and change the yarn here
Yarn usage using an alternative yarn – Use our yarn converter here

-------------------------------------------------------

DROPS Air
DROPS Air
65% Alpaca, 28% Polyamide, 7% Wool
from 4.80 £ /50g
Get the yarn to make this pattern from 48.00£.

The yarn cost is calculated from the pattern’s smallest size and the yarn’s cheapest product type. Looking for an even better price? You might find it on the DROPS Deals!

Pattern instructions

NOTE: This pattern is written in British English. All measurements in charts are in cm. For conversion from cm to inches - click here. There are different terms for crocheting in British and American English. If this pattern includes crochet, click for "crochet terms" here. For this pattern in American English, please click here.
-------------------------------------------------------

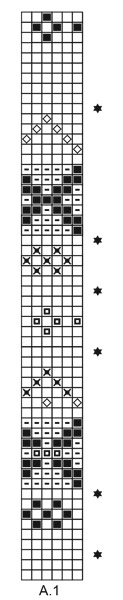
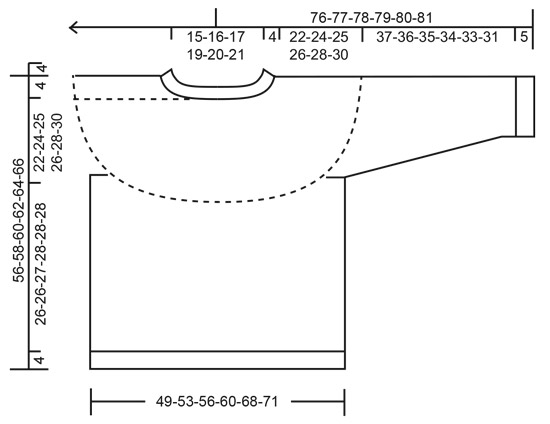
EXPLANATIONS FOR THE PATTERN:

-------------------------------------------------------

PATTERN: 
See diagram A.1. The whole pattern is worked in stocking stitch

KNITTING TIP:
To avoid the knitting tension becoming tighter when working pattern, it is important that the strands at the back are not tight. Use a size larger needle when working pattern if this is a problem.
If the knitting tension is not correct in height and you work too tightly, the garment will be short and the armholes too small – you can correct for this by regularly working an extra row in the 1-coloured sections.
If you work loosely, the garment will be too long and the armholes too big – you can correct for this by regularly working 1 round less in the 1-coloured sections.

INCREASE TIP (evenly spaced):
To work out how to increase evenly, count the total number of stitches on the needle (e.g. 80 stitches) and divide by the number of increases to be made (e.g. 22) = 3.6. 
In this example, increase by making 1 yarn over after alternately each 3rd and 4th stitch. On the next round knit the yarn overs twisted to avoid holes.

DECREASE TIP (for sleeves): 
Decrease 1 stitch on either side of the marker thread as follows: Work until there are 3 stitches left before the marker thread, knit 2 together, knit 2 (marker thread sits between these 2 stitches), slip 1 stitch as if to knit, knit 1 and pass the slipped stitch over the knitted stitch.

CASTING-OFF TIP:
To avoid the cast-off edge being tight you can cast off with a larger size needle. If the edge is still tight, make 1 yarn over after approx. each 4th stitch at the same time as casting off; the yarn overs are cast off as normal stitches.

-------------------------------------------------------

START THE PIECE HERE:

-------------------------------------------------------

JUMPER – SHORT OVERVIEW OF THE PIECE:
The neck and yoke are worked in the round with circular needle, top down from the transition between left sleeve and the back piece. The yoke is divided for body and sleeves and the body continued in the round with circular needle. The sleeves are worked in the round with short circular needle/double pointed needles, top down.

DOUBLE NECK:
Cast on 80-84-88-94-96-102 stitches with circular needle size 4.5 mm and wheat. Knit 1 round, then work rib (= knit 1 twisted, purl 1) in the round for 9 cm. 
When the rib is finished, knit 1 round where you increase 22-24-26-26-30-36 stitches evenly spaced – read INCREASE TIP = 102-108-114-120-126-138 stitches. 
Change to circular needle size 5.5 mm and insert 1 marker at the beginning of the round; the yoke is measured from this marker!

YOKE:
Work A.1 (= 6 stitches) a total of 17-18-19-20-21-23 times on the round – remember KNITTING TIP. On the rounds with stars increase as follows – remember INCREASE TIP:
Star-1: Increase 24-30-30-30-30-36 stitches evenly spaced = 126-138-144-150-156-174 stitches.
Star-2: Increase 30-30-30-30-30-30 stitches evenly spaced = 156-168-174-180-186-204 stitches.
Star-3: Increase 30-30-30-30-30-30 stitches evenly spaced = 186-198-204-210-216-234 stitches.
Star-4: Increase 30-36-30-30-30-30 stitches evenly spaced = 216-234-234-240-246-264 stitches.
Star-5: Increase 24-30-30-30-30-36 stitches evenly spaced = 240-264-264-270-276-300 stitches.
Sizes S and M are now finished with increases. Go to All sizes below. Sizes L, XL, XXL and XXXL continue to:
Star-6: Increase 24-18-36-36 stitches evenly spaced = 288-288-312-336 stitches.

All sizes:
Continue with pattern until the piece measures 22-24-25-26-28-30 cm from the marker on the neck. 
Continue the pattern on the next round as follows: Work the first 72-78-84-84-96-102 stitches (= back piece), place the next 48-54-60-60-60-66 stitches on a thread for the sleeve and cast on 6-6-6-12-12-12 new stitches (in side under the sleeve), work the next 72-78-84-84-96-102 stitches (= front piece), place the next 48-54-60-60-60-66 stitches on a thread for the sleeve and cast on 6-6-6-12-12-12 new stitches (in side under the sleeve). 
Body and sleeves are finished separately. THE PIECE IS NOW MEASURED FROM HERE!

BODY:
= 156-168-180-192-216-228 stitches. Continue in the round until A.1 has been completed then continue with wheat to finished length. When the piece measures 26-26-27-28-28-28 cm from the division, knit 1 round where you increase 28-30-32-32-36-38 stitches evenly spaced = 184-198-212-224-252-266 stitches. Change to circular needle size 4.5 mm and work rib (= knit 1 twisted, purl 1) for 4 cm. Cast off with knit over knit and purl over purl - read CASTING-OFF TIP.
The jumper measures approx. 56-58-60-62-64-66 cm from the shoulder down. 

SLEEVE:
Place the 48-54-60-60-60-66 stitches from the thread on the one side of the piece on short circular needle/double pointed needles size 5.5 mm and knit up 1 stitch in each of the 6-6-6-12-12-12stitches cast on under the sleeve = 54-60-66-72-72-78 stitches. Insert a marker thread in the middle of the 6-6-6-12-12-12 stitches under the sleeve (3-3-3-6-6-6 stitches on each side of the thread). Continue in the round with pattern in the same way as on the body – the pattern will not fit under the sleeve. When the sleeve measures 5-3-3-3-3-3 cm from the division, decrease 1 stitch on each side of the marker thread - read DECREASE TIP. Decrease like this every 3½-3-2½-2-2-1½ cm a total of 9-11-13-15-14-17 times = 36-38-40-42-44-44 stitches. Continue working until the sleeve measures 37-36-35-34-33-31 cm (shorter measurements in larger sizes due to longer yoke), knit 1 round where you increase 6-6-6-6-8-8 stitches evenly spaced = 42-44-46-48-52-52 stitches. Change to double pointed needles size 4.5 mm and work rib (= knit 1 twisted, purl 1) for 5 cm. Cast off with knit over knit and purl over purl – remember CASTING-OFF TIP. Work the other sleeve in the same way. 

ASSEMBLY:
Fold the top of the neck to the wrong side and fasten down. To avoid the neck being tight and rolling outwards, it is important that the seam is elastic.

Diagram

symbols = wheat
symbols = beige
symbols = old pink
symbols = brown
symbols = red brick
symbols = ruby red
symbols = star = increase-round – read description in text
diagram
diagram

Each of our patterns has specific tutorial videos to help you.

Do you have a question? See a list of frequently asked questions (FAQ)

Knitting tension is what determines the final measurements of your work, and is usually measured per 10 x 10 cm. It is provided like so: number of stitches in width x number of rows in height - eg: 19 stitches x 26 rows = 10 x 10 cm.

The knitting tension is very individual; some people knit/crochet loosely while others work tightly. You adjust the knitting tension with the needle size, which is why the suggested needle size is only meant as a guide! You need to adjust this (up or down) to ensure that YOUR knitting tension matches the knitting tension provided in the pattern. If you work with a different knitting tension than provided you will have a different yarn consumption, and your work will have different measurements than what the pattern suggests.

The knitting tension also determines which yarns can replace each other. As long as you achieve the same knitting tension you can replace one yarn with another.

See DROPS lesson: How to measure your tension/gauge

See DROPS video: How to make a gauge tension swatch

The required amount of yarn is provided in grams, eg: 450 g. To calculate how many balls you’ll need you first need to know how many grams are in 1 ball (25g, 50g or 100g). This information is available if you click on the individual yarn quality on our pages. Divide the amount required with the amount of each ball. For example, if each ball is 50g (the most common amount), the calculation will be as follows: 450 / 50 = 9 balls.

The important thing when changing from one yarn to another is that the knitting/crochet tension remains the same. This is so that the measurements of the finished piece will be the same as on the sketch provided. It is easier to achieve the same knitting tension using yarns from the same yarn group. It is also possible to work with multiple strands of a thinner yarn to achieve the knitting tension of a thicker one. Please try our yarn converter. We recommend you to always work a test swatch.

Please NOTE: when changing yarn the garment might have a different look and feel to the garment in the photo, due to individual properties and qualities of each yarn.

See DROPS lesson: Can I use a different yarn than the one mentioned in the pattern?

All our yarns are categorised into yarn groups (from A to F) according to thickness and knitting tension – group A contains the thinnest yarns and group F the thickest. This makes it easier for you to find alternative yarns to our patterns, should you wish to switch yarn. All yarns within the same group have a similar knitting tension and can easily replace each other. However, different yarn qualities have different structures and properties which will give the finished work a unique look and feel.

Click here for an overview of the yarns in each yarn group

At the top of all our patterns you’ll find a link to our yarn calculator, which is a helpful tool should you wish to use a different yarn than suggested. By filling in the yarn quality you wish to replace, the amount (in your size) and number of strands, the calculator will present good alternative yarns with the same knitting tension. Additionally it will tell you how much you’ll require in the new qualities and whether you’ll need to work with multiple strands. Most skeins are 50g (some are 25g or 100g).

If the pattern is worked with multiple colours, every colour will have to be calculated separately. Similarly, if the pattern is worked with several strands of different yarns (for example 1 strand Alpaca and 1 strand Kid-Silk) you will have to find alternatives for each, individually.

Click here to see our yarn calculator

Since different yarns have different qualities and textures we have chosen to keep the original yarn in our patterns. However, you can easily find options among our available qualities by using our yarn calculator, or simply pick a yarn from the same yarn group.

It is possible that some retailers still have discontinued yarns in stock, or that someone has a few skeins at home that they would like to find patterns for.

The yarn calculator will provide both alternative yarn as well as required amount in the new quality.

If you think it's hard to decide what size to make, it can be a good idea to measure a garment you own already and like the size of. Then you can pick the size by comparing those measures with the ones available in the pattern's size chart.

You'll find the size chart at the bottom of the pattern.

See DROPS lesson: How to read size chart

The needle size provided in the pattern serves only as a guide, the important thing is to follow the knitting tension. And since knitting tension is very individual, you will have to adjust the needle size to ensure that YOUR tension is the same as in the pattern – maybe you’ll have to adjust 1, or even 2 needle sizes, up or down to achieve the correct tension. For this, we recommend that you work test swatches.

Should you work with a different knitting tension than the one provided, the measurements of the finished garment might deviate from the measurement sketch.

See DROPS lesson: How to measure your tension/gauge

See DROPS video: How to make a tension/gauge swatch

Working a garment top-down provides more flexibility and room for personal adjustment. For example it is easier to try the garment on while working, as well as making adjustments to length of yoke and shoulder caps.

The instructions are carefully explaining every step, in the correct order. Diagrams are adjusted to the knitting direction and are worked as usual.

The diagram depicts all rows/rounds, and every stitch seen from the right side. It is read from bottom to top, from right to left. 1 square = 1 stitch.

When working back and forth, every other row is worked from the right side and every other row is worked from the wrong side. When working from the wrong side, the diagram will have to be worked reversed: from left to right, knit stitches are purled, purl stitches are knit etc.

When working in the round every round is worked from the right side and the diagram are worked from right to left on all rounds.

See DROPS lesson: How to read knitting diagrams

The diagram depicts all rows/rounds, and every stitch seen from the right side. It is worked from bottom to top, from right to left.

When working back and forth every other row is worked from the right side: from right to left and every other row is worked from the wrong side: from left to right.

When working in the round, every row in the diagram are worked from the right side, from right to left.

When working a circular diagram you start in the middle and work your way outwards, counter clockwise, row by row.

The rows usually start with a given number of chain stitches (equivalent to the height of the following stitch), this will either be depicted in the diagram or explained in the pattern.

See DROPS lesson: How to read crochet diagrams

Instructions for working several diagrams after each other on the same row/round, will often be written like so: “work A.1, A.2, A.3 a total of 0-0-2-3-4 times". This means you work A.1 once, then A.2 is worked once, and A.3 is repeated (in width) the number of times provided for your size – in this case like so: S = 0 times, M = 0 times, L=2 times, XL= 3 times and XXL = 4 times.

The diagrams are worked as usual: begin with the first row in A.1, then work the first row in A.2 etc.

See DROPS lesson: How to read knitting diagrams

See DROPS lesson: How to read crochet diagrams

The total width of the garment (from wrist-to-wrist) will be larger in the larger sizes, despite the actual sleeves being shorter. The larger sizes have longer sleeve caps and wider shoulders, so there will be a good fit in all sizes.

The measurement sketch/schematic drawing provides information regarding the full length of the garment. If it’s a jumper or a jacket the length is measured from the highest point on the shoulder closest to the neckline, and straight down to the bottom of the garment. It is NOT measured from the tip of shoulder. Similarly, the length of yoke is measured from the highest point on the shoulder and down to where yoke is split into body and sleeves.

On a jacket measures are never taken along bands, unless specifically stated. Always measure inside band stitches when measuring the length.

See DROPS lesson: How to read a schematic drawing

Diagrams are often repeated on the round or in height. 1 repeat is the diagram the way it appears in the pattern. If it says to work 5 repeats of A.1 in the round, then you work A.1 a total of 5 times after/next to each other in the round. If it says to work 2 repeats of A.1 vertically/in height you work the entire diagram once, then begin again at the start and work the entire diagram one more time.

Chain stitches are slightly narrower than other stitches and to avoid working the cast-on edge too tight, we simply chain more stitches to begin with. The stitch count will be adjusted on the following row to fit the pattern and measurement sketch.

The rib edge is more elastic and will contract slightly compared to, for example, stocking stitch. By increasing before the rib edge, you avoid a visible difference in width between the rib edge and the rest of the body.

It’s very easy to cast off too tightly, and by making yarn overs while casting off (and simultaneously casting these off) you avoid a too tight cast off edge.

See DROPS video: How to bind off with yarn overs (yo)

To achieve an even increase (or decrease) you can increase on, for example: every 3rd and 4th row alternately, like so: work 2 rows and increase on the 3rd row, work 3 rows and increase on the 4th. Repeat this until the increase is complete.

See DROPS lesson: Increase or decrease 1 st on every 3rd and 4th row alternately

Should you prefer to work in the round instead of back and forth, you may of course adjust the pattern. You’ll need to add steeks mid-front (usually 5 stitches), and follow the instructions. When you would normally turn and work from the wrong side, simply work across the steek and continue in the round. At the end you’ll cut the piece open, pick up stitches to work bands, and cover the cut edges.

See DROPS video: How to knit steeks and cut open

Should you prefer to work back and forth instead of in the round, you may of course adjust the pattern so you work the pieces separately and then assemble them at the end. Divide the stitches for the body in 2, add 1 edge stitch in each side (for sewing) and work the front and back pieces separately.

See DROPS lesson: Can I adapt a pattern for circular needles into straight needles?

Pattern repeats can vary slightly in the different sizes, in order to get the correct proportions. If you’re not working the exact same size as the garment in the photo, yours might deviate slightly. This has been carefully developed and adjusted so that the complete impression of the garment is the same in all sizes.

Make sure to follow instructions and diagrams for your size!

If you have found a pattern you like which is available in women’s size it’s not very difficult to convert it to men’s size. The biggest difference will be the length of sleeves and body. Start working on the women size that you think would fit across the chest. The additional length will be worked right before you cast off for the armhole/sleeve cap. If the pattern is worked top-down you can add the length right after the armhole or before the first decrease on sleeve.

Regarding additional yarn amount, this will depend on how much length you add, but it is better with a skein too many than too few.

All yarns will have excess fibres (from production) that might come off as lint or shedding. Brushed yarns (ie hairier yarns) have more of these loose, excess fibres, causing more shedding.

Shedding also depends on what is worn under or over the garment, and whether this pulls at the yarn fibres. It’s therefore not possible to guarantee that there will be no shedding

Below are some tips on how to get the best result when working with hairier yarns:

1. When the garment is finished (before you wash it) shake it vigorously so the looser hairs come off. NOTE: do NOT use a lint roller, brush or any method that pulls at the yarn.

2. Place the garment in a plastic bag and put it in your freezer - the temperature will cause the fibres to become less attached to each other, and excess fibres will come off easier.

3. Leave in the freezer for a few hours before taking it out and shaking it again.

4. Wash the garment according to the instructions on the yarn label.

Pilling is a natural process that happens to even the most exclusive of fibers. It's a natural sign of wear and tear that is hard to avoid, and that is most visible in high friction areas of your garment like a sweater's arms and cuffs.

You can make your garment look as new by removing the pilling, using a fabric comb or a pill/lint remover.

Still can't find the answer you need? Then scroll down and leave your question so one of our experts can try to help you. This will be done normally within 5 to 10 working days.
In the meantime, you can read the questions and answers that others have left to this pattern or join the DROPS Workshop on Facebook to get help from fellow knitters/crocheters!

You might also like...

Mistletoe Kisses

Ludmila Veliksar, Germany

Post a comment to pattern DROPS 217-7

We would love to hear what you have to say about this pattern!

If you want to leave a question, please make sure you select the correct category in the form below, to speed up the answering process. Required fields are marked *.

Comments / Questions (18)

country flag Sissi wrote:

Gibt es hier keine verkürzten Reihen für den Nackenbereich. Ein Pullover sitzt doch am Körper viel angenehmer, besser mit verkürzten Reihen, oder (erhöhtem Nacken) etwa nicht? Wie könnte ich bei diesem Modell für eine bessere Passform rechnen? Liebe Grüße und vielen Dank. 🕊💫🕊

10.01.2024 - 15:00

DROPS Design answered:

Liebe Sissi, eine Erhöhung können Sie dann nach einem ähnlichen Modell (selbe Maschenprobe) stricken. Viel Spaß beim stricken!

10.01.2024 - 16:21

country flag José wrote:

Ik begrijp niet hoe je de boord breit met 1 st recht gedraaid en dan 1 averecht. Wat is gedraaid?

26.10.2023 - 08:58

DROPS Design answered:

Dag José,

Bij de lijst met video's onderaan het patroon staat ook een video over hoe je gedraaid recht breit. Hier is de link naar de video.

26.10.2023 - 19:55

country flag José Marx wrote:

Ik begrijp niet hoe je de boord breit met 1 st recht gedraaid en dan 1 averecht. Wat is gedraaid?

26.10.2023 - 08:56

country flag Müller Lu wrote:

Ich möchte diesen Pulli mit einer dünnen Alpaka Seide Wolle stricke. Wie kann ich diese Aneitung umrechnung in ein dünneres Garn.

12.03.2023 - 21:19

DROPS Design answered:

Liebe Frau Müller, leider könnnen wir nicht jede Anleitung nach jeder Maschenprobe/Anfrage anpassen, aber hier finden Sie alle unsere gestrickte nordische Pullover mit Maschenprobe 25-23 Maschen, sicher kann Ihnen davon inspirieren. Viel Spaß beim stricken!

13.03.2023 - 10:22

country flag Ana Alves wrote:

I wish to make this pullover from bottom to top and I am using more colors, is it still possible to keep it without seams or hole marks around shoulders and breast? Would you be so kind to guide me to a design where I may learn how to do it? Thank you

03.03.2023 - 10:53

DROPS Design answered:

Bom dia, É possível tricotar de baixo para cima, em redondo, mas deverá fazer os cálculos por si mesma, ou seja, inverter todos os números de malhass, de aumentos/diminuições. Pode também pesquisar na home page do nosso site por modelos em redondo, com encaixe arredondado. que se tricotem de baixo para cima e encontrará outros modelos com jacquard..:-) Bons tricôs!

03.03.2023 - 11:23

country flag Jette Larsen wrote:

Der står i opskrift, at jeg skal tage ud 5 gange på bærestykket, men der i diagram sat 6 mærker af til udtagning. Hvilket af de 2 er korrekt🤔

20.02.2023 - 07:06

DROPS Design answered:

Hej Jette, det kommer an på hvilken størrelse du strikker :)

23.02.2023 - 15:09

country flag Eva wrote:

Hei, holder på å strikke denne genseren. Men når jeg strikker på Bolen under armene står det i oppskriften - strikk til arbeidet møller 28 cm før du skal øke med et antall masker(i min str. 32 masker) ER dette rett? Dette vil da si att økningen kommer langt ned. Ev (

13.02.2023 - 12:20

DROPS Design answered:

Hei Eva. I denne oppskriften er det ingen økninger under ermene, men du øker masker i siste omgang før vrangborden. Dette gjøres for å få en penere overgang mellom bol og vrangbord. Så oppskriften stemmer :) mvh DROPS Design

13.02.2023 - 14:16

country flag Wendy Annette Thomassen wrote:

Jeg har strikket den fine sweater, i drops Air. Jeg syndes at den er blevet bredere i omkreds, og derfor lidt for kort. Nu vil jeg strikke en mere i perlegrå, og må så tage lidt ind i omkredsen. Jeg kan ikke forstå hvorfor man skal tage ud, lige før ribben skal strikkes forneden. I butikken hvor jeg købte garnet, siger de at der skal blandes en tråd i, for ellers holder den ikke faconen. Er det rigtigt, og hvad tråd er det? Tak

18.09.2022 - 22:16

DROPS Design answered:

Hej Wendy, nej det stemmer ikke! Blusen er strikket i 1 tråd DROPS Air. Lav en strikkeprøve, du skal have 16 masker på 10 cm for at få målene som du finder i måleskitsen nederst i opskriften. :)

20.09.2022 - 14:46

country flag Linda Bjelkeflo wrote:

Jättefin tröja! Jag skulle vilja göra den i andra färger med Drop Air Beige mix 26 som bottenfärg istället för vete, sen vill jag ha mönstret i blå färger istället för röda nyanser, vilka blå färger skulle ni rekommendera att jag byter ut brun, beige, rubinröd, röd tegelsten och gammelrosa till?

31.03.2022 - 16:34

DROPS Design answered:

Hei Linda. Å gi andre fargevalg er vanskelig siden det er så personlig. Men kanskje beholde bruntonene/bytte 26 med 35. Og så bytte de 3 rødlige fargene med blålige farger. Bytt den mørkeste rød til en mørk blå, mellomste rødlig til en mellomst blålig osv. Men pass på at det er noen blåfarger DU syns passer sammen. mvh DROPS Design

04.04.2022 - 13:45

country flag Lise wrote:

This is a wonderful pattern, however note that I needed 300g of the basic color for Size M. Thank you!

05.02.2022 - 12:05