DROPS Safran
DROPS Safran
100% Cotton
from 1.45 $ /50g
Get the yarn to make this pattern from 4.35$.

The yarn cost is calculated from the pattern’s smallest size and the yarn’s cheapest product type. Looking for an even better price? You might find it on the DROPS Deals!

DROPS Super Sale

Strawberry Summer

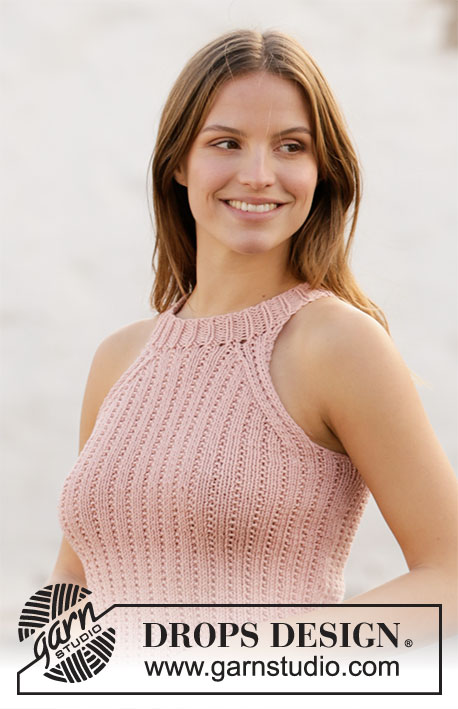
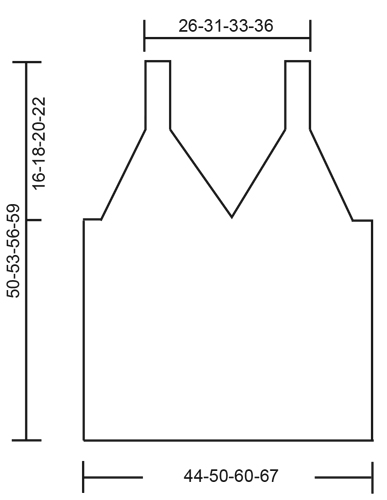
Knitted top in DROPS Safran. Piece is knitted bottom up with rib. Size: S - XXXL

DROPS 211-18
DROPS design: Pattern e-302
Yarn group A
----------------------------------------------------------

SIZE:
S - M/L - XL/XXL – XXXL

Finished measurements:
Chest measurements: 88-100-120-134 cm = 34 5/8”-39 3/8”-47 1/4”-52 3/4”
Full length: 50-53-56-59 cm = 19 3/4”-21”-22”-23 1/4”

All measurements in charts are in cm.
Measurements on chart show garment stretched, the top is more narrow because of pattern.

MATERIALS:
DROPS SAFRAN from Garnstudio (belongs to yarn group A)
150-200-250-250 g color 57, mauve

KNITTING GAUGE:
24 stitches in width and 32 rows vertically in stockinette stitch = 10 x 10 cm = 4” x 4”.

NEEDLES:
DROPS CIRCULAR NEEDLE SIZE 3 mm = US 2,5: Length 60 or 80 cm = 24” and 32” for rib.
Needle size is only a suggestion! If you have too many stitches on 10 cm = 4” switch to a larger needle size. If you have too few stitches on 10 cm = 4” switch to a smaller needle size.

-------------------------------------------------------

Alternative Yarn – See how to change yarns here
Yarn Groups A to F – Use the same pattern and change the yarn here
Yarn usage using an alternative yarn – Use our yarn converter here

-------------------------------------------------------

DROPS Safran
DROPS Safran
100% Cotton
from 1.45 $ /50g
Get the yarn to make this pattern from 4.35$.

The yarn cost is calculated from the pattern’s smallest size and the yarn’s cheapest product type. Looking for an even better price? You might find it on the DROPS Deals!

DROPS Super Sale

SAVE 30% on 6 cotton favorites!
Valid until 04.12.2024

Pattern instructions

NOTE: This pattern is written in American English. All measurements in charts are in cm. For conversion from inches to cm - click here. There are different terms for crocheting in American and British English. If this pattern includes crochet, click for "crochet terms" here. For this pattern in British English, please click here.
----------------------------------------------------------

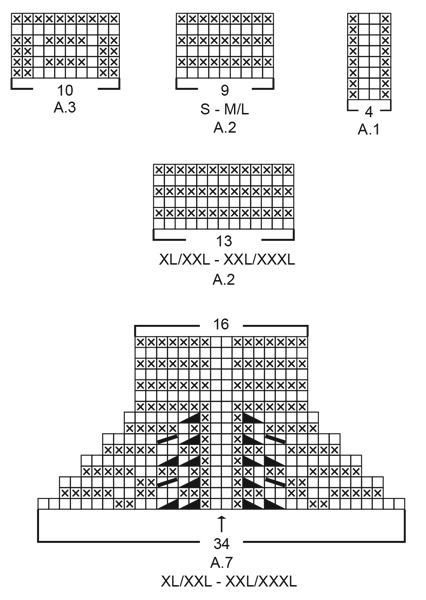
EXPLANATION FOR THE PATTERN:

----------------------------------------------------------

GARTER STITCH (back and forth):
Knit all rows.
1 ridge vertically = knit 2 rows.

PATTERN:
See diagrams A.1 to A.7. Choose diagram for your size (applies to A.2 and A.7). Diagrams show all rows in pattern seen from the right side.

----------------------------------------------------------

START THE PIECE HERE:

----------------------------------------------------------

TOP - SHORT OVERVIEW OF THE PIECE:
Work body in the round on circular needle, from the bottom and up to armholes. Then work back piece and the 2 front pieces separately, back and forth on circular needle until finished measurements. Straps on front piece are fastened to back piece.

BODY:
Cast on 224-256-304-336 stitches on circular needle size 3 mm = US 2,5 with Safran. Work A.1 in the round – insert at the same time 1 marker thread at the beginning of round (= left side when garments is worn), and 1 marker thread after 112-128-152-168 stitches (= right side when garment is worn). Both marker threads is between 2 purl stitches. Move the marker thread upwards when working. REMEMBER THE KNITTING GAUGE!
When piece measures 33-34-35-36 cm = 13”-13 3/8”-13 3/4”-14 1/4”, work next round as follows (approx. 1 cm = 3/8” remains until piece is divided mid front, and decrease for armholes):
Work A.2 (= 9-9-13-13 stitches), continue A.1 over the next 42-50-58-66 stitches, work A.3 (= 10 stitches mid front), continue A.1 over the next 42-50-58-66 stitches), work A.2 over the next 18-18-26-26 stitches (= 2 repetitions of 9-9-13-13 stitches – marker thread is between these 2 repetitions), continue A.1 over the next 94-110-126-142 stitches (= back piece), and work A.2 over the remaining 9-9-13-13 stitches. Continue pattern like this until A.2 and A.3 have been worked vertically.
On next round bind off for armholes, i.e. work next round as follows: Bind off 4-4-8-8 stitches for armhole, work 5 stitches in GARTER STITCH – read explanation above, continue A.1 over the next 42-50-58-66 stitches, work 10 stitches in garter stitch (= mid front), continue A.1 over the next 42-50-58-66 stitches, work 5 stitches in garter stitch, bind off 8-8-16-16 stitches for armhole, work 5 stitches in garter stitch, continue A.1 over the next 94-110-126-142 stitches, work 5 stitches in garter stitch, and bind off the remaining 4-4-8-8 stitches for armhole. Cut the yarn. Finish back piece and front pieces separately.

BACK PIECE:
= 104-120-136-152 stitches. Begin from wrong side and work 1 row in rib as before with 5 edge stitches in garter stitch in each side.
Continue to work in rib with 5 edge stitches in garter stitch in each side while AT THE SAME TIME decreasing for armholes on every row from right side as explained below. I.e. work first row from right side as follows: Work A.4 (= 13 stitches), continue rib as before until 13 stitches remain on row, finish with A.5 (= 13 stitches).
Continue pattern like this until A.4 and A.5 have been worked 4-4-5-6 times in total vertically (= 16-16-20-24 stitches decreased in each side) = 72-88-96-104 stitches remain.
Work 3 ridges back and forth over all stitches. Bind off - make sure that the bind-off edge is not too tight. Back piece measures approx. 11-11-14-16 cm = 4 3/8”-4 3/8”-5 1/2”-6 1/4” from where piece was divided for front piece and bac piece.

FRONT PIECE:
= 104-120-136-152 stitches. Divide the piece mid front and slip half the stitches on 1 stitch holder or extra needle. Then work first part as explained below.

PART-1:
= 52-60-68-76 stitches. Begin from wrong side and work 1 row in rib as before with 5 edge stitches in garter stitch in each side.
Insert 1 marker between the 2 middle stitches on row (= between 2 knit stitch seen from right side). Marker indicates the middle.
Continue to work in rib with 5 edge stitches in garter stitch in each side while at the same time decreasing on each side of the middle as explained below. I.e. work first row from right side as follows: 5 edge stitches in garter stitch, work rib as before until 7 stitches remain before marker, work A.6 (= 14 stitches), work rib as before until 5 stitches remain on row, and finish with 5 edge stitches in garter stitch. Continue pattern like this, and repeat A.6 vertically until 34 stitches remain on row – finish after 1 row from wrong side.
Now work A.7 over these 34 stitches. When A.7 has been worked, 12-12-16-16 stitches remain on needle for strap, and front piece measures approx. 11-13-16-18 cm = 4 3/8”-5 1/8”-6 1/4”-7” from where piece was divided for front and back piece. Work strap as explained below.

STRAP:
= 12-12-16-16 stitches. Work in garter stitch back and forth until the strap measures approx. 10-12-10-10 cm = 4”-4 3/4”-4”-4” – try the top on and work to desired length, strap should continue over the shoulder and down to back piece. Bind off.

PART-2:
Slip the 52-60-68-76 stitches from stitch holder or extra needle back on circular needle size 3 mm = US 2,5, and work part-2 the same way as part-1. Then work strap the same way as on part-1. Bind off.

ASSEMBLY:
Fasten straps to back piece - begin at the edge in each side and sew stitch too stitch. Cut and fasten the thread.

Diagram

All measurements in charts are in cm.

symbols = knit from the right side, purl from the wrong side
symbols = purl from the right side, knit from the wrong side
symbols = purl 2 twisted together
symbols = purl 2 together
symbols = knit 2 together
symbols = slip 1 stitch knitwise, knit 1, pass slipped stitch over stitch worked
symbols = marker is between 2 knit stitches (seen from right side)
diagram
diagram
diagram
Do you have a question? See a list of frequently asked questions (FAQ)

Knitting tension is what determines the final measurements of your work, and is usually measured per 10 x 10 cm. It is provided like so: number of stitches in width x number of rows in height - eg: 19 stitches x 26 rows = 10 x 10 cm.

The knitting tension is very individual; some people knit/crochet loosely while others work tightly. You adjust the knitting tension with the needle size, which is why the suggested needle size only serve as a guide! You need to adjust this (up or down) to ensure that YOUR knitting tension matches the knitting tension provided in the pattern. If you work with a different knitting tension than provided you will have a different yarn consumption, and your work will have different measurements than what the pattern suggests.

The knitting tension also determines which yarns can replace each other. As long as you achieve the same knitting tension you can replace one yarn with another.

See DROPS lesson: How to measure your tension/gauge

See DROPS video: How to make a gauge tension swatch

The required amount of yarn is provided in grams, eg: 450 g. To calculate how many balls you’ll need you first need to know how many grams are in 1 ball (25g, 50g or 100g). This information is available if you click on the individual yarn quality on our pages. Divide the amount required with the amount of each ball. For example, if each ball is 50g (the most common amount), the calculation will be as follows: 450 / 50 = 9 balls.

The important thing when changing from one yarn to another is that the knitting/crochet tension remains the same. This is so that the measurements of the finished piece will be the same as on the sketch provided. It is easier to achieve the same knitting tension using yarns from the same yarn group. It is also possible to work with multiple strands of a thinner yarn to achieve the knitting tension of a thicker one. Please try our yarn converter. We recommend you to always work a test swatch.

Please NOTE: when changing yarn the garment might have a different look and feel to the garment in the photo, due to individual properties and qualities of each yarn.

See DROPS lesson: Can I use a different yarn than the one mentioned in the pattern?

All our yarns are categorised into yarn groups (from A to F) according to thickness and knitting tension – group A contains the thinnest yarns and group F the thickest. This makes it easier for you to find alternative yarns to our patterns, should you wish to switch yarn. All yarns within the same group have a similar knitting tension and can easily replace each other. However, different yarn qualities have different structures and properties which will give the finished work a unique look and feel.

Click here for an overview of the yarns in each yarn group

At the top of all our patterns you’ll find a link to our yarn converter, which is a helpful tool should you wish to use a different yarn than suggested. By filling in the yarn quality you wish to replace, the amount (in your size) and number of strands, the converter will present good alternative yarns with the same knitting tension. Additionally it will tell you how much you’ll require in the new qualities and whether you’ll need to work with multiple strands. Most skeins are 50g (some are 25g or 100g).

If the pattern is worked with multiple colours, every colour will have to be converted separately. Similarly, if the pattern is worked with several strands of different yarns (for example 1 strand Alpaca and 1 strand Kid-Silk) you will have to find alternatives for each, individually.

Click here to see our yarn converter

Since different yarns have different qualities and textures we have chosen to keep the original yarn in our patterns. However, you can easily find options among our available qualities by using our yarn converter, or simply pick a yarn from the same yarn group.

It is possible that some retailers still have discontinued yarns in stock, or that someone has a few skeins at home that they would like to find patterns for.

The yarn converter will provide both alternative yarn as well as required amount in the new quality.

If you think it's hard to decide what size to make, it can be a good idea to measure a garment you own already and like the size of. Then you can pick the size by comparing those measures with the ones available in the pattern's size chart.

You'll find the size chart at the bottom of the pattern.

See DROPS lesson: How to read size chart

The needle size provided in the pattern serves only as a guide, the important thing is to follow the knitting tension. And since knitting tension is very individual, you will have to adjust the needle size to ensure that YOUR tension is the same as in the pattern – maybe you’ll have to adjust 1, or even 2 needle sizes, up or down to achieve the correct tension. For this, we recommend that you work test swatches.

Should you work with a different knitting tension than the one provided, the measurements of the finished garment might deviate from the measurement sketch.

See DROPS lesson: How to measure your tension/gauge

See DROPS video: How to make a gauge tension swatch

Working a garment top-down provides more flexibility and room for personal adjustment. For example it is easier to try the garment on while working, as well as making adjustments to length of yoke and shoulder caps.

The instructions are carefully explaining every step, in the correct order. Diagrams are adjusted to the knitting direction and are worked as usual.

The diagram depicts all rows/rounds, and every stitch seen from the right side. It is read from bottom to top, from right to left. 1 square = 1 stitch.

When working back and forth, every other row is worked from the right side and every other row is worked from the wrong side. When working from the wrong side, the diagram will have to be worked reversed: from left to right, knit stitches are purled, purl stitches are knit etc.

When working in the round every round is worked from the right side and the diagram are worked from right to left on all rounds.

See DROPS lesson: How to read knitting diagrams

The diagram depicts all rows/rounds, and every stitch seen from the right side. It is worked from bottom to top, from right to left.

When working back and forth every other row is worked from the right side: from right to left and every other row is worked from the wrong side: from left to right.

When working in the round, every row in the diagram are worked from the right side, from right to left.

When working a circular diagram you start in the middle and work your way outwards, counter clockwise, row by row.

The rows usually start with a given number of chain stitches (equivalent to the height of the following stitch), this will either be depicted in the diagram or explained in the pattern.

See DROPS lesson: How to read crochet diagrams

Instructions for working several diagrams after each other on the same row/round, will often be written like so: “work A.1, A.2, A.3 a total of 0-0-2-3-4 times". This means you work A.1 once, then A.2 is worked once, and A.3 is repeated (in width) the number of times provided for your size – in this case like so: S = 0 times, M = 0 times, L=2 times, XL= 3 times and XXL = 4 times.

The diagrams are worked as usual: begin with the first row in A.1, then work the first row in A.2 etc.

See DROPS lesson: How to read knitting diagrams

See DROPS lesson: How to read crochet diagrams

The total width of the garment (from wrist-to-wrist) will be larger in the larger sizes, despite the actual sleeves being shorter. The larger sizes have longer sleeve caps and wider shoulders, so there will be a good fit in all sizes.

The measurement sketch/schematic drawing provides information regarding the full length of the garment. If it’s a jumper or a jacket the length is measured from the highest point on the shoulder (usually closest to the neckline), and straight down to the bottom of the garment. It is NOT measured from the tip of shoulder. Similarly, the length of yoke is measured from the highest point on the shoulder and down to where yoke is split into body and sleeves.

See DROPS lesson: How to read a schematic drawing

Diagrams are often repeated on the round or in height. 1 repeat is the diagram the way it appears in the pattern. If it says to work 5 repeats of A.1 in the round, then you work A.1 a total of 5 times after/next to each other in the round. If it says to work 2 repeats of A.1 vertically/in height you work the entire diagram once, then begin again at the start and work the entire diagram one more time.

Chain stitches are slightly narrower than other stitches and to avoid working the cast-on edge too tight, we simply chain more stitches to begin with. The stitch count will be adjusted on the following row to fit the pattern and measurement sketch.

The rib edge is more elastic and will contract slightly compared to, for example, stocking stitch. By increasing before the rib edge, you avoid a visible difference in width between the rib edge and the rest of the body.

It’s very easy to cast off too tightly, and by making yarn overs while casting off (and simultaneously casting these off) you avoid a too tight cast off edge.

See DROPS video: How to bind off with yarn overs (yo)

To achieve an even increase (or decrease) you can increase on, for example: every 3rd and 4th row alternately, like so: work 2 rows and increase on the 3rd row, work 3 rows and increase on the 4th. Repeat this until the increase is complete.

See DROPS lesson: Increase or decrease 1 st on every 3rd and 4th row alternately

Should you prefer to work in the round instead of back and forth, you may of course adjust the pattern. You’ll need to add steeks mid-front (usually 5 stitches), and follow the instructions. When you would normally turn and work from the wrong side, simply work across the steek and continue in the round. At the end you’ll cut the piece open, pick up stitches to work bands, and cover the cut edges.

See DROPS video: How to knit steeks and cut open

Should you prefer to work back and forth instead of in the round, you may of course adjust the pattern so you work the pieces separately and then assemble them at the end. Divide the stitches for the body in 2, add 1 edge stitch in each side (for sewing) and work the front and back pieces separately.

See DROPS lesson: Can I adapt a pattern for circular needles into straight needles?

Pattern repeats can vary slightly in the different sizes, in order to get the correct proportions. If you’re not working the exact same size as the garment in the photo, yours might deviate slightly. This has been carefully developed and adjusted so that the complete impression of the garment is the same in all sizes.

Make sure to follow instructions and diagrams for your size!

If you have found a pattern you like which is available in women’s size it’s not very difficult to convert it to men’s size. The biggest difference will be the length of sleeves and body. Start working on the women size that you think would fit across the chest. The additional length will be worked right before you cast off for the armhole/sleeve cap. If the pattern is worked top-down you can add the length right after the armhole or before the first decrease on sleeve.

Regarding additional yarn amount, this will depend on how much length you add, but it is better with a skein too many than too few.

All yarns will have excess fibres (from production) that might come off as lint or shedding. Brushed yarns (ie hairier yarns) have more of these loose, excess fibres, causing more shedding.

Shedding also depends on what is worn under or over the garment, and whether this pulls at the yarn fibres. It’s therefore not possible to guarantee that there will be no shedding

Below are some tips on how to get the best result when working with hairier yarns:

1. When the garment is finished (before you wash it) shake it vigorously so the looser hairs come off. NOTE: do NOT use a lint roller, brush or any method that pulls at the yarn.

2. Place the garment in a plastic bag and put it in your freezer - the temperature will cause the fibres to become less attached to each other, and excess fibres will come off easier.

3. Leave in the freezer for a few hours before taking it out and shaking it again.

4. Wash the garment according to the instructions on the yarn label.

Pilling is a natural process that happens to even the most exclusive of fibers. It's a natural sign of wear and tear that is hard to avoid, and that is most visible in high friction areas of your garment like a sweater's arms and cuffs.

You can make your garment look as new by removing the pilling, using a fabric comb or a pill/lint remover.

Still can't find the answer you need? Then scroll down and leave your question so one of our experts can try to help you. This will be done normally within 5 to 10 working days.
In the meantime, you can read the questions and answers that others have left to this pattern or join the DROPS Workshop on Facebook to get help from fellow knitters/crocheters!

You might also like...

Strawberry Summer

Magali, United States

Strawberry Summer

Joanna, Poland

Strawberry Summer

Margriethar, Netherlands

Strawberry Summer

Fran.made, Italy

Strawberry Summer

Suzi Greiff, Denmark

211-18 Strawberry Summer

Agnieszka, Poland

Topp i Safran

Hilde Karin Alfarnes, Norway

Post a comment to pattern DROPS 211-18

We would love to hear what you have to say about this pattern!

If you want to leave a question, please make sure you select the correct category in the form below, to speed up the answering process. Required fields are marked *.

Comments / Questions (121)

country flag Hannelore Krause wrote:

Ich habe dieses Top gestrickt und es ist wirklich sehr schön geworden. Mit der Anleitung habe ich mich schwer getan, es aber nach einigen Versuchen hingekriegt. Wenn ich wüsste, wie man das macht, würde ich gerne Fotos schicken !?

06.04.2023 - 16:54

country flag Hannelore Krause wrote:

Ich habe dieses Top gestrickt und es ist wirklich sehr schön geworden. Mit der Anleitung habe ich mich schwer getan, es aber nach einigen Versuchen hingekriegt. Wenn ich wüsste, wie man das macht, würde ich gerne Fotos schicken !?

06.04.2023 - 16:52

country flag Patricia wrote:

En la espalda dice 3 pliegues, cómo se hace? Con cuantos puntos termina la espalda para talla S Gracias

18.09.2022 - 17:28

country flag Kate wrote:

Hi there! Thanks for the pattern, it looks great! Can this be modified to be worked in double broken rib instead? Also, can I change the thickness of the garter stitch border to be a couple centimetres, or will it change the fit? Thanks so much!

10.09.2022 - 04:17

DROPS Design answered:

Dear Kate, the ribbing worked in this pattern will give the top the strechness it needs, if you work any other pattern you might have a different result - the best would be to follow the pattern or maybe rather find another one that is more matching your request. Happy knitting!

12.09.2022 - 09:26

country flag Mary wrote:

Hi. I really love this pattern and would like to try it, however, I'm trying to convert it to straight needles and your instructions are very confusing for figuring out the pattern in general. Is there any way you can help? I can't figure out how to start, where it starts and what happens when, even after reading through all of your tutorials. Please help!

02.09.2022 - 10:24

DROPS Design answered:

Dear Mary, we are unfortunately not able to adjust every pattern to every request, you will find some help to adjust the pattern into straight needles here - for further individual assistance you are welcome to contact your DROPS Store or any knitting forum. Thanks for your comprehension.

02.09.2022 - 13:07

country flag Van Hoeck Mariëlle wrote:

I am knitting the front panel and started with 52 stitches. After I completed A6 there are 44st left on the needle, the pattern says 34st. When I go to A7 the ribbing doesn’t math anymore. Is it not correct that in A6 you increase 8 stitches? What did I do wrong? Thanks for helping me.

09.07.2022 - 12:21

DROPS Design answered:

Dear Mariëlle, in A.6 you decrease 2 stitches in each row from the right side, at both sides of the central stitches. You need to repeat this decrease 9 times, until you have 34 stitches in the needles. After this, the rib in A.7 should match. Happy knitting!

09.07.2022 - 18:38

country flag Anette wrote:

Ich bin jetzt bei 34cm und es fehlt noch 1 cm bis zu den Armausschnitten. Ich soll in der nächsten Runde A1, A2 und A3 stricken. und A2 und A3 in der Höhe zu Ende stricken. Dann sind es aber mehr als 1 cm bis zur Abnahme. Soll ich also diese 6 Reihen von A2 und A3 hochstricken bis ich für die Armausschnitte abkette?

08.07.2022 - 16:46

DROPS Design answered:

Liebe Anette, sollte Ihre Maschenprobe in der Höhe stimmen, dann bekommen Sie für diese 6 Reihen ca 1 cm (= A.2 = 3 krausrippen in S-M/L). Viel Spaß beim stricken!

11.07.2022 - 08:55

country flag Martina Giers wrote:

Hallo, ich stricke Gr. M/L .Bei einer Länge von 34 cm soll man 9 M A2 stricken ,dann 50 M.A1 bei mir endet das mit einer rechten Masche und das Rippenmuster verschiebt sich 1 M nach links, dann 10 Maschen A3,dann 50 M A1.hier beginne ich A1 mit links habe aber vorher A1 mit rechts geendet. kann das stimmen?Muss sich das Rippenmuster nicht zur Mitte hin verschieben?oder habe ich einen Knoten im Kopf?

23.06.2022 - 10:21

DROPS Design answered:

Liebe Frau Giers, A.1 ist (1 li, 2 re, 1 li). Dann stricken Sie 9 Maschen A.2, A.1 beginnt jetzt mit den 3 letzten Maschen (= 2 rechten Maschen), A.1 wiederholen Sie noch über die nächsten 44 Maschen wie zuvor, dann enden Sie mit den 3 ersten Maschen in A.1 (=3+44+3= 50 M A.1); A.1 beginnt und endet mit 2 re. Maschen. Viel Spaß beim stricken!

23.06.2022 - 13:10

country flag Elisabetta Salimei wrote:

Il motivo A2 sul modello Strawberry Summer e-302 per I ferri dritti si lavora a punto legaccio, oppure come indicato per i ferri circolari a maglia rasata?

12.06.2022 - 14:38

DROPS Design answered:

Buonasera Elisabetta, ci può spiegare meglio il suo dubbio? Il motivo mostra tutti i ferri del lavoro e si lavora dal basso verso l'alto, da destra a sinistra. Buon lavoro!

15.06.2022 - 21:44

country flag Gry wrote:

Summertop

12.06.2022 - 13:37