DROPS Brushed Alpaca Silk
77% Alpaca, 23% Silk
from 2.90 £ /25g
Get the yarn to make this pattern from 11.60£.

The yarn cost is calculated from the pattern’s smallest size and the yarn’s cheapest product type. Looking for an even better price? You might find it on the DROPS Deals!

DROPS SS24

Late Nights

Knitted jumper with raglan in DROPS Brushed Alpaca Silk. Piece is knitted with lace pattern. Size XS–XXL.

DROPS 212-11
DROPS design: Pattern as-129
Yarn group C or A + A
----------------------------------------------------------

SIZE:
XS - S - M - L - XL – XXL

MATERIALS:
DROPS BRUSHED ALPACA SILK from Garnstudio (belongs to yarn group C)
100-125-125-150-150-175 g colour 22, pale rust

KNITTING TENSION:
17 stitches in width and 22 rows vertically in stocking stitch = 10 x 10 cm.

NEEDLES:
DROPS DOUBLE POINTED NEEDLES SIZE 5 mm
DROPS CIRCULAR NEEDLE SIZE 5 mm : Length 40 and 80 cm for stocking stitch.
DROPS DOUBLE POINTED NEEDLES SIZE 4 mm
DROPS CIRCULAR NEEDLE SIZE 4 mm : Length 40 and 80 cm for rib.
Needle size is only a suggestion! If you have too many stitches on 10 cm switch to a larger needle size. If you have too few stitches on 10 cm switch to a smaller needle size.

-------------------------------------------------------

Alternative Yarn – See how to change yarns here
Yarn Groups A to F – Use the same pattern and change the yarn here
Yarn usage using an alternative yarn – Use our yarn converter here

-------------------------------------------------------

DROPS Brushed Alpaca Silk
77% Alpaca, 23% Silk
from 2.90 £ /25g
Get the yarn to make this pattern from 11.60£.

The yarn cost is calculated from the pattern’s smallest size and the yarn’s cheapest product type. Looking for an even better price? You might find it on the DROPS Deals!

Pattern instructions

NOTE: This pattern is written in British English. All measurements in charts are in cm. For conversion from cm to inches - click here. There are different terms for crocheting in British and American English. If this pattern includes crochet, click for "crochet terms" here. For this pattern in American English, please click here.
----------------------------------------------------------

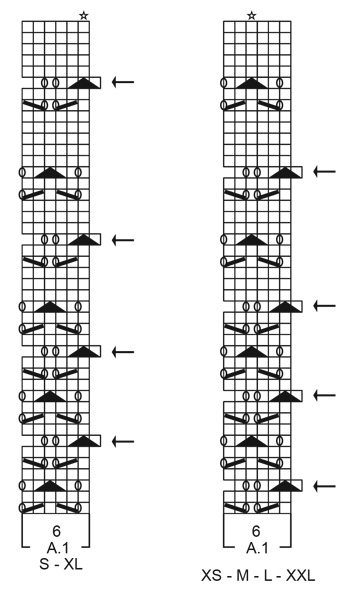
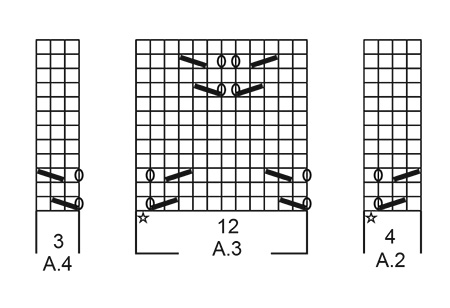
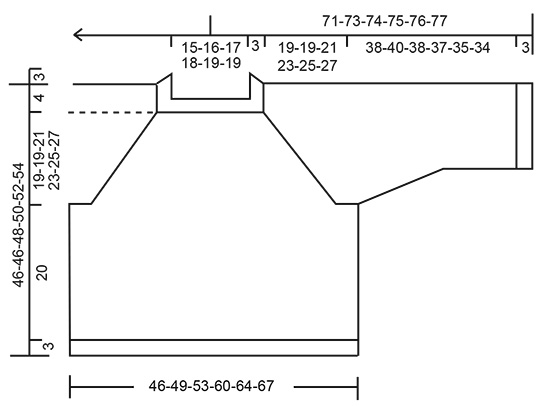
EXPLANATION FOR THE PATTERN:

----------------------------------------------------------

PATTERN: 
See diagrams A.1 to A.4. Choose diagram for your size (applies to A.1).

DECREASE TIP (evenly):
To calculate how to decrease evenly, use the total number of stitches on row (e.g. 180 stitches), and divide stitches by number of decreases to be done (e.g. 24) = 7.5. 
In this example decrease by knitting alternately every 6th and 7th stitch and every 7th and 8th stitch together.

INCREASE TIP (applies to sleeves):
Work until 2 stitches remain before marker thread, 1 yarn over, knit 4 (marker thread is in the middle of these stitches), 1 yarn over. On next round knit yarn overs twisted to avoid holes. Then work the new stitches in stocking stitch

RAGLAN:
Decrease 1 stitch on each side of marker thread in every transition between sleeves and body (= 8 stitches decreased) as follows: Work until 2 stitches remain before marker thread, knit 2 together, marker thread is here, slip 1 stitch knitwise, knit 1, pass slipped stitch over stitch worked.

----------------------------------------------------------

START THE PIECE HERE:

----------------------------------------------------------

JUMPER - SHORT OVERVIEW OF THE PIECE:
Work body in the round on circular needle, from the bottom and up to armholes. Then work the sleeves in the round on double pointed needles/a short circular needle up to armholes. Then slip sleeves on to same circular needle as body. Work yoke and neck edge in the round on circular needle.

BODY:
Cast on 180-196-208-236-248-264 stitches on circular needle size 4 mm with Brushed Alpaca Silk. Knit 1 round. Then work rib (= knit 2/purl 2) for 3 cm. Knit 1 round while decreasing 24-28-28-32-32-36 stitches evenly - read DECREASE TIP = 156-168-180-204-216-228 stitches. Switch to circular needle size 5 mm. Insert a marker thread at beginning of round (= in one side of jumper). Work A.1 – choose diagram for your size, the entire round (= 26-28-30-34-36-38 repetitions of 6 stitches). REMEMBER THE KNITTING TENSION! When 1 round remains in A.1, piece measures approx. 23 cm. Work next round as follows: Cast off the first 5-5-5-6-6-6 stitches, work the next 69-75-81-91-97-103 stitches, cast off the next 9-9-9-11-11-11 stitches for armhole, work the next 69-75-81-91-97-103 stitches, cast off the last 4-4-4-5-5-5 stitches. 9-9-9-11-11-11 stitches have been cast off in each side for armholes. Cut the yarn. Put piece aside and work the sleeves.

SLEEVE:
Cast on 52-56-56-64-64-68 stitches on double pointed needles size 4 mm with Brushed Alpaca Silk. Knit 1 round. Then work rib (= knit 2/purl 2) in the round for 3 cm. Knit 1 round while decreasing 10-8-8-10-10-8 stitches evenly = 42-48-48-54-54-60 stitches. Switch to double pointed needles size 5 mm. Insert a marker thread at beginning of round (= mid under sleeve).
Now pattern A.1 - choose diagram for your size, in the round (= 7-8-8-9-9-10 repetitions of 6 stitches). When A.1 has been worked vertically, sleeve measures approx. 23 cm.
Now work as many repetitions with lace pattern A.3 there is room for on round. - Adjust so that star in A.3 is worked over star in A.1! Work the remaining stitches on round in stocking stitch. AT THE SAME TIME on first round begin increase under sleeve- read INCREASE TIP. Increase like this approx. every 3-4-3-2-1-1 cm 6-5-6-7-10-10 times in total = 54-58-60-68-74-80 stitches. When diagrams have been worked vertically, continue with stocking stitch until finished measurements. When sleeve measures 41-43-41-40-38-37 cm, cast off 9-9-9-11-11-11 stitches under sleeve (cast off 5-5-5-6-6-6 stitches before marker thread and 4-4-4-5-5-5 stitches after marker thread) = 45-49-51-57-63-69 stitches for sleeve. Put piece aside and knit the other sleeve the same way.

YOKE:
Slip sleeves on to same circular needle as body where armholes were cast off = 228-248-264-296-320-344 stitches. Now insert 4 marker threads in the piece. Insert marker threads 2-0-2-2-0-2 stitches in on body. I.e. in size S and XL insert marker threads in transition between body and sleeves. And in size XS, M, L, XXL insert marker threads so that 2 stitches in each side of body are on the sleeves.
Begin round by marker thread in transition between right sleeve and back piece.
Work pattern as follows: * Work 5-4-5-4-3-4 stitches in stocking stitch, A.2 (= 4 stitches), A.3 over the next 48-60-60-72-84-84 stitches (= 4-5-5-6-7-7 repetitions of 12 stitches), A.4 (= 3 stitches), work 5-4-5-4-3-4 stitches in stocking stitch (= back piece/front piece), marker thread is here, work in stocking stitch over the next 49-49-55-61-63-73 stitches (= sleeve) *, work from *-* 1 more time on round. Continue in the round like this. When yoke measures 3-3-2-1-2-2 cm, begin decrease for RAGLAN – read explanation above. Decrease like this every other round 18-19-21-24-25-28 times in total = 84-96-96-104-120-120 stitches. The piece measures approx. 19-19-21-23-25-27 cm from where the body and sleeves were placed together. Now work the neck as described below.

NECK EDGE:
Knit 1 round while decreasing 8-16-12-16-28-28 stitches evenly = 76-80-84-88-92-92 stitches. Switch to a short circular needle size 4 mm. Work rib (knit 2/purl 2) in the round for 3 cm. Cast off stitches with knit over knit and purl over purl. Jumper measures approx. 46-46-48-50-52-54 cm from shoulder and down.

ASSEMBLY:
Sew the openings under the sleeves.

Diagram

symbols = knit
symbols = between 2 stitches make 1 yarn over, on next round knit yarn over to make hole
symbols = knit 2 together
symbols = slip 1 stitch knitwise, knit 1, pass slipped stitch over stitch worked
symbols = slip 1 stitch knitwise, knit 2 stitches together, pass slipped stitch over stitches worked together
symbols = stitch with star in diagram A.2 and A.3 should fit stitch with star in A.1.
symbols = to make the pattern fit on rounds with arrow, begin round 1 stitch before marker thread in the side/mid under sleeve, i.e. 1 stitch to the right of marker thread. Begin round when 1 stitch remains on round before the one with arrow.
diagram
diagram
diagram

Each of our patterns has specific tutorial videos to help you.

Do you have a question? See a list of frequently asked questions (FAQ)

Knitting tension is what determines the final measurements of your work, and is usually measured per 10 x 10 cm. It is provided like so: number of stitches in width x number of rows in height - eg: 19 stitches x 26 rows = 10 x 10 cm.

The knitting tension is very individual; some people knit/crochet loosely while others work tightly. You adjust the knitting tension with the needle size, which is why the suggested needle size is only meant as a guide! You need to adjust this (up or down) to ensure that YOUR knitting tension matches the knitting tension provided in the pattern. If you work with a different knitting tension than provided you will have a different yarn consumption, and your work will have different measurements than what the pattern suggests.

The knitting tension also determines which yarns can replace each other. As long as you achieve the same knitting tension you can replace one yarn with another.

See DROPS lesson: How to measure your tension/gauge

See DROPS video: How to make a gauge tension swatch

The required amount of yarn is provided in grams, eg: 450 g. To calculate how many balls you’ll need you first need to know how many grams are in 1 ball (25g, 50g or 100g). This information is available if you click on the individual yarn quality on our pages. Divide the amount required with the amount of each ball. For example, if each ball is 50g (the most common amount), the calculation will be as follows: 450 / 50 = 9 balls.

The important thing when changing from one yarn to another is that the knitting/crochet tension remains the same. This is so that the measurements of the finished piece will be the same as on the sketch provided. It is easier to achieve the same knitting tension using yarns from the same yarn group. It is also possible to work with multiple strands of a thinner yarn to achieve the knitting tension of a thicker one. Please try our yarn converter. We recommend you to always work a test swatch.

Please NOTE: when changing yarn the garment might have a different look and feel to the garment in the photo, due to individual properties and qualities of each yarn.

See DROPS lesson: Can I use a different yarn than the one mentioned in the pattern?

All our yarns are categorised into yarn groups (from A to F) according to thickness and knitting tension – group A contains the thinnest yarns and group F the thickest. This makes it easier for you to find alternative yarns to our patterns, should you wish to switch yarn. All yarns within the same group have a similar knitting tension and can easily replace each other. However, different yarn qualities have different structures and properties which will give the finished work a unique look and feel.

Click here for an overview of the yarns in each yarn group

At the top of all our patterns you’ll find a link to our yarn calculator, which is a helpful tool should you wish to use a different yarn than suggested. By filling in the yarn quality you wish to replace, the amount (in your size) and number of strands, the calculator will present good alternative yarns with the same knitting tension. Additionally it will tell you how much you’ll require in the new qualities and whether you’ll need to work with multiple strands. Most skeins are 50g (some are 25g or 100g).

If the pattern is worked with multiple colours, every colour will have to be calculated separately. Similarly, if the pattern is worked with several strands of different yarns (for example 1 strand Alpaca and 1 strand Kid-Silk) you will have to find alternatives for each, individually.

Click here to see our yarn calculator

Since different yarns have different qualities and textures we have chosen to keep the original yarn in our patterns. However, you can easily find options among our available qualities by using our yarn calculator, or simply pick a yarn from the same yarn group.

It is possible that some retailers still have discontinued yarns in stock, or that someone has a few skeins at home that they would like to find patterns for.

The yarn calculator will provide both alternative yarn as well as required amount in the new quality.

If you think it's hard to decide what size to make, it can be a good idea to measure a garment you own already and like the size of. Then you can pick the size by comparing those measures with the ones available in the pattern's size chart.

You'll find the size chart at the bottom of the pattern.

See DROPS lesson: How to read size chart

The needle size provided in the pattern serves only as a guide, the important thing is to follow the knitting tension. And since knitting tension is very individual, you will have to adjust the needle size to ensure that YOUR tension is the same as in the pattern – maybe you’ll have to adjust 1, or even 2 needle sizes, up or down to achieve the correct tension. For this, we recommend that you work test swatches.

Should you work with a different knitting tension than the one provided, the measurements of the finished garment might deviate from the measurement sketch.

See DROPS lesson: How to measure your tension/gauge

See DROPS video: How to make a tension/gauge swatch

Working a garment top-down provides more flexibility and room for personal adjustment. For example it is easier to try the garment on while working, as well as making adjustments to length of yoke and shoulder caps.

The instructions are carefully explaining every step, in the correct order. Diagrams are adjusted to the knitting direction and are worked as usual.

The diagram depicts all rows/rounds, and every stitch seen from the right side. It is read from bottom to top, from right to left. 1 square = 1 stitch.

When working back and forth, every other row is worked from the right side and every other row is worked from the wrong side. When working from the wrong side, the diagram will have to be worked reversed: from left to right, knit stitches are purled, purl stitches are knit etc.

When working in the round every round is worked from the right side and the diagram are worked from right to left on all rounds.

See DROPS lesson: How to read knitting diagrams

The diagram depicts all rows/rounds, and every stitch seen from the right side. It is worked from bottom to top, from right to left.

When working back and forth every other row is worked from the right side: from right to left and every other row is worked from the wrong side: from left to right.

When working in the round, every row in the diagram are worked from the right side, from right to left.

When working a circular diagram you start in the middle and work your way outwards, counter clockwise, row by row.

The rows usually start with a given number of chain stitches (equivalent to the height of the following stitch), this will either be depicted in the diagram or explained in the pattern.

See DROPS lesson: How to read crochet diagrams

Instructions for working several diagrams after each other on the same row/round, will often be written like so: “work A.1, A.2, A.3 a total of 0-0-2-3-4 times". This means you work A.1 once, then A.2 is worked once, and A.3 is repeated (in width) the number of times provided for your size – in this case like so: S = 0 times, M = 0 times, L=2 times, XL= 3 times and XXL = 4 times.

The diagrams are worked as usual: begin with the first row in A.1, then work the first row in A.2 etc.

See DROPS lesson: How to read knitting diagrams

See DROPS lesson: How to read crochet diagrams

The total width of the garment (from wrist-to-wrist) will be larger in the larger sizes, despite the actual sleeves being shorter. The larger sizes have longer sleeve caps and wider shoulders, so there will be a good fit in all sizes.

The measurement sketch/schematic drawing provides information regarding the full length of the garment. If it’s a jumper or a jacket the length is measured from the highest point on the shoulder closest to the neckline, and straight down to the bottom of the garment. It is NOT measured from the tip of shoulder. Similarly, the length of yoke is measured from the highest point on the shoulder and down to where yoke is split into body and sleeves.

On a jacket measures are never taken along bands, unless specifically stated. Always measure inside band stitches when measuring the length.

See DROPS lesson: How to read a schematic drawing

Diagrams are often repeated on the round or in height. 1 repeat is the diagram the way it appears in the pattern. If it says to work 5 repeats of A.1 in the round, then you work A.1 a total of 5 times after/next to each other in the round. If it says to work 2 repeats of A.1 vertically/in height you work the entire diagram once, then begin again at the start and work the entire diagram one more time.

Chain stitches are slightly narrower than other stitches and to avoid working the cast-on edge too tight, we simply chain more stitches to begin with. The stitch count will be adjusted on the following row to fit the pattern and measurement sketch.

The rib edge is more elastic and will contract slightly compared to, for example, stocking stitch. By increasing before the rib edge, you avoid a visible difference in width between the rib edge and the rest of the body.

It’s very easy to cast off too tightly, and by making yarn overs while casting off (and simultaneously casting these off) you avoid a too tight cast off edge.

See DROPS video: How to bind off with yarn overs (yo)

To achieve an even increase (or decrease) you can increase on, for example: every 3rd and 4th row alternately, like so: work 2 rows and increase on the 3rd row, work 3 rows and increase on the 4th. Repeat this until the increase is complete.

See DROPS lesson: Increase or decrease 1 st on every 3rd and 4th row alternately

Should you prefer to work in the round instead of back and forth, you may of course adjust the pattern. You’ll need to add steeks mid-front (usually 5 stitches), and follow the instructions. When you would normally turn and work from the wrong side, simply work across the steek and continue in the round. At the end you’ll cut the piece open, pick up stitches to work bands, and cover the cut edges.

See DROPS video: How to knit steeks and cut open

Should you prefer to work back and forth instead of in the round, you may of course adjust the pattern so you work the pieces separately and then assemble them at the end. Divide the stitches for the body in 2, add 1 edge stitch in each side (for sewing) and work the front and back pieces separately.

See DROPS lesson: Can I adapt a pattern for circular needles into straight needles?

Pattern repeats can vary slightly in the different sizes, in order to get the correct proportions. If you’re not working the exact same size as the garment in the photo, yours might deviate slightly. This has been carefully developed and adjusted so that the complete impression of the garment is the same in all sizes.

Make sure to follow instructions and diagrams for your size!

If you have found a pattern you like which is available in women’s size it’s not very difficult to convert it to men’s size. The biggest difference will be the length of sleeves and body. Start working on the women size that you think would fit across the chest. The additional length will be worked right before you cast off for the armhole/sleeve cap. If the pattern is worked top-down you can add the length right after the armhole or before the first decrease on sleeve.

Regarding additional yarn amount, this will depend on how much length you add, but it is better with a skein too many than too few.

All yarns will have excess fibres (from production) that might come off as lint or shedding. Brushed yarns (ie hairier yarns) have more of these loose, excess fibres, causing more shedding.

Shedding also depends on what is worn under or over the garment, and whether this pulls at the yarn fibres. It’s therefore not possible to guarantee that there will be no shedding

Below are some tips on how to get the best result when working with hairier yarns:

1. When the garment is finished (before you wash it) shake it vigorously so the looser hairs come off. NOTE: do NOT use a lint roller, brush or any method that pulls at the yarn.

2. Place the garment in a plastic bag and put it in your freezer - the temperature will cause the fibres to become less attached to each other, and excess fibres will come off easier.

3. Leave in the freezer for a few hours before taking it out and shaking it again.

4. Wash the garment according to the instructions on the yarn label.

Pilling is a natural process that happens to even the most exclusive of fibers. It's a natural sign of wear and tear that is hard to avoid, and that is most visible in high friction areas of your garment like a sweater's arms and cuffs.

You can make your garment look as new by removing the pilling, using a fabric comb or a pill/lint remover.

Still can't find the answer you need? Then scroll down and leave your question so one of our experts can try to help you. This will be done normally within 5 to 10 working days.
In the meantime, you can read the questions and answers that others have left to this pattern or join the DROPS Workshop on Facebook to get help from fellow knitters/crocheters!

You might also like...

Late Nights

Marianna, Italy

Late Nights

Andrea, United States

Late Nights

Pilar, Spain

Post a comment to pattern DROPS 212-11

We would love to hear what you have to say about this pattern!

If you want to leave a question, please make sure you select the correct category in the form below, to speed up the answering process. Required fields are marked *.

Comments / Questions (70)

country flag Loulou wrote:

Bonjour Pour faire le diagramme il se tricote sur 25 mailles A1 A2 A3 A4 et on reprend toujours ses mailles Merci de votre réponse

21.01.2023 - 09:23

DROPS Design answered:

Bonjour Loulou, j'ai peur de mal comprendre votre question désolée d'avance; A.1 se tricote sur 6 mailles, A.3 sur 12 mailles (en plaçant la maille avec l'étoile dans A.3 au-dessus de la maille avec l'étoile dans A.1); les diagrammes A.2, A.3 et A.4 vont se tricoter ainsi: A.2 (4 m), on répète ensuite les 12 m de A.3 et on termine par A.4 (3 m), A.2 et A.4 sont le début et la fin du point ajouré. N'hésitez pas à nous donner plus d'infos: taille, partie du modèle où vous en êtes etc.. pour que nous puissions vous aider davantage si besoin. Merci pour votre compréhension.

23.01.2023 - 08:46

country flag Yana wrote:

Hello, I’m looking to knit an xs of this sweater, using the suggested yarn DROPS Brushed Alpaca Silk. Is it right that I need 100g or 560m of this yarn? Thank you

17.11.2022 - 08:27

DROPS Design answered:

Dear Yana, correct, you need 100 g DROPS Brushed Alpaca Silk /25 g a ball = 4 balls each 153 yds approx. = 612 meters. Happy knitting!

17.11.2022 - 10:16

country flag Pauline Zaccaria wrote:

Bonjour, je tricote S. J'aligner A1 et A3. Donc, Je tricote la dernière m de A3, ce qui correspond à la 1e m de A1. Puis je recommence A3. Est ce que je déplace le marqueur au début de A3 (décalé d'1 maille après). Je suis alors capable de faire 4 fois A3 pour mon 1er rang, et arrivé au moment où il reste 3m, je ne fais pas la diminution suivi du jeté car je n'aurais pas assez de maille, je tricote alors 1m en jersey puis effectue l'augmentation ?

07.11.2022 - 17:43

DROPS Design answered:

Bonjour Mme Zaccaria, les tours ne doivent pas être décalés, vous devez juste aligner A.3 au-dessus de A.1 de sorte que la maille avec l'étoile dans A.3 soit celle avec l'étoile dans A.1, tricotez en jersey les mailles (au milieu sous la manche) que vous ne pouvez pas tricoter en suivant A.3. Les augmentations se tricoteront aussi en jersey. Bon tricot!

08.11.2022 - 08:57

country flag Brigitte wrote:

Bonjour, je fais,la grandeur XS, pour l’empiètement,pour indiquer mon début de rang, ça dit de placer un fil marqueur sur 2 mailles de chaque côté du dos et du devant soient sur les manches. Est-ce que je place deux mailles sur la manche droit pour le dos, 2 mailles sur la manche gauche pour le dos et la même chose pour le devant ? Lorsque je place le marqueur sur le deux dernières mailles de la manche pour faire le dos par la suite, ça n’arrive pas.

01.11.2022 - 02:39

DROPS Design answered:

Bonjour Brigitte, vous devez avoir 45 m pour chaque manche et 69 m pour le dos/le devant, mettez vos marqueurs ainsi à partir du début du dos: comptez 2 m, placez 1 marqueur, comptez 65 m (il reste 2 m du dos), placez 1 marqueur, comptez 49 m (les 45 m de la manche + 2 m du dos + 2 m du devant), placez 1 marqueur, comptez 65 m (il reste 2 m du devant), placez 1 marqueur, comptez 49 m (les 45 m de la manche + 2 m du devant + 2 m du dos). Bon tricot!

01.11.2022 - 10:31

country flag Brigitte Lapointe wrote:

Merci pour votre réponse mais j'ai une autre question. Est-ce que la première fois je place l'étoile de A1 et A3, ça devient le nouveau début de mon rang ? Est-ce que je dois déplacer mon marqueur de début de rang ? Que dois-je faire avec mes trois mailles du début ? Je fais la grandeur XS. Est-ce que je dois commencer la grille en faisant les mailles qui sont juste avec l'étoile de A3 ? Que vais-je faire avec les mailles en surplus ? Merci !

19.10.2022 - 18:55

DROPS Design answered:

Bonjour Mme Lapointe, le début des tours ne doit pas changer, vous tricotez simplement le 1er A.3 en le plaçant au-dessus du 1er A.1 et continuez le tour en tricotant autant de A.3 que possible - tricotez en jersey les mailles que vous ne pouvez pas tricoter en suivant le diagramme. Bon tricot!

20.10.2022 - 09:48

country flag Brigitte wrote:

Bonjour, je tricote le modèle Late night as129, grandeur Xsan. Je viens de terminer la grille A1 pour une manche et je tente de comprendre la suite. Je dois placer l’étoile du A1 sous a3. Je ne comprend pas la suite , les augmentations,le reste en Jersey, etc.besoin de plus de précisions

19.10.2022 - 03:41

DROPS Design answered:

Bonjour Brigitte, pour que A.3 soit joliment aligné au-dessus de A.1, placez la maille avec l'étoile dans A.1 au niveau de l'étoile dans A.3, comptez le nombre de mailles avant le début du tour et reportez ce nombre de mailles dans le 1er A.3 pour savoir où commencer le tour, répétez ensuite A.3. Augmentez en même temps 2 mailles sou s la manche dès le 1er tour de A.3 (cf AUGMENTATIONS) - Tricotez en jersey les mailles sous la manche que vous ne pouvez pas tricoter en suivant A.3. Bon tricot!

19.10.2022 - 10:02

country flag HYGGELIG wrote:

Bonjour, je fais xs et je me demande comment aligner l’étoile de A3 avec celle de A1. Pour A1, mon étoile se retrouve à la 4e maille suivant le marqueur. Je ne sais pas quoi faire. Merci :-)

07.06.2022 - 04:09

DROPS Design answered:

Bonjour Mme Hyggelig, cette maille dans A.1 doit être la dernière de A.3, tricotez les mailles précédentes en début de tour comme dans le diagramme (si vous n'avez pas assez de mailles pour 1 diminution + 1 jeté, tricotez ces mailles en jersey), jusqu'à ce qu'il reste 2 mailles avant celle avec l'étoile dans A.3 soit au-dessus de la 1ère maille avec l'étoile dans A.1, terminez le diagramme et répétez-le en le reprenant à la 1ère maille. Bon tricot!

07.06.2022 - 10:29

country flag Hyggelig wrote:

Merci pour les précisions Lorsque j aurai fait toutes mes séquences de A1 avec la flèche, il va rester une mailles avant le marqueur? Je la tricote à l endroit? Merci

23.05.2022 - 15:32

DROPS Design answered:

Bonjour Mme Hyggelig, à la fin du tour avec la flèche, vous aurez tricoté la dernière maille du dernier A.1, tricotez maintenant la 1ère maille du tour précédent (= la diminution), et commencez le tour suivant. Bon tricot!

23.05.2022 - 16:34

country flag HYGGELIG wrote:

Encore moi… pour A1 est ce que je laisse la maille à gauche? Si oui, il va me manquer une maille sur l autre moitié? Je fais xs, donc j aurai un côté à 77 mailles puisque j’utilise la 78e pour faire mon premier triangle… merci car là je bussieres bloqué hihihi

20.05.2022 - 19:20

DROPS Design answered:

Re-bonjour, regardez la réponse ci-dessous, et n'hésitez pas à nous dire si ce n'est pas encore bien clair. Bon tricot!

23.05.2022 - 07:51

country flag HYGGELIG wrote:

Pour le tour avec la flèche, même si je dois faire le A.1 26 fois, ça s’applique seulement à la première séquence A.1? Merci :-)

20.05.2022 - 15:40

DROPS Design answered:

Bonjour Mme Yggelig, au début du tour avec la flèche, commencez par la dernière maille du tour précédent (= c'est celle que l'on va glisser sans tricoter) et tricotez les 2 premières mailles du 1er A.1 du tour ensemble à l'endroit, passez ensuite la dernière maille du tour précédent par-dessus ces 2 mailles tricotées ensemble, à la fin du premier A.1, tricotez la dernière maille avec les 2 premières du A.1 suivant et ainsi de suite tout le tour. Bon tricot!

23.05.2022 - 07:49