DROPS Brushed Alpaca Silk
77% Alpaca, 23% Silk
from 2.90 £ /25g
Get the yarn to make this pattern from 11.60£.

The yarn cost is calculated from the pattern’s smallest size and the yarn’s cheapest product type. Looking for an even better price? You might find it on the DROPS Deals!

DROPS SS24

Late Nights

Knitted jumper with raglan in DROPS Brushed Alpaca Silk. Piece is knitted with lace pattern. Size XS–XXL.

DROPS 212-11
DROPS design: Pattern as-129
Yarn group C or A + A
----------------------------------------------------------

SIZE:
XS - S - M - L - XL – XXL

MATERIALS:
DROPS BRUSHED ALPACA SILK from Garnstudio (belongs to yarn group C)
100-125-125-150-150-175 g colour 22, pale rust

KNITTING TENSION:
17 stitches in width and 22 rows vertically in stocking stitch = 10 x 10 cm.

NEEDLES:
DROPS DOUBLE POINTED NEEDLES SIZE 5 mm
DROPS CIRCULAR NEEDLE SIZE 5 mm : Length 40 and 80 cm for stocking stitch.
DROPS DOUBLE POINTED NEEDLES SIZE 4 mm
DROPS CIRCULAR NEEDLE SIZE 4 mm : Length 40 and 80 cm for rib.
Needle size is only a suggestion! If you have too many stitches on 10 cm switch to a larger needle size. If you have too few stitches on 10 cm switch to a smaller needle size.

-------------------------------------------------------

Alternative Yarn – See how to change yarns here
Yarn Groups A to F – Use the same pattern and change the yarn here
Yarn usage using an alternative yarn – Use our yarn converter here

-------------------------------------------------------

DROPS Brushed Alpaca Silk
77% Alpaca, 23% Silk
from 2.90 £ /25g
Get the yarn to make this pattern from 11.60£.

The yarn cost is calculated from the pattern’s smallest size and the yarn’s cheapest product type. Looking for an even better price? You might find it on the DROPS Deals!

Pattern instructions

NOTE: This pattern is written in British English. All measurements in charts are in cm. For conversion from cm to inches - click here. There are different terms for crocheting in British and American English. If this pattern includes crochet, click for "crochet terms" here. For this pattern in American English, please click here.
----------------------------------------------------------

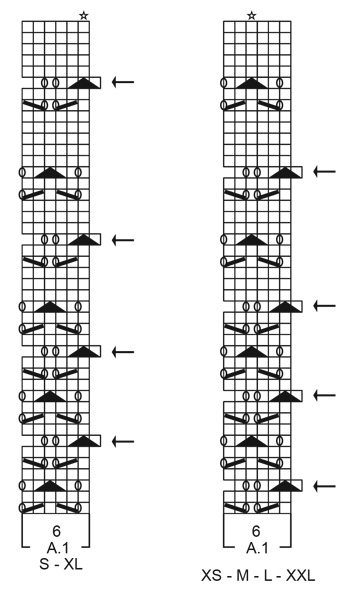
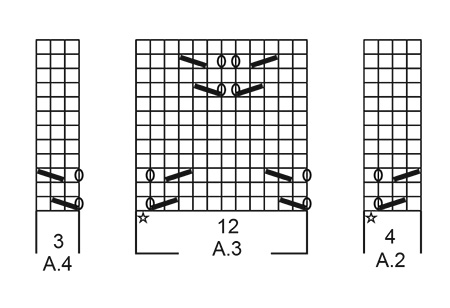
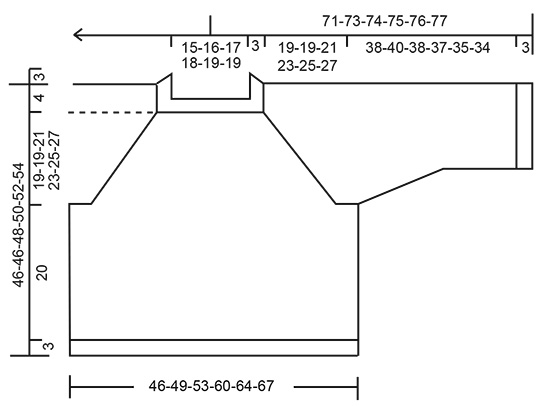
EXPLANATION FOR THE PATTERN:

----------------------------------------------------------

PATTERN: 
See diagrams A.1 to A.4. Choose diagram for your size (applies to A.1).

DECREASE TIP (evenly):
To calculate how to decrease evenly, use the total number of stitches on row (e.g. 180 stitches), and divide stitches by number of decreases to be done (e.g. 24) = 7.5. 
In this example decrease by knitting alternately every 6th and 7th stitch and every 7th and 8th stitch together.

INCREASE TIP (applies to sleeves):
Work until 2 stitches remain before marker thread, 1 yarn over, knit 4 (marker thread is in the middle of these stitches), 1 yarn over. On next round knit yarn overs twisted to avoid holes. Then work the new stitches in stocking stitch

RAGLAN:
Decrease 1 stitch on each side of marker thread in every transition between sleeves and body (= 8 stitches decreased) as follows: Work until 2 stitches remain before marker thread, knit 2 together, marker thread is here, slip 1 stitch knitwise, knit 1, pass slipped stitch over stitch worked.

----------------------------------------------------------

START THE PIECE HERE:

----------------------------------------------------------

JUMPER - SHORT OVERVIEW OF THE PIECE:
Work body in the round on circular needle, from the bottom and up to armholes. Then work the sleeves in the round on double pointed needles/a short circular needle up to armholes. Then slip sleeves on to same circular needle as body. Work yoke and neck edge in the round on circular needle.

BODY:
Cast on 180-196-208-236-248-264 stitches on circular needle size 4 mm with Brushed Alpaca Silk. Knit 1 round. Then work rib (= knit 2/purl 2) for 3 cm. Knit 1 round while decreasing 24-28-28-32-32-36 stitches evenly - read DECREASE TIP = 156-168-180-204-216-228 stitches. Switch to circular needle size 5 mm. Insert a marker thread at beginning of round (= in one side of jumper). Work A.1 – choose diagram for your size, the entire round (= 26-28-30-34-36-38 repetitions of 6 stitches). REMEMBER THE KNITTING TENSION! When 1 round remains in A.1, piece measures approx. 23 cm. Work next round as follows: Cast off the first 5-5-5-6-6-6 stitches, work the next 69-75-81-91-97-103 stitches, cast off the next 9-9-9-11-11-11 stitches for armhole, work the next 69-75-81-91-97-103 stitches, cast off the last 4-4-4-5-5-5 stitches. 9-9-9-11-11-11 stitches have been cast off in each side for armholes. Cut the yarn. Put piece aside and work the sleeves.

SLEEVE:
Cast on 52-56-56-64-64-68 stitches on double pointed needles size 4 mm with Brushed Alpaca Silk. Knit 1 round. Then work rib (= knit 2/purl 2) in the round for 3 cm. Knit 1 round while decreasing 10-8-8-10-10-8 stitches evenly = 42-48-48-54-54-60 stitches. Switch to double pointed needles size 5 mm. Insert a marker thread at beginning of round (= mid under sleeve).
Now pattern A.1 - choose diagram for your size, in the round (= 7-8-8-9-9-10 repetitions of 6 stitches). When A.1 has been worked vertically, sleeve measures approx. 23 cm.
Now work as many repetitions with lace pattern A.3 there is room for on round. - Adjust so that star in A.3 is worked over star in A.1! Work the remaining stitches on round in stocking stitch. AT THE SAME TIME on first round begin increase under sleeve- read INCREASE TIP. Increase like this approx. every 3-4-3-2-1-1 cm 6-5-6-7-10-10 times in total = 54-58-60-68-74-80 stitches. When diagrams have been worked vertically, continue with stocking stitch until finished measurements. When sleeve measures 41-43-41-40-38-37 cm, cast off 9-9-9-11-11-11 stitches under sleeve (cast off 5-5-5-6-6-6 stitches before marker thread and 4-4-4-5-5-5 stitches after marker thread) = 45-49-51-57-63-69 stitches for sleeve. Put piece aside and knit the other sleeve the same way.

YOKE:
Slip sleeves on to same circular needle as body where armholes were cast off = 228-248-264-296-320-344 stitches. Now insert 4 marker threads in the piece. Insert marker threads 2-0-2-2-0-2 stitches in on body. I.e. in size S and XL insert marker threads in transition between body and sleeves. And in size XS, M, L, XXL insert marker threads so that 2 stitches in each side of body are on the sleeves.
Begin round by marker thread in transition between right sleeve and back piece.
Work pattern as follows: * Work 5-4-5-4-3-4 stitches in stocking stitch, A.2 (= 4 stitches), A.3 over the next 48-60-60-72-84-84 stitches (= 4-5-5-6-7-7 repetitions of 12 stitches), A.4 (= 3 stitches), work 5-4-5-4-3-4 stitches in stocking stitch (= back piece/front piece), marker thread is here, work in stocking stitch over the next 49-49-55-61-63-73 stitches (= sleeve) *, work from *-* 1 more time on round. Continue in the round like this. When yoke measures 3-3-2-1-2-2 cm, begin decrease for RAGLAN – read explanation above. Decrease like this every other round 18-19-21-24-25-28 times in total = 84-96-96-104-120-120 stitches. The piece measures approx. 19-19-21-23-25-27 cm from where the body and sleeves were placed together. Now work the neck as described below.

NECK EDGE:
Knit 1 round while decreasing 8-16-12-16-28-28 stitches evenly = 76-80-84-88-92-92 stitches. Switch to a short circular needle size 4 mm. Work rib (knit 2/purl 2) in the round for 3 cm. Cast off stitches with knit over knit and purl over purl. Jumper measures approx. 46-46-48-50-52-54 cm from shoulder and down.

ASSEMBLY:
Sew the openings under the sleeves.

Diagram

symbols = knit
symbols = between 2 stitches make 1 yarn over, on next round knit yarn over to make hole
symbols = knit 2 together
symbols = slip 1 stitch knitwise, knit 1, pass slipped stitch over stitch worked
symbols = slip 1 stitch knitwise, knit 2 stitches together, pass slipped stitch over stitches worked together
symbols = stitch with star in diagram A.2 and A.3 should fit stitch with star in A.1.
symbols = to make the pattern fit on rounds with arrow, begin round 1 stitch before marker thread in the side/mid under sleeve, i.e. 1 stitch to the right of marker thread. Begin round when 1 stitch remains on round before the one with arrow.
diagram
diagram
diagram

Each of our patterns has specific tutorial videos to help you.

Do you have a question? See a list of frequently asked questions (FAQ)

Knitting tension is what determines the final measurements of your work, and is usually measured per 10 x 10 cm. It is provided like so: number of stitches in width x number of rows in height - eg: 19 stitches x 26 rows = 10 x 10 cm.

The knitting tension is very individual; some people knit/crochet loosely while others work tightly. You adjust the knitting tension with the needle size, which is why the suggested needle size is only meant as a guide! You need to adjust this (up or down) to ensure that YOUR knitting tension matches the knitting tension provided in the pattern. If you work with a different knitting tension than provided you will have a different yarn consumption, and your work will have different measurements than what the pattern suggests.

The knitting tension also determines which yarns can replace each other. As long as you achieve the same knitting tension you can replace one yarn with another.

See DROPS lesson: How to measure your tension/gauge

See DROPS video: How to make a gauge tension swatch

The required amount of yarn is provided in grams, eg: 450 g. To calculate how many balls you’ll need you first need to know how many grams are in 1 ball (25g, 50g or 100g). This information is available if you click on the individual yarn quality on our pages. Divide the amount required with the amount of each ball. For example, if each ball is 50g (the most common amount), the calculation will be as follows: 450 / 50 = 9 balls.

The important thing when changing from one yarn to another is that the knitting/crochet tension remains the same. This is so that the measurements of the finished piece will be the same as on the sketch provided. It is easier to achieve the same knitting tension using yarns from the same yarn group. It is also possible to work with multiple strands of a thinner yarn to achieve the knitting tension of a thicker one. Please try our yarn converter. We recommend you to always work a test swatch.

Please NOTE: when changing yarn the garment might have a different look and feel to the garment in the photo, due to individual properties and qualities of each yarn.

See DROPS lesson: Can I use a different yarn than the one mentioned in the pattern?

All our yarns are categorised into yarn groups (from A to F) according to thickness and knitting tension – group A contains the thinnest yarns and group F the thickest. This makes it easier for you to find alternative yarns to our patterns, should you wish to switch yarn. All yarns within the same group have a similar knitting tension and can easily replace each other. However, different yarn qualities have different structures and properties which will give the finished work a unique look and feel.

Click here for an overview of the yarns in each yarn group

At the top of all our patterns you’ll find a link to our yarn calculator, which is a helpful tool should you wish to use a different yarn than suggested. By filling in the yarn quality you wish to replace, the amount (in your size) and number of strands, the calculator will present good alternative yarns with the same knitting tension. Additionally it will tell you how much you’ll require in the new qualities and whether you’ll need to work with multiple strands. Most skeins are 50g (some are 25g or 100g).

If the pattern is worked with multiple colours, every colour will have to be calculated separately. Similarly, if the pattern is worked with several strands of different yarns (for example 1 strand Alpaca and 1 strand Kid-Silk) you will have to find alternatives for each, individually.

Click here to see our yarn calculator

Since different yarns have different qualities and textures we have chosen to keep the original yarn in our patterns. However, you can easily find options among our available qualities by using our yarn calculator, or simply pick a yarn from the same yarn group.

It is possible that some retailers still have discontinued yarns in stock, or that someone has a few skeins at home that they would like to find patterns for.

The yarn calculator will provide both alternative yarn as well as required amount in the new quality.

If you think it's hard to decide what size to make, it can be a good idea to measure a garment you own already and like the size of. Then you can pick the size by comparing those measures with the ones available in the pattern's size chart.

You'll find the size chart at the bottom of the pattern.

See DROPS lesson: How to read size chart

The needle size provided in the pattern serves only as a guide, the important thing is to follow the knitting tension. And since knitting tension is very individual, you will have to adjust the needle size to ensure that YOUR tension is the same as in the pattern – maybe you’ll have to adjust 1, or even 2 needle sizes, up or down to achieve the correct tension. For this, we recommend that you work test swatches.

Should you work with a different knitting tension than the one provided, the measurements of the finished garment might deviate from the measurement sketch.

See DROPS lesson: How to measure your tension/gauge

See DROPS video: How to make a tension/gauge swatch

Working a garment top-down provides more flexibility and room for personal adjustment. For example it is easier to try the garment on while working, as well as making adjustments to length of yoke and shoulder caps.

The instructions are carefully explaining every step, in the correct order. Diagrams are adjusted to the knitting direction and are worked as usual.

The diagram depicts all rows/rounds, and every stitch seen from the right side. It is read from bottom to top, from right to left. 1 square = 1 stitch.

When working back and forth, every other row is worked from the right side and every other row is worked from the wrong side. When working from the wrong side, the diagram will have to be worked reversed: from left to right, knit stitches are purled, purl stitches are knit etc.

When working in the round every round is worked from the right side and the diagram are worked from right to left on all rounds.

See DROPS lesson: How to read knitting diagrams

The diagram depicts all rows/rounds, and every stitch seen from the right side. It is worked from bottom to top, from right to left.

When working back and forth every other row is worked from the right side: from right to left and every other row is worked from the wrong side: from left to right.

When working in the round, every row in the diagram are worked from the right side, from right to left.

When working a circular diagram you start in the middle and work your way outwards, counter clockwise, row by row.

The rows usually start with a given number of chain stitches (equivalent to the height of the following stitch), this will either be depicted in the diagram or explained in the pattern.

See DROPS lesson: How to read crochet diagrams

Instructions for working several diagrams after each other on the same row/round, will often be written like so: “work A.1, A.2, A.3 a total of 0-0-2-3-4 times". This means you work A.1 once, then A.2 is worked once, and A.3 is repeated (in width) the number of times provided for your size – in this case like so: S = 0 times, M = 0 times, L=2 times, XL= 3 times and XXL = 4 times.

The diagrams are worked as usual: begin with the first row in A.1, then work the first row in A.2 etc.

See DROPS lesson: How to read knitting diagrams

See DROPS lesson: How to read crochet diagrams

The total width of the garment (from wrist-to-wrist) will be larger in the larger sizes, despite the actual sleeves being shorter. The larger sizes have longer sleeve caps and wider shoulders, so there will be a good fit in all sizes.

The measurement sketch/schematic drawing provides information regarding the full length of the garment. If it’s a jumper or a jacket the length is measured from the highest point on the shoulder closest to the neckline, and straight down to the bottom of the garment. It is NOT measured from the tip of shoulder. Similarly, the length of yoke is measured from the highest point on the shoulder and down to where yoke is split into body and sleeves.

On a jacket measures are never taken along bands, unless specifically stated. Always measure inside band stitches when measuring the length.

See DROPS lesson: How to read a schematic drawing

Diagrams are often repeated on the round or in height. 1 repeat is the diagram the way it appears in the pattern. If it says to work 5 repeats of A.1 in the round, then you work A.1 a total of 5 times after/next to each other in the round. If it says to work 2 repeats of A.1 vertically/in height you work the entire diagram once, then begin again at the start and work the entire diagram one more time.

Chain stitches are slightly narrower than other stitches and to avoid working the cast-on edge too tight, we simply chain more stitches to begin with. The stitch count will be adjusted on the following row to fit the pattern and measurement sketch.

The rib edge is more elastic and will contract slightly compared to, for example, stocking stitch. By increasing before the rib edge, you avoid a visible difference in width between the rib edge and the rest of the body.

It’s very easy to cast off too tightly, and by making yarn overs while casting off (and simultaneously casting these off) you avoid a too tight cast off edge.

See DROPS video: How to bind off with yarn overs (yo)

To achieve an even increase (or decrease) you can increase on, for example: every 3rd and 4th row alternately, like so: work 2 rows and increase on the 3rd row, work 3 rows and increase on the 4th. Repeat this until the increase is complete.

See DROPS lesson: Increase or decrease 1 st on every 3rd and 4th row alternately

Should you prefer to work in the round instead of back and forth, you may of course adjust the pattern. You’ll need to add steeks mid-front (usually 5 stitches), and follow the instructions. When you would normally turn and work from the wrong side, simply work across the steek and continue in the round. At the end you’ll cut the piece open, pick up stitches to work bands, and cover the cut edges.

See DROPS video: How to knit steeks and cut open

Should you prefer to work back and forth instead of in the round, you may of course adjust the pattern so you work the pieces separately and then assemble them at the end. Divide the stitches for the body in 2, add 1 edge stitch in each side (for sewing) and work the front and back pieces separately.

See DROPS lesson: Can I adapt a pattern for circular needles into straight needles?

Pattern repeats can vary slightly in the different sizes, in order to get the correct proportions. If you’re not working the exact same size as the garment in the photo, yours might deviate slightly. This has been carefully developed and adjusted so that the complete impression of the garment is the same in all sizes.

Make sure to follow instructions and diagrams for your size!

If you have found a pattern you like which is available in women’s size it’s not very difficult to convert it to men’s size. The biggest difference will be the length of sleeves and body. Start working on the women size that you think would fit across the chest. The additional length will be worked right before you cast off for the armhole/sleeve cap. If the pattern is worked top-down you can add the length right after the armhole or before the first decrease on sleeve.

Regarding additional yarn amount, this will depend on how much length you add, but it is better with a skein too many than too few.

All yarns will have excess fibres (from production) that might come off as lint or shedding. Brushed yarns (ie hairier yarns) have more of these loose, excess fibres, causing more shedding.

Shedding also depends on what is worn under or over the garment, and whether this pulls at the yarn fibres. It’s therefore not possible to guarantee that there will be no shedding

Below are some tips on how to get the best result when working with hairier yarns:

1. When the garment is finished (before you wash it) shake it vigorously so the looser hairs come off. NOTE: do NOT use a lint roller, brush or any method that pulls at the yarn.

2. Place the garment in a plastic bag and put it in your freezer - the temperature will cause the fibres to become less attached to each other, and excess fibres will come off easier.

3. Leave in the freezer for a few hours before taking it out and shaking it again.

4. Wash the garment according to the instructions on the yarn label.

Pilling is a natural process that happens to even the most exclusive of fibers. It's a natural sign of wear and tear that is hard to avoid, and that is most visible in high friction areas of your garment like a sweater's arms and cuffs.

You can make your garment look as new by removing the pilling, using a fabric comb or a pill/lint remover.

Still can't find the answer you need? Then scroll down and leave your question so one of our experts can try to help you. This will be done normally within 5 to 10 working days.
In the meantime, you can read the questions and answers that others have left to this pattern or join the DROPS Workshop on Facebook to get help from fellow knitters/crocheters!

You might also like...

Late Nights

Marianna, Italy

Late Nights

Andrea, United States

Late Nights

Pilar, Spain

Post a comment to pattern DROPS 212-11

We would love to hear what you have to say about this pattern!

If you want to leave a question, please make sure you select the correct category in the form below, to speed up the answering process. Required fields are marked *.

Comments / Questions (70)

country flag Constanza wrote:

Hola! Estoy tejiendo la manga de la talla S. No entiendo cómo se hacen los aumentos en A3. Luego de completar A1 viene el marcapuntos. Debo tejer dos derechos y un aumento. Pero si la primera vuelta de A3 comienza donde está la estrella, el primer aumento quedaría después de la lazada (entre la lazada y "deslizar 1 punto como de derecho, 1 derecho, pasar el punto deslizado sobre el punto trabajado"). ¿El marcapuntos debe estar antes de la estrella? Muchas gracias!

18.04.2022 - 22:55

DROPS Design answered:

Hola Constanza, para la talla S, se trabajan 2 hebras seguidas. Para que la labor quede mejor, se recomienda ajustar para aumentar en las filas donde solo se trabaje en punto jersey, no en las que tienen calados. Los puntos aumentados se trabajan en punto jersey.

20.04.2022 - 20:13

country flag Monica wrote:

Salve, esiste un modello raglan tipo questo con maniche di colore diverso dal corpo cosicché vengono lavorate separatamente e poi cucite al corpo? grazie

13.11.2021 - 14:20

DROPS Design answered:

Buonasera Monica, ci sono tantissimi modelli sul nostro sito da sfogliare: sicuramente potrà trovare un modello che fa al caso suo. Buon lavoro!

16.11.2021 - 22:26

country flag Thomas Yolande wrote:

Je voudrais faire le modèle L avec 2 aiguilles simples donc 4 les cotes et 5 ensuite .est ce que je dois monter113 mailles étant donner quand aiguilles circulaires il faut113 mailles cordialement

13.11.2021 - 07:30

DROPS Design answered:

Bonjour Mme Thomas, nous ne sommes malheureusement pas en mesure de pouvoir adapter chacun de nos modèles à chaque demande, toutefois, cette leçon donne quelques informations qui devraient pouvoir vous aider; n'hésitez pas à contacter votre magasin pour toute assistance complémentaire. Bon tricot!

15.11.2021 - 07:30

country flag Magda wrote:

Dzień dobry, po przerobieniu A1 na wysokość dł robótki jest krótsza niż 23 cm. Czy dorobić do tej długości bez wzoru?

17.09.2021 - 19:49

DROPS Design answered:

Witaj Magdo, tak, przerabiaj kolejny motyw/y A.1, aż robótka ma długość 23 cm lub taką jaka ci odpowiada. Pozdrawiamy!

18.09.2021 - 22:27

country flag Tessie wrote:

Vielen Dank für die Antwort! Den Abnahmetipp habe ich verstanden. Ich weiss jedoch nicht, wie ich den Abnahmetipp in das Muster A.3 integrieren kann. Vielen Dank für die Präzisierung!

20.08.2021 - 18:34

DROPS Design answered:

Liebe Tessie, die Zunahmen beim Ärmel werden glatt rechst gestrickt, nicht in A.3. Viel Spaß beim stricken!

23.08.2021 - 07:09

country flag Tessie wrote:

Wie kann ich die Zunahmen in das Muster A.3 beim Ärmel nach A.1 einfügen? Beginne ich mit 2 re und Umschlag und dann weiter mit dem Muster und höre wieder mit Umschlag und 2 rechten Maschen auf? Vielen Dank für die Hilfe

19.08.2021 - 19:41

DROPS Design answered:

Liebe Tessie, die Zunahmen beim Ärmel stricken Sie glatt rechts - siehe ZUNAHMETIPP (gilt für die Ärmel):. Viel Spaß beim stricken!

20.08.2021 - 07:22

country flag Rianne wrote:

Ik ga bovenstaande trui breien maar niet in de rondte, maar met voor- achterpand en (losse) mouwen. Kunnen jullie mij vertellen hoe ik de raglan kan breien. Het gaat er bij mij alleen om hoe vaak of om de hoeveel naalden ik moet afkanten. Verder kom ik er wel aan uit...

22.05.2021 - 14:45

DROPS Design answered:

Dag Rianne,

Je kunt het zelfde aantal aanhouden als in het patroon aangegeven voor jouw maat. Er ontstaat dan vanzelf een raglanlijn. Als je een extra kantsteek toevoegt, kun je het werk langs de raglanlijn in elkaar naaien.

26.05.2021 - 14:34

country flag Anna wrote:

Wird die Maschenprobe mit Nadelstärke 4 oder 5 gestrickt? Liebe Grüße Anna

17.05.2021 - 16:49

DROPS Design answered:

Liebe Anna, normalerweise gilt: die Maschenprobe wird mit der Nadelstärke gestrickt, mit der der Hauptteil des Kleidungsstücks gestrickt wird - also mit der dickeren Nadelstärke. Die dünnere Nadel wird in der Regel für die Ränder/Bündchen/Blenden verwendet. Hier stricken Sie also mit Nadel Nr. 5 bzw. passen die Nadelstärke so an, dass Sie die Maschenprobe erreichen. Je nachdem, ob Sie fester oder lockerer stricken, benötigen Sie vielleicht eine andere Nadelstärke. Gutes Gelingen und viel Spaß beim Stricken!

17.05.2021 - 18:39

country flag Britta wrote:

Hallo, ich möchte gerne den Pullover in Größe S stricken und habe eine Frage zum Muster A1. Wenn ich in der Runde bin mit dem Pfeil fange ich das Muster in der Vorrunde an. Versetzt sich das Muster dann anschließend jeweils um eine Masche oder startet die nächste Musterreihe praktisch wieder am original Start? Ich habe einen Test gestrickt kann aber das Muster nicht wirklich erkennen. Danke vorab und eine schönen Tag Britta Scheffler

11.03.2021 - 08:18

DROPS Design answered:

Liebe Britta, nur bei der Runde mit dem Pfeil sollen Sie 1 Masche früher die Runde anfangen, dann am Ende von jedem A.1 stricken Sie die letzte Masche von A.1 zusammen mit den 2 ersten Maschen von nächstem A.1 - Anfang der Runde solle wie zuvor bleiben. Viel Spaß beim stricken!

11.03.2021 - 08:27

country flag Ingunn Govertsen wrote:

Hei! Når jeg har strikket hele A1 er bolen mye kortere enn 23 cm. Hva gjør jeg feil? Takk for svar

15.02.2021 - 09:29