DROPS Karisma
DROPS Karisma
100% Wool
from 2.30 £ /50g
Get the yarn to make this pattern from 32.20£.

The yarn cost is calculated from the pattern’s smallest size and the yarn’s cheapest product type. Looking for an even better price? You might find it on the DROPS Deals!

DROPS SS24

Inner Circle

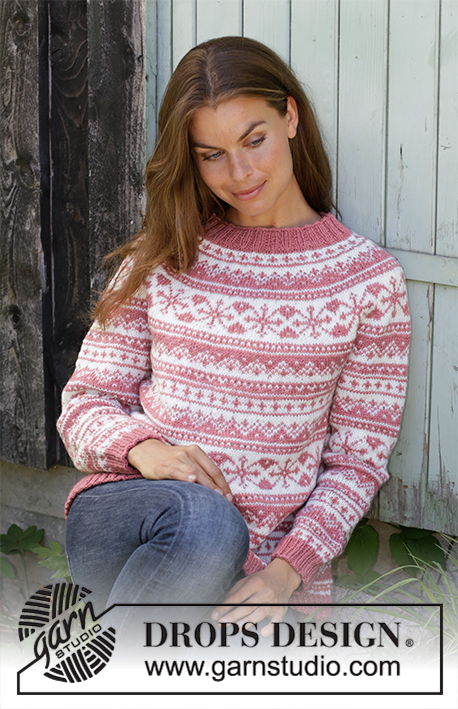
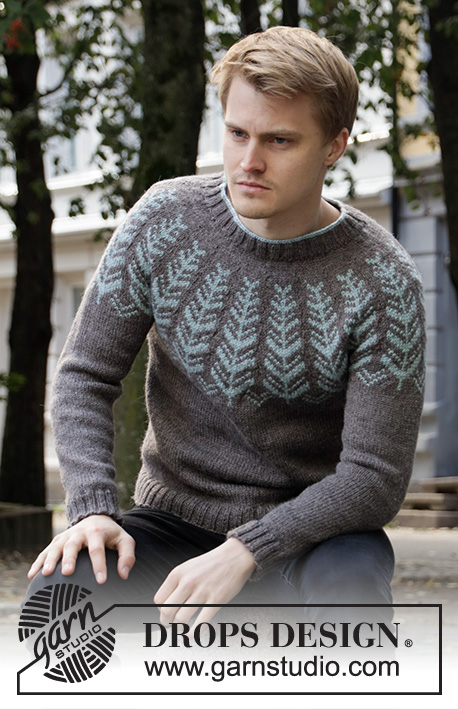
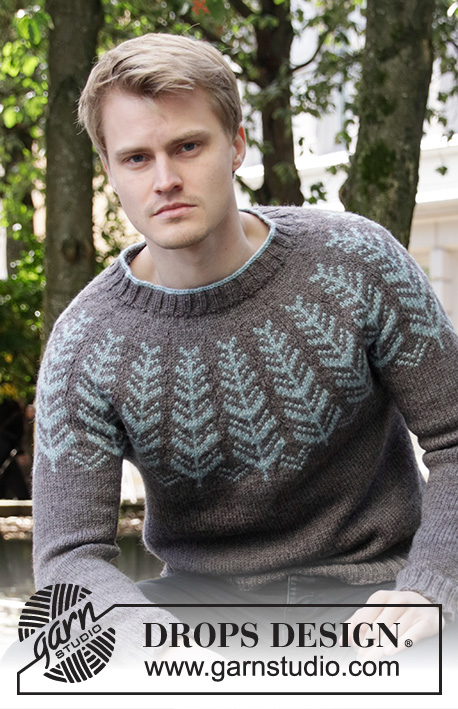
Knitted jumper for men with round yoke in DROPS Karisma. The piece is worked top down with Nordic pattern. Sizes S - XXXL.

DROPS 208-11
DROPS Design: Pattern no u-897
Yarn group B
-------------------------------------------------------

SIZES:
S - M - L - XL - XXL – XXXL

MATERIALS:
DROPS KARISMA from Garnstudio (belongs to yarn group B)
600-650-650-650-750-750 g colour 54, beige brown
100-150-150-150-150-200 g colour 69, light grey green

KNITTING TENSION:
21 stitches in width and 28 rows in height with stocking stitch = 10 x 10 cm.

NEEDLES:
DROPS DOUBLE POINTED NEEDLES SIZE 4 MM – for stocking stitch.
DROPS CIRCULAR NEEDLE SIZE 4 MM: Length 40 cm and 80 cm for stocking stitch.
DROPS DOUBLE POINTED NEEDLES SIZE 3 MM – for rib.
DROPS CIRCULAR NEEDLE SIZE 3 MM: Length 80 cm for rib.
Needle size is only a guide. If you get too many stitches on 10 cm, change to a larger needle size. If you get too few stitches on 10 cm, change to a smaller needle size.

-------------------------------------------------------

Alternative Yarn – See how to change yarns here
Yarn Groups A to F – Use the same pattern and change the yarn here
Yarn usage using an alternative yarn – Use our yarn converter here

-------------------------------------------------------

DROPS Karisma
DROPS Karisma
100% Wool
from 2.30 £ /50g
Get the yarn to make this pattern from 32.20£.

The yarn cost is calculated from the pattern’s smallest size and the yarn’s cheapest product type. Looking for an even better price? You might find it on the DROPS Deals!

Pattern instructions

NOTE: This pattern is written in British English. All measurements in charts are in cm. For conversion from cm to inches - click here. There are different terms for crocheting in British and American English. If this pattern includes crochet, click for "crochet terms" here. For this pattern in American English, please click here.
-------------------------------------------------------

EXPLANATIONS FOR THE PATTERN:

-------------------------------------------------------

PATTERN: 
See diagram A.1.
All stitches are worked in stocking stitch.

KNITTING TIP (for two-coloured pattern):
To avoid the knitting tension becoming tight when working patter, it is important the strands at the back are not tight.

ELEVATION:
Insert a marker thread in the first stitch on the round (= mid back). Start from the right side and knit 11-11-12-13-13-14 stitches, turn, tighten the strand and purl 22-22-24-26-26-28 stitches back. Turn, tighten the strand and knit 33-33-36-39-39-42, turn, tighten the strand and purl 44-44-48-52-52-56. Turn, tighten the strand and knit 55-55-60-65-65-70, turn, tighten the strand and purl 66-66-72-78-78-84, turn, tighten the strand and knit back to the beginning of the round.

DECREASE/INCREASE TIP (evenly spaced):
To work out how to decrease/increase evenly, count the total number of stitches on needle (e.g. 108 stitches), and divide by number of decreases/increases to be made (e.g. 16) = 6.8. In this example, decrease by working together approx. each 6th and 7th stitch.
When increasing, make 1 yarn over after approx. each 7th stitch. On the next round work the yarn overs twisted to avoid holes.

INCREASE TIP-1 (for sides of body):
Work until there are 2 stitches left before the marker thread, make 1 yarn over, knit 4 (marker thread sits between these 4 stitches) make 1 yarn over (= 2 stitches increased).
On the next round knit the yarn overs twisted to avoid holes.

DECREASE TIP (for sleeves): 
Decrease 1 stitch on each side of the marker thread as follows: Work until there are 3 stitches left before the marker thread, knit 2 together, knit 2 (marker thread sits between these 2 stitches), slip 1 stitch as if to knit, knit 1 and pass the slipped stitch over the knitted stitch.

-------------------------------------------------------

START THE PIECE HERE:

-------------------------------------------------------

JUMPER – SHORT OVERVIEW OF THE PIECE:
The piece is worked in the round with circular needle, from mid back and top down. The sleeves are worked in the round with double pointed needle/ short circular needle, top down.

NECK:
Cast on 108-116-120-124-128-132 stitches with circular needle size 3 mm and light grey green. Knit 1 round. Change to beige brown and work rib (knit 2, purl 2) for 4 cm. Knit 1 round where you decrease 16-19-19-20-20-20 stitches evenly spaced – read DECREASE/INCREASE TIP = 92-97-101-104-108-112 stitches. Knit 1 round where you increase 20-22-32-36-39-42 stitches evenly spaced = 112-119-133-140-147-154 stitches. Change to circular needle size 4 mm. For a better fit you can work an elevation so the neck is slightly higher at the back. The elevation can be left out; the neck will then be the same front and back – read ELEVATION. 

YOKE:
Now work pattern A.1 (= 7 stitches) 16-17-19-20-21-22 repeats on the round (start with your size in the diagram) - read KNITTING TIP and REMEMBER THE KNITTING TENSION! Continue this pattern in the round. When A.1 has been completed in height there are 288-306-342-360-378-396 stitches on the needle and the piece measures approx. 23-24-24-24-24-24 cm.

Size S: The yoke is finished – continue with ALL SIZES below.

Sizes M, L and XL:
Continue working stocking stitch with beige brown until the piece measures 25-27-28 cm from the cast-on edge, AT THE SAME TIME when the piece measures 24-24-24 cm increase 14-6-20 stitches evenly spaced = 320-348-380 stitches. Continue with ALL SIZES below.

Sizes XXL and XXXL:
Continue working stocking stitch with beige brown until the piece measures 30-32 cm from the cast-on edge, AT THE SAME TIME when the piece measures 24-24 cm increase 11-14 stitches evenly spaced and when the piece measures 27-29 cm increase 11-14 stitches evenly spaced = 400-424 stitches.

ALL SIZES:
The next round is worked as follows: Work 42-46-50-56-60-65 stitches as before (= half back piece), place the next 60-68-74-78-80-82 stitches on 1 thread for the sleeve, cast on 8-8-10-10-12-14 new stitches on the needle (= in side under the sleeve), work 84-92-100-112-120-130 stitches (= front piece), place the next 60-68-74-78-80-82 stitches on 1 thread for the sleeve, cast on 8-8-10-10-12-14 new stitches on the needle (= in side under the sleeve) and work the remaining 42-46-50-56-60-65 stitches as before (= half back piece). Body and sleeves are finished separately. THE PIECE IS NOW MEASURED FROM HERE!

BODY:
= 184-200-220-244-264-288 stitches. Insert a marker thread in the middle of the 8-8-10-10-12-14 new stitches cast on under each sleeve (= 92-100-110-122-132-144 stitches between the threads on both the front and back pieces.
Work stocking stitch in the round with beige brown. When the piece measures 30-30-30-31-31-31 cm from the division, knit 1 round where you increase 40 stitches evenly spaced = 224-240-260-284-304-328 stitches. Change to circular needle size 3 mm and work rib (knit 2, purl 2) for 4 cm. Cast off with knit over knit and purl over purl. The jumper measures approx. 60-62-64-66-68-70 cm from the shoulder down.

SLEEVE:
Place the 60-68-74-78-80-82 stitches from the thread on the one side of the piece on short circular needle size 4 mm and knit up 1 stitch in each of the 8-8-10-10-12-14 stitches cast on under the sleeve = 68-76-84-88-92-96 stitches. Insert a marker thread in the middle of the 8-8-10-10-12-14 stitches under the sleeve. Work stocking stitch in the round with beige brown.
When the piece measures 5-3-4-5-5-3 cm from the division decrease 2 stitches mid under the sleeve – read DECREASE TIP. Decrease like this every 5-4-3-3-2.5-2.5 cm a total of 8-10-12-12-14-14 times = 52-56-60-64-64-68 stitches. When the sleeve measures 45-43-42-41-40-38 cm from the division (shorter measurements in the larger sizes due to longer yoke), change to double pointed needles size 3 mm and work rib (= knit 2, purl 2) for 4 cm. Cast off with knit over knit and purl over purl but to avoid the cast-off edge being tight, make 1 yarn over after each 4th stitch (yarn overs cast off as normal stitches). The sleeve measures approx. 49-47-46-45-44-42 cm from the division. Work the other sleeve in the same way.

Diagram

symbols = beige brown
symbols = light grey green
symbols = between 2 stitches make 1 yarn over. On the next round knit the yarn over twisted to avoid a hole
symbols = knitting direction
diagram
diagram

Each of our patterns has specific tutorial videos to help you.

Do you have a question? See a list of frequently asked questions (FAQ)

Knitting tension is what determines the final measurements of your work, and is usually measured per 10 x 10 cm. It is provided like so: number of stitches in width x number of rows in height - eg: 19 stitches x 26 rows = 10 x 10 cm.

The knitting tension is very individual; some people knit/crochet loosely while others work tightly. You adjust the knitting tension with the needle size, which is why the suggested needle size is only meant as a guide! You need to adjust this (up or down) to ensure that YOUR knitting tension matches the knitting tension provided in the pattern. If you work with a different knitting tension than provided you will have a different yarn consumption, and your work will have different measurements than what the pattern suggests.

The knitting tension also determines which yarns can replace each other. As long as you achieve the same knitting tension you can replace one yarn with another.

See DROPS lesson: How to measure your tension/gauge

See DROPS video: How to make a gauge tension swatch

The required amount of yarn is provided in grams, eg: 450 g. To calculate how many balls you’ll need you first need to know how many grams are in 1 ball (25g, 50g or 100g). This information is available if you click on the individual yarn quality on our pages. Divide the amount required with the amount of each ball. For example, if each ball is 50g (the most common amount), the calculation will be as follows: 450 / 50 = 9 balls.

The important thing when changing from one yarn to another is that the knitting/crochet tension remains the same. This is so that the measurements of the finished piece will be the same as on the sketch provided. It is easier to achieve the same knitting tension using yarns from the same yarn group. It is also possible to work with multiple strands of a thinner yarn to achieve the knitting tension of a thicker one. Please try our yarn converter. We recommend you to always work a test swatch.

Please NOTE: when changing yarn the garment might have a different look and feel to the garment in the photo, due to individual properties and qualities of each yarn.

See DROPS lesson: Can I use a different yarn than the one mentioned in the pattern?

All our yarns are categorised into yarn groups (from A to F) according to thickness and knitting tension – group A contains the thinnest yarns and group F the thickest. This makes it easier for you to find alternative yarns to our patterns, should you wish to switch yarn. All yarns within the same group have a similar knitting tension and can easily replace each other. However, different yarn qualities have different structures and properties which will give the finished work a unique look and feel.

Click here for an overview of the yarns in each yarn group

At the top of all our patterns you’ll find a link to our yarn calculator, which is a helpful tool should you wish to use a different yarn than suggested. By filling in the yarn quality you wish to replace, the amount (in your size) and number of strands, the calculator will present good alternative yarns with the same knitting tension. Additionally it will tell you how much you’ll require in the new qualities and whether you’ll need to work with multiple strands. Most skeins are 50g (some are 25g or 100g).

If the pattern is worked with multiple colours, every colour will have to be calculated separately. Similarly, if the pattern is worked with several strands of different yarns (for example 1 strand Alpaca and 1 strand Kid-Silk) you will have to find alternatives for each, individually.

Click here to see our yarn calculator

Since different yarns have different qualities and textures we have chosen to keep the original yarn in our patterns. However, you can easily find options among our available qualities by using our yarn calculator, or simply pick a yarn from the same yarn group.

It is possible that some retailers still have discontinued yarns in stock, or that someone has a few skeins at home that they would like to find patterns for.

The yarn calculator will provide both alternative yarn as well as required amount in the new quality.

If you think it's hard to decide what size to make, it can be a good idea to measure a garment you own already and like the size of. Then you can pick the size by comparing those measures with the ones available in the pattern's size chart.

You'll find the size chart at the bottom of the pattern.

See DROPS lesson: How to read size chart

The needle size provided in the pattern serves only as a guide, the important thing is to follow the knitting tension. And since knitting tension is very individual, you will have to adjust the needle size to ensure that YOUR tension is the same as in the pattern – maybe you’ll have to adjust 1, or even 2 needle sizes, up or down to achieve the correct tension. For this, we recommend that you work test swatches.

Should you work with a different knitting tension than the one provided, the measurements of the finished garment might deviate from the measurement sketch.

See DROPS lesson: How to measure your tension/gauge

See DROPS video: How to make a tension/gauge swatch

Working a garment top-down provides more flexibility and room for personal adjustment. For example it is easier to try the garment on while working, as well as making adjustments to length of yoke and shoulder caps.

The instructions are carefully explaining every step, in the correct order. Diagrams are adjusted to the knitting direction and are worked as usual.

The diagram depicts all rows/rounds, and every stitch seen from the right side. It is read from bottom to top, from right to left. 1 square = 1 stitch.

When working back and forth, every other row is worked from the right side and every other row is worked from the wrong side. When working from the wrong side, the diagram will have to be worked reversed: from left to right, knit stitches are purled, purl stitches are knit etc.

When working in the round every round is worked from the right side and the diagram are worked from right to left on all rounds.

See DROPS lesson: How to read knitting diagrams

The diagram depicts all rows/rounds, and every stitch seen from the right side. It is worked from bottom to top, from right to left.

When working back and forth every other row is worked from the right side: from right to left and every other row is worked from the wrong side: from left to right.

When working in the round, every row in the diagram are worked from the right side, from right to left.

When working a circular diagram you start in the middle and work your way outwards, counter clockwise, row by row.

The rows usually start with a given number of chain stitches (equivalent to the height of the following stitch), this will either be depicted in the diagram or explained in the pattern.

See DROPS lesson: How to read crochet diagrams

Instructions for working several diagrams after each other on the same row/round, will often be written like so: “work A.1, A.2, A.3 a total of 0-0-2-3-4 times". This means you work A.1 once, then A.2 is worked once, and A.3 is repeated (in width) the number of times provided for your size – in this case like so: S = 0 times, M = 0 times, L=2 times, XL= 3 times and XXL = 4 times.

The diagrams are worked as usual: begin with the first row in A.1, then work the first row in A.2 etc.

See DROPS lesson: How to read knitting diagrams

See DROPS lesson: How to read crochet diagrams

The total width of the garment (from wrist-to-wrist) will be larger in the larger sizes, despite the actual sleeves being shorter. The larger sizes have longer sleeve caps and wider shoulders, so there will be a good fit in all sizes.

The measurement sketch/schematic drawing provides information regarding the full length of the garment. If it’s a jumper or a jacket the length is measured from the highest point on the shoulder closest to the neckline, and straight down to the bottom of the garment. It is NOT measured from the tip of shoulder. Similarly, the length of yoke is measured from the highest point on the shoulder and down to where yoke is split into body and sleeves.

On a jacket measures are never taken along bands, unless specifically stated. Always measure inside band stitches when measuring the length.

See DROPS lesson: How to read a schematic drawing

Diagrams are often repeated on the round or in height. 1 repeat is the diagram the way it appears in the pattern. If it says to work 5 repeats of A.1 in the round, then you work A.1 a total of 5 times after/next to each other in the round. If it says to work 2 repeats of A.1 vertically/in height you work the entire diagram once, then begin again at the start and work the entire diagram one more time.

Chain stitches are slightly narrower than other stitches and to avoid working the cast-on edge too tight, we simply chain more stitches to begin with. The stitch count will be adjusted on the following row to fit the pattern and measurement sketch.

The rib edge is more elastic and will contract slightly compared to, for example, stocking stitch. By increasing before the rib edge, you avoid a visible difference in width between the rib edge and the rest of the body.

It’s very easy to cast off too tightly, and by making yarn overs while casting off (and simultaneously casting these off) you avoid a too tight cast off edge.

See DROPS video: How to bind off with yarn overs (yo)

To achieve an even increase (or decrease) you can increase on, for example: every 3rd and 4th row alternately, like so: work 2 rows and increase on the 3rd row, work 3 rows and increase on the 4th. Repeat this until the increase is complete.

See DROPS lesson: Increase or decrease 1 st on every 3rd and 4th row alternately

Should you prefer to work in the round instead of back and forth, you may of course adjust the pattern. You’ll need to add steeks mid-front (usually 5 stitches), and follow the instructions. When you would normally turn and work from the wrong side, simply work across the steek and continue in the round. At the end you’ll cut the piece open, pick up stitches to work bands, and cover the cut edges.

See DROPS video: How to knit steeks and cut open

Should you prefer to work back and forth instead of in the round, you may of course adjust the pattern so you work the pieces separately and then assemble them at the end. Divide the stitches for the body in 2, add 1 edge stitch in each side (for sewing) and work the front and back pieces separately.

See DROPS lesson: Can I adapt a pattern for circular needles into straight needles?

Pattern repeats can vary slightly in the different sizes, in order to get the correct proportions. If you’re not working the exact same size as the garment in the photo, yours might deviate slightly. This has been carefully developed and adjusted so that the complete impression of the garment is the same in all sizes.

Make sure to follow instructions and diagrams for your size!

If you have found a pattern you like which is available in women’s size it’s not very difficult to convert it to men’s size. The biggest difference will be the length of sleeves and body. Start working on the women size that you think would fit across the chest. The additional length will be worked right before you cast off for the armhole/sleeve cap. If the pattern is worked top-down you can add the length right after the armhole or before the first decrease on sleeve.

Regarding additional yarn amount, this will depend on how much length you add, but it is better with a skein too many than too few.

All yarns will have excess fibres (from production) that might come off as lint or shedding. Brushed yarns (ie hairier yarns) have more of these loose, excess fibres, causing more shedding.

Shedding also depends on what is worn under or over the garment, and whether this pulls at the yarn fibres. It’s therefore not possible to guarantee that there will be no shedding

Below are some tips on how to get the best result when working with hairier yarns:

1. When the garment is finished (before you wash it) shake it vigorously so the looser hairs come off. NOTE: do NOT use a lint roller, brush or any method that pulls at the yarn.

2. Place the garment in a plastic bag and put it in your freezer - the temperature will cause the fibres to become less attached to each other, and excess fibres will come off easier.

3. Leave in the freezer for a few hours before taking it out and shaking it again.

4. Wash the garment according to the instructions on the yarn label.

Pilling is a natural process that happens to even the most exclusive of fibers. It's a natural sign of wear and tear that is hard to avoid, and that is most visible in high friction areas of your garment like a sweater's arms and cuffs.

You can make your garment look as new by removing the pilling, using a fabric comb or a pill/lint remover.

Still can't find the answer you need? Then scroll down and leave your question so one of our experts can try to help you. This will be done normally within 5 to 10 working days.
In the meantime, you can read the questions and answers that others have left to this pattern or join the DROPS Workshop on Facebook to get help from fellow knitters/crocheters!

You might also like...

Inner Circle

Andrea Di Muzio, Italy

Inner Circle

IntreccidiCeci, Italy

Post a comment to pattern DROPS 208-11

We would love to hear what you have to say about this pattern!

If you want to leave a question, please make sure you select the correct category in the form below, to speed up the answering process. Required fields are marked *.

Comments / Questions (27)

country flag Marianne Sandberg wrote:

Hej! Jag stickar herrtröja 208-11 i stl. S. Jag har stickat halskant och ska börja med oket. När jag kommit så långt att jag ska sticka mönstret, får jag 20 rapporter, det ska vara 16 st. Har jag för många maskor? Ska jag bara öka 1 gång på första varvet när mönstret börjar? Jag har ökat var sjunde maska!! MVH: Marianne Sandberg

22.11.2021 - 14:59

DROPS Design answered:

Hej Marianne. Det stämmer att du ska öka i början av varje rapport (dvs omslag, 7 m, omslag.. osv). När första varvet är stickat har du ökat 16 m och har då 128 m på varvet. Nästa varv består en rapport av 8 maskor. 128 m / 8 m = 16 rapporter. Du ska alltså fortfarande ha 16 rapporter på varvet. Mvh DROPS Design

23.11.2021 - 08:43

country flag Nicolette Mörth wrote:

Hallo, ich bin beim Ende der Passe und komme mit den Zahlen nicht zurecht. Vor der Teilung soll man bei größe M 348 Maschen auf den Nadeln haben. Dann wird in Rücken-, Vorderteil und Ärmeln geteilt, und zwar 46, 68, 92, 68 und 46 Maschen. Das macht 320 Maschen. Was ist mit den restlichen 48? Wo habe ich falsch gelesen? Vielen Dank.

23.09.2021 - 18:44

DROPS Design answered:

Liebe Frau Mörth, in M sollen Sie 306 M nach A.1 haben, dann nehmen Sie 14 M regelmäßig verteilt zu = 320 M (342+6=348 M in L), so haben Sie: 46+68+92+68+46=320 M. Viel Spaß beim stricken!

24.09.2021 - 07:31

country flag Riitta Lakkals wrote:

Haluan dropsin langan alpakka lankaan yllä olevaan malliin, mikä on langan menekki?

11.08.2021 - 15:55

DROPS Design answered:

DROPS Alpaca on Karisma-lankaa ohuempi lanka, eli neuletiheys ei ole näillä langoilla sama. Jos teet neuleen Alpaca-langalla, siitä ei tule oikean muotoinen. Lisäksi Alpaca-lanka neulotaan ohuemmilla puikoilla.

25.08.2021 - 17:16

country flag Anne Grete Langseth wrote:

Strikker «Inner circle» i medium, men får ikke regnestykket til å stemme. Det skal være 306 masker, og så øke opp til 348 = øke 6 masker + 8 masker under hver arm. Dette blir 22 masker, men det mangler fortsatt 20 masker. Enten er det jeg som ikke forstår mønsteret, eller så mangler mattekunnskaper hos dere. Har nå rekt opp 2 ganger uten å forstå.

06.08.2021 - 14:01

DROPS Design answered:

Hei Anne Grete, Det ser ut som du strikke størrelse M, som har 306 masker før økingen. I neste avsnitt er det kun M, L og XL som er beskrevet, så du da strikke etter første tallet i lista, så du øker 14 masker jevnt fordelt (på hele runden, ikke bare under ermene) og har 320 masker når du da går til alle størrelser. God fornøyelse!

09.08.2021 - 10:05

country flag Anne Regenstreif wrote:

After the neck ribbing is completed, the instructions have you decrease on one row, then increase on the next. Why not just do the increases? Example for size XL, you decrease by 20 sts. evenly, then on next row increase by 36 sts. evenly. What is the reason for doing this, rather than just increasing 16 sts. in one round?

26.07.2021 - 14:58

DROPS Design answered:

Dear Mrs Regenstreif, this helps to make a nice transition between neck and yoke. Happy knitting!

26.07.2021 - 15:04

country flag Anna Hansen wrote:

Efter ribbort skal der tages ind og øges igen ? Jeg har set spørgsmålet tidligere , hvor i svarede det blev pænere, der giver ikke mening for mig , håber at jeg får svar

30.06.2021 - 22:16

DROPS Design answered:

Hei Anna. Plagg strikket ovenfra og ned: Når du minsker masker etter vrangborden for deretter øker, får plagget et bedre hold/stabilitet, det vil ikke sige så mye som det ville ha gjordt dersom man ikke hadde minsket maskeantallet før det økes igjen. Plagg strikket nedenifra og opp: Dersom vrangborden har et mye mindre maskeantall enn bolen, bil plagget få en stram vrangbord og bli ganske posete (noe man ofte så på plagg fra 1980-tallet). For å få en penere overgang mellom vrangbord og bol, er det flere masker i vrangborden enn bolen. mvh DROPS design

05.07.2021 - 13:57

country flag Amica wrote:

Hola, No comprendo porqué he de disminuir puntos al terminar el elástico y después aumentar Trabajar 1 vuelta de derecho y al mismo tiempo disminuir 16-19-19-20-20-20 puntos repartidos – Trabajar 1 vuelta de derecho y al mismo tiempo aumentar 20-22-32-36-39-42 puntos repartidos = 112-119-133-140-147-154 puntos. Gracias de antemano

21.12.2020 - 01:46

DROPS Design answered:

Hola Amica! La orilla de resorte es más elástica y se contraerá ligeramente comparada a, por ejemplo, el punto jersey. Al aumentar antes de la orilla de resorte, evitas una diferencia visible con el ancho entre la orilla de resorte y el resto del cuerpo. El mismo pricipio es cuando hay que disminuir despues de la orilla de resorte. Buen trabajo!

21.12.2020 - 10:30

country flag Wenche Lølanf wrote:

Det står i str l at dey skal økes 6 masker eyyer ca 24 cm, men det er helt feol. det må være 26? Da blir resten også feil.

20.12.2020 - 23:26

DROPS Design answered:

Hej Wenche, du skal øke 6 masker for at få 348 m når du deler arbejdet. Og antal masker stemmer når du deler det. God fornøjelse!

07.01.2021 - 11:08

country flag Susan England wrote:

The diagram for yoke pattern shows increase symbols on both sides of pattern. Does this mean you increase sts on all symbols for all sizes?

10.11.2020 - 22:11

DROPS Design answered:

Dear Mrs England, that's right, diagram A.1 is the same for all sizes (but will be worked a different number of times in each size), so that A.1 starts with 7 sts and after all increases in diagrams are done, there are 18 sts in each A.1. Happy knitting!

11.11.2020 - 08:53

country flag KATTY CASTELLAT wrote:

Pourquoi diminuer et réaugmenter aussitôt après de 20 m au niveau du col ? Merci...

05.11.2020 - 09:33

DROPS Design answered:

Bonjour Mme Catellat, on délimite ainsi bien le col entre la fin des côtes et le début de l'empiècement. Bon tricot!

05.11.2020 - 11:07