
Popular categories
Looking for a yarn?


Comments / Questions (62)
![]() Lindsey wrote:
Lindsey wrote:
What does mid-stitch in A2 mean? I read the definition but it still is confusing. Do you start the round at the stitch marked mid-stitch?
22.11.2024 - 23:32DROPS Design answered:
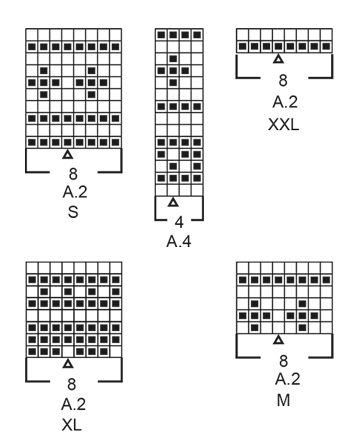
Dear Lindsey, the triangle with the middle stitch is explained in the sleeve. This is the middle stitch at the top of the sleeve and we mark this stitch so that you can have a centered pattern. This way, if you increase/decrease and the charts start to misalign, you can hide the misalignments under the sleeve, where they will be barely noticeable, while the middle stitch will always be at the center of the pattern repeat. You can read more on how to center a chart here: https://www.garnstudio.com/lesson.php?id=39&cid=19 (the arrow would be the mid-stitch triangle in A.2). Happy knitting!
24.11.2024 - 20:13
![]() Jo Lang wrote:
Jo Lang wrote:
Hi, the person I am knitting this sweater for is not keen on the width of the neck. Is there any way I can make the neck smaller and then cast-on to begin the pattern?
13.07.2024 - 12:58DROPS Design answered:
Dear Jo, please understand that with many thousands of patterns available for free on our site, we cannot modify them to each individual request. Having said that, you could start with the numver of stitches ypu need for the smaller neck, and then increase more stitches for the first and the 5th row of A.1 pattern, maybe even adding a row with the off white color before and after the first pattern (the three roe that makes up the cross. However, by the time you get to the first arrow, you should have the number of stitches given in the pattern. Happy Knitting!
16.07.2024 - 00:58
![]() Laureen TÊTU wrote:
Laureen TÊTU wrote:
Bonjour, Y a t-il une astuce particulière pour éviter de voir le décalage à chaque début de rang quand nous ne commençons pas le rang avec la même couleur que le rang précédent ? Merci beaucoup !
23.06.2024 - 19:07DROPS Design answered:
Bonjour Mme Têtu, vous pouvez utiliser l'astuce de cette vidéo pour les rayures lorsque vous avez plusieurs rangs d'une même couleur, sinon le décalage est inévitable; parfois en resserrant un peu le fil à la jonction entre les tours, on arrive à le cacher un peu. Bon tricot!
24.06.2024 - 09:55
![]() Marilyn wrote:
Marilyn wrote:
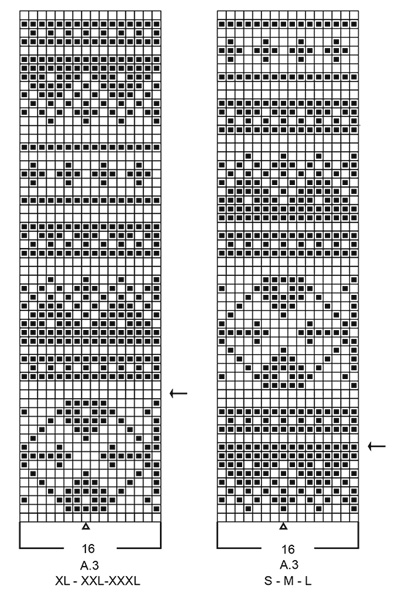
Stickar Selvik i xl och har nu börjat med ärmarna. Kommit till mönster A3 men då stämmer inte rapporten på 16 maskor när jag har 88 maskor? Jag har rivit upp 3 gånger nu och får det inte att stämma när mönstret möts. Vad gör jag för fel??
21.04.2024 - 19:06DROPS Design answered:
Hej Marilyn, mønsteret skal stemme midt ovenpå ærmet og kommer ikke til at stemme under ærmet i og med at det er her du tager ind :)
23.04.2024 - 14:10
![]() Martine wrote:
Martine wrote:
Après reprise des mailles sur fil, plus les mailles relevées sous la manche, quand on fait les diminutions on ne termine plus normalement le motif jacquard .... Est ce normal ? Est ce que le jacquard doit commencer au niveau du fil des diminutions ? Merci d'avance
11.03.2024 - 12:41DROPS Design answered:
Bonjour Martine, il est normal que le motif ne tombe pas juste au milieu sous la manche, vous allez tricoter de moins en moins de mailles en jacquard, veillez juste à ce que le jacquard continue bien en hauteur comme dans les diagrammes. Bon tricot!
11.03.2024 - 14:33
![]() Farmen wrote:
Farmen wrote:
Hvor har det blitt av diagram A1, har det falt ut fra oppskriften ?
18.03.2023 - 21:19DROPS Design answered:
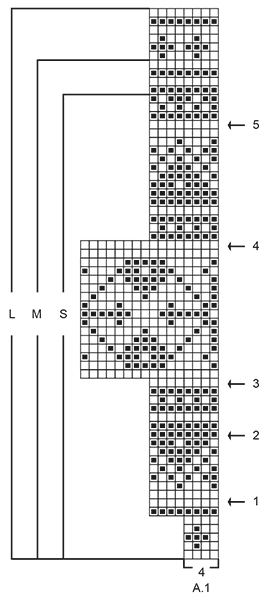
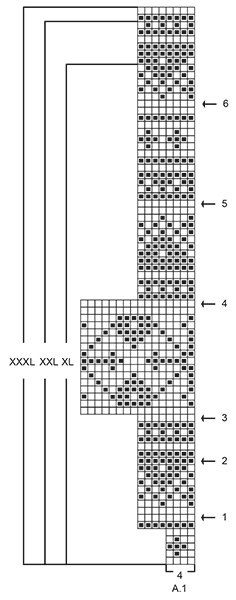
Hei Farmen, A.1 er de 2 første lange diagrammene, rett etter teksten (velg diagram for din størrelse). God fornøyelse!
20.03.2023 - 06:52
![]() Isabella wrote:
Isabella wrote:
Ik ben Drops 196-18 aan het breien en ga nu met de mouw beginnen. In het patroon staat dat ik een markeerdraad in een steek moet toevoegen. In het instructie filmpje zie je hoe je die draad tussen steken moet toevoegen. Ik weet niet hoe je de draad in de steek moet toevoegen en of je de draad er later dan nog wel uit krijgt.
29.01.2023 - 10:01
![]() Maria wrote:
Maria wrote:
Czy przy robieniu rękawa po każdym zamykaniu oczek mam na nowo obliczać jak zacząć wzór, żeby się zgadzał na wierzchu rękawa? Pod rękawem wzór chyba nie będzie się zgadzał, tam gdzie były zamykane oczka i na końcu rzędu? (ponieważ nie ma wystarczającej ilości oczek aby zrobić cały wzór)
13.12.2022 - 22:37DROPS Design answered:
Witaj Mario, a nitka na rękawie (na środku na górze rękawa) służy do obliczenia gdzie zaczyna się żakard. Niestety trzeba to robić, z powodu zamykania oczek żakard nie będzie się zgadzał. Ważne aby był poprawny na rękawie, pod spodem rękawa nie będzie to już widoczne. Pozdrawiamy!
14.12.2022 - 13:01
![]() Susanne wrote:
Susanne wrote:
Guten Tag , ich habe den Pullover für eine Freundin gestrickt er saß super nun mußte er gewaschen, sie hat ih auf 20 Grad gewaschen und im Liegen getrocknet nun ist der pullover so groß geworden das sie ihn nicht mehr anziehen kann woran liegt das bloß ? Ich stricke gerade den zweiten und möchte nicht das es nochmal passiert ,
04.10.2022 - 12:41DROPS Design answered:
Liebe Susanne, wenn Sie Merino Extra Fine oder Karisma benutzt haben, dann ist die Wolle Superwash, so kann sie en Pullover in der Waschmaschine waschen - mehr lesen Sie unter den jeweiligen Farbkarten und noch mehr über wolle waschen lesen Sie hier - Im Notfall wenden Sie sich bitte an Ihrem DROPS Laden, dort wird man Ihnen am besten weiterhelfen (auch per Telefon oder per E-Mail). Viel Spaß beim stricken!
04.10.2022 - 13:30
![]() Susanne Voss wrote:
Susanne Voss wrote:
Guten Abend , ich versteh das mit der Mittelmasche nicht ,Wird die nur am Arm Berücksichtigt? Ich hab dazu nichts in der Anleitung gefunden Danke schön Susanne
09.06.2022 - 17:08DROPS Design answered:
Liebe Frau Voss, ja genau, die Mittelmasche in A.2 und A.3 betrifft nur die Ärmel. Diese Lektion erklärt, wie man ein Diagram in der Mitte platziert und kann dann Ihnen sicher weiterhelfen. Viel Spaß beim stricken!
10.06.2022 - 08:33
|
|||||||||||||
Selvik#selviksweater |
|||||||||||||
 |
 |
||||||||||||
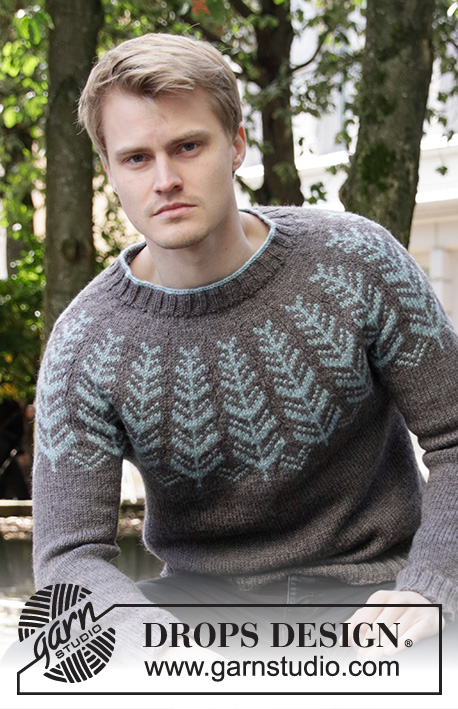
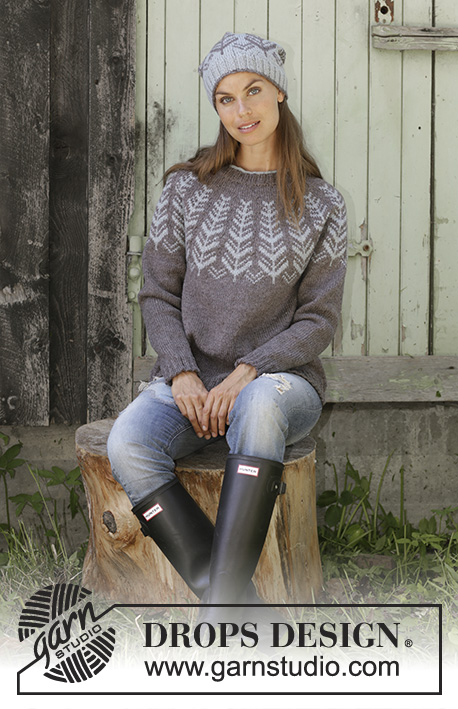
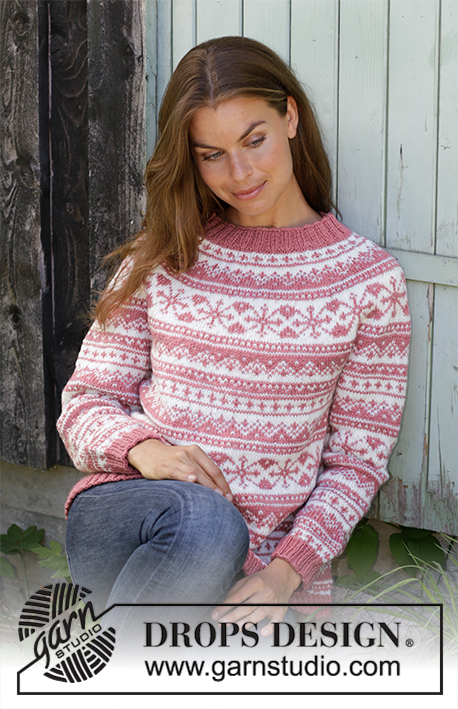
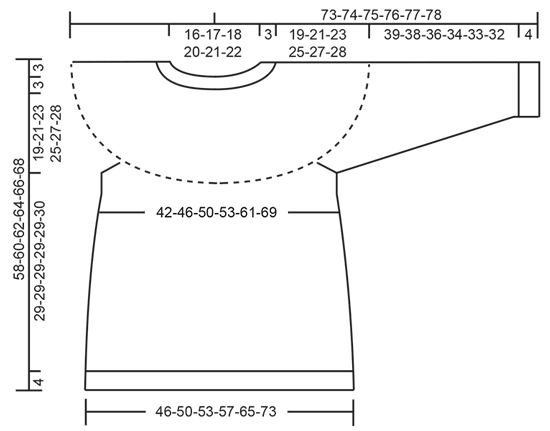
Knitted jumper in DROPS Merino Extra Fine or DROPS Karisma. The piece is worked top down with round yoke and Nordic pattern. Sizes S - XXXL
DROPS 196-18 |
|||||||||||||
|
------------------------------------------------------- EXPLANATIONS FOR THE PATTERN: ------------------------------------------------------- INCREASE/DECREASE TIP: To work out how to increase/decrease evenly, count the total number of stitches on the needle (e.g. 104 stitches) and divide by the number of increases/decreases to be made (e.g. 24) = 4.3. In this example, increase by making 1 yarn over after approx. each 4th stitch. On the next round knit the yarn overs twisted to avoid holes. When decreasing knit approx. each 3rd and 4th stitch together. KNITTING TIP-1: To avoid the knitting tension becoming tighter when working pattern, it is important that the strands at the back of the piece are not tight. You can use a size larger needle when working pattern if this is a problem. KNITTING TIP-2: It is also important to maintain the knitting tension in height or the yoke will be too short and the armholes too small! PATTERN: See diagrams A.1 to A.4. Choose diagram for your size. The whole pattern is worked in stocking stitch. DECREASE TIP (for mid under sleeves): Start 2 stitches before the stitch with the marker thread, knit 2 together, knit 1 (= the stitch with the marker thread), slip 1 stitch as if to knit, knit 1, pass the slipped stitch over the knitted stitch (= 2 stitches decreased). ------------------------------------------------------- START THE PIECE HERE: ------------------------------------------------------- JUMPER – SHORT OVERVIEW OF THE PIECE: Neck, yoke and body are worked in the round with circular needle, top down. The sleeves are worked in the round with short circular needle/double pointed needles, top down. NECK: Cast on 104-108-112-120-124-132 stitches with circular needle size 3 mm and dark rose. Knit 1 round. Then work rib in the round (= knit 2 / purl 2) for 3 cm. Knit 1 round where you increase 24-28-32-32-36-44 stitches evenly on round – read INCREASE/DECREASE TIP = 128-136-144-152-160-176 stitches. Change to circular needle size 4 mm and knit 1 round. Then work yoke as described below. YOKE: Read KNITTING TIP-1 and KNITTING TIP-2! Work A.1 in the round (= 32-34-36-38-40-44 repeats of 4 stitches). Continue this pattern in the round. AT THE SAME TIME on each round marked with an arrow in A.1 increase evenly on round as described below – read INCREASE/DECREASE TIP and REMEMBER THE KNITTING TENSION! On the round marked with arrow-1 increase 32-32-32-32-40-40 stitches evenly on round = 160-168-176-184-200-216 stitches (there is now room for 20-21-22-23-25-27 repeats of 8 stitches). On the round marked with arrow-2 increase 32-40-40-40-40-48 stitches evenly on round = 192-208-216-224-240-264 stitches (there is now room for 24-26-27-28-30-33 repeats of 8 stitches). On the round marked with arrow-3 increase 32-32-40-48-48-40 stitches evenly on round = 224-240-256-272-288-304 stitches (there is now room for 14-15-16-17-18-19 repeats of 16 stitches). On the round marked with arrow-4 increase 32-32-32-32-40-48 stitches evenly on round (there is now room for 32-34-36-38-41-44 repeats of 8 stitches) = 256-272-288-304-328-352 stitches. On the round marked with arrow-5 increase 32-32-32-24-32-32 stitches evenly on round (there is now room for 36-38-40-41-45-48 repeats of 8 stitches) = 288-304-320-328-360-384 stitches. The increases are now finished in sizes S, M and L. On the row marked with arrow-6 (for sizes XL, XXL and XXXL) increase 24-24-32 stitches evenly on round = 288-304-320-352-384-416 stitches on the needle. The increases are now finished in sizes XL, XXL and XXXL. Continue working until just the last round in A.1 is left. The piece now measures 22-24-26-28-30-31 cm from the cast-on edge mid front. The next round is worked as follows: Work 40-44-46-50-56-64 stitches as shown in last row in the diagram (= ½ back piece), place the next 64-64-68-76-80-80 stitches on a thread for sleeve, cast on 8-8-12-12-16-16 new stitches on the needle (= in side under sleeve), knit 80-88-92-100-112-128 stitches as shown in the last round in the diagram (= front piece), place the next 64-64-68-76-80-80 stitches on a thread for sleeve, cast on 8-8-12-12-16-16 new stitches on the needle (= in side under sleeve), knit 40-44-46-50-56-64 stitches as shown in last round in diagram (= ½ back piece). Body and sleeves are finished separately. THE PIECE IS NOW MEASURED FROM HERE! BODY: = 176-192-208-224-256-288 stitches. The first round is worked as follows: SIZES S, M, XL and XXL: Work A.2 in the round (= 22-24-28-32 repeats of 8 stitches). When A.2 has been completed, work A.3 in the round (= 11-12-14-16 repeats of 16 stitches). Then continue as described under ALL SIZES. SIZES L and XXXL: Work A.3 in the round (= 13-18 repeats of 16 stitches). Then continue as described under ALL SIZES. ALL SIZES: Continue A.3 as described above. A.3 is repeated in height as far as the rib. AT THE SAME TIME on the round marked with an arrow in A.3 increase 16 stitches evenly on round in all sizes = 192-208-224-240-272-304 stitches (this increase is only on the first repeat of A.3 in height). Continue this pattern (there is now room for 1 more repeat of A.3 in width). Work until the piece measures approx. 29-29-29-29-29-30 cm from the division for sleeves – finish after a complete pattern section in dark rose. Knit 1 round with dark rose where you increase 40-40-44-48-56-60 stitches evenly on round = 232-248-268-288-328-364 stitches. Change to circular needle size 3 mm and work rib in the round (= knit 2 / purl 2) for 4 cm. Cast off with knit over knit and purl over purl, but make sure that the cast-off edge is not tight (if this is a problem, you can make 1 yarn over after each 8th stitch at the same time as casting off - the yarn overs are cast off as normal stitches. The jumper measures approx. 58-60-62-64-66-68 cm from the shoulder down. SLEEVE: Place the 64-64-68-76-80-80 stitches from the thread on the one side of the piece on short circular needle size 4 mm and knit up 1 stitch in each of the 8-8-12-12-16-16 stitches cast on under the sleeve = 72-72-80-88-96-96 stitches on the needle. Insert 1 marker thread in the middle of the 8-8-12-12-16-16 stitches under the sleeve, i.e. insert the marker thread in the first stitch after the middle, count 35-35-39-43-47-47 stitches and insert 1 marker thread in the next stitch (= mid-stitch). There are now 35-35-39-43-47-47 stitches left on the round after the last marker thread. Allow the marker threads to follow your work onwards. The marker thread under the sleeve is later used when you decrease under the sleeve and the marker thread on top is used to count to where the pattern starts. READ THE REST OF THIS SECTION BEFORE CONTINUING! Work the last round in A.1 so that A.1 finishes in the same way as on the body. PATTERN: In sizes S, M, XL, XXL work A.2 in the round (= 9-9-11-12 repeats of 8 stitches), but count out from the middle - mid-stitch in A.2 should match the stitch with the marker thread on top of sleeve. When A.2 has been completed, work A.3 in the same way. In sizes L and XXXL work A.3 straight after working the last round in A.1 and count out from the mid-stitch in the same way as for the other sizes. A.3 is repeated in height until the piece measures 29-28-26-23-22-21 cm from the division – finish after a complete repeat in height. Then work A.4 in the round in the same way. DECREASING: AT THE SAME TIME when the piece measures 3-3-3-3-2-2 cm decrease 2 stitches mid under sleeve – read DECREASE TIP. Decrease like this every 2½-3-2-1½-1½-1½ cm a total of 14-12-16-18-20-20 times = 44-48-48-52-56-56 stitches. When the sleeve measures approx. 39-38-36-34-33-32 cm from the division (shorter measurements in larger sizes due to longer yoke) knit 1 round with dark rose where you increase 4 stitches evenly on round in all sizes = 48-52-52-56-60-60 stitches. Change to double pointed needles size 3 mm. Work rib in the round (= knit 2 / purl 2) for 4 cm. Cast off with knit over knit and purl over purl, but make sure that the cast-off edge is not tight (if this is a problem, you can make 1 yarn over after each 8th stitch at the same time as casting off - yarn overs cast off as normal stitches). The sleeve measures approx. 43-42-40-38-37-36 cm from the division down. Work the other sleeve in the same way. |
|||||||||||||
Diagram explanations |
|||||||||||||
|
|||||||||||||
|
|||||||||||||
|
|||||||||||||
|
|||||||||||||
|
|||||||||||||
|
|||||||||||||
Have you finished this pattern?Tag your pictures with #dropspattern #selviksweater or submit them to the #dropsfan gallery. Do you need help with this pattern?You'll find 23 tutorial videos, a Comments/Questions area and more by visiting the pattern on garnstudio.com. © 1982-2025 DROPS Design A/S. We reserve all rights. This document, including all its sub-sections, has copyrights. Read more about what you can do with our patterns at the bottom of each pattern on our site. |
|||||||||||||


With over 40 years in knitting and crochet design, DROPS Design offers one of the most extensive collections of free patterns on the internet - translated to 17 languages. As of today we count 314 catalogues and 11822 patterns translated into English (UK/cm).
We work hard to bring you the best knitting and crochet have to offer, inspiration and advice as well as great quality yarns at incredible prices! Would you like to use our patterns for other than personal use? You can read what you are allowed to do in the Copyright text at the bottom of all our patterns. Happy crafting!
Post a comment to pattern DROPS 196-18
We would love to hear what you have to say about this pattern!
If you want to leave a question, please make sure you select the correct category in the form below, to speed up the answering process. Required fields are marked *.