DROPS Safran
DROPS Safran
100% Cotton
from 1.30 £ /50g
Get the yarn to make this pattern from 7.80£.

The yarn cost is calculated from the pattern’s smallest size and the yarn’s cheapest product type. Looking for an even better price? You might find it on the DROPS Deals!

DROPS SS24

Alberta Rose Jacket

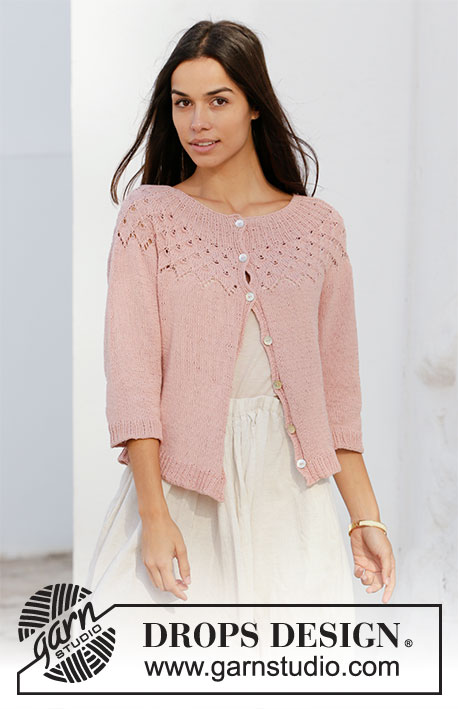
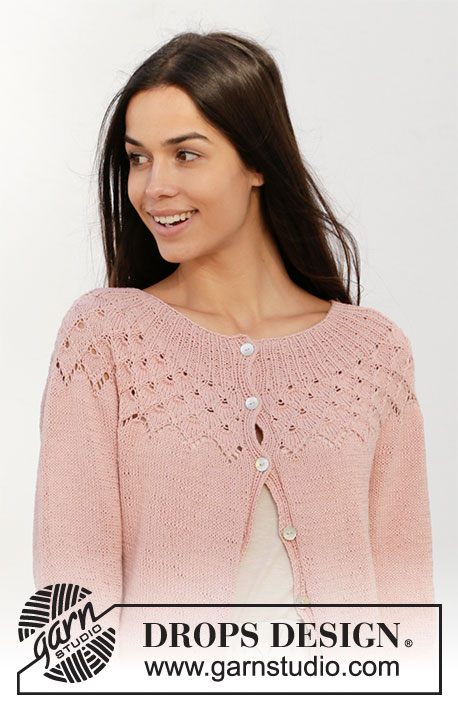
Knitted jacket with round yoke in DROPS Safran. The piece is worked top down with lace pattern, leaf pattern and ¾-length sleeves. Sizes S - XXXL.

DROPS 212-6
DROPS Design: Pattern no e-301
Yarn group A
-------------------------------------------------------

SIZES:
S - M - L - XL - XXL - XXXL

MATERIALS:
DROPS SAFRAN from Garnstudio (belongs to yarn group A)
300-300-350-400-400-450 g colour 56, powder pink

KNITTING TENSION:
23 stitches in width and 30 rows in height with stocking stitch = 10 x 10 cm.

NEEDLES:
DROPS DOUBLE POINTED NEEDLES SIZE 3.5 MM.
DROPS CIRCULAR NEEDLE SIZE 3.5 MM: Length 80 cm for stocking stitch.
DROPS DOUBLE POINTED NEEDLES SIZE 2.5 MM.
DROPS CIRCULAR NEEDLE SIZE 2.5 MM: Length 80 cm for rib.
Needle size is only a guide. If you get too many stitches on 10 cm, change to a larger needle size. If you get too few stitches on 10 cm, change to a smaller needle size.

DROPS MOTHER OF PEARL BUTTONS, Arched (white) NO 522: 7-7-7-8-8-8 items.

-------------------------------------------------------

Alternative Yarn – See how to change yarns here
Yarn Groups A to F – Use the same pattern and change the yarn here
Yarn usage using an alternative yarn – Use our yarn converter here

-------------------------------------------------------

DROPS Safran
DROPS Safran
100% Cotton
from 1.30 £ /50g
Get the yarn to make this pattern from 7.80£.

The yarn cost is calculated from the pattern’s smallest size and the yarn’s cheapest product type. Looking for an even better price? You might find it on the DROPS Deals!

Pattern instructions

NOTE: This pattern is written in British English. All measurements in charts are in cm. For conversion from cm to inches - click here. There are different terms for crocheting in British and American English. If this pattern includes crochet, click for "crochet terms" here. For this pattern in American English, please click here.
-------------------------------------------------------

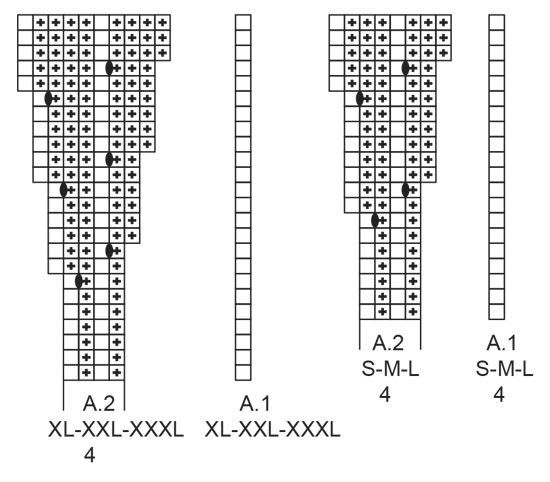
EXPLANATIONS FOR THE PATTERN:

-------------------------------------------------------

PATTERN: 
See diagrams A.1 to A.5. Choose diagrams for your size. The diagrams show all the rows in the pattern seen from the right side.

INCREASE TIP-1 (for sides of body):
All increases are worked from the right side!
Work until there are 2 stitches left before the marker thread, make 1 yarn over, knit 4 (marker thread sits between these 4 stitches), make 1 yarn over.
On the next row work the yarn overs twisted to avoid holes. Then work the new stitches in stocking stitch

INCREASE TIP-2 (evenly spaced):
To work out how to increase evenly, count the total number of stitches on the needle (e.g. 257 stitches) minus the bands (e.g. 14 stitches) and divide the remaining stitches by the number of increases to be made (e.g. 64) = 3.79. 
In this example, increase by making 1 yarn over after approx. each 4th stitch. On the next row work the yarn overs twisted to avoid holes.

DECREASE TIP (for sleeves): 
Decrease 1 stitch on each side of the marker thread as follows: Work until there are 3 stitches left before the marker thread, knit 2 together, knit 2 (marker thread sits between these 2 stitches), slip 1 stitch as if to knit, knit 1 and pass the slipped stitch over the knitted stitch.

CASTING-OFF TIP:
To avoid the cast-off edge being tight you can cast off with a larger size needle. If the edge is still tight, make 1 yarn over after approx. each 4th stitch at the same time as casting off and the yarn overs are cast off as normal stitches.
.
BUTTONHOLES:
Work buttonholes on right band (when garment is worn). Work from the right side when there are 4 stitches left on row as follows: Make 1 yarn over, knit 2 together and knit the last 2 stitches. On the next row (wrong side) knit the yarn over to leave a hole.
The first buttonhole is worked when the neck measures 1½-2 cm. Then work the other 6-6-7-7-7-7 buttonholes with approx. 7-7-7½-7-7-7½ cm between each one.

-------------------------------------------------------

START THE PIECE HERE:

-------------------------------------------------------

JACKET – SHORT OVERVIEW OF THE PIECE:
The neck and yoke are worked back and forth with circular needle, from mid front and top down. The yoke is divided for body and sleeves and the body is continued back and forth with circular needle. The sleeves are worked in the round with double pointed needles, top down.

NECK:
Cast on 123-131-139-139-143-155 stitches (including 7 band stitches on each side towards mid front) with circular needle size 2.5 mm and Safran. Purl 1 row (= wrong side). The next row is worked as follows from the right side: Knit 2, purl 2, knit 1, purl 2 (= band), A.1 (= 1 stitch), A.2 (= 4 stitches) until there are 7 stitches left on the row (= 27-29-31-31-32-35 times in width) and over the band purl 2, knit 1, purl 2, knit 2. Remember the BUTTONHOLES – see description above.
When the first 6 rows of the pattern have been worked, change to circular needle size 3.5 mm.
Insert 1 marker after the band at the beginning of the row; the yoke will be measured from this marker!

YOKE:
Continue the pattern as before and increase as shown in A.2. When A.1 and A.2 have been worked 1 time in height there are 231-247-263-325-335-365 stitches on the row. The piece measures approx. 5-5-5-6-6-6 cm from the marker.
On the next row from the right side work as follows:
Knit 2, purl 2, knit 1, purl 2 over the band stitches as before, A.3 (= 1 stitch), A.4 (= 8-8-8-10-10-10 stitches) until there are 15-15-15-17-17-17 stitches left (= 26-28-30-30-31-34 times in width), A.5 (= 8-8-8-10-10-10 stitches) and over the band purl 2, knit 1, purl 2 and knit 2.
REMEMBER THE KNITTING TENSION!
When A.3 to A.5 have been worked 1 time in height there are 337-361-385-447-461-503 stitches on the row.
The piece measures approx. 16-16-16-21-21-21 cm from the marker. Continue with stocking stitch and knit over knit and purl over purl on the bands until the piece measures 18-20-21-23-25-27 cm from the marker.
Now divide the piece for body and sleeves as follows:
Work the first 53-56-59-69-71-80 stitches, place the next 70-74-80-93-94-98 stitches on a thread for the sleeve and cast on 8-8-10-8-12-10 stitches under the sleeve, work 91-101-107-123-131-147 stitches, place the next 70-74-80-93-94-98 stitches on a thread for the sleeve and cast on 8-8-10-8-12-10 stitches under the sleeve and work the last 53-56-59-69-71-80 stitches.

BODY:
= 213-229-245-277-297-327 stitches. Insert 1 marker thread 57-60-64-73-77-85 stitches in from each side (= sides of body). There are 99-109-117-131-143-157 stitches between the marker threads on the back piece.
Allow the threads to follow your work onwards; they will be used when increasing in the sides.
Continue with stocking stitch and knit over knit and purl over purl on the bands as before.
When the piece measures 3 cm from the division increase 1 stitch on each side of both marker threads – read INCREASE TIP-1 (= 4 stitches increased). Increase like this every 2½ cm a total of 7 times = 241-257-273-305-325-355 stitches.
Continue working until the piece measures 26-26-27-27-27-27 cm from the division. (or to desired length; there are 4 cm left to finished length). Knit 1 row from the right side and increase 62-64-66-67-68-68 stitches evenly spaced (band stitches worked as before) – read INCREASE TIP-2 = 303-321-339-372-393-423 stitches.
The increase is done to prevent the rib being tight.
Change to circular needle size 2.5 mm and work the next row from the wrong side as follows:
Purl 2, knit 2, purl 1, knit 2 on the band as before, * purl 1, knit 2 *, work from *-* until you have 8 stitches left on the row, purl 1 and then, on the bands, knit 2, purl 1, knit 2, purl 2 as before.
Continue this rib for 4 cm. Cast off with knit from the right side – read CASTING-OFF TIP.

SLEEVES:
Place the 70-74-80-93-94-98 stitches from the thread on the one side of the piece onto double pointed needles size 3.5 mm and knit up 1 stitch in each of the 8-8-10-8-12-10 stitches cast on under the sleeve = 78-82-90-101-106-108 stitches.
Insert 1 marker thread in the middle of these 8-8-10-8-12-10 new stitches under the sleeve.
Allow the thread to follow your work onwards; it will be used when decreasing mid under sleeve.
Work in the round in stocking stitch. When the piece measures 2 cm from the division decrease 1 stitch on each side of the marker thread – read DECREASE TIP (= 2 stitches decreased). Decrease like this every 2½-2-1½-1-1-1 cm a total of 9-10-13-17-18-18 times = 60-62-64-67-70-72 stitches.
When the sleeve measures 30-28-28-26-25-23 cm from where the sleeve was divided from the body, increase 6-7-8-5-8-6 stitches evenly spaced = 66-69-72-72-78-78 stitches. Change to double pointed needles size 2.5 mm and work rib (= knit 1 / purl 2) over all stitches. Cast off with knit when the sleeve measures 34-32-32-30-29-27 cm from the division.
Work the other sleeve in the same way.

ASSEMBLY:
Sew the buttons onto the left band.

This pattern has been corrected.

Updated online: 03.03.2020
Correction: Edit on 4th row of diagram A.4 and A.5 in size XL-XXL-XXXL.

Diagram

symbols = knit from right side, purl from wrong side
symbols = purl from right side, knit from wrong side
symbols = work 4-4-4-5-5-5 stitches in the same stitch as follows: Knit 1, but do not slip the stitch from the left needle, make 1 yarn over, knit 1 in same stitch, 1 yarn over, knit 0-0-0-1-1-1 in same stitch and slip the worked stitch from the needle
symbols = work 7-7-7-9-9-9 stitches in the same stitch as follows: Knit 1, but do not slip the stitch from the left needle, * 1 yarn over , knit 1 in same stitch *, work from *-* a total of 3-3-3-4-4-4 times, slip the worked stitch from the needle
symbols = between 2 stitches make 1 yarn over; the yarn over is worked twisted on the next row (no hole)
symbols = between 2 stitches make 1 yarn over
symbols = knit 2 together
symbols = slip 1 stitch as if to knit, knit 1, pass the slipped stitch over the knitted stitch
symbols = slip 2 stitches onto the right needle as if to knit together, knit 1, pass the 2 slipped stitches over the knitted stitch
symbols = work 3 stitches in the same stitch as follows: Knit 1, but do not slip the stitch from the left needle, 1 yarn over, knit 1 in same stitch, slip the stitch from the needle
diagram
diagram
diagram
diagram

Each of our patterns has specific tutorial videos to help you.

Do you have a question? See a list of frequently asked questions (FAQ)

Knitting tension is what determines the final measurements of your work, and is usually measured per 10 x 10 cm. It is provided like so: number of stitches in width x number of rows in height - eg: 19 stitches x 26 rows = 10 x 10 cm.

The knitting tension is very individual; some people knit/crochet loosely while others work tightly. You adjust the knitting tension with the needle size, which is why the suggested needle size is only meant as a guide! You need to adjust this (up or down) to ensure that YOUR knitting tension matches the knitting tension provided in the pattern. If you work with a different knitting tension than provided you will have a different yarn consumption, and your work will have different measurements than what the pattern suggests.

The knitting tension also determines which yarns can replace each other. As long as you achieve the same knitting tension you can replace one yarn with another.

See DROPS lesson: How to measure your tension/gauge

See DROPS video: How to make a gauge tension swatch

The required amount of yarn is provided in grams, eg: 450 g. To calculate how many balls you’ll need you first need to know how many grams are in 1 ball (25g, 50g or 100g). This information is available if you click on the individual yarn quality on our pages. Divide the amount required with the amount of each ball. For example, if each ball is 50g (the most common amount), the calculation will be as follows: 450 / 50 = 9 balls.

The important thing when changing from one yarn to another is that the knitting/crochet tension remains the same. This is so that the measurements of the finished piece will be the same as on the sketch provided. It is easier to achieve the same knitting tension using yarns from the same yarn group. It is also possible to work with multiple strands of a thinner yarn to achieve the knitting tension of a thicker one. Please try our yarn converter. We recommend you to always work a test swatch.

Please NOTE: when changing yarn the garment might have a different look and feel to the garment in the photo, due to individual properties and qualities of each yarn.

See DROPS lesson: Can I use a different yarn than the one mentioned in the pattern?

All our yarns are categorised into yarn groups (from A to F) according to thickness and knitting tension – group A contains the thinnest yarns and group F the thickest. This makes it easier for you to find alternative yarns to our patterns, should you wish to switch yarn. All yarns within the same group have a similar knitting tension and can easily replace each other. However, different yarn qualities have different structures and properties which will give the finished work a unique look and feel.

Click here for an overview of the yarns in each yarn group

At the top of all our patterns you’ll find a link to our yarn calculator, which is a helpful tool should you wish to use a different yarn than suggested. By filling in the yarn quality you wish to replace, the amount (in your size) and number of strands, the calculator will present good alternative yarns with the same knitting tension. Additionally it will tell you how much you’ll require in the new qualities and whether you’ll need to work with multiple strands. Most skeins are 50g (some are 25g or 100g).

If the pattern is worked with multiple colours, every colour will have to be calculated separately. Similarly, if the pattern is worked with several strands of different yarns (for example 1 strand Alpaca and 1 strand Kid-Silk) you will have to find alternatives for each, individually.

Click here to see our yarn calculator

Since different yarns have different qualities and textures we have chosen to keep the original yarn in our patterns. However, you can easily find options among our available qualities by using our yarn calculator, or simply pick a yarn from the same yarn group.

It is possible that some retailers still have discontinued yarns in stock, or that someone has a few skeins at home that they would like to find patterns for.

The yarn calculator will provide both alternative yarn as well as required amount in the new quality.

If you think it's hard to decide what size to make, it can be a good idea to measure a garment you own already and like the size of. Then you can pick the size by comparing those measures with the ones available in the pattern's size chart.

You'll find the size chart at the bottom of the pattern.

See DROPS lesson: How to read size chart

The needle size provided in the pattern serves only as a guide, the important thing is to follow the knitting tension. And since knitting tension is very individual, you will have to adjust the needle size to ensure that YOUR tension is the same as in the pattern – maybe you’ll have to adjust 1, or even 2 needle sizes, up or down to achieve the correct tension. For this, we recommend that you work test swatches.

Should you work with a different knitting tension than the one provided, the measurements of the finished garment might deviate from the measurement sketch.

See DROPS lesson: How to measure your tension/gauge

See DROPS video: How to make a tension/gauge swatch

Working a garment top-down provides more flexibility and room for personal adjustment. For example it is easier to try the garment on while working, as well as making adjustments to length of yoke and shoulder caps.

The instructions are carefully explaining every step, in the correct order. Diagrams are adjusted to the knitting direction and are worked as usual.

The diagram depicts all rows/rounds, and every stitch seen from the right side. It is read from bottom to top, from right to left. 1 square = 1 stitch.

When working back and forth, every other row is worked from the right side and every other row is worked from the wrong side. When working from the wrong side, the diagram will have to be worked reversed: from left to right, knit stitches are purled, purl stitches are knit etc.

When working in the round every round is worked from the right side and the diagram are worked from right to left on all rounds.

See DROPS lesson: How to read knitting diagrams

The diagram depicts all rows/rounds, and every stitch seen from the right side. It is worked from bottom to top, from right to left.

When working back and forth every other row is worked from the right side: from right to left and every other row is worked from the wrong side: from left to right.

When working in the round, every row in the diagram are worked from the right side, from right to left.

When working a circular diagram you start in the middle and work your way outwards, counter clockwise, row by row.

The rows usually start with a given number of chain stitches (equivalent to the height of the following stitch), this will either be depicted in the diagram or explained in the pattern.

See DROPS lesson: How to read crochet diagrams

Instructions for working several diagrams after each other on the same row/round, will often be written like so: “work A.1, A.2, A.3 a total of 0-0-2-3-4 times". This means you work A.1 once, then A.2 is worked once, and A.3 is repeated (in width) the number of times provided for your size – in this case like so: S = 0 times, M = 0 times, L=2 times, XL= 3 times and XXL = 4 times.

The diagrams are worked as usual: begin with the first row in A.1, then work the first row in A.2 etc.

See DROPS lesson: How to read knitting diagrams

See DROPS lesson: How to read crochet diagrams

The total width of the garment (from wrist-to-wrist) will be larger in the larger sizes, despite the actual sleeves being shorter. The larger sizes have longer sleeve caps and wider shoulders, so there will be a good fit in all sizes.

The measurement sketch/schematic drawing provides information regarding the full length of the garment. If it’s a jumper or a jacket the length is measured from the highest point on the shoulder closest to the neckline, and straight down to the bottom of the garment. It is NOT measured from the tip of shoulder. Similarly, the length of yoke is measured from the highest point on the shoulder and down to where yoke is split into body and sleeves.

On a jacket measures are never taken along bands, unless specifically stated. Always measure inside band stitches when measuring the length.

See DROPS lesson: How to read a schematic drawing

Diagrams are often repeated on the round or in height. 1 repeat is the diagram the way it appears in the pattern. If it says to work 5 repeats of A.1 in the round, then you work A.1 a total of 5 times after/next to each other in the round. If it says to work 2 repeats of A.1 vertically/in height you work the entire diagram once, then begin again at the start and work the entire diagram one more time.

Chain stitches are slightly narrower than other stitches and to avoid working the cast-on edge too tight, we simply chain more stitches to begin with. The stitch count will be adjusted on the following row to fit the pattern and measurement sketch.

The rib edge is more elastic and will contract slightly compared to, for example, stocking stitch. By increasing before the rib edge, you avoid a visible difference in width between the rib edge and the rest of the body.

It’s very easy to cast off too tightly, and by making yarn overs while casting off (and simultaneously casting these off) you avoid a too tight cast off edge.

See DROPS video: How to bind off with yarn overs (yo)

To achieve an even increase (or decrease) you can increase on, for example: every 3rd and 4th row alternately, like so: work 2 rows and increase on the 3rd row, work 3 rows and increase on the 4th. Repeat this until the increase is complete.

See DROPS lesson: Increase or decrease 1 st on every 3rd and 4th row alternately

Should you prefer to work in the round instead of back and forth, you may of course adjust the pattern. You’ll need to add steeks mid-front (usually 5 stitches), and follow the instructions. When you would normally turn and work from the wrong side, simply work across the steek and continue in the round. At the end you’ll cut the piece open, pick up stitches to work bands, and cover the cut edges.

See DROPS video: How to knit steeks and cut open

Should you prefer to work back and forth instead of in the round, you may of course adjust the pattern so you work the pieces separately and then assemble them at the end. Divide the stitches for the body in 2, add 1 edge stitch in each side (for sewing) and work the front and back pieces separately.

See DROPS lesson: Can I adapt a pattern for circular needles into straight needles?

Pattern repeats can vary slightly in the different sizes, in order to get the correct proportions. If you’re not working the exact same size as the garment in the photo, yours might deviate slightly. This has been carefully developed and adjusted so that the complete impression of the garment is the same in all sizes.

Make sure to follow instructions and diagrams for your size!

If you have found a pattern you like which is available in women’s size it’s not very difficult to convert it to men’s size. The biggest difference will be the length of sleeves and body. Start working on the women size that you think would fit across the chest. The additional length will be worked right before you cast off for the armhole/sleeve cap. If the pattern is worked top-down you can add the length right after the armhole or before the first decrease on sleeve.

Regarding additional yarn amount, this will depend on how much length you add, but it is better with a skein too many than too few.

All yarns will have excess fibres (from production) that might come off as lint or shedding. Brushed yarns (ie hairier yarns) have more of these loose, excess fibres, causing more shedding.

Shedding also depends on what is worn under or over the garment, and whether this pulls at the yarn fibres. It’s therefore not possible to guarantee that there will be no shedding

Below are some tips on how to get the best result when working with hairier yarns:

1. When the garment is finished (before you wash it) shake it vigorously so the looser hairs come off. NOTE: do NOT use a lint roller, brush or any method that pulls at the yarn.

2. Place the garment in a plastic bag and put it in your freezer - the temperature will cause the fibres to become less attached to each other, and excess fibres will come off easier.

3. Leave in the freezer for a few hours before taking it out and shaking it again.

4. Wash the garment according to the instructions on the yarn label.

Pilling is a natural process that happens to even the most exclusive of fibers. It's a natural sign of wear and tear that is hard to avoid, and that is most visible in high friction areas of your garment like a sweater's arms and cuffs.

You can make your garment look as new by removing the pilling, using a fabric comb or a pill/lint remover.

Still can't find the answer you need? Then scroll down and leave your question so one of our experts can try to help you. This will be done normally within 5 to 10 working days.
In the meantime, you can read the questions and answers that others have left to this pattern or join the DROPS Workshop on Facebook to get help from fellow knitters/crocheters!

You might also like...

Post a comment to pattern DROPS 212-6

We would love to hear what you have to say about this pattern!

If you want to leave a question, please make sure you select the correct category in the form below, to speed up the answering process. Required fields are marked *.

Comments / Questions (34)

country flag Carina wrote:

Hola. Un comentario y una pregunta Comentario: en la talla s hay que poner 124 puntos, no 123, para que se puedan hacer las repeticiones Pregunta: si uso una lana que tejo con agujas de 5.5 mm, y cojo la talla s, quedará muy grande? La lana no es drops, es una que ya tenía y no pone el grosor, así que cómo puedo saber a qué categoría de grosor corresponde una lana que no es drops? Gracias

21.08.2021 - 15:20

DROPS Design answered:

Hola Carina, para saber a qué categoría pertenece puedes hacer una muestra de la tensión del tejido con la aguja elegida y calculas cuántos puntos y filas hay en 10 cm. Si te parece que el tejido queda demasiado flojo o tenso, se puede variar el número de la aguja. En cuánto a la talla S, sí, debido a la diferencia en grosor entre el hilo de la labor y el hilo que has descrito, la talla S quedará bastante más grande. Por otro lado, 123 puntos son correctos. Son 7 puntos de la cenefa a cada lado (7+7) + A.1 (=1 punto)+ A.2 (4x27 = 108 puntos). 14 +108+1= 123

23.08.2021 - 13:10

country flag Kriszti wrote:

Megkötöttem az A1-A2 összes sorát és 263 szemem van a tűn. A leírás szerint 325 szemnek kellene lennie. Az L-es méretet készítem, kezdő szemszam: 139. Ha ezek a megfelelő mérethez tartozó kezdő szemszamok: xs-123, s-131, m-139, l-139, xl-143,xxl-155. A minta leírásában csak xxl-es méret van megadva, míg az ábrán (A3-A4) XXXL is van.Hogyan folytassam tovább A3-A4 8-as szemszam vagy 10-es szemszam? Félek nem lesz jó a méret.Előre is köszönöm a segítséget!

16.08.2021 - 14:57

country flag Kriszti wrote:

Megkötöttem az A1-A2 összes sorát és 263 szemem van a tűn. A leírás szerint 325 szemnek kellene lennie. Az L-es méretet készítem, kezdő szemszam: 139. Ha ezek a megfelelő mérethez tartozó kezdő szemszamok: xs-123, s-131, m-139, l-139, xl-143,xxl-155. A minta leírásában csak xxl-es méret van megadva, míg az ábrán (A3-A4) XXXL is van.Hogyan folytassam tovább A3-A4 8-as szemszam vagy 10-es szemszam? Félek nem lesz jó a méret.Előre is köszönöm a segítséget!

16.08.2021 - 14:44

country flag Ingela Hjelm wrote:

Jag har frågat ang storlekstabell förAlberta Rosé Jacket och fått svar att det finns längst ner på mönstret. Kan inte finna någon måttabell. Behöver veta bystmått o längd innan jag påbörjar arbetet.

10.08.2021 - 13:35

DROPS Design answered:

Hej Ingela. Om du ser på mönstret här över, mellan symbolförklaringarna och diagrammen, så hittar du en måttskiss där med mått i cm för alla storlekar. Mvh DROPS Design

17.08.2021 - 14:00

country flag Ingela Hjelm wrote:

Mönster Alberta Rosé Jacket. Har inte köpt garn än . På mönstret finns ingen storleksguide endast s-xxxl, vet inte vilken storlek jag behöver sticka .

03.08.2021 - 17:54

DROPS Design answered:

Hej Ingela, jo, du har en måttskiss längst ner i mönstret. Välj storleken på de mått som passar dig :)

04.08.2021 - 08:30

country flag Wendy wrote:

I'm knitting the large size. I cast on 139 and worked 1 full pattern of A1 and A2. At the end of the yoke I only have 239 stitches, not 263. I have 14 band stitches (left plus right) and 25 repeats of A1 plus A2. What am I doing wrong? Casting on 139 gives 14 band stitches plus 25 times 5 chart stitches. I don't understand what the pattern means when it states "(=27-29-31-31-32-35 times in width)". 31times 9, plus 14 would make 293 stitches. Love the Pattern! Help please.

02.08.2021 - 15:57

DROPS Design answered:

Dar Wendy, if you are knitting the size L, you cast on 139 stitches for the neck edge. After the first row, knitted withpurls, you do the band (=7 stitch), A.1 (= 1 stitch), A.2 (= 4 stitch, 31 times = 124 stitch) and 7 stitches for the band (= 139 stitches. By the time you've knitted all rows of A.2, in each repeat of A.2 (for sie L) you increased 4 stitches (31x4 = 124). If you add that to the 139 stitches you've started with, you hould get the 263 stitch. Happy Stitching!

03.08.2021 - 04:55

country flag Sandi Strohman wrote:

I am making the Alberta Rose cardigan in size XXL. After ripping out and redoing rows of the yoke charts, I am now onto the stockinette stitch and have come to the section where I need to separate the sleeves from the fronts and back. The stitch count says I should have a total of 461 stitches. I have only 405. The pattern appears to have worked out properly...what could have happened? I am having such a hard time with this pattern even though I am an advanced knitter.

19.04.2021 - 13:58

DROPS Design answered:

Dear Mrs Strohman, in XXL there are 14 sts in each A.4 and 12 sts in A.5 when they are done: 7 front band sts + 1 (A.3) + 14stsx31 repeats A.4 + 12 sts A.5 + 7=7+1+.434+12+7=461 sts. Hope this helps, happy knitting!

19.04.2021 - 15:20

country flag Uschi Geisler wrote:

Guten Morgen! Ja, vielen lieben Dank, die Antworten haben mir sehr geholfen!! 👍😊 Ein schönes Wochenende Uschi

12.03.2021 - 09:00

country flag Uschi Geisler wrote:

Nochmals vielen Dank, sie müssen mich für komplett unfähig halten. Tut mir leid! Ich hatte schon das Model 335 gestrickt und hatte keine Probleme. Deshalb weiß ich nicht wo mein Fehler ist. Soll ich A1 auch nur einmal am Anfang stricken und dann nur noch A2 ? Irgendwo hab ich ein Denkfehler ganz liebe Grüße und danke für die Hilfe

11.03.2021 - 16:36

DROPS Design answered:

Liebe Frau Geisler, ja genau, A.1 muss nur einmal ganz am Anfang (zwischen den Blende-Maschen und A.2) gestrickt werden, damit das Muster symetrisch wird (A.2 beginnt mit 1 Li M und endet mit 1 re M). Kann Ihnen die vorrige Antwort helfen? Es werden alle Maschen beschrieben, wie sie gestrickt werden sollen. Viel Spaß beim stricken!

12.03.2021 - 08:19

country flag Uschi Geisler wrote:

Vielen lieben Dank für die schnelle Antwort! Das habe ich jetzt verstanden! Wenn ich noch was fragen kann, wenn ich mit der halsblende fertig bin, dann habe ich wenn ich 123 Maschen angeschlagen habe am Ende keine 231 Maschen sondern nur 212 auf der Nadel. Wenn ich dann zusätzlich 19 zunehme stimmt das Muster nicht mehr

11.03.2021 - 14:50

DROPS Design answered:

Liebe Frau Geisler, Sie stricken die 1. Größe, korrekt? dann wiederholen Sie 27 Mal A.2 - in A.2 werden jeweils 4 Maschen zugenommen, nach A.2 haben Sie: 7 Blende-Maschen, A.1, 27 x A.2 (= 8 Maschen x 27 Mal = 216 Maschen), 7 Blende-Maschen = 7+1+216+7= 231 Maschen nach A.1/A.2. Viel Spaß beim stricken!

11.03.2021 - 16:09