DROPS Polaris
DROPS Polaris
100% Wool
from 5.65 $ /100g
Get the yarn to make this pattern from 67.80$.

The yarn cost is calculated from the pattern’s smallest size and the yarn’s cheapest product type. Looking for an even better price? You might find it on the DROPS Deals!

DROPS Super Sale

Elise

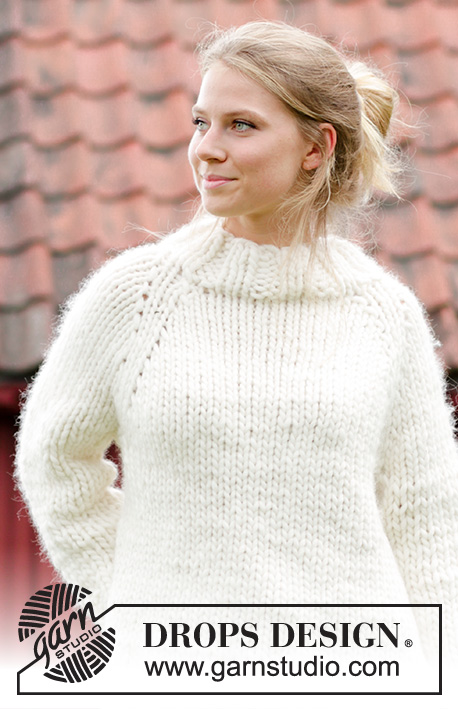
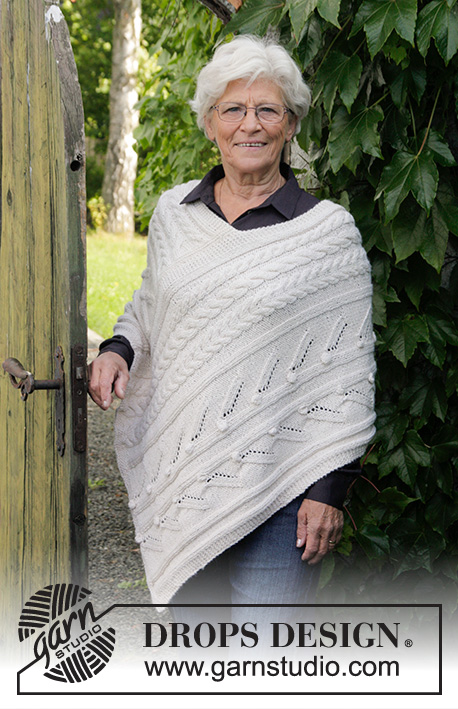
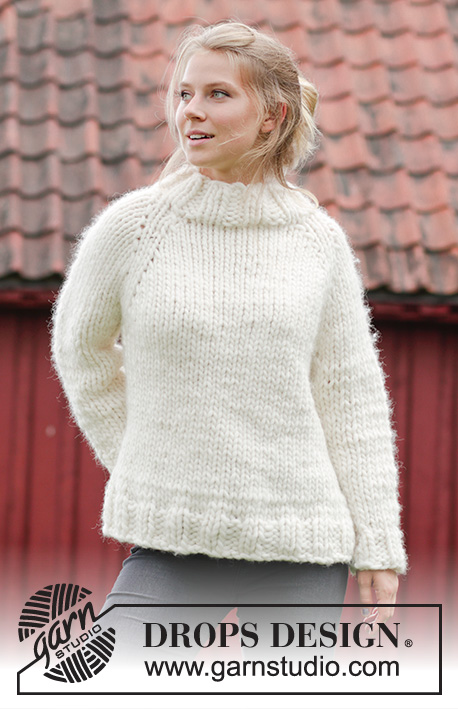
Knitted jumper with raglan, high collar and split in the sides, worked top down. Sizes S - XXXL. The piece is worked in 1 strand DROPS Polaris or 4 strands Air.

DROPS 184-8
DROPS Design: Pattern no po-094
Yarn group F or E + E or C + C + C + C
-----------------------------------------------------------
Sizes: S - M - L - XL - XXL - XXXL
Materials:
DROPS POLARIS from Garnstudio (belongs to yarn group F)
1200-1300-1400-1500-1700-1900 g color 01, off white
Or use:
DROPS AIR from Garnstudio (belongs to yarn group C)
600-650-700-750-850-950 g color 01, off white

DROPS CIRCULAR NEEDLE (60 and 80 cm / 24'' and 32'') SIZE 15 MM/US 19 – or the size needed to get 7 stitches and 8 rows stockinette stitch on 10 cm / 4'' in width and 10 cm / 4'' in height with 1 strand Polaris or 4 strands Air.

-------------------------------------------------------

Alternative Yarn – See how to change yarns here
Yarn Groups A to F – Use the same pattern and change the yarn here
Yarn usage using an alternative yarn – Use our yarn converter here

-------------------------------------------------------

DROPS Polaris
DROPS Polaris
100% Wool
from 5.65 $ /100g
Get the yarn to make this pattern from 67.80$.

The yarn cost is calculated from the pattern’s smallest size and the yarn’s cheapest product type. Looking for an even better price? You might find it on the DROPS Deals!

DROPS Super Sale

SAVE 30% on 6 cotton favorites!
Valid until 04.12.2024

Pattern instructions

NOTE: This pattern is written in American English. All measurements in charts are in cm. For conversion from inches to cm - click here. There are different terms for crocheting in American and British English. If this pattern includes crochet, click for "crochet terms" here. For this pattern in British English, please click here.
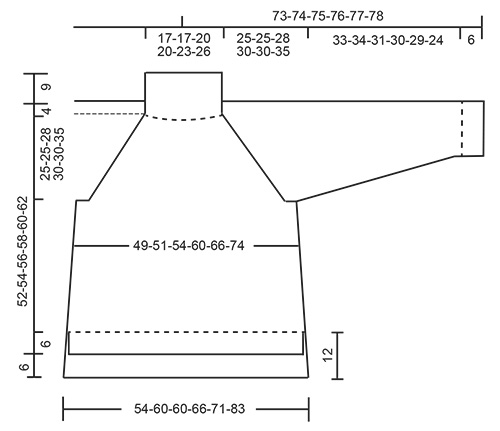
INFORMATION FOR THE PATTERN:

CHANGING THE STRAND-TIP (applies if using Polaris):
When changing balls with Polaris divide the old strand in two for the last 15 cm / 6'' – cut off one of the parts, and do the same with the new strand. Lay the first and the last 15 cm / 6'' over each other so that you get the normal thickness of the yarn and continue working – in this way you do not get a visible join in the yarn.

DECREASE TIP-1:
Start 2 stitches before the marker thread, knit 2 stitches together, (the marker thread sits here), slip 1 stitch as if to knit, knit 1, pass the slipped stitch over.

DECREASE TIP-2:
NOTE: So that the decreases are made alternately in the right and left side of the piece, decrease as follows:
In sizes S, M and L decrease alternately at the beginning and end of the rows you are decreasing on.
In sizes XL, XXL and XXXL decrease at the beginning of row you are decreasing on (alternately from right side and from wrong side of piece).
Decrease as follows from the right side: Knit 2 stitches together.
Decrease as follows from the wrong side: Purl 2 stitches together.

MAGIC LOOP:
If you are working in the round with a circular needle which is too long for the number of stitches, you can do as follows: The circular needle should be long and have a flexible wire. Push the stitches to the middle of the wire. Divide the stitches in the middle and pull the wire out between the stitches. Push the stitches to the ends of the needle in each side; make sure the stitches are not twisted. The yarn strand you are working with is on the back needle and you begin working on the front needle. Pull out the back needle to work the stitches on the front needle. When the stitches on the front needle have been worked, turn and push the stitches back on the empty needle and work the other side in the same way. Continue like this in the round, making sure you always pull out the needle on the side you have the strand on.

RAGLAN:
Increase to raglan on each side of the marker thread (= 8 stitches increased on the round).
Increase as follows, start 1 stitch before the marker thread: Make 1 yarn over, knit 2 stitches (the marker thread sits in the middle of these stitches), make 1 yarn over. On the next round knit the yarn overs twisted to prevent holes.

INCREASE TIP (for body):
Increase 1 stitch by making a yarn over. On the next round knit the yarn overs twisted to prevent holes.

RIDGE/GARTER STITCH (worked back and forth):
1 ridge = Knit 2 rows.
----------------------------------------------------------

JUMPER:
The piece is worked in the round with circular needle and top down. The sleeves are worked back and forth with circular needle. Read CHANGING THE STRAND-TIP (applies if using Polaris)!

YOKE:
Cast on 40-40-44-44-48-52 stitches with circular needle size 15 mm / US 19 and 1 strand Polaris or 4 strands Air. Work rib (knit 2/ purl 2) for 9 cm / 3½''. Insert 4 marker threads in the piece without working the stitches as follows: First marker thread at the beginning of the round, second marker thread after 14-14-16-16-18-20 stitches (= back piece), third marker thread after 6 new stitches (= sleeve), fourth marker thread after 14-14-16-16-18-20 new stitches (= front piece), there are now 6 stitches left before the first marker thread (= sleeve). Knit 1 round where you decrease 1 stitch on each side of each marker thread – read DECREASE TIP-1 = 32-32-36-36-40-44 stitches. NOTE: In our assortment we do not have shorter circular needles than 60 cm / 23½'' in needle size 15 mm / US 19. You have now decreased stitches so that the circumference of the piece is smaller than 60 cm / 23½'' in sizes S - XXL. Therefore, continue working with MAGIC LOOP – see description above until you have increased enough stitches to use circular needle 60 cm / 23½'' or 80 cm / 32" as normal.
Work stockinette stitch, AT THE SAME TIME on round 2 start increases to RAGLAN – see description above. Increase in this way every 2nd round 8-10-10-11-12-14 times = 96-112-116-124-136-156 stitches. REMEMBER THE GAUGE!
The increases to raglan are now finished in sizes M, L, XXL and XXXL. In sizes S and XL work 1 more round where you increase 1 stitch on the front and back pieces in the same way (do not increase on the sleeves) = 4 stitches increased.
There are now 100-112-116-128-136-156 stitches on the round. The piece measures approx. 21-25-25-29-30-35 cm / 8 1/4"-9 3/4"-9 3/4"-11½"-11 3/4"-13 3/4'' from after the rib and down. Continue without increases for 3-0-2-1-0-0 more rounds. The piece measures approx. 25-25-28-30-30-35 cm / 9 3/4"-9 3/4"-11"-11 3/4"-11 3/4"-13 3/4'' from after the rib and down.
The next round is worked as follows: Work 30-32-34-38-40-46 stitches (= back piece), place the next 20-24-24-26-28-32 stitches on a thread (= sleeve), cast on 4-4-4-4-6-6 stitches under the sleeve, work 30-32-34-38-40-46 stitches (= front piece), place the next 20-24-24-26-28-32 stitches on a thread (= sleeve), cast on 4-4-4-4-6-6 stitches under the sleeve. Insert a marker in the piece. THE PIECE IS NOW MEASURED FROM HERE!

BODY:
= 68-72-76-84-92-104 stitches. Continue with stockinette stitch. Insert 1 marker thread in each side in the middle of the new stitches which were cast on (= 2-2-2-2-3-3 new stitches on each side of the marker thread) and 34-36-38-42-46-52 stitches between marker threads for the back and front pieces.
Now increase in the sides as follows – read INCREASE TIP:
When the piece measures 5 cm / 2'' increase 1 stitch before each marker thread.
When the piece measures 8 cm / 3 1/8'' increase 1 stitch after each marker thread.
When the piece measures 10 cm / 4'' increase 1 stitch before each marker thread.
When the piece measures 12 cm / 4¾'' increase 1 stitch after each marker thread.
There are now 76-80-84-92-100-112 stitches on the round.
Now continue as follows in the different sizes:

Sizes S, L, XL and XXL:
Continue in the round with stockinette stitch until the piece measures 17-18-18-20 cm / 6 3/4"-7"-7"-8''.

Sizes M and XXXL:
Continue in the round with stockinette stitch until the piece measures19-17 cm / 7½"-6 3/4'' and at the same time increase as follows:
When the piece measures 14 cm / 5½'' increase 1 stitch before each marker thread.
When the piece measures 16 cm / 6 1/4'' increase 1 stitch after each marker thread.

ALL SIZES:
There are now 76-84-84-92-100-116 stitches on the round. When the piece measures 17-19-18-18-20-17 cm / 6 3/4"-7½"-7"-7"-8"-6 3/4'' place the 38-42-42-46-50-58 stitches on the back piece on a thread. Continue by working rib back and forth over the 38-42-42-46-50-58 stitches on the front piece. Start from the right side and work as follows: 2 stitches GARTER STITCH - see description above, * knit 2, purl 2 *, work from *-* until there are 4 stitches left on the needle, knit 2 and finish with 2 stitches garter stitch.
Continue in this way until the rib measures 6 cm / 2 3/8'' and the piece a total of 52-54-56-58-60-62 cm / 20½''-21¼''-22''-22¾''-23 5/8''-24 3/8'' from the shoulder down. Loosely bind off with knit over knit and purl over purl. Place the stitches from the back piece back on the needle and work stockinette stitch with 2 edge stitches in garter stitch in each side for 6 cm / 2 3/8''. Then work rib back and forth in the same way as for the front piece until the rib measures 6 cm / 2 3/8''. The split on the front piece is 6 cm / 2 3/8'' long; the split on the back piece is 12 cm / 4¾'' long. The piece measures in total approx. 58-60-62-64-66-68 cm / 22¾''-23 5/8''-24 3/8''-25¼''-26''-26¾'' from the shoulder and down the back piece.

SLEEVE:
The sleeves are worked back and forth with circular needle and are sewn together at the end. Place the 20-24-24-26-28-32 stitches from the thread back on circular needle size 15 mm / US 19 and cast on 2-2-2-2-3-3 new stitches in each side = 24-28-28-30-34-38 stitches. Work stockinette stitch back and forth over all stitches. When the piece measures 4-4-2-4-4-2 cm / 1½"-1½"-3/4"-1½"-1½"-3/4'' decrease 1 stitch in the right side of the piece – read DECREASE TIP-2. Decrease alternately in the left and right side of the piece every 2nd-2nd-2nd-1st-1st-1st row 8-12-12-14-14-18 times (= 4-6-6-7-7-9 times in each side) = 16-16-16-16-20-20 stitches. When the piece measures 33-34-32-30-29-24 cm / 13"-13½"-12½"-11 3/4"-11½"-9½'' work rib (knit 2, purl 2) for 6 cm / 2 3/8''. Loosely bind off with knit over knit and purl over purl. Work the other sleeve in the same way.

ASSEMBLY:
Sew the seams under the sleeves in the outermost loop of the outermost stitch so that the seam is not thick. Sew the opening under the sleeves.

Diagram

All measurements in charts are in cm.

diagram measurements

Each of our patterns has specific tutorial videos to help you.

Do you have a question? See a list of frequently asked questions (FAQ)

Knitting tension is what determines the final measurements of your work, and is usually measured per 10 x 10 cm. It is provided like so: number of stitches in width x number of rows in height - eg: 19 stitches x 26 rows = 10 x 10 cm.

The knitting tension is very individual; some people knit/crochet loosely while others work tightly. You adjust the knitting tension with the needle size, which is why the suggested needle size only serve as a guide! You need to adjust this (up or down) to ensure that YOUR knitting tension matches the knitting tension provided in the pattern. If you work with a different knitting tension than provided you will have a different yarn consumption, and your work will have different measurements than what the pattern suggests.

The knitting tension also determines which yarns can replace each other. As long as you achieve the same knitting tension you can replace one yarn with another.

See DROPS lesson: How to measure your tension/gauge

See DROPS video: How to make a gauge tension swatch

The required amount of yarn is provided in grams, eg: 450 g. To calculate how many balls you’ll need you first need to know how many grams are in 1 ball (25g, 50g or 100g). This information is available if you click on the individual yarn quality on our pages. Divide the amount required with the amount of each ball. For example, if each ball is 50g (the most common amount), the calculation will be as follows: 450 / 50 = 9 balls.

The important thing when changing from one yarn to another is that the knitting/crochet tension remains the same. This is so that the measurements of the finished piece will be the same as on the sketch provided. It is easier to achieve the same knitting tension using yarns from the same yarn group. It is also possible to work with multiple strands of a thinner yarn to achieve the knitting tension of a thicker one. Please try our yarn converter. We recommend you to always work a test swatch.

Please NOTE: when changing yarn the garment might have a different look and feel to the garment in the photo, due to individual properties and qualities of each yarn.

See DROPS lesson: Can I use a different yarn than the one mentioned in the pattern?

All our yarns are categorised into yarn groups (from A to F) according to thickness and knitting tension – group A contains the thinnest yarns and group F the thickest. This makes it easier for you to find alternative yarns to our patterns, should you wish to switch yarn. All yarns within the same group have a similar knitting tension and can easily replace each other. However, different yarn qualities have different structures and properties which will give the finished work a unique look and feel.

Click here for an overview of the yarns in each yarn group

At the top of all our patterns you’ll find a link to our yarn converter, which is a helpful tool should you wish to use a different yarn than suggested. By filling in the yarn quality you wish to replace, the amount (in your size) and number of strands, the converter will present good alternative yarns with the same knitting tension. Additionally it will tell you how much you’ll require in the new qualities and whether you’ll need to work with multiple strands. Most skeins are 50g (some are 25g or 100g).

If the pattern is worked with multiple colours, every colour will have to be converted separately. Similarly, if the pattern is worked with several strands of different yarns (for example 1 strand Alpaca and 1 strand Kid-Silk) you will have to find alternatives for each, individually.

Click here to see our yarn converter

Since different yarns have different qualities and textures we have chosen to keep the original yarn in our patterns. However, you can easily find options among our available qualities by using our yarn converter, or simply pick a yarn from the same yarn group.

It is possible that some retailers still have discontinued yarns in stock, or that someone has a few skeins at home that they would like to find patterns for.

The yarn converter will provide both alternative yarn as well as required amount in the new quality.

If you think it's hard to decide what size to make, it can be a good idea to measure a garment you own already and like the size of. Then you can pick the size by comparing those measures with the ones available in the pattern's size chart.

You'll find the size chart at the bottom of the pattern.

See DROPS lesson: How to read size chart

The needle size provided in the pattern serves only as a guide, the important thing is to follow the knitting tension. And since knitting tension is very individual, you will have to adjust the needle size to ensure that YOUR tension is the same as in the pattern – maybe you’ll have to adjust 1, or even 2 needle sizes, up or down to achieve the correct tension. For this, we recommend that you work test swatches.

Should you work with a different knitting tension than the one provided, the measurements of the finished garment might deviate from the measurement sketch.

See DROPS lesson: How to measure your tension/gauge

See DROPS video: How to make a gauge tension swatch

Working a garment top-down provides more flexibility and room for personal adjustment. For example it is easier to try the garment on while working, as well as making adjustments to length of yoke and shoulder caps.

The instructions are carefully explaining every step, in the correct order. Diagrams are adjusted to the knitting direction and are worked as usual.

The diagram depicts all rows/rounds, and every stitch seen from the right side. It is read from bottom to top, from right to left. 1 square = 1 stitch.

When working back and forth, every other row is worked from the right side and every other row is worked from the wrong side. When working from the wrong side, the diagram will have to be worked reversed: from left to right, knit stitches are purled, purl stitches are knit etc.

When working in the round every round is worked from the right side and the diagram are worked from right to left on all rounds.

See DROPS lesson: How to read knitting diagrams

The diagram depicts all rows/rounds, and every stitch seen from the right side. It is worked from bottom to top, from right to left.

When working back and forth every other row is worked from the right side: from right to left and every other row is worked from the wrong side: from left to right.

When working in the round, every row in the diagram are worked from the right side, from right to left.

When working a circular diagram you start in the middle and work your way outwards, counter clockwise, row by row.

The rows usually start with a given number of chain stitches (equivalent to the height of the following stitch), this will either be depicted in the diagram or explained in the pattern.

See DROPS lesson: How to read crochet diagrams

Instructions for working several diagrams after each other on the same row/round, will often be written like so: “work A.1, A.2, A.3 a total of 0-0-2-3-4 times". This means you work A.1 once, then A.2 is worked once, and A.3 is repeated (in width) the number of times provided for your size – in this case like so: S = 0 times, M = 0 times, L=2 times, XL= 3 times and XXL = 4 times.

The diagrams are worked as usual: begin with the first row in A.1, then work the first row in A.2 etc.

See DROPS lesson: How to read knitting diagrams

See DROPS lesson: How to read crochet diagrams

The total width of the garment (from wrist-to-wrist) will be larger in the larger sizes, despite the actual sleeves being shorter. The larger sizes have longer sleeve caps and wider shoulders, so there will be a good fit in all sizes.

The measurement sketch/schematic drawing provides information regarding the full length of the garment. If it’s a jumper or a jacket the length is measured from the highest point on the shoulder (usually closest to the neckline), and straight down to the bottom of the garment. It is NOT measured from the tip of shoulder. Similarly, the length of yoke is measured from the highest point on the shoulder and down to where yoke is split into body and sleeves.

See DROPS lesson: How to read a schematic drawing

Diagrams are often repeated on the round or in height. 1 repeat is the diagram the way it appears in the pattern. If it says to work 5 repeats of A.1 in the round, then you work A.1 a total of 5 times after/next to each other in the round. If it says to work 2 repeats of A.1 vertically/in height you work the entire diagram once, then begin again at the start and work the entire diagram one more time.

Chain stitches are slightly narrower than other stitches and to avoid working the cast-on edge too tight, we simply chain more stitches to begin with. The stitch count will be adjusted on the following row to fit the pattern and measurement sketch.

The rib edge is more elastic and will contract slightly compared to, for example, stocking stitch. By increasing before the rib edge, you avoid a visible difference in width between the rib edge and the rest of the body.

It’s very easy to cast off too tightly, and by making yarn overs while casting off (and simultaneously casting these off) you avoid a too tight cast off edge.

See DROPS video: How to bind off with yarn overs (yo)

To achieve an even increase (or decrease) you can increase on, for example: every 3rd and 4th row alternately, like so: work 2 rows and increase on the 3rd row, work 3 rows and increase on the 4th. Repeat this until the increase is complete.

See DROPS lesson: Increase or decrease 1 st on every 3rd and 4th row alternately

Should you prefer to work in the round instead of back and forth, you may of course adjust the pattern. You’ll need to add steeks mid-front (usually 5 stitches), and follow the instructions. When you would normally turn and work from the wrong side, simply work across the steek and continue in the round. At the end you’ll cut the piece open, pick up stitches to work bands, and cover the cut edges.

See DROPS video: How to knit steeks and cut open

Should you prefer to work back and forth instead of in the round, you may of course adjust the pattern so you work the pieces separately and then assemble them at the end. Divide the stitches for the body in 2, add 1 edge stitch in each side (for sewing) and work the front and back pieces separately.

See DROPS lesson: Can I adapt a pattern for circular needles into straight needles?

Pattern repeats can vary slightly in the different sizes, in order to get the correct proportions. If you’re not working the exact same size as the garment in the photo, yours might deviate slightly. This has been carefully developed and adjusted so that the complete impression of the garment is the same in all sizes.

Make sure to follow instructions and diagrams for your size!

If you have found a pattern you like which is available in women’s size it’s not very difficult to convert it to men’s size. The biggest difference will be the length of sleeves and body. Start working on the women size that you think would fit across the chest. The additional length will be worked right before you cast off for the armhole/sleeve cap. If the pattern is worked top-down you can add the length right after the armhole or before the first decrease on sleeve.

Regarding additional yarn amount, this will depend on how much length you add, but it is better with a skein too many than too few.

All yarns will have excess fibres (from production) that might come off as lint or shedding. Brushed yarns (ie hairier yarns) have more of these loose, excess fibres, causing more shedding.

Shedding also depends on what is worn under or over the garment, and whether this pulls at the yarn fibres. It’s therefore not possible to guarantee that there will be no shedding

Below are some tips on how to get the best result when working with hairier yarns:

1. When the garment is finished (before you wash it) shake it vigorously so the looser hairs come off. NOTE: do NOT use a lint roller, brush or any method that pulls at the yarn.

2. Place the garment in a plastic bag and put it in your freezer - the temperature will cause the fibres to become less attached to each other, and excess fibres will come off easier.

3. Leave in the freezer for a few hours before taking it out and shaking it again.

4. Wash the garment according to the instructions on the yarn label.

Pilling is a natural process that happens to even the most exclusive of fibers. It's a natural sign of wear and tear that is hard to avoid, and that is most visible in high friction areas of your garment like a sweater's arms and cuffs.

You can make your garment look as new by removing the pilling, using a fabric comb or a pill/lint remover.

Still can't find the answer you need? Then scroll down and leave your question so one of our experts can try to help you. This will be done normally within 5 to 10 working days.
In the meantime, you can read the questions and answers that others have left to this pattern or join the DROPS Workshop on Facebook to get help from fellow knitters/crocheters!

You might also like...

Post a comment to pattern DROPS 184-8

We would love to hear what you have to say about this pattern!

If you want to leave a question, please make sure you select the correct category in the form below, to speed up the answering process. Required fields are marked *.

Comments / Questions (12)

country flag Josefine wrote:

Hej Jeg forstår ikke helt hvilke materialer jeg skal bruge til denne sweater? Er det rundpind i 60 cm kun men hvad størrelse ? :)

30.12.2019 - 10:42

DROPS Design answered:

Hei Josefine. Du skal bruke str. nr. 15. DROPS RUNDPINDE (60 og 80 cm) nr 15 – eller de pinde du skal bruge for at få 7 masker og 8 pinde glatstrik på 10 cm i bredden og 10 cm i højden med 1 tråd Polaris eller 4 tråde Air. God Fornøyelse!

20.01.2020 - 11:35

country flag Eliina Härkönen wrote:

Erittäin hyvät ohjeet jopa minä onnistuin saamaan hyvän tuloksen Kaunis pusero

17.12.2019 - 17:51

country flag Claudia Carolina wrote:

È giusto diminuire maglie dopo il collo se si usa lo stesso ferro quindi non di misura inferiore per il collo come di solito consigliate alla fine delle coste collo diminuire maglie quando si passa a ferro misura maggiore?

22.08.2019 - 20:35

DROPS Design answered:

Buonasera Claudia, non ci sono errori nelle spiegazioni: le maglie vengono comunque diminuite perchè la lavorazione a coste tende a "tirare" il lavoro, che risulterebbe troppo molle se non si diminuissero le maglie. Buon lavoro!

22.08.2019 - 21:27

country flag Olga wrote:

Hvor mange nøster trengs til Str M?

26.03.2019 - 10:46

DROPS Design answered:

Hei Olga, For størrelse M trenger du 1300 g DROPS Polaris eller 650 g DROPS Air. Hver nøste er 50 g, så det blir 26 nøster Polaris eller 13 nøster Air. God fornøyelse!

27.03.2019 - 06:54

country flag Ragnhild wrote:

Egner dette mønsteret seg for nybegynnere?

02.12.2018 - 10:44

country flag Eloïse wrote:

Bonjour! Pourquoi faire des diminutions après le col pour augmenter exactement le même nombre de mailles le tour suivant? Est-ce pour ajuster le col et resserrer un peu le travail après les côtes 2/2? Un commentaire précédent en anglais (que je parle parfaitement) évoque ce réajustement, mais je n'en saisis pas bien l\'intérêt. Merci de m'éclairer.

30.10.2018 - 12:41

DROPS Design answered:

Bonjour Éloïse, on diminue à la fin du col pour ajuster à la bonne taille (circonférence), puis on augmente pour le raglan, de chaque côté de chacun des 4 marqueurs. Bon tricot!

30.10.2018 - 14:39

country flag Eloïse_de_Bdp wrote:

Bonjour! \r\nPourquoi faire des diminutions après le col pour augmenter exactement le même nombre de mailles le tour suivant? Est-ce pour ajuster le col et resserrer un peu le travail après les côtes 2/2? Un commentaire précédent en anglais (que je parle parfaitement) évoque ce réajustement, mais je n\'en saisis pas bien l\'intérêt. Merci de m\'éclairer.

30.10.2018 - 12:39

country flag åshild Hodne wrote:

Hei. Kan dere hjelpe meg å finne et mønster på en enkel damegenser, må bruke tykke pinner, raglanfelling, starte nede, ikke hårete garn.... Åshild

05.09.2018 - 14:00

DROPS Design answered:

Hej Åshild, hvad med denne DROPS 164-12 med eller uden fletter i DROPS Eskimo eller 2 tråde fra garngruppe C DROPS Garngrupper God fornøjelse! :)

11.09.2018 - 09:35

country flag Amy wrote:

What do decrease in the yoke do? In particular the instruction says to decrease 1 stitch on each side of each marker thread. Can I omit this step?

25.04.2018 - 08:03

DROPS Design answered:

Dear Amy, these dec will get the measurements getting right, you first dec after ribbing (ribbing will tighten piece more than stocking will) then start to increase for raglan. Happy knitting!

25.04.2018 - 08:45

country flag Amy wrote:

Could you give me some tips on how I could turn it into a turtleneck? 40 stitches would be a bit too much

23.04.2018 - 10:54

DROPS Design answered:

Dear Amy, most of the time a turtleneck is worked over the same number of sts as a crew neck but just over more rows. For any assistance adjusting the pattern to your own taste please feel free to contact the store where you bought your yarn, even per mail telephone or social media. Happy knitting!

23.04.2018 - 11:23