
Popular categories
Looking for a yarn?


|
||||||||||||||||||||||
Hello Kitten |
||||||||||||||||||||||
 |
 |
|||||||||||||||||||||
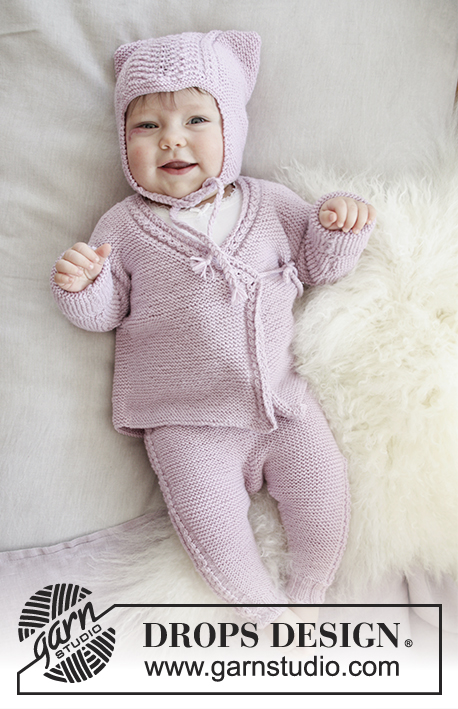
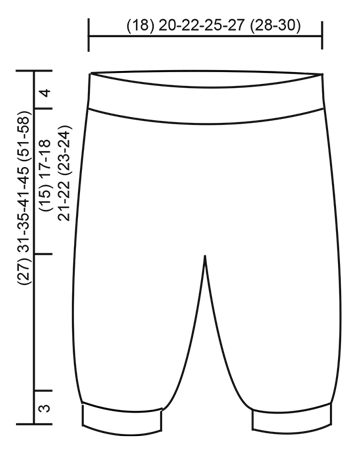
The set consists of: Hat for baby with garter stitch, wave pattern and earflaps. Wrap-around jacket and pants with garter stitch and lace pattern. Sizes premature – 4 years. The set is knitted in DROPS BabyMerino.
DROPS Baby 29-9 |
||||||||||||||||||||||
|
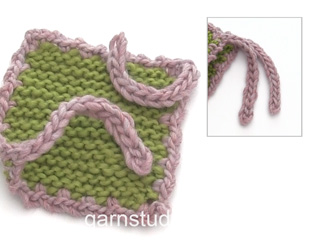
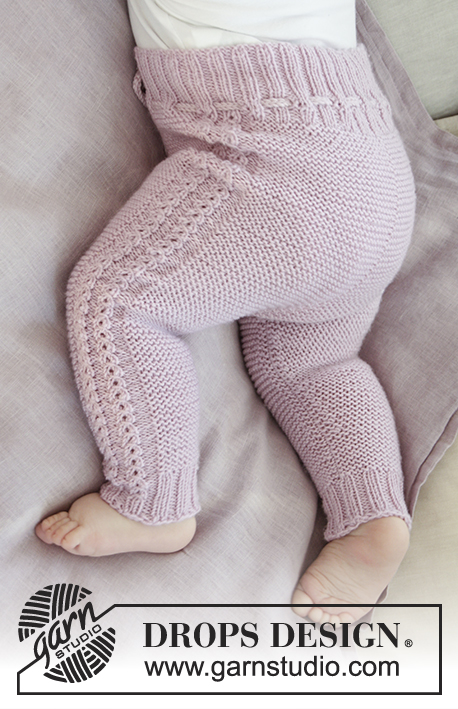
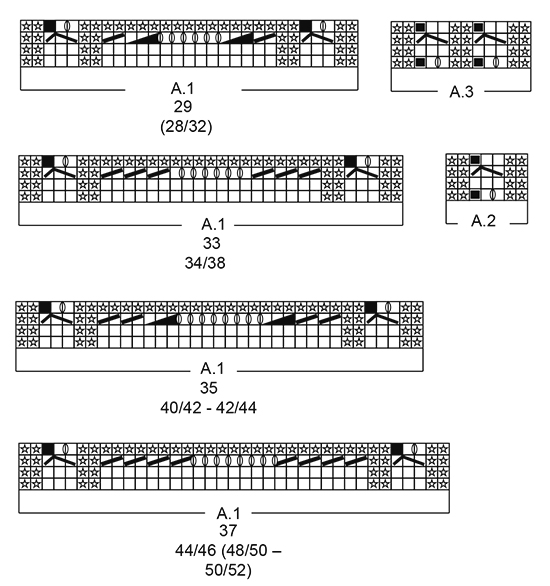
INFORMATION FOR THE PATTERN: RIDGE/GARTER STITCH (back and forth): 1 ridge = knit 2 rows. PATTERN: Hat: See diagram A.1. Jacket: See diagram A.2. Pants: See diagram A.3. The diagrams show all the rows in the patterns seen from the right side. Choose the diagram for your size. DECREASE TIP-1 (for hat): All decreases are made from the right side! Decrease as follows: Work 1 edge stitch in garter stitch, slip 1 stitch as if to knit, knit 1, pass the slipped stitch over (= 1 stitch decreased), work garter stitch until there are 3 stitches left, knit 2 stitches together (= 1 stitch decreased), 1 edge stitch in garter stitch. DECREASE TIP-2 (for jacket): All decreases are made from the right side! Decrease as follows after the 1 edge stitch and A.2 (for the right front piece): Slip 1 stitch as if to knit, knit 1, pass the slipped stitch over (= 1 stitch decreased). Decrease as follows before the 1 edge stitch and A.2 (for the left front piece): Knit 2 together (= 1 stitch decreased). DECREASE TIP-3 (for the pants): Work until there are 3 stitches left before the marker, then knit 2 stitches together (= 1 stitch decreased), work 2 stitches (the marker sits between these 2 stitches) and then knit 2 stitches twisted together (= 1 stitch decreased). INCREASE TIP (for the pants): Increase 2 stitches by making 1 yarn over on each side of 2 stitches, on the next round, the yarn overs are knitted twisted to prevent holes. ---------------------------------------------------------- HAT: The hat is worked back and forth, top down. Cast on (79) 89-99-103-107 (115-121) stitches with circular needle size 3 mm / US 2.5 and Baby Merino. Work GARTER STITCH – see description above, until the piece measures 3 cm / 1". Then work as follows: (25) 28-32-34-35 (39-42) stitches in garter stitch, A.1 over (29) 33-35-35-37 (37-37) stitches and work (25) 28-32-34-35(39-42) stitches in garter stitch. REMEMBER THE GAUGE! Work in this way until the piece measures (14) 14-15-16-16 (18-19) cm / (5½") 5½"-6"-6¼"-6¼" (7"-7½"). Work 2 ridges. On the next row from the right side, bind off for the earflaps as follows: bind off the first (5) 8-10-10-9(11-12) stitches, knit the next (20) 20-22-24-26 (28-30) stitches (= first earflap) and place these stitches on a thread, bind off the next (29) 33-35-35-37 (37-37) stitches, knit over the next (20) 20-22-24-26 (28-30) stitches (= 2nd earflap) and place these stitches on a thread, bind off the last (5) 8-10-10-9 (11-12) stitches. Cut the strand. EARFLAPS: = (20) 20-22-24-26 (28-30) stitches. Place the stitches from one of the threads back on the needle, work garter stitch and decrease 1 stitch inside 1 edge stitch in each side of the piece – READ DECREASE TIP-1, as follows: Decrease 1 stitch in each side of the piece every 4th row a total of (6) 6-5-5-6 (6-7) times and 1 stitch in each side of the piece every 2nd row a total of (2) 2-4-5-5 (6-6) times = 4 stitches. The earflap measure approx. (6) 6-6-6-7 (8-8) cm / (2½") 2½"-2½"-2½"-2¾" (3"-3"). Bind off and fasten the strand. Repeat on the other earflap. ASSEMBLY: Sew the sides together, sewing edge to edge in the outermost stitch. Fold the hat so that this seam is mid back and then sew the cast-on edge together the same way. TIE CORD: Cut 6 strands of approx. 60 cm / 23½" and thread them halfway through the tip of the earflap, in other words, there will be 12 strands to plait. Plait 1 plait. Tie 1 knot at the bottom. Do the same in the other earflap. --------------------------------------------------------- JACKET: The piece is worked back and forth on circular needle. Start with one of the front pieces, cast on stitches for the sleeve and work up to the shoulder. Work the other front piece, work the 2 front pieces together and work down the back piece. RIGHT FRONT PIECE: LOOSELY cast on (34) 37-44-48-52 (55-62) stitches with circular needle size 3 mm / US 2.5 and Baby Merino and work 3 RIDGES – see description above (first row = right side). Work as follows from the right side: Work 1 edge stitch in garter stitch, A.2 over 6 stitches and work garter stitch to end of row. Continue pattern in this way until the piece measures (9) 12-16-16-17 (20-23) cm / (3½") 4¾"-6¼"-6¼"-6¾" (8"-9") – adjust so that the next row is worked from the right side. Work 1 short row (starting from the right side) as follows: Work 1 edge stitch in garter stitch, A.2, turn the piece, tighten the strand and work back from the wrong side as before. Turn the piece. READ THE WHOLE OF THE FOLLOWING SECTION BEFORE CONTINUING! YOU BIND OFF FOR THE NECK AT THE SAME TIME AS YOU CAST ON STITCHES FOR THE SHOULDER/SLEEVE. DECREASE FOR NECK: Decrease 1 stitch for the neck inside 1 edge stitch and A.2 at the beginning of the row – READ DECREASE TIP-2. Decrease in this way every 2nd row a total of (18) 18-22-24-26 (28-32) times, then decrease every 4th row a total of 2 times. SHOULDER/SLEEVE: When the piece measures (12) 15-19-20-21 (24-27) cm / (4¾") 6"-7½"-8"-8¼" (9½"-10½") cast on new stitches at the end of each row from the right side (= towards the side) for the sleeve as follows: Cast on (3) 4-6-6-6 (6-6) stitches a total of (4) 4-4-5-6 (7-8) times and (16) 19-19-18-19 (23-26) stitches a total of 1 time. After all increases and decreases there are (42) 52-63-70-79 (90-102) stitches on the row for the shoulder/sleeve. Continue with garter stitch and A.2 until the piece measures (20) 24-28-30-32 (36-40) cm / (8") 9½"-11"-11¾"-12½" (14¼"-15¾") – adjust so that you finish with the 4th row in A.2, now continue by working garter stitch over all stitches. Insert 1 marker = mid top of shoulder. Cast on 2 new stitches at the end of the row towards the neck (= from the wrong side) a total of 2 times = (46) 56-67-74-83 (94-106) stitches (last row = wrong side). Place all the stitches on a thread. LEFT FRONT PIECE: LOOSELY cast on (34) 37-44-48-52 (55-62) stitches with circular needle size 3 mm / US 2.5 and Baby Merino and work 3 ridges (first row = right side). Continue as follows from the right side: Work garter stitch until there are 7 stitches left on the needle, A.2 over 6 stitches and 1 edge stitch in garter stitch. Continue the pattern in this way until the piece measures (9) 12-16-16-17 (20-23) cm / (3½") 4¾"-6¼"-6¼"-6¾" (8"-9") – adjust so that the next row is worked from the wrong side. Work 1 short row (starting from the wrong side) as follows: Work 1 edge stitch in garter stitch, A.2, turn the piece, tighten the strand and work back from the right side. Turn the piece and work back from the wrong side. REMEMBER THE GAUGE! READ THE WHOLE OF THE NEXT SECTION BEFORE CONTINUING! YOU DECREASE FOR THE NECK AT THE SAME TIME AS YOU CAST ON STITCHES FOR THE SHOULDER/SLEEVE. DECREASE FOR THE NECK: Decrease 1 stitch for the neck before A.2 and 1 edge stitch at the end of the row. Decrease in this way every 2nd row a total of (18) 18-22-24-26 (28-32) times, then decrease every 4th row a total of 2 times. SHOULDER/SLEEVE: When the piece measures (12) 15-19-20-21 (24-27) cm / (4¾") 6"-7½"-8"-8¼" (9½"-10½") cast on new stitches at the end of each row from the wrong side (= towards the side) for the sleeve as follows: Cast on (3) 4-6-6-6 (6-6) stitches a total of (4) 4-4-5-6 (7-8) times and (16) 19-19-18-19 (23-26) stitches a total of 1 time. After all increases and decreases there are (42) 52-63-70-79 (90-102) stitches on the row for shoulder/sleeve. Continue with garter stitch and A.2 until the piece measures (20) 24-28-30-32 (36-40) cm / (8") 9½"-11"-11¾"-12½" (14¼"-15¾") – adjust so that you finish with the 4th row in A.2, now continue by working garter stitch over all stitches. Insert 1 marker = mid top of shoulder. Cast on 2 new stitches at the end of the row towards the neck (= from the right side) a total of 2 times = (46) 56-67-74-83 (94-106) stitches. Knit 1 row from the wrong side. BACK PIECE: Knit over the left front piece from the right side (= (46) 56-67-74-83 (94-106) stitches), cast on (8) 8-10-10-12 (14-16) new stitches (= back of neck) and knit the right front piece on to the circular needle (= knit from the right side) = (100) 120-144-158-178 (202-228) stitches. THE PIECE IS NOW MEASURED FROM THE MARKERS ON THE SHOULDERS. Continue with garter stitch back and forth on the needle. When the piece measures (6) 7-7-7½-8 (9-9) cm / (2½") 2¾"-2¾"-2⅞"-3" (3½"-3½") bind off sleeve stitches as follows: bind off at the beginning of each row in each side of the piece as follows: (16) 19-19-18-19 (23-26) stitches 1 time and (3) 4-6-6-6 (6-6) stitches a total of (4) 4-4-5-6 (7-8) times = (44) 50-58-62-68 (72-80) stitches. Continue working until the piece measures approx. (20) 24-28-30-32 (36-40) cm / (8") 9½"-11"-11¾"-12½" (14¼"-15¾") – fold the piece double at the markers on the shoulders and make sure that the front and back pieces are the same length – the loosely bind off. ASSEMBLY: Sew side and sleeve seams edge to edge in the outermost loop of the outermost stitch. CROCHET EDGE: Crochet with hook size C/2.5 mm around the whole opening of the jacket as follows (from the right side): Work 1 single crochet in the first stitch, * 1 chain stitch, skip approx. 2 stitches/rows, 1 single crochet in the next stitch *, repeat from *-* around the whole jacket, but in each of the corners (where the decreases for the neck start on the front pieces) work the tie cord as follows: 1 single crochet in the tip, work chain stitches for approx. 20-25 cm / 8"-9¾", turn and work back with 1 slip stitch in each chain stitch, work 1 single crochet in the tip of the front piece again. The round is finished with 1 slip stitch in the first single crochet. Make 2 loose tie cords: Work chains for approx 20-25 cm / 8"-9¾", turn and work back with 1 slip stitch in each chain stitch. Cut the strand and make 1 more tie cord the same way. Fasten 1 tie cord on the inside on right side and 1 tie cord on the outside on the left side. Make sure to place the ties at the same height as the tie on the outside. --------------------------------------------------------- PANTS: The piece is worked in the round, top down. The round starts mid back. Cast on (88) 96-104-120-128 (136-144) stitches with circular needle size 2.5 mm / US 1.5 and Baby Merino. Insert 1 marker at the beginning of the round (= mid back) and 1 marker after (44) 48-52-60-64 (68-72) stitches (= mid front). Work rib as follows from mid back: knit 1, * purl 2, knit 2 *, repeat from *-* and finish with purl 2 and knit 1. When the rib section measures 4 cm / 1½" work a row of holes for the tie cord as follows: * knit 1, 1 yarn over, purl 2 together, knit 2, 1 yarn over, purl 2 together, knit 1 *, repeat from *-* the whole round. Work 1 round of rib with knit 2 / purl 2. Work an elevation at the back of the rib section as follows: Work (7) 7-9-9-9 (9-9) stitches, turn, tighten the strand, work (14) 14-18-18-18 (18-18) stitches back, turn, tighten the strand, work (20) 20-26-26-26 (26-26) stitches, turn, tighten the strand, work (26) 26-34-34-34 (34-34) stitches back. Continue in this way by working (6) 6-8-8-8 (8-8) more stitches each time you turn until you have worked a total of (50) 50-66-66-82 (82-82) stitches. Turn. Change to circular needle size 3 mm / US 2.5. Work as follows from mid back: Work (17) 19-21-25-27 (29-31) stitches in GARTER STITCH – see description above, A.3 (= 10 stitches), work (34) 38-42-50-54 (58-62) stitches in garter stitch, A.3 over 10 stitches, work (17) 19-21-25-27 (29-31) stitches in garter stitch. REMEMBER THE GAUGE! When the piece measures (10) 12-13-16-15 (16-17) cm / (4") 4¾"-5"-6¼"-6" (6¼"-6¾") mid front, increase 1 stitch on each side of the 2 middle stitches at the front and back – READ INCREASE TIP (= 4 stitches increased). Increase in this way every 2nd round a total of (8) 8-8-8-12 (12-12) times = (120) 128-136-152-176 (184-192) stitches. When the piece measures (15) 17-18-21-22 (23-24) cm / (6") 6¾"-7"-8¼"-8¾" (9"-9½") mid front (you should now have finished the increases) bind off stitches for the gusset on the next round of work as follows: Start mid back and cast of the first (6) 6-6-6-8 (8-8) stitches, work garter stitch until there are (6) 6-6-6-8 (8-8) stitches left before the marker in front and bind off (12) 12-12-12-16 (16-16) stitches, work garter stitch until there are (6) 6-6-6-8 (8-8) stitches left on the round, bind off the last (6) 6-6-6-8 (8-8) stitches. Place the stitches for one of the legs on a thread and finish each leg separately. LEG: The piece is worked in the round with double pointed needles. = (48) 52-56-64-72 (76-80) stitches. Divide the stitches on to 4 double pointed needles size 3 mm / US 2.5 and insert 1 marker at the beginning of the round (= inside leg). Continue with garter stitch and A.3 in the side as before for (1) 1-1-2-2 (2-3) cm / (½") ½"-½"-¾"-¾" (3/4"-1") – adjust so that the next round is 1 round of knit. Decrease 1 stitch on each side of the marker – READ DECREASE TIP-3, as follows: SIZE PREMATURE - 12/18 MONTHS: On every 4th round. SIZE 2 YEARS: On every 6th round. SIZE 3/4 YEARS: On every 8th round a total of (8) 10-10-12-12 (12-12) times = (32) 32-36-40-48 (52-56) stitches. Work until the piece measures (24) 28-32-38-42 (48-55) cm / (9½") 11"-12½"-15"-16½" (19"-21½"), now continue with A.3 as before but the garter stitches are worked in rib with knit 2/purl 2 until the piece measures approx. (26) 30-34-40-44 (50-57) cm / (10¼") 11¾"-13½"-15¾"-17¼" (19¾"-22½") from the cast-on edge – adjust so that the last round is the 4th round in A.3. Work rib over all stitches until the piece measures (27) 31-35-41-45 (51-58) cm / (10½") 12¼"-13¾"-16"-17¾" (20"-22¾") from cast-on edge. Bind off with knit over knit and purl over purl. Place the stitches from the other leg back on double pointed needles size 3 mm / US 2.5 and work as for the first leg. ASSEMBLY: Sew the (12) 12-12-12-16 (16-16) stitches bind off between the legs, to each other. TIE CORD: Crochet a tie cord on the waist with hook size 2.5 mm as follows: Work chain stitches for approx. 110 cm / 44", turn and work back with 1 slip stitch in each chain stitch, cut and fasten the strand. Tread the tie cord through the holes made in the rib and tie it at the front. |
||||||||||||||||||||||
Diagram explanations |
||||||||||||||||||||||
|
||||||||||||||||||||||
|
||||||||||||||||||||||

|
||||||||||||||||||||||
|
||||||||||||||||||||||
|
Have you made this or any other of our designs? Tag your pictures in social media with #dropsdesign so we can see them! Do you need help with this pattern?You'll find tutorial videos, a Comments/Questions area and more by visiting the pattern on garnstudio.com. © 1982-2024 DROPS Design A/S. We reserve all rights. This document, including all its sub-sections, has copyrights. Read more about what you can do with our patterns at the bottom of each pattern on our site. |
||||||||||||||||||||||


With over 40 years in knitting and crochet design, DROPS Design offers one of the most extensive collections of free patterns on the internet - translated to 17 languages. As of today we count 304 catalogs and 11422 patterns - 11417 of which are translated into English (US/in).
We work hard to bring you the best knitting and crochet have to offer, inspiration and advice as well as great quality yarns at incredible prices! Would you like to use our patterns for other than personal use? You can read what you are allowed to do in the Copyright text at the bottom of all our patterns. Happy crafting!
Comments / Questions (68)
Prosím, u čepičky je popsáno, že se plete do výše 16cm. Je to 16cm od lemu nebo celkově 16cm včetně lemu? Děkuju moc.
25.11.2018 - 00:09DROPS Design answered:
Milá Martino, jde o celkovou výšku, včetně lemu. Hodně pohody při pletení! Hana
25.11.2018 - 17:55Börjat med byxan. Men förstår inte mönstret A3 . Inte nybörjare! Svart ruta? Tredje varv? Tacksam för svar MVH
06.11.2018 - 12:10DROPS Design answered:
Hej, denna svarta ruta ska du hoppa över, det är en maska som har minskats bort och inte finns i arbetet längre. Fortsätt bara med följande ruta i diagrammet.
06.11.2018 - 14:25Hallo. Ich bin dabei dir Hose zu stricken und komme mit dem Muster nicht ganz zurecht. Es wird beschrieben, dass es immer 10 Maschen sind. Aber in der 2. Und 3. Reihe komme ich doch auf 12 machen? Danke und liebe Grüße
21.10.2018 - 16:42DROPS Design answered:
Liebe Hali, A.3 wird über die nächsten 10 Maschen gestrickt, aber es stimmt, daß am Ende der 1. Reihe und bei der 2. Reihe 12 Maschen sind (wegen die beiden Umschläge). Bei der 3. und 4. Reihe haben Sie 10 Maschen wieder. Das Video unten zeigt wie man dieses Muster strickt. Viel Spaß beim stricken!
22.10.2018 - 09:37Buongiorno vorrei sapere se è possibile lavorare i pantaloni con i ferri diritti (purtroppo non so usare i ferri circolari)o se avete un modello da lavorare con ferri diritti. Grazie e buona giornata Marina
04.09.2018 - 13:28DROPS Design answered:
Buongiorno Marina. Questo modello è lavorato avanti e indietro sui ferri dritti . In base alla sua esperienza, può adattarlo inserendo la lavorazione del diagramma sulla parte esterna delle gambe. Per un aiuto più personalizzato, può rivolgersi al suo rivenditore Drops di fiducia. Buon lavoro!
04.09.2018 - 14:38Olen vaiheessa, missä pitää päättää silmukoita juuri ennen lahkeen aloittamista. Miten päätän silmukat?
14.08.2018 - 11:54DROPS Design answered:
Silmukat päätetään seuraavalla tavalla: Neulo 2 silmukkaa, vedä sitten ensimmäiseksi neulottu silmukka toisen silmukan yli, neulo vasemman käden puikon seuraava silmukka, vedä aiemmin neulottu silmukka äsken neulotun silmukan yli, jne.
07.09.2018 - 13:23Prečo treba robiť sveter na kruhových ihliciach? pletieme ho v riadkoch s okrajovými očkami, alebo v kruhových riadkoch? ďakujem
06.08.2018 - 18:41DROPS Design answered:
Dobrý den, Deniso, svetr pleteme v řadách. Kruhová jehlice je praktičtější ve chvíli, kdy nahodíme oka pro rukávy a máme tím pádem delší řadu. Pokud ale chcete, můžete plést i na klasických rovných jehlicích - jelikož jde o dětský svetřík, měla by se vám tam oka vejít. Příjemné chvíle s jehlicemi! Hana
07.08.2018 - 15:16Is this pattern available in English?
29.07.2018 - 08:50DROPS Design answered:
Dear Mrs Cole, yes this pattern is available in English, just click on the drop menu under the picture to change language. Happy knitting!
31.07.2018 - 10:24Tere! Alustasin jaki parema hõlmaga, kudusin parempidi esimese mustrirea A2. Kuidas tuleb kududa pahempidine rida? Kas muster käib ka pahempidiste ridade kohta?
09.07.2018 - 21:43DROPS Design answered:
Tere Margit! Skeemil on näidatud kõik read. Head kudumist!
13.08.2018 - 22:10Hej Jeg har lidt problemer med at strikke de bukser, for at strikke retstrik når man strikker rundt - så strikker man da ikke ret på alle pindende? så bliver det glat? eller er det sådan at når man har strikket buksen, så vender man vrangen ud inden man syr dem sammen i skridtet? jeg kan ikke lige tolke det :-) hjælp :-) Hilsen Birgit
30.05.2018 - 11:35DROPS Design answered:
Hej Birgit, Når du strikker retstrik rundt, så strikker du hver 2.omgang vrang, så får du rillerne :)
30.05.2018 - 13:39Ich bin bei der Jacke am rechten Vorderteil. Nach den 16cm beginnen die 18x abnahmen k 36 Reihen) & 2x in der 4. Reihe ( 8 Reihen). So komme ich auf 44 Reihen. Am Ende ( vor den Zunahmen für die Ärmel) soll ich nur 19cm insgesamt haben, d.h. 44 Reihen in 3cm, das passt definitiv nicht. Maschenprobe und Garn sind identisch, bin nun bei der 8. Reihe und hab schon 4cm. Die Maße scheinen nicht zu stimmen. ( Größe 1/3 Mon)
07.05.2018 - 21:51DROPS Design answered:
Liebe Frau Eichstädt, die Abnahmen für Halsausschnitt sollen nicht bei 19 cm fertig sein, dh nach 19 cm schlagen Sie die neuen Maschen für den Ärmel an und gleichzeitig stricken Sie die Abnahmen für den Hals weiter. Wenn alle Zu- und Abnhamen fertig sind, weiter stricken bis die Arbeit 28 cm misst (= Schulter). Viel Spaß beim stricken!
08.05.2018 - 09:06