DROPS Muskat
DROPS Muskat
100% Cotton
from 11.00 RON /50g
Get the yarn to make this pattern from 66.00RON.

The yarn cost is calculated from the pattern’s smallest size and the yarn’s cheapest product type. Looking for an even better price? You might find it on the DROPS Deals!

DROPS SS24

Hawaiian Breeze

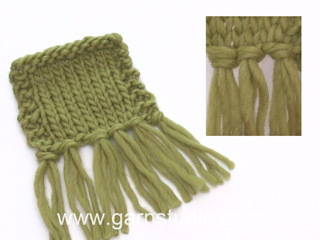
Crochet top with lace pattern and fringes in DROPS Muskat. Size: S - XXXL

DROPS 175-27
DROPS design: Pattern r-712
Yarn group B
----------------------------------------------------------
Size: S - M - L - XL - XXL - XXXL
Materials:
DROPS MUSKAT from Garnstudio (belongs to yarn group B)
300-350-350-400-450-500 g no 08, off white

DROPS CROCHET HOOK SIZE 4 mm - or size needed to get 18 treble crochets x 9 rows = 10 cm in width and 10 cm vertically.
----------------------------------------------------------

-------------------------------------------------------

Alternative Yarn – See how to change yarns here
Yarn Groups A to F – Use the same pattern and change the yarn here
Yarn usage using an alternative yarn – Use our yarn converter here

-------------------------------------------------------

DROPS Muskat
DROPS Muskat
100% Cotton
from 11.00 RON /50g
Get the yarn to make this pattern from 66.00RON.

The yarn cost is calculated from the pattern’s smallest size and the yarn’s cheapest product type. Looking for an even better price? You might find it on the DROPS Deals!

Pattern instructions

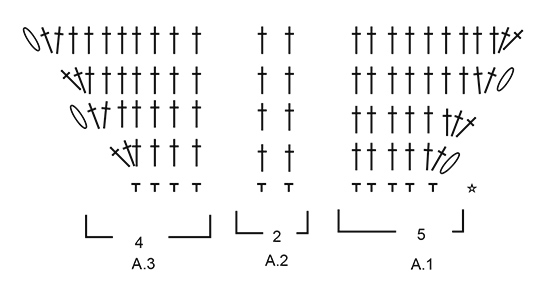
CROCHET INFO:
At beginning of every row with treble crochets in A.1 and A.3 work 5 chain stitches to turn with. These 5 chain stitches do not replace first treble crochet.
When working in the round, replace the first treble crochet with 3 chain stitches, finish round with 1 slip stitch in 3rd chain stitch at beginning of round.

PATTERN: 
See diagrams A.1 to A.5. 

INCREASE TIP:
Increase by working 2 treble crochets in 1 treble crochet.
----------------------------------------------------------

TOP:
Top is worked top down. First work front piece and back piece back and forth separately, then work in the round over both parts.

FRONT PIECE:
Work 42-44-44-47-47-49 loose chain stitches on hook size 4 mm with Muskat. Turn and work as follows: Work 1 double crochet in second chain stitch from hook (= 1 double crochet + 1 chain stitch to turn with), work 1 double crochet in each of the next 0-2-2-0-0-2 chain stitches, * skip 1 chain stitch, work 1 double crochet in each of the next 4 chain stitches *, repeat from *-* 7-7-7-8-8-8 more times = 33-35-35-37-37-39 double crochets. Turn and work pattern as follows: Begin on 2nd row. Work A.1 over the first 5 double crochet, A.2 over the next 24-26-26-28-28-30 double crochets, A.3 over the remaining 4 double crochet - READ CROCHET INFO. REMEMBER THE CROCHET TENSION! When diagram A.1 to A.3 have been done vertically, continue with treble crochets and increases the same way until 11-12-13-14-15-16 rows with increases have been worked in total (increase 3 treble crochets on every row). There are now 66-71-74-79-82-87 treble crochets on row. Put piece aside.

BACK PIECE:
Work the same way as on front piece.

BODY:
Now work the two parts together as follows: Turn and work 1 treble crochet in each of the 66-71-74-79-82-87 treble crochets from back piece, work 6-12-12-16-24-30 chain stitches, work 1 treble crochet in each of the 66-71-74-79-82-87 treble crochets from front piece, work 6-12-12-16-24-30 chain stitches and finish with 1 slip stitch in 3rd chain stitch at beginning of round. Then work piece in the round, continue with 1 treble crochet in every treble crochet/chain stitch = 144-166-172-190-212-234 treble crochets. When working in the round, turn after every round to work alternately from right side and wrong side. This is so that the texture is the same on the entire top. Insert 1 marker thread in each side, in the middle of the 6-12-12-16-24-30 chain stitches. NOW MEASURE THE PIECE FROM HERE. When piece measures 4 cm, increase 1 treble crochet on each side of each marker thread - READ INCREASE TIP. Increase every 3-3-3-3-4-4 cm 4 times in total = 160-182-188-206-228-250 treble crochets. Piece now measures 14-15-15-16-17-18 cm work 1 round while increasing 3-5-5-5-1-3 treble crochets evenly = 163-187-193-211-229-253 treble crochets, then work as follows: Work A.4 over the first treble crochet on round, then repeat A.5 over the remaining treble crochets. A.4 shows beginning and end of round. Do not turn, work all rounds from right side. Fasten off when A.4 and A.5 have been worked 1 time vertically. Piece measures approx. 40-42-44-46-48-50 cm in total.

TIE:
Work 2 loose ties as follows: Work chain stitches with Muskat on hook size 4 mm until the tie measures 100 cm, turn and work 1 slip stitch in every chain stitch but make sure that the slipped stitches are not worked tighter than chain stitches. Fasten off. Work another tie the same way.

Baste tie through one side on front piece, between second and third treble crochet from edge in the first row with treble crochets. Baste tie through one side on back piece the same way and tie a knot on shoulder. Repeat on the other side of top.

FRINGES:
Cut 4 lengths of yarn of 20 cm. Place them double, thread loop from right side between 2 treble crochets at the bottom of body. Then pull yarn ends through loops and tighten. Fasten fringes approx. 2 cm apart at the bottom of top.

Diagram

symbols = 1 treble crochet in treble crochet/double crochet
symbols = 1 treble crochet around chain stitch/chain space
symbols = 5 chain stitches - READ CROCHET INFO.
symbols = 1 chain stitch
symbols = 1 double crochet in stitch
symbols = this row has already been worked
symbols = 1 double crochet around chain stitch
symbols = slip stitch
diagram
diagram
Do you have a question? See a list of frequently asked questions (FAQ)

Knitting tension is what determines the final measurements of your work, and is usually measured per 10 x 10 cm. It is provided like so: number of stitches in width x number of rows in height - eg: 19 stitches x 26 rows = 10 x 10 cm.

The knitting tension is very individual; some people knit/crochet loosely while others work tightly. You adjust the knitting tension with the needle size, which is why the suggested needle size is only meant as a guide! You need to adjust this (up or down) to ensure that YOUR knitting tension matches the knitting tension provided in the pattern. If you work with a different knitting tension than provided you will have a different yarn consumption, and your work will have different measurements than what the pattern suggests.

The knitting tension also determines which yarns can replace each other. As long as you achieve the same knitting tension you can replace one yarn with another.

See DROPS lesson: How to measure your tension/gauge

See DROPS video: How to make a gauge tension swatch

The required amount of yarn is provided in grams, eg: 450 g. To calculate how many balls you’ll need you first need to know how many grams are in 1 ball (25g, 50g or 100g). This information is available if you click on the individual yarn quality on our pages. Divide the amount required with the amount of each ball. For example, if each ball is 50g (the most common amount), the calculation will be as follows: 450 / 50 = 9 balls.

The important thing when changing from one yarn to another is that the knitting/crochet tension remains the same. This is so that the measurements of the finished piece will be the same as on the sketch provided. It is easier to achieve the same knitting tension using yarns from the same yarn group. It is also possible to work with multiple strands of a thinner yarn to achieve the knitting tension of a thicker one. Please try our yarn converter. We recommend you to always work a test swatch.

Please NOTE: when changing yarn the garment might have a different look and feel to the garment in the photo, due to individual properties and qualities of each yarn.

See DROPS lesson: Can I use a different yarn than the one mentioned in the pattern?

All our yarns are categorised into yarn groups (from A to F) according to thickness and knitting tension – group A contains the thinnest yarns and group F the thickest. This makes it easier for you to find alternative yarns to our patterns, should you wish to switch yarn. All yarns within the same group have a similar knitting tension and can easily replace each other. However, different yarn qualities have different structures and properties which will give the finished work a unique look and feel.

Click here for an overview of the yarns in each yarn group

At the top of all our patterns you’ll find a link to our yarn calculator, which is a helpful tool should you wish to use a different yarn than suggested. By filling in the yarn quality you wish to replace, the amount (in your size) and number of strands, the calculator will present good alternative yarns with the same knitting tension. Additionally it will tell you how much you’ll require in the new qualities and whether you’ll need to work with multiple strands. Most skeins are 50g (some are 25g or 100g).

If the pattern is worked with multiple colours, every colour will have to be calculated separately. Similarly, if the pattern is worked with several strands of different yarns (for example 1 strand Alpaca and 1 strand Kid-Silk) you will have to find alternatives for each, individually.

Click here to see our yarn calculator

Since different yarns have different qualities and textures we have chosen to keep the original yarn in our patterns. However, you can easily find options among our available qualities by using our yarn calculator, or simply pick a yarn from the same yarn group.

It is possible that some retailers still have discontinued yarns in stock, or that someone has a few skeins at home that they would like to find patterns for.

The yarn calculator will provide both alternative yarn as well as required amount in the new quality.

If you think it's hard to decide what size to make, it can be a good idea to measure a garment you own already and like the size of. Then you can pick the size by comparing those measures with the ones available in the pattern's size chart.

You'll find the size chart at the bottom of the pattern.

See DROPS lesson: How to read size chart

The needle size provided in the pattern serves only as a guide, the important thing is to follow the knitting tension. And since knitting tension is very individual, you will have to adjust the needle size to ensure that YOUR tension is the same as in the pattern – maybe you’ll have to adjust 1, or even 2 needle sizes, up or down to achieve the correct tension. For this, we recommend that you work test swatches.

Should you work with a different knitting tension than the one provided, the measurements of the finished garment might deviate from the measurement sketch.

See DROPS lesson: How to measure your tension/gauge

See DROPS video: How to make a tension/gauge swatch

Working a garment top-down provides more flexibility and room for personal adjustment. For example it is easier to try the garment on while working, as well as making adjustments to length of yoke and shoulder caps.

The instructions are carefully explaining every step, in the correct order. Diagrams are adjusted to the knitting direction and are worked as usual.

The diagram depicts all rows/rounds, and every stitch seen from the right side. It is read from bottom to top, from right to left. 1 square = 1 stitch.

When working back and forth, every other row is worked from the right side and every other row is worked from the wrong side. When working from the wrong side, the diagram will have to be worked reversed: from left to right, knit stitches are purled, purl stitches are knit etc.

When working in the round every round is worked from the right side and the diagram are worked from right to left on all rounds.

See DROPS lesson: How to read knitting diagrams

The diagram depicts all rows/rounds, and every stitch seen from the right side. It is worked from bottom to top, from right to left.

When working back and forth every other row is worked from the right side: from right to left and every other row is worked from the wrong side: from left to right.

When working in the round, every row in the diagram are worked from the right side, from right to left.

When working a circular diagram you start in the middle and work your way outwards, counter clockwise, row by row.

The rows usually start with a given number of chain stitches (equivalent to the height of the following stitch), this will either be depicted in the diagram or explained in the pattern.

See DROPS lesson: How to read crochet diagrams

Instructions for working several diagrams after each other on the same row/round, will often be written like so: “work A.1, A.2, A.3 a total of 0-0-2-3-4 times". This means you work A.1 once, then A.2 is worked once, and A.3 is repeated (in width) the number of times provided for your size – in this case like so: S = 0 times, M = 0 times, L=2 times, XL= 3 times and XXL = 4 times.

The diagrams are worked as usual: begin with the first row in A.1, then work the first row in A.2 etc.

See DROPS lesson: How to read knitting diagrams

See DROPS lesson: How to read crochet diagrams

The total width of the garment (from wrist-to-wrist) will be larger in the larger sizes, despite the actual sleeves being shorter. The larger sizes have longer sleeve caps and wider shoulders, so there will be a good fit in all sizes.

The measurement sketch/schematic drawing provides information regarding the full length of the garment. If it’s a jumper or a jacket the length is measured from the highest point on the shoulder closest to the neckline, and straight down to the bottom of the garment. It is NOT measured from the tip of shoulder. Similarly, the length of yoke is measured from the highest point on the shoulder and down to where yoke is split into body and sleeves.

On a jacket measures are never taken along bands, unless specifically stated. Always measure inside band stitches when measuring the length.

See DROPS lesson: How to read a schematic drawing

Diagrams are often repeated on the round or in height. 1 repeat is the diagram the way it appears in the pattern. If it says to work 5 repeats of A.1 in the round, then you work A.1 a total of 5 times after/next to each other in the round. If it says to work 2 repeats of A.1 vertically/in height you work the entire diagram once, then begin again at the start and work the entire diagram one more time.

Chain stitches are slightly narrower than other stitches and to avoid working the cast-on edge too tight, we simply chain more stitches to begin with. The stitch count will be adjusted on the following row to fit the pattern and measurement sketch.

The rib edge is more elastic and will contract slightly compared to, for example, stocking stitch. By increasing before the rib edge, you avoid a visible difference in width between the rib edge and the rest of the body.

It’s very easy to cast off too tightly, and by making yarn overs while casting off (and simultaneously casting these off) you avoid a too tight cast off edge.

See DROPS video: How to bind off with yarn overs (yo)

To achieve an even increase (or decrease) you can increase on, for example: every 3rd and 4th row alternately, like so: work 2 rows and increase on the 3rd row, work 3 rows and increase on the 4th. Repeat this until the increase is complete.

See DROPS lesson: Increase or decrease 1 st on every 3rd and 4th row alternately

Should you prefer to work in the round instead of back and forth, you may of course adjust the pattern. You’ll need to add steeks mid-front (usually 5 stitches), and follow the instructions. When you would normally turn and work from the wrong side, simply work across the steek and continue in the round. At the end you’ll cut the piece open, pick up stitches to work bands, and cover the cut edges.

See DROPS video: How to knit steeks and cut open

Should you prefer to work back and forth instead of in the round, you may of course adjust the pattern so you work the pieces separately and then assemble them at the end. Divide the stitches for the body in 2, add 1 edge stitch in each side (for sewing) and work the front and back pieces separately.

See DROPS lesson: Can I adapt a pattern for circular needles into straight needles?

Pattern repeats can vary slightly in the different sizes, in order to get the correct proportions. If you’re not working the exact same size as the garment in the photo, yours might deviate slightly. This has been carefully developed and adjusted so that the complete impression of the garment is the same in all sizes.

Make sure to follow instructions and diagrams for your size!

If you have found a pattern you like which is available in women’s size it’s not very difficult to convert it to men’s size. The biggest difference will be the length of sleeves and body. Start working on the women size that you think would fit across the chest. The additional length will be worked right before you cast off for the armhole/sleeve cap. If the pattern is worked top-down you can add the length right after the armhole or before the first decrease on sleeve.

Regarding additional yarn amount, this will depend on how much length you add, but it is better with a skein too many than too few.

All yarns will have excess fibres (from production) that might come off as lint or shedding. Brushed yarns (ie hairier yarns) have more of these loose, excess fibres, causing more shedding.

Shedding also depends on what is worn under or over the garment, and whether this pulls at the yarn fibres. It’s therefore not possible to guarantee that there will be no shedding

Below are some tips on how to get the best result when working with hairier yarns:

1. When the garment is finished (before you wash it) shake it vigorously so the looser hairs come off. NOTE: do NOT use a lint roller, brush or any method that pulls at the yarn.

2. Place the garment in a plastic bag and put it in your freezer - the temperature will cause the fibres to become less attached to each other, and excess fibres will come off easier.

3. Leave in the freezer for a few hours before taking it out and shaking it again.

4. Wash the garment according to the instructions on the yarn label.

Pilling is a natural process that happens to even the most exclusive of fibers. It's a natural sign of wear and tear that is hard to avoid, and that is most visible in high friction areas of your garment like a sweater's arms and cuffs.

You can make your garment look as new by removing the pilling, using a fabric comb or a pill/lint remover.

Still can't find the answer you need? Then scroll down and leave your question so one of our experts can try to help you. This will be done normally within 5 to 10 working days.
In the meantime, you can read the questions and answers that others have left to this pattern or join the DROPS Workshop on Facebook to get help from fellow knitters/crocheters!

You might also like...

Post a comment to pattern DROPS 175-27

We would love to hear what you have to say about this pattern!

If you want to leave a question, please make sure you select the correct category in the form below, to speed up the answering process. Required fields are marked *.

Comments / Questions (46)

country flag Mélanie wrote:

Bonjour je fais le modèle taille L. "Quand les diagrammes A.1 à A.3 ont été crochetés 1 fois en hauteur, continuer en brides et les augmentations de la même façon jusqu'à ce que 13rangs avec des augmentations aient été crochetés au total. On a maintenant 74br" moi je n'ai que 73 et non 74 et pour cela il faut que je fasse 14 rangs. Je me suis trompés quelques part ?

08.05.2020 - 09:33

DROPS Design answered:

Bonjour Mélanie, vérifiez bien votre nombre de mailles/augmentations, vous augmentez 3 brides par rang et crochetez 13 rangs au total soit 3*13= 39 augmentations + les 35 brides du début = 74 brides. Bon crochet!

08.05.2020 - 10:07

country flag Angela wrote:

Hallo, wie kann man diese Anleitung auf XS umrechnen? LG

30.04.2020 - 14:39

DROPS Design answered:

Liebe Angela, leider können wir jeder Anleitung nach jedem individuellen Frage anpassen und einzelne Modelle auf individuellen Wunsch hin umrechnen. Wenn sie Hilfe damit brauchen, wenden Sie sich bitte an Ihrem DROPS Laden, dort hilft man Ihnen gerne weiter. Viel Spaß beim stricken!

04.05.2020 - 14:36

country flag Mélanie wrote:

Je vous remercie, petite question encore que je n'est pas très bien compris quand vous dîtes "Crocheter 1 tour en augmentant 3 brides à intervalles réguliers=163 brides." Cela ve dire...???

02.04.2020 - 11:01

DROPS Design answered:

Bonjour Mélanie, quand les augmentations sont terminées, vous avez 160 brides. Quand l'ouvrage mesure 14 cm (les augmentations sont terminées), vous crochetez 1 tour sur toutes les mailles mais en même temps augmentez 3 brides à intervalles réguliers = vous avez maintenant 163 brides. Découvrez ici comment augmenter à intervalles réguliers. Bon crochet!

02.04.2020 - 11:32

country flag Mélanie wrote:

Bonjour, Merci pour votre réponse mais elle m'a perdu. Que voulez-vous dire par "continuez comme avant ?" Si je comprends je dois faire une augmentation après que mon ouvrage fasse 4 cm puis je fait des rangs de brides et ne refait des augmentations que 3 cm après ??

02.04.2020 - 09:33

DROPS Design answered:

Bonjour Mélanie et oups désolée, il fallait lire "augmentez" pas "diminuez" effectivement, erreur de ma part. Vous augmentez quand l'ouvrage mesure 4 cm puis quand il mesure 7 cm (= 3 cm après la 1ère), puis 10 cm (= 3 cm après la 2ème) et 13 cm (= 3 cm après la 3ème). Bon crochet!

02.04.2020 - 10:41

country flag Mélanie wrote:

Bonjour, Je doute un peu sur cette partie "Augmenter 4 fois au total tous les 3-3-3-3-4-4 cm = 160-182-188-206-228-250 brides." J'ai compris la parti des 4 fois par contre quand vous dîtes tous les 3cm c'est comme si vous disiez 3rangs ?? (Je fait la taille S)

01.04.2020 - 18:11

DROPS Design answered:

Bonjour Mélanie, Quand le dos et le devant mesurent 4 cm vous augmentez 1 bride de chaque côté, continuez comme avant et 3 cm après le 1er rang d'augmentation, vous augmentez à nouveau - ajustez le nombre de rangs en fonction de votre tension en hauteur. Et répétez ces augmentations 4 fois au total en taille S (= vous augmentez 4 fois 2 brides = 6 brides au total). Bon crochet!

02.04.2020 - 07:49

country flag Carmen wrote:

Hola.me encanta como trabajais,los proyectos que teneis,son espectaculares.

13.07.2019 - 19:27

country flag Sofia wrote:

Se giro come se stessi lavorando avanti e indietro le 3 catenelle con cui sostituisco la prima maglia mi formano un buco, è normale?

15.06.2019 - 12:47

DROPS Design answered:

Buongiorno Sofia. Sì, si forma un piccolo buco. Se riesce ad ingrandire la fotografia, è visibile anche nel capo indossato dalla modella. Buon lavoro!

15.06.2019 - 19:21

country flag Sofia wrote:

Buongiorno, non capisco questa parte "Quando si lavora in tondo, girare alla fine di ogni giro, per lavorare alternativamente sul diritto e sul rovescio del lavoro" : intendete di lavorare come se fosse avanti e indietro? Cioè faccio la maglia bassissima poi torno indietro?

15.06.2019 - 11:54

DROPS Design answered:

Buongiorno Sofia. Sì, chiude il giro con una maglia bassissima e poi torna indietro. Buon lavoro!

15.06.2019 - 19:13

country flag Sofia wrote:

Buongiorno, ho una domanda sulla parte del davanti : se prima dello schema A1, A2 e A3 ci sono 33 maglie e dopo lo schema 45 (33+ 3 aumenti ogni riga), come possono essere 66 dopo 11 righe con 3 aumenti alla volta? Non dovrebbero essere 78?

14.06.2019 - 15:14

DROPS Design answered:

Buongiorno Sofia. Deve aumentare in tutto 11 volte. Nel conteggio, sono comprese le prime 4 righe dei diagrammi. Quindi dopo lo schema, quando ha 45 m, aumenta per altre 7 volte. Buon lavoro!

14.06.2019 - 17:02

country flag Pakki wrote:

Estoy hecha un lío con el diagrama a-4 y a-5 . Sobre todo el a-4(primer punto) Hay algún video? O podría decirme si son 3 cadenetas y un punto raso? Muchas gracias

18.05.2019 - 00:06

DROPS Design answered:

Hola Pakki, El diagrama A.4 muestra cómo comienza (con 3 puntos de cadeneta) y finaliza (con 1 punto enano en el tercer punto de cadeneta del inicio de la vuelta) la vuelta cuando trabajamos el cuerpo.

18.05.2019 - 20:07