
Popular categories
Looking for a yarn?


|
|
Queen of the Chill |
|
|
|
|
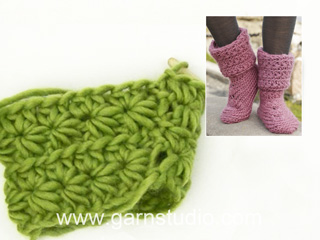
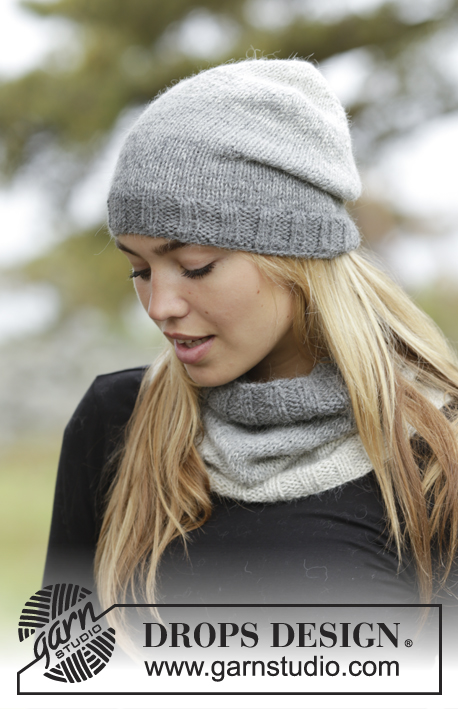
Crochet DROPS hat and neck warmer with star pattern in ”Nepal”.
DROPS 171-45 |
|
|
HAT: CROCHET INFO: Replace first dc at beg of every dc round with 1 ch. Finish every round with 1 sl st in first ch on round. INCREASE TIP: Inc 1 st by working 2 dc in same st. STAR PATTERN (in the round): ROUND 1: 3 ch, pick up 5 sts, beg in 2nd ch from hook, when picking up st in dc pick up in back loop (= 6 loops on hook), make a YO and pull through all 6 loops, work 1 ch to make a hole over the 6 sts, * pick up 1 st in the hole, pick up 1 st in the side on the last of the 6 sts, pick up 1 st in same ch as the last of the 6 sts was picked up in, 1 st in back loop in each of the 2 next ch (= 6 loops on hook), make a YO and pull through all 6 loops, 1 ch *, repeat from *-*, finish with 1 sl st in 3rd ch at beg of round. ROUND 2: 2 ch, work 2 htr in each "star hole", finish round with 1 sl st in 2nd ch at beg of round = 34-36 stars. ROUND 3: 3 ch, pick up 1 st in 2nd and 3rd ch from hook, 1 st in back loop of the first 3 htr on row (= 6 loops on hook), make a YO and pull through all 6 loops, 1 ch, * pick up 1 st in the hole, 1 st in the side on the last of the 6 sts, 1 st in back loop of same htr as the last of the 6 sts was picked up in, 1 st in back loop of each of the next 2 htr (= 6 loops on hook), make a YO and pull through all 6 loops, 1 ch *, repeat from *-*, finish with 1 sl st in 3rd ch at beg of round. Repeat 2nd and 3rd round 2 times in total, work 2nd round 1 more time (= 6 rounds in total vertically = 3 stars vertically). ---------------------------------------------------------- HAT: The piece is worked top down in the round. Crochet 4 ch on hook size 5 mm with Nepal and form a ring with 1 sl st in first ch. ROUND 1: Work 6 dc in ch-ring – READ CROCHET INFO! Now work all dc in back loop of dc from previous round. ROUND 2: Work 2 dc in every dc = 12 dc. ROUND 3: * 1 dc in first dc, 2 dc in next dc *, repeat from *-* the entire round = 18 dc. ROUND 4: * 1 dc in each of the first 2 dc, 2 dc in next dc *, repeat from *-* the entire round = 24 dc. REMEMBER THE CROCHET TENSION! ROUND 5: * 1 dc in each of the first 3 dc, 2 dc in next dc *, repeat from *-* the entire round = 30 dc. ROUND 6: * 1 dc in each of the first 4 dc, 2 dc in next dc *, repeat from *-* the entire round = 36 dc. ROUND 7: * 1 dc in each of the first 5 dc, 2 dc in next dc *, repeat from *-* the entire round = 42 dc. ROUND 8: * 1 dc in each of the first 6 dc, 2 dc in next dc *, repeat from *-* the entire round = 48 dc. ROUND 9: * 1 dc in each of the first 7 dc, 2 dc in next dc *, repeat from *-* the entire round = 54 dc. ROUND 10: * 1 dc in each of the first 8 dc, 2 dc in next dc *, repeat from *-* the entire round = 60 dc. ROUND 11: * 1 dc in each of the first 9 dc, 2 dc in next dc *, repeat from *-* the entire round = 66 dc. SIZE S/M: ROUND 12: Work 1 round with 1 dc in every dc and inc 3 dc evenly - READ INCREASE TIP = 69 dc. SIZE L/XL: ROUND 12: * 1 dc in each of the first 10 dc, 2 dc in next dc *, repeat from *-* the entire round = 72 dc. ROUND 13: Work 1 round with 1 dc in every dc and inc 1 dc - READ INCREASE TIP = 73 dc. BOTH SIZES: Piece measures approx. 7-8 cm. Continue to work 1 dc in back loop of every dc until piece measures 18-19 cm. Then work STAR PATTERN – see explanation above. Make sure to not make the star pattern to tight! When star pattern has been worked, work 1 edge in the round as follows: Work 1 dc in back loop of first htr, * 1 ch, skip 1 htr, 1 dc in next htr *, repeat from *-* the entire round. Fasten off. ---------------------------------------------------------- NECK WARMER: STAR PATTERN: ROUND 1: 3 ch, pick up 5 sts, beg in 2nd ch from hook, when picking up st in dc pick up in back loop (= 6 loops on hook), make a YO and pull through all 6 loops, work 1 ch to make a hole over the 6 sts, * pick up 1 st in the hole, pick up 1 st in the side on the last of the 6 sts, pick up 1 st in same ch as the last of the 6 sts was picked up in, 1 st in back loop in each of the 2 next ch (= 6 loops on hook), make a YO and pull through all 6 loops, 1 ch *, repeat from *-*, finish with 1 sl st in 3rd ch at beg of round. ROUND 2: 2 ch, work 2 htr in each "star hole", finish round with 1 sl st in 2nd ch at beg of round = 36-39 stars. ROUND 3: 3 ch, pick up 1 st in 2nd and 3rd ch from hook, 1 st in back loop of the first 3 htr on row (= 6 loops on hook), make a YO and pull through all 6 loops, 1 ch, * pick up 1 st in the hole, 1 st in the side on the last of the 6 sts, 1 st in back loop of same htr as the last of the 6 sts was picked up in, 1 st in back loop of each of the next 2 htr (= 6 loops on hook), make a YO and pull through all 6 loops, 1 ch *, repeat from *-*, finish with 1 sl st in 3rd ch at beg of round. Repeat round 2 and 3. ---------------------------------------------------------- NECK WARMER: Crochet 73-79 LOOSE ch on hook size 6 mm with Nepal and form a ring with 1 sl st in first ch. Work STAR PATTERN - see explanation above. REMEMBER THE CROCHET TENSION! Neck warmer should measure approx. 61-66 cm in circumference, make sure to avoid a tight neck warmer. When piece measures 24-26 cm, adjust so that last round is 2nd round, work 1 edge around the neck warmer as follows: Work 1 ch (= first dc), * 1 ch, skip 1 htr, 1 dc in next htr *, repeat from *-* around the entire neck warmer, finish with 1 sl st in first ch. Fasten off. Work the same edge in opposite side of piece, i.e. in ch-row from RS. Fasten off. |
|
|
Have you made this or any other of our designs? Tag your pictures in social media with #dropsdesign so we can see them! Do you need help with this pattern?You'll find tutorial videos, a Comments/Questions area and more by visiting the pattern on garnstudio.com. © 1982-2024 DROPS Design A/S. We reserve all rights. This document, including all its sub-sections, has copyrights. Read more about what you can do with our patterns at the bottom of each pattern on our site. |


With over 40 years in knitting and crochet design, DROPS Design offers one of the most extensive collections of free patterns on the internet - translated to 17 languages. As of today we count 304 catalogues and 11422 patterns - 11422 of which are translated into English (UK/cm).
We work hard to bring you the best knitting and crochet have to offer, inspiration and advice as well as great quality yarns at incredible prices! Would you like to use our patterns for other than personal use? You can read what you are allowed to do in the Copyright text at the bottom of all our patterns. Happy crafting!
Comments / Questions (45)
Til arbeidet måler 18-19 cm, menes det da fra midten og ut på lua?
24.08.2021 - 22:17DROPS Design answered:
Hei Marit, Ja, det er riktig. God fornøyelse!
25.08.2021 - 09:32Ik begrijp niet zo goed wat ik met die “informatie voor het haken” moet in combinatie met de beschrijving van de muts. Als ik steeds een losse of een hv haak als eerste en laatste steek, dan krijg ik toch een oneffenheid in de muts aangezien je rond haakt?
16.02.2021 - 21:15DROPS Design answered:
Dag Feikje,
Excuses voor het late antwoord. Volgens mij zijn beide opties eigenlijk wel mogelijk. Volgens het patroon haak je een halve vast en een losse aan het eind/begin van de toer, maar je zou ook door kunnen haken in de rondte als je dat mooier vindt.
26.05.2021 - 13:44Hoeveel steken moet je opzetten voor de muts bij het beginnen van de sterren?
11.01.2021 - 20:51DROPS Design answered:
Dag Fanny,
In het patroon staat aangegeven hoeveel vasten je per maat op de toer hebt voordat het sterrenpatroon begint. Voor maat S/M is dat 69 en voor maat L/XL is dat 73 vasten.
17.01.2021 - 12:57Jag är på varv 21. Jag undrar hur stor omkretsen på mössan borde vara ungefär? Det känns som om den kommer bli för liten... Eller är det för tidigt att avgöra? Det är min första mössa. Jag gjorde en testlapp som stämde bra.
06.01.2021 - 09:26DROPS Design answered:
Hej Anette, på varv 21 kan du avgöra om den känns för liten i omkrets. Men om den passar runt om, är det bara att virka stjärnmönster till den känns bra :)
15.01.2021 - 13:46Bonjour, Concernant la consigne info sur le bonnet de remplacer la 1ère ms par une ml, est-ce que cela veut dire que nous devons « passer » la première ms de la chaîne et débuter chaque tour à la deuxième ? Ce n’est pas très clair et deux tuto du site se contredisent sur crocheter en rond. Bonne journée
28.12.2020 - 12:11DROPS Design answered:
Bonjour Émilie, chaque tour de mailles serrées commence par 1 maille en l'air, et se termine par 1 maille coulée dans cette maille en l'air, au début de chaque tour, vous allez faire 1 maille en l'air (= 1ère maille serrée), puis 1 maille serrée dans la maille suivante (= la 1ère maille serrée du tour) et dans chaque maille jusqu'à la fin du tour. Si vous êtes plus à l'aise avec cette maille en l'air en plus, procédez comme vous préférez. Bon crochet!
04.01.2021 - 10:00Bonjour, Tout d'abord merci pour ce modèle que je trouve très joli et que je suis contente de réaliser !Pour le tour de cou, j'ai cependant un petit problème, je n'ai jamais le même nombre d'étoiles d'un rang à l'autre et je ne comprends pas pourquoi ? J'ai bien suivi les instructions et la vidéo mais j'en ai parfois plus et parfois moins. Ça ne se voit pas tellement mais ça ne me semble pas normal ! Auriez-vous une suggestion ?D'avance merci
17.12.2020 - 02:44DROPS Design answered:
Bonjour Tulipe, c'est effectivement étrange, vous devriez avoir exactement le même nombre d'étoiles à chaque fois, vérifiez bien que vous avez aussi le bon nombre de demi-brides à chaque fois que vous crochetez le tour 2, cela pourrait être l'explication. Essayez de bien aligner les étoiles les unes au-dessus des autres en prenant celle du tour précédent en repère? Bon crochet!
17.12.2020 - 08:58Bonjour,\r\nTout d\'abord merci pour ce modèle que je trouve très joli et que je suis contente de réaliser !\r\nPour le tour de cou, j\'ai cependant un petit problème, je n\'ai jamais le même nombre d\'étoiles d\'un rang à l\'autre et je ne comprends pas pourquoi ? J\'ai bien suivi les instructions et la vidéo mais j\'en ai parfois plus et parfois moins. Ça ne se voit pas tellement mais ça ne me semble pas normal ! Auriez-vous une suggestion ?\r\nD\'avance merci
17.12.2020 - 02:41Hi, can you please clarify the following: Piece measures approx. 7-8 cm / 2 3/4"-3". - how to measure: from center to edge (radius) or the entire piece (diameter)? If there’s no other increase, will the hat fit the circumference of adult’s head? Thanks!
16.11.2020 - 20:45DROPS Design answered:
Dear Helen, if your tension is right (= 17 rows = 10 cm/4"), you should have the first 12 rows in first size - 13 rows in 2nd size measure 7-8 cm / 2 3/4"-3"., ie from the first row to the last row (lay hat flat and measure from the top to the last row worked). Make sure your tension in width is also right one to get the correct measurements/size. Happy crocheting!
17.11.2020 - 09:46Jeg er næsten færdig med huen i xl men den bliver alt for lille min er kun blevet 47 og ikke 57 som der står i opskrifter hvad har jeg gjort forkert
20.02.2020 - 21:42DROPS Design answered:
Hej Medine, så skal du prøve at hækle på en større hæklenål. Lav en lille prøve med fastmasker, du skal få 17 fastmasker på 10 cm. Således måler du strikke-/hæklefastheden!
21.02.2020 - 08:09Hvad skal man efter omgang 13, hvis man gerne vil lave en str L/XL? Kan kun se opskriften op til str M/L.
21.01.2020 - 20:05DROPS Design answered:
Hei Rikke. Her er det nok en tastefeil. Det skal være L/XL (og ikke M/L) over 12. og 13. omgang. Dette skal vi få ordnet, takk for at du gjorde oss oppmerksom på dette. mvh DROPS design
27.01.2020 - 14:12