
Popular categories
Looking for a yarn?


|
|||||||||||||||||||||||||||||||||||||
Helsinki |
|||||||||||||||||||||||||||||||||||||
 |
 |
||||||||||||||||||||||||||||||||||||
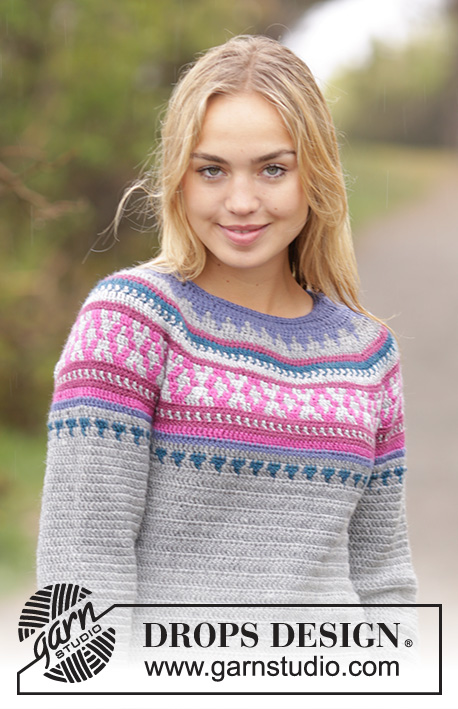
Crochet DROPS jumper with multi-coloured pattern and round yoke, worked top down in ”Karisma”. Size: S - XXXL.
DROPS 172-35 |
|||||||||||||||||||||||||||||||||||||
|
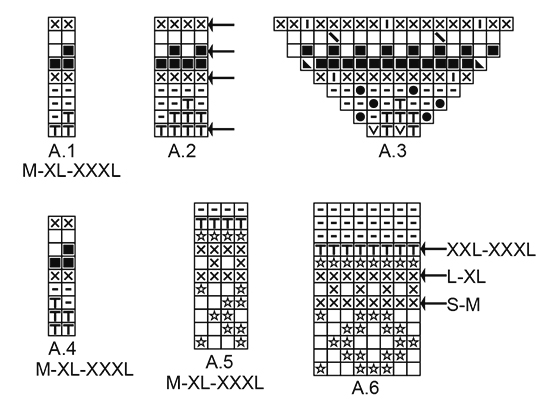
PATTERN: See diagrams A.1 to A.11. Diagrams show colour pattern on jumper. See diagram for correct size. Work diagrams A.1, A.4, A.5 and A.8 only in size M-XL-XXXL. CROCHET INFO: Work piece in the round back and forth, i.e. work every row tog at the end of row. Beg every row with tr with 3 ch (= first tr) and finish with 1 sl st in 3rd ch at beg of row, turn piece. Replace first tr at beg of every tr round with 3 ch. Finish round with 1 sl st in 3rd ch at beg of round. INCREASE TIP-1: Work 2 tr with same colour in 1 tr on previous round. COLOUR PATTERN: When changing colour work as follows: Replace first tr with 3 ch, if last tr on previous row/round and first tr on next row/round are different colour work last tr as follows: Work last tr with first colour but wait with last pull through, switch to next colour and work last pull through, 1 sl st in 3rd ch at beg of row/round, then work 3 ch (= beg of row/round). When working with two colour place strand for the colour not worked over sts from previous row/round, work around the strand so that it is hidden and follows when working. Make sure to avoid tights yarn and not to tighten yarn when picking it up from previous row/round. DECREASE TIP: Work until 4 tr remain before marker, work 2 tr tog, work 1 tr in each of the next 4 tr, (marker is in the middle of these sts), work the next 2 tr tog (= 2 tr dec). Repeat at both markers. INCREASE TIP-2: Work until 3 tr remain before marker, work 2 tr in next tr, 1 tr in each of the next 4 tr (marker is in the middle of these sts) and 2 tr in next tr (= 2 tr inc). Repeat at both markers. ---------------------------------------------------------- JUMPER: Work piece back and forth but work piece tog at the end of row, top down. YOKE: Work 106-110-115-120-124-129 ch on hook size 4 mm with denim blue and form a ring with 1 sl st in first ch. Work 3 ch (= 1 tr) - READ CROCHET INFO, work 1 tr in each of the next 1-5-3-1-5-3 ch, * skip 1 ch, 1 tr in each of the next 6 ch *, repeat from *-* the entire row = 92-96-100-104-108-112 tr. Work from mid back as follows: Work 1st row in A.1 to A.4 and inc evenly as follows (= from RS): Work A.1 (= 2 tr) over the first 0-2-0-2-0-2 tr, repeat A.2 (= 4 tr) over the next 14-13-16-15-18-17 tr and inc 2-3-4-5-6-7 tr (= half back piece) – READ INCREASE TIP-1, A.3 (= 4 tr) – see in in diagram, repeat A.2 over the next 10 tr and inc 2-2-2-2-6-6 tr, A.3 over the next 4 tr (= right sleeve), repeat A.2 over the next 28-30-32-34-36-38 tr and inc 4-6-8-10-12-14 tr (= front piece), A.3 over the next 4 tr, repeat A.2 over the next 10 tr and inc 2-2-2-2-6-6 tr, A.3 over the next 4 tr (= left sleeve), repeat A.2 (= 4 tr) over the next 14-13-16-15-18-17 tr and inc 2-3-4-5-6-7 tr, finish with A.4 over the next 0-2-0-2-0-2 tr = 112-120-128-136-152-160 tr (incl inc in A.3) – READ COLOUR PATTERN. Work 2nd row in A.1 to A.4 as follows (= from WS): Work A.4 over the first 0-2-0-2-0-2 tr, repeat A.2 over the next 16-16-20-20-24-24 tr, A.3, repeat A.2 over the next 12-12-12-12-16-16 tr, A.3, repeat A.2 over the next 32-36-40-44-48-52 tr, A.3, repeat A.2 over the next 12-12-12-12-16-16 tr, A.3, repeat A.2 over the next 16-16-20-20-24-24 tr, finish with A.1 over the last 0-2-0-2-0-2 tr = 120-128-136-144-160-168 sts (incl inc in A.3). REMEMBER THE CROCHET TENSION! Work 5th row in A.1 to A.4 and inc evenly as follows (= from RS): Work A.1 over the first 0-2-0-2-0-2 tr, repeat A.2 over the next 16-16-20-20-24-24 tr and inc 0-2-4-4-4-4 tr, A.3, repeat A.2 over the next 12-12-12-12-16-16 tr and inc 4-4-4-4-8-8 tr, A.3, repeat A.2 over the next 32-36-40-44-48-52 tr and inc 0-4-4-4-8-8 tr, A.3, repeat A.2 over the next 12-12-12-12-16-16 tr and inc 4-4-4-4-8-8 tr, A.3, repeat A.2 over the next 16-16-20-20-24-24 tr and inc 0-2-4-4-4-4 tr, finish with A.4 over the last 0-2-0-2-0-2 tr = 152-168-180-188-216-224 tr (incl inc in A.3). Work 6th row in A.1 to A.4 as follows (= from WS): Work A.4 over the first 0-0-0-2-0-2 tr, repeat A.2 over the next 16-20-24-24-28-28 tr, A.3, repeat A.2 over the next 16-16-16-16-24-24 tr, A.3, repeat A.2 over the next 32-40-44-48-56-60 tr, A.3, repeat A.2 over the next 16-16-16-16-24-24 tr, A.3, repeat A.2 over the next 16-20-24-24-28-28 tr, A.1 over the last 0-0-0-2-0-2 tr = 160-176-188-196-224-232 sts (incl inc in A.3). Then work as follows in each size: SIZE S: The even inc is now done, continue and work A.1 to A.4 and inc as in A.3. When A.1 to A.4 have been worked 1 time vertically, there are 180 tr. SIZE M-L-XL-XXL-XXXL: Work 7th row in A.1 to A.4 and inc evenly as follows (= from RS): Work A.1 over the next 0-0-2-0-2 tr, repeat A.2 over the next 20-24-24-28-28 tr and inc 0-0-2-4-4 tr, A.3, repeat A.2 over the next 16-16-16-24-24 tr and inc 4 tr, A.3, repeat A.2 over the next 40-44-48-56-60 tr and inc 0-4-4-4-8 tr, A.3, repeat A.2 over the next 16-16-16-24-24 tr and inc 4 tr, A.3, repeat A.2 over the next 20-24-24-28-28 tr and inc 0-0-2-4-4 tr, finish with A.4 over the last 0-0-2-0-2 tr = 184-200-212-244-256 tr. Work 8th row in A.1 to A.4 as follows (= from WS): Work A.4 over the first 0-0-0-0-2 tr, repeat A.2 over the next 20-24-28-32-32 tr, A.3, repeat A.2 over the next 20-20-20-28-28 tr, A.3, repeat A.2 over the next 40-48-52-60-68 tr, A.3, repeat A.2 over the next 20-20-20-28-28 tr, A.3, repeat A.2 over the next 20-24-28-32-32 tr, A.1 over the last 0-0-0-0-2 tr = 192-208-220-252-264 sts (incl inc in A.3). Work 9th row in A.1 to A.4 and inc evenly as follows (= from RS): Work A.1 over the next 0-0-0-0-2 tr, repeat A.2 over the next 20-24-28-32-32 tr and inc 0-0-0-0-2 tr, A.3, repeat A.2 over the next 20-20-20-28-28 tr and inc 4 tr, A.3, repeat A.2 over the next 40-48-52-60-68 tr and inc 0-0-4-4-4 tr, A.3, repeat A.2 over the next 20-20-20-28-28 tr and inc 4 tr, A.3, repeat A.2 over the next 20-24-28-32-32 tr and inc 0-0-0-0-2 tr, A.4 over the last 0-0-0-0-2 tr = 212-228-244-276-292 tr (incl inc in A.3). ALL SIZES: Piece now measures approx. 11 cm. Work 1st row in A.5 to A.8 as follows (= from WS): Work A.8 (= 4 tr) over the first 0-4-0-4-0-4 tr, repeat A.6 (= 8 tr) over the next 16-16-24-24-32-32 tr, repeat A.7 (= 7 tr) over the next 21 tr, A.6 over the next 16-24-24-24-32-32 tr, repeat A.7 over the next 21 tr, repeat A.6 over the next 32-40-48-56-64-72 tr, repeat A.7 over the next 21 tr, A.6 over the next 16-24-24-24-32-32 tr, repeat A.7 over the next 21 tr, repeat A.6 over the next 16-16-24-24-32-32 tr, A.5 (= 4 tr) over the next 0-4-0-4-0-4 tr. Continue pattern like this and inc as shown in A.7. Work 5-5-7-7-9-9 rows of A.5 to A.8. On 6th-6th-8th-8th-10th-10th row – see arrow in diagram in A.5 to A.8 work and inc evenly as follows (= from RS): Work A.5 over the next 0-4-0-4-0-4 tr, A.6 over the next 16-16-24-24-32-32 tr and inc 2-2-2-2-2-4 tr, repeat A.7 over the next 30 tr, A.6 over the next 16-24-24-24-32-32 tr and inc 4-0-2-6-0-4 tr, A.7 over the next 30 tr, A.6 over the next 32-40-48-56-64-72 tr and inc 4-4-4-4-4-8 tr, repeat A.7 over the next 30 tr, A.6 over the next 16-24-24-24-32-32 tr and inc 4-0-2-6-0-4 tr, repeat A.7 over the next 30 tr, repeat A.6 over the next 16-16-24-24-32-32 tr and inc 2-2-2-2-2-4 tr, A.8 over the last 0-4-0-4-0-4 tr = 232-256-276-300-320-352 tr. Work 1-2-1-2-1-2 rows more of A.5-A.8 AT THE SAME TIME on first row inc 0-4-16-16-16-12 tr evenly (i.e. 7-8-9-10-11-12 rows of A.5 to A.8 have been worked in total) = 232-260-292-316-336-364 tr. Piece measures approx. 19-20-21-22-23-24 cm. Then work as follows in each size: SIZE M-XL-XXXL: Work next row as follows - from WS: Work A.6 over the first 37-45-55 tr (= half back piece), work 8-8-10 ch, insert 1 marker between these sts, skip the next 56-68-72 tr (= left sleeve), A.6 over the next 74-90-110 tr (= front piece), work 8-8-10 ch, insert 1 marker between these sts, skip the next 56-68-72 tr (= right sleeve), A.6 over the last 37-45-55 tr (= half back piece) = 164-196-240 tr. SIZE S-L-XXL: Work next row as follows from RS: Work A.6 over the first 33-41-49 tr (= half back piece), skip the next 50-64-70 tr (= right sleeve), work 8-8-10 ch, insert 1 marker between these sts, A.6 over the next 66-82-98 tr (= front piece), skip the next 50-64-70 tr (= left sleeve), work 8-8-10 ch, insert 1 marker between these sts, A.6 over the last 33-41-49 tr (= half back piece) = 148-180-216 tr. ALL SIZES: = 148-164-180-196-216-240 tr. Insert 1 marker in the piece. NOW MEASURE THE PIECE FROM HERE. Repeat A.9 the entire round. Then continue with medium grey. When piece measures 4 cm from marker, dec 2 tr at each marker - READ DECREASE TIP. Dec like this every 9-5-5-10-6-6 cm 2-3-3-2-3-3 times in total = 140-152-168-188-204-228 tr. When piece measures 15-17-17-19-19-21 cm, inc 2 tr at each marker – see INCREASE TIP-2. Inc like this every 3 cm a total of 4 times = 156-168-184-204-220-244 tr. When piece measures 31-33-33-35-35-37 cm, inc 0-0-2-0-2-2 tr evenly = 156-168-186-204-222-246 tr. Adjust so that next row is from RS. Work A.10 (= 6 sts) in the round. When A.10 has been worked 1 time vertically, piece measures approx. 54-56-58-60-62-64 cm from neck edge. Fasten off. SLEEVE: = 50-56-64-68-70-72 tr. Sleeve is worked in the round, top down. Beg by working mid under sleeve as follows: Work 8th-9th-10th-11th-12th-13th round in diagram A.8 over all sts like this (i.e. work stripes, diagram will not fit no of sts). Work 1 dc in 5th ch of the 8-8-8-8-10-10 ch work in armhole on body, 3 ch (= 1 tr), work 1 tr in each of the next 3-3-3-3-5-5 ch, work 1 tr in every tr over sleeve, work 1 tr in each of the remaining 4 ch under sleeve = 58-64-72-76-80-82 tr. Insert 1 marker thread mid under sleeve. Insert 1 marker in piece, NOW MEASURE PIECE FROM HERE. Leave marker in piece, move marker thread when working. Work like this on next round: Work 1-0-0-0-0-1 tr, repeat A.9 over the next 56-64-72-76-80-80 tr (= 14-16-18-19-20-20 times in width), finish with 1-0-0-0-0-1 tr. When A.9 has been worked 1 time vertically, continue with medium grey. When piece measures 5 cm, dec 1 tr on each side of marker thread (= 2 tr dec). Dec like this every 3- 2½-2-1½-1½-1½ cm 9-12-14-16-16-17 times in total = 40-40-44-44-48-48 tr. When piece measures 40-40-39-39-38-38 cm (shorter measurements in the larger sizes because of longer yoke), work A.11 (= 2 tr) on round. Fasten off when A.11 has been worked 1 time vertically. Piece measures approx. 70-71-72-73-74-75 cm from neck edge. Work the other sleeve the same way. NECK EDGE: Worked in the round from mid back. Work ch where tr were worked (i.e. do not work over the ch skipped = 92-96-100-104-108-112 tr). Work with denim blue as follows: ROUND 1: Work 1 dc in each of the first 8-9-10-11-12-13 sts, * 1 htr in each of the next 3 sts, 1 tr in each of the next 3 sts, 1 dtr in each of the next 18 ch, 1 tr in each of the next 3 sts, 1 htr in each of the next 3 sts *, 1 dc in each of the next 16-18-20-22-24-26 sts, repeat from *-* 1 time, 1 dc in each of the last 8-9-10-11-12-13 sts. ROUND 2: Work 1 dc in each of the first 12-13-14-15-16-17 sts, ** 1 htr in each of the next 3 sts, 1 tr in each of the next 3 sts, * work the next 2 dtr tog *, repeat from *-* 4 more times, 1 tr in each of the next 3 sts, 1 htr in each of the next 3 sts **, 1 dc in each of the next 24-26-28-30-32-34 sts, repeat from **-** 1 more time, finish with 1 dc in each of the last 12-13-14-15-16-17 sts = 82-86-90-94-98-102 sts. Work 1 round with 1 dc in every st. Fasten off. |
|||||||||||||||||||||||||||||||||||||
Diagram explanations |
|||||||||||||||||||||||||||||||||||||
|
|||||||||||||||||||||||||||||||||||||
|
|||||||||||||||||||||||||||||||||||||

|
|||||||||||||||||||||||||||||||||||||

|
|||||||||||||||||||||||||||||||||||||
|
Have you made this or any other of our designs? Tag your pictures in social media with #dropsdesign so we can see them! Do you need help with this pattern?You'll find tutorial videos, a Comments/Questions area and more by visiting the pattern on garnstudio.com. © 1982-2024 DROPS Design A/S. We reserve all rights. This document, including all its sub-sections, has copyrights. Read more about what you can do with our patterns at the bottom of each pattern on our site. |
|||||||||||||||||||||||||||||||||||||


With over 40 years in knitting and crochet design, DROPS Design offers one of the most extensive collections of free patterns on the internet - translated to 17 languages. As of today we count 304 catalogues and 11422 patterns - 11422 of which are translated into English (UK/cm).
We work hard to bring you the best knitting and crochet have to offer, inspiration and advice as well as great quality yarns at incredible prices! Would you like to use our patterns for other than personal use? You can read what you are allowed to do in the Copyright text at the bottom of all our patterns. Happy crafting!
Comments / Questions (100)
Hello! I’m beginning the pattern with the Karisma wool (which is lovely). It seems that the explanations for the yoke rows 3 to 5 are missing. Do I have to follow the same explanations as row 2 until row 5 or can you give me the missing rows explanations? Thanks!
05.03.2022 - 18:49DROPS Design answered:
Dear Veronique, rows 3 and 4 have to be worked as explained in the charts. The only reason rows 1-2 and 5-6 are explained in the text is due to them having increases that are not included in the charts. Happy crocheting!
06.03.2022 - 13:28Ik ben de draad kwijt na toer 8 ( ik haak maat L). In welke kleuren haak ik de volgende toeren ( voor het splitsen van het voor en achterpand) ? Ga ik verder met het tels Hema van A6 en A7 of sla ik de rijen die bij XXL-XXXL staan over ( en dus ook die kleuren)?
14.01.2022 - 09:10DROPS Design answered:
Dag Marije,
Na toer 8 in telpatroon A.1 t/m A.4 komt de toer met kruisjes in het telpatroon, dus die brei je in donkerroze (net als de 5e toer). Daarna ga je verder met A.5 tot en met A.8 en op de toer waar een pijl staat met jouw maat erbij meerder je steken zoals aangegeven in de beschrijving. Je slaat dus geen rijen over.
11.02.2022 - 16:25Dobrý den, neplánujete prosím přeložit tento návod do češtiny? Nedaří se mi začátek sedla. Možná by mi stačil odkaz na podobný návod, který je už do češtiny přeložený. Moc děkuji, Michaela
02.06.2021 - 13:18Hi, I was wondering, how does the back yoke seem to be higher than the front yoke when the piece is crocheted round?
10.03.2021 - 06:16DROPS Design answered:
Hi Keriman, The yoke is the same length front and back. Happy crocheting!
10.03.2021 - 07:27Hej igen. Har inte fått svar på min fråga om varv 3 och 4. Vilket diagram följer jag på dessa varv för att få 180 maskor efter varv 5?
05.03.2021 - 07:18DROPS Design answered:
Hej Lena, varv 3 och 4 virkas enligt samma diagrammer i samma ordning som 2:a varvet. Lycka till :)
05.03.2021 - 08:34Takk for svar. Når jeg zoomer inn på bildet, ser jeg at rad 11-13 i A6 (3 rader mellomgrå) ikke er heklet før A9. Som jeg ser det, går mønsteret på bildet direkte fra rad 10 i A6 (jeansblå) til A9. Er det meningen at rad 11-13 skal hekles i str. S?
21.12.2020 - 16:13DROPS Design answered:
Hej Astrid, når jeg tæller, ser det ud til at du skal hækle 8 rækker i diagram A.6 og arbejdet måler ca 19 cm når du deler til ryg & forstkke. God fornøjelse!
23.12.2020 - 11:13Jeg hækler str. S og har hæklet række 8 i A5-A8. Som jeg læser opskriften, skal jeg nu hækle A9 hele vejen rundt. Kan det passe at jeg ikke skal hækle række 9-13 i A5-A8? Jeg ser at de er hæklet på billedet, så jeg er lidt i tvivl om det er meningen at de skal hækles eller ikke. Tak :)
13.12.2020 - 16:22DROPS Design answered:
Hei Astrid. Du skal hekle til og med 7. rad av A.5 - A.8. Du skal da ha 232 staver og arbeidet måler ca 19 cm. Nå skal du hekle A.6 (13 rader) og så A.9 (4 rader). Deretter hekles arbeidet videre med mellomgrå. Om plagget på bildet er heklet i str. M, kan det bli en liten forskjell når du hekler str. S. mvh DROPS design
21.12.2020 - 11:44Ik heb gisteren een vraag gestuurd en vandaag een antwoord gehad, maar die beantwoord mijn vraag niet. Ik haak voor maat XL Het gaat om de toer NA de 1e rij stk in denimbl. Daar staat haak 1e toer in A1 t/m A4 - ik denk dan dat je net zolang A1 t/m A4 moet herhalen tot je rond bent- maar dan staat er meerder gelijkmatig als volgt: haak A1 (=2stk)over de eerste 2 stk- dit snap ik, want A1 is 2 stk- herhaal A2 over 15 stk en meerder 5 stk - snap ik NIET want A2=4stk zonder meerdering?????
19.11.2020 - 11:40DROPS Design answered:
Dag Wilma,
Je haakt 15 steken van A.4 , dus 15 stokjes met denimblauw en tegelijkertijd meerder je 5 steken in deze 15 steken zodat je in totaal op 20 steken komt. Het meerderen doe je door 2 stokjes in 1 stokje te haken verdeeld (dus niet allemaal op dezelfde plek) over deze 15 steken.
19.11.2020 - 11:51Bij de pas staat bij: haak 1e toer .....'herhaal A2(Is 4 stk) over de volgende 15 stk en meerder 5 stk is helft achterpand) A2 is echter 4 stk breed, hoe kan ik dat over 15 stk haken? Kun je niet gewoon het telpatroon van A1 t/m A4 telkens herhalen tot je rond bent en 1e stk doen door 3 lossen?
18.11.2020 - 15:00DROPS Design answered:
Dag Wilma,
De eerste toer van A.2 bestaat enkel uit stokjes in denimblauw, dus je stopt gewoon als je klaar bent met het aangegeven aantal steken. Op de volgende toer begint het patroon over 4 steken en omdat je op de eerste toer hebt gemeerderd zodat dat gedeelte een meervoud van 4 steken heeft, zul je op de volgende toer goed uitkomen met patroon A.2.
19.11.2020 - 10:31Hi! I'm working on a size S and stuck after row 6. It has 160 sts at this point and the pattern says even increases are now done and to only make the increases in A.3 but there are no increases there on row 7. Am I missing something or where are the extra 20 sts coming from as there now should be 180 after this next row?
01.11.2020 - 21:03DROPS Design answered:
Dear Kat, after row 6, continue diagrams in height as before, ie you will now increase only in A.3 (2 sts in each diagram on every round/every other round just as shown in diagram) and not anymore in the other diagrams. When all diagrams are done (A.1 to A.4) you should have 18 sts in each A.3 and 180 sts in total. Happy crocheting!
02.11.2020 - 09:09