DROPS Safran
DROPS Safran
100% Cotton
from 1.30 £ /50g
Get the yarn to make this pattern from 9.10£.

The yarn cost is calculated from the pattern’s smallest size and the yarn’s cheapest product type. Looking for an even better price? You might find it on the DROPS Deals!

DROPS SS24

Warm Apricot Cardigan

Crochet DROPS jacket with lace pattern and raglan in ”Safran”. The piece is worked top down. Size: S - XXXL.

DROPS Extra 0-1286
DROPS design: Pattern no e-242
Yarn group A
----------------------------------------------------------
Size: S - M - L - XL - XXL - XXXL
Materials:
DROPS SAFRAN from Garnstudio
350-350-400-450-500-550 g colour no 13, coral

DROPS CROCHET HOOK SIZE 3.5 mm – or size needed to get 22 tr x 12 rows = 10 x 10 cm.
DROPS MOTHER-OF-PEARL BUTTON: Arched (white), NO 521: 6 pieces in all sizes.

-------------------------------------------------------

Alternative Yarn – See how to change yarns here
Yarn Groups A to F – Use the same pattern and change the yarn here
Yarn usage using an alternative yarn – Use our yarn converter here

-------------------------------------------------------

DROPS Safran
DROPS Safran
100% Cotton
from 1.30 £ /50g
Get the yarn to make this pattern from 9.10£.

The yarn cost is calculated from the pattern’s smallest size and the yarn’s cheapest product type. Looking for an even better price? You might find it on the DROPS Deals!

Pattern instructions

NOTE: This pattern is written in British English. All measurements in charts are in cm. For conversion from cm to inches - click here. There are different terms for crocheting in British and American English. If this pattern includes crochet, click for "crochet terms" here. For this pattern in American English, please click here.
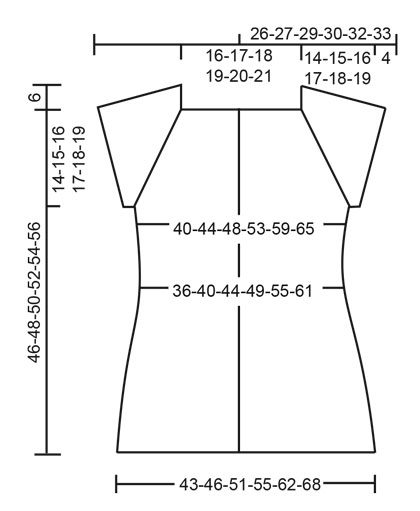
PATTERN:
See diagrams A.1 to A.3.

CROCHET INFO:
On every tr row replace first tr with 3 ch.
On every dc row replace first dc with 1 ch.
Replace first tr at on every tr round with 3 ch, finish the round with 1 sl st in 3rd ch from beg of round.
On every dc round, replace first dc with 1 ch and finish round with 1 sl st in 1st ch from beg of round.

INCREASE TIP-1:
Inc 1 tr by working 2 tr in same tr.

INCREASE TIP-2 (applies to sides of body):
Work until 3 tr remain before the marker thread, work 2 tr in next tr (= 1 tr inc), work 1 tr in each of the next 4 tr (the marker thread is in the middle of these sts), work 2 tr in next tr (= 1 tr inc).

RAGLAN:
Inc for raglan on each side of A.2.
Inc 2 sts BEFORE A.2 as follows: Work until 2 tr remain before A.2, work 2 tr in each of the next 2 tr (= 2 tr inc).
Inc 2 sts AFTER A.2 as follows: Work 2 tr in each of the first 2 tr after A.2 (= 2 tr inc).
Inc 1 sts BEFORE A.2 as follows: Work until 1 tr remains before A.2, work 2 tr in next tr (= 1 tr inc).
Inc 1 sts AFTER A.2 as follows: Work 2 tr in first tr after A.2 (= 1 tr inc).
The inc on body and sleeves are uneven as explained in pattern.

DECREASE TIP:
Work until 4 tr remain before marker thread, work the next 2 tr tog as follows: Work 1 tr in next tr but wait with last pull through (= 2 sts on hook), work 1 tr in next tr, but on last pull through pull yarn through all sts on hook - 1 tr have been dec, work 1 tr in each of the next 4 tr (marker thread is between these sts), work the next 2 tr tog (= 1 tr dec).
----------------------------------------------------------

YOKE:
Worked back and forth, top down. Work 174-179-184-189-194-199 ch on hook size 3.5 mm with Safran. Work next row as follows: Work 1 tr in 4th ch from hook (= 2 tr) - READ CROCHET INFO, * skip 1 ch, 1 tr in each of the next 4 ch *, repeat from *-* = 138-142-146-150-154-158 tr (= incl 5 band tr in each side of piece).

Then work next row as follows: Work 1 tr in each of the first 5 tr (= band), A.1 over the next 7 tr, 1 tr in each of the next 11-12-13-14-15-16 tr AT THE SAME TIME inc 4-5-5-6-7-8 tr evenly – READ INCREASE TIP-1 – (= front piece), A.2 over the next 11 tr, 2 tr in next tr, 1 tr in each of the next 4 tr, 2 tr in next tr, A.2 over the next 11 tr (= sleeve), 1 tr in each of the next 36-38-40-42-44-46 tr AT THE SAME TIME inc 8-10-10-12-14-16 tr evenly (= back piece), A.2 over the next 11 tr, 2 tr in next tr, 1 tr in each of the next 4 tr, 2 tr in next tr, A.2 over the next 11 tr (= sleeve), 1 tr in each of the next 11-12-13-14-15-16 tr AT THE SAME TIME inc 4-5-5-6-7-8 tr evenly, A.1 over the next 7 tr (= front piece), 1 tr in each of the last 5 tr (= band). On front piece there are now 5 band sts, A.1 and 15-17-18-20-22-24 tr, on sleeve there is A.2, 8 tr and A.2 and on back piece there are 44-48-50-54-58-62 tr. On next row inc for RAGLAN – see explanation above!

INC AS FOLLOWS ON FRONT AND BACK PIECE: Inc 2 tr every row 3-4-7-9-13-16 times in total, then 1 tr every row 12-12-10-9-6-5 times in total.
INC AS FOLLOWS ON SLEEVES: Inc 2 tr every row 0-0-1-3-4-4 times in total, then 1 tr every row 15-16-16-15-15-17 times in total. REMEMBER THE CROCHET TENSION!

When A.1 and A.2 have been worked 1 time vertically, repeat A.1a over A.1 and A.2a over A.2. After all inc there are now on each front piece 5 band sts, A.1 and 33-37-42-47-54-61 tr, on each sleeve there is A.2, 38-40-44-50-54-58 tr and A.2 and on back piece there are 80-88-98-108-122-136 tr. Piece measures approx. 14-15-16-17-18-19 cm. Work next row as follows: Work 1 tr in each of the first 5 tr, A.1a as before, 1 tr in each of the next 33-37-42-47-54-61 tr, work 8 ch (= under sleeve), insert 1 marker thread in the middle between the new ch, skip: A.2a, 38-40-44-50-54-58 tr and A.2a (= sleeve), work 1 tr in each of the next 80-88-98-108-122-136 tr, 8 ch (= under sleeve), insert 1 marker thread in the middle of the new sts, skip: A.2a, 38-40-44-50-54-58 tr and A.2a (= sleeve), work 1 tr in each of the next 33-37-42-47-54-61 tr, A.1a as before, 1 tr in each of the last 5 tr = 156-172-192-212-240-268 tr (incl 5 band sts in each side), 16 ch and A.1a inside 5 band tr in each side of piece. Insert 1 marker in piece, NOW MEASURE PIECE FROM HERE. Move marker threads when working, leave the marker in piece.

BODY:
Work 1 tr in every tr, 1 tr in every ch and A.1a as before. There are 88-96-106-116-130-144 tr between marker threads on back piece. When piece measures 3 cm (measured from marker), dec 1 st on each side of each marker threads in the side (= 4 sts dec) - READ DECREASE TIP! Repeat dec every 4-4-3½-4½-4½-4½ cm 3-3-4-3-3-4 more times = 156-172-188-212-240-264 tr in total (incl band sts in each side) and A.1a inside 5 band tr in each side of piece. There are 80-88-96-108-122-134 tr on back piece. When piece measures 17-18-19-20-21-22 cm (measured from marker), inc 1 st on each side of each marker thread (= 4 tr inc) – see INCREASE TIP-2. Repeat inc every 1½ cm 6-6-7-6-6-7 more times = 184-200-220-240-268-296 tr on row (incl 5 band sts in each side) and A.1a inside 5 band tr in each side of piece. Continue with 1 tr in every tr and A.1a until piece measures 32-33-34-35-36-37 cm (measured from marker). Piece measures approx. 46-48-50-52-54-56 cm in total from neck edge. Work 1 edge along the bottom of the jacket as follows: Work * 1 dc in first/next tr, 4 ch, skip approx. 1 cm *, repeat from *-* over tr, work A.1a over A.1a as before. Adjust to finish with 1 dc in last tr. Fasten off.

SLEEVE EDGE:
Sleeve is worked in the round, top down. Beg by working mid under sleeve as follows: Work 1 dc in 5th ch of the 8 ch worked in armhole on body. Work 3 ch (= 1 tr). Then work with 1 tr in each of the next 3 ch, A.2a as before, 1 tr in each of the next 38-40-44-50-54-58 tr, A.2a as before, 1 tr in each of the last 4 ch under sleeve, finish with 1 sl st in 3rd ch at beg of round. Work 1 tr in every tr and A.2a until 1 whole repetition of A.2a has been worked. Then work 1 tr in every tr, work A.2b over A.2a = 68-70-74-80-84-88 tr. On next round work 1 tr in every tr AT THE SAME TIME dec 12 tr evenly = 56-58-62-68-72-76 tr. Work 1 tr in every tr until sleeve edge measures approx. 4 cm. Work * 1 dc in first/next tr, 4 ch, skip approx. 1 cm *, repeat from *-* around the entire sleeve. Fasten off. Work a sleeve edge around the other sleeve.

NECK EDGE:
Beg mid front. Work * 1 dc in first/next tr, 4 ch, skip approx. 1 cm *, repeat from *-* around the entire neck, make sure to avoid a tight neck edge. Adjust to finish with 1 dc in last tr.

POCKET:
Work 34 ch (incl 1 ch to turn with) on hook size 3.5 mm with Safran. Work A.3a 4 times in total in width (NOTE: Work first dc in 2nd ch from hook), finish with first st of A.3a in last ch (so piece is the same in both sides). NOTE: Always work last st as first st in diagram. When A.3a has been worked 1 time vertically, repeat A.3b over A.3a until piece measures 7 cm, adjust so that last row is last row in A.3b, then work A.3c over A.3b. Fasten off. Crochet another pocket.

ASSEMBLY:
Sew pockets on to jacket, approx. 7 cm from bottom edge and approx. in the middle on front piece. Fasten buttons on left band, fasten the top button approx. 2 cm from neck edge, then fasten them approx. 8 cm apart. Button between 2nd and 3rd tr on right band.

Diagram

symbols = ch
symbols = dc in tr/ch

symbols = dc around ch-space
symbols = tr in tr
symbols = tr around ch-space
symbols = Bobble: Work tr-group with 4 tr in same tr: * Work 1 tr but wait with last pull through *, repeat from *-* 3 more times in same tr, 1 YO, pull yarn through all sts on hook.
symbols = Bobble: Work tr-group with 4 tr around same ch-space: * Work 1 tr but wait with last pull through *, repeat from *-* 3 more times around same ch-space, 1 YO, pull yarn through all sts on hook.
symbols = first row is explained in pattern
diagram
diagram
Do you have a question? See a list of frequently asked questions (FAQ)

Knitting tension is what determines the final measurements of your work, and is usually measured per 10 x 10 cm. It is provided like so: number of stitches in width x number of rows in height - eg: 19 stitches x 26 rows = 10 x 10 cm.

The knitting tension is very individual; some people knit/crochet loosely while others work tightly. You adjust the knitting tension with the needle size, which is why the suggested needle size is only meant as a guide! You need to adjust this (up or down) to ensure that YOUR knitting tension matches the knitting tension provided in the pattern. If you work with a different knitting tension than provided you will have a different yarn consumption, and your work will have different measurements than what the pattern suggests.

The knitting tension also determines which yarns can replace each other. As long as you achieve the same knitting tension you can replace one yarn with another.

See DROPS lesson: How to measure your tension/gauge

See DROPS video: How to make a gauge tension swatch

The required amount of yarn is provided in grams, eg: 450 g. To calculate how many balls you’ll need you first need to know how many grams are in 1 ball (25g, 50g or 100g). This information is available if you click on the individual yarn quality on our pages. Divide the amount required with the amount of each ball. For example, if each ball is 50g (the most common amount), the calculation will be as follows: 450 / 50 = 9 balls.

The important thing when changing from one yarn to another is that the knitting/crochet tension remains the same. This is so that the measurements of the finished piece will be the same as on the sketch provided. It is easier to achieve the same knitting tension using yarns from the same yarn group. It is also possible to work with multiple strands of a thinner yarn to achieve the knitting tension of a thicker one. Please try our yarn converter. We recommend you to always work a test swatch.

Please NOTE: when changing yarn the garment might have a different look and feel to the garment in the photo, due to individual properties and qualities of each yarn.

See DROPS lesson: Can I use a different yarn than the one mentioned in the pattern?

All our yarns are categorised into yarn groups (from A to F) according to thickness and knitting tension – group A contains the thinnest yarns and group F the thickest. This makes it easier for you to find alternative yarns to our patterns, should you wish to switch yarn. All yarns within the same group have a similar knitting tension and can easily replace each other. However, different yarn qualities have different structures and properties which will give the finished work a unique look and feel.

Click here for an overview of the yarns in each yarn group

At the top of all our patterns you’ll find a link to our yarn calculator, which is a helpful tool should you wish to use a different yarn than suggested. By filling in the yarn quality you wish to replace, the amount (in your size) and number of strands, the calculator will present good alternative yarns with the same knitting tension. Additionally it will tell you how much you’ll require in the new qualities and whether you’ll need to work with multiple strands. Most skeins are 50g (some are 25g or 100g).

If the pattern is worked with multiple colours, every colour will have to be calculated separately. Similarly, if the pattern is worked with several strands of different yarns (for example 1 strand Alpaca and 1 strand Kid-Silk) you will have to find alternatives for each, individually.

Click here to see our yarn calculator

Since different yarns have different qualities and textures we have chosen to keep the original yarn in our patterns. However, you can easily find options among our available qualities by using our yarn calculator, or simply pick a yarn from the same yarn group.

It is possible that some retailers still have discontinued yarns in stock, or that someone has a few skeins at home that they would like to find patterns for.

The yarn calculator will provide both alternative yarn as well as required amount in the new quality.

If you think it's hard to decide what size to make, it can be a good idea to measure a garment you own already and like the size of. Then you can pick the size by comparing those measures with the ones available in the pattern's size chart.

You'll find the size chart at the bottom of the pattern.

See DROPS lesson: How to read size chart

The needle size provided in the pattern serves only as a guide, the important thing is to follow the knitting tension. And since knitting tension is very individual, you will have to adjust the needle size to ensure that YOUR tension is the same as in the pattern – maybe you’ll have to adjust 1, or even 2 needle sizes, up or down to achieve the correct tension. For this, we recommend that you work test swatches.

Should you work with a different knitting tension than the one provided, the measurements of the finished garment might deviate from the measurement sketch.

See DROPS lesson: How to measure your tension/gauge

See DROPS video: How to make a tension/gauge swatch

Working a garment top-down provides more flexibility and room for personal adjustment. For example it is easier to try the garment on while working, as well as making adjustments to length of yoke and shoulder caps.

The instructions are carefully explaining every step, in the correct order. Diagrams are adjusted to the knitting direction and are worked as usual.

The diagram depicts all rows/rounds, and every stitch seen from the right side. It is read from bottom to top, from right to left. 1 square = 1 stitch.

When working back and forth, every other row is worked from the right side and every other row is worked from the wrong side. When working from the wrong side, the diagram will have to be worked reversed: from left to right, knit stitches are purled, purl stitches are knit etc.

When working in the round every round is worked from the right side and the diagram are worked from right to left on all rounds.

See DROPS lesson: How to read knitting diagrams

The diagram depicts all rows/rounds, and every stitch seen from the right side. It is worked from bottom to top, from right to left.

When working back and forth every other row is worked from the right side: from right to left and every other row is worked from the wrong side: from left to right.

When working in the round, every row in the diagram are worked from the right side, from right to left.

When working a circular diagram you start in the middle and work your way outwards, counter clockwise, row by row.

The rows usually start with a given number of chain stitches (equivalent to the height of the following stitch), this will either be depicted in the diagram or explained in the pattern.

See DROPS lesson: How to read crochet diagrams

Instructions for working several diagrams after each other on the same row/round, will often be written like so: “work A.1, A.2, A.3 a total of 0-0-2-3-4 times". This means you work A.1 once, then A.2 is worked once, and A.3 is repeated (in width) the number of times provided for your size – in this case like so: S = 0 times, M = 0 times, L=2 times, XL= 3 times and XXL = 4 times.

The diagrams are worked as usual: begin with the first row in A.1, then work the first row in A.2 etc.

See DROPS lesson: How to read knitting diagrams

See DROPS lesson: How to read crochet diagrams

The total width of the garment (from wrist-to-wrist) will be larger in the larger sizes, despite the actual sleeves being shorter. The larger sizes have longer sleeve caps and wider shoulders, so there will be a good fit in all sizes.

The measurement sketch/schematic drawing provides information regarding the full length of the garment. If it’s a jumper or a jacket the length is measured from the highest point on the shoulder closest to the neckline, and straight down to the bottom of the garment. It is NOT measured from the tip of shoulder. Similarly, the length of yoke is measured from the highest point on the shoulder and down to where yoke is split into body and sleeves.

On a jacket measures are never taken along bands, unless specifically stated. Always measure inside band stitches when measuring the length.

See DROPS lesson: How to read a schematic drawing

Diagrams are often repeated on the round or in height. 1 repeat is the diagram the way it appears in the pattern. If it says to work 5 repeats of A.1 in the round, then you work A.1 a total of 5 times after/next to each other in the round. If it says to work 2 repeats of A.1 vertically/in height you work the entire diagram once, then begin again at the start and work the entire diagram one more time.

Chain stitches are slightly narrower than other stitches and to avoid working the cast-on edge too tight, we simply chain more stitches to begin with. The stitch count will be adjusted on the following row to fit the pattern and measurement sketch.

The rib edge is more elastic and will contract slightly compared to, for example, stocking stitch. By increasing before the rib edge, you avoid a visible difference in width between the rib edge and the rest of the body.

It’s very easy to cast off too tightly, and by making yarn overs while casting off (and simultaneously casting these off) you avoid a too tight cast off edge.

See DROPS video: How to bind off with yarn overs (yo)

To achieve an even increase (or decrease) you can increase on, for example: every 3rd and 4th row alternately, like so: work 2 rows and increase on the 3rd row, work 3 rows and increase on the 4th. Repeat this until the increase is complete.

See DROPS lesson: Increase or decrease 1 st on every 3rd and 4th row alternately

Should you prefer to work in the round instead of back and forth, you may of course adjust the pattern. You’ll need to add steeks mid-front (usually 5 stitches), and follow the instructions. When you would normally turn and work from the wrong side, simply work across the steek and continue in the round. At the end you’ll cut the piece open, pick up stitches to work bands, and cover the cut edges.

See DROPS video: How to knit steeks and cut open

Should you prefer to work back and forth instead of in the round, you may of course adjust the pattern so you work the pieces separately and then assemble them at the end. Divide the stitches for the body in 2, add 1 edge stitch in each side (for sewing) and work the front and back pieces separately.

See DROPS lesson: Can I adapt a pattern for circular needles into straight needles?

Pattern repeats can vary slightly in the different sizes, in order to get the correct proportions. If you’re not working the exact same size as the garment in the photo, yours might deviate slightly. This has been carefully developed and adjusted so that the complete impression of the garment is the same in all sizes.

Make sure to follow instructions and diagrams for your size!

If you have found a pattern you like which is available in women’s size it’s not very difficult to convert it to men’s size. The biggest difference will be the length of sleeves and body. Start working on the women size that you think would fit across the chest. The additional length will be worked right before you cast off for the armhole/sleeve cap. If the pattern is worked top-down you can add the length right after the armhole or before the first decrease on sleeve.

Regarding additional yarn amount, this will depend on how much length you add, but it is better with a skein too many than too few.

All yarns will have excess fibres (from production) that might come off as lint or shedding. Brushed yarns (ie hairier yarns) have more of these loose, excess fibres, causing more shedding.

Shedding also depends on what is worn under or over the garment, and whether this pulls at the yarn fibres. It’s therefore not possible to guarantee that there will be no shedding

Below are some tips on how to get the best result when working with hairier yarns:

1. When the garment is finished (before you wash it) shake it vigorously so the looser hairs come off. NOTE: do NOT use a lint roller, brush or any method that pulls at the yarn.

2. Place the garment in a plastic bag and put it in your freezer - the temperature will cause the fibres to become less attached to each other, and excess fibres will come off easier.

3. Leave in the freezer for a few hours before taking it out and shaking it again.

4. Wash the garment according to the instructions on the yarn label.

Pilling is a natural process that happens to even the most exclusive of fibers. It's a natural sign of wear and tear that is hard to avoid, and that is most visible in high friction areas of your garment like a sweater's arms and cuffs.

You can make your garment look as new by removing the pilling, using a fabric comb or a pill/lint remover.

Still can't find the answer you need? Then scroll down and leave your question so one of our experts can try to help you. This will be done normally within 5 to 10 working days.
In the meantime, you can read the questions and answers that others have left to this pattern or join the DROPS Workshop on Facebook to get help from fellow knitters/crocheters!

You might also like...

Post a comment to pattern DROPS Extra 0-1286

We would love to hear what you have to say about this pattern!

If you want to leave a question, please make sure you select the correct category in the form below, to speed up the answering process. Required fields are marked *.

Comments / Questions (29)

country flag Coutarel wrote:

Pour le dos et les devants les diminutions se font sous la manche de chaque coté du fil marqueur ? pour les augmentations 2 elles se font au même endroit ? merci pour votre réponse

19.05.2017 - 11:50

DROPS Design answered:

Bonjour Mme Coutarel, tout à fait, vous diminuez 4 B (= 2 de chaque côté = 1 de chaque côté de chacun des marqueurs sous les manches) et vous augmentez 4B (= 2 de chaque côté = 1 de chaque côté de chacun des marqueurs sous les manches). Bon crochet!

19.05.2017 - 13:45

country flag Coutarel wrote:

Pour le raglan vous dites pour le dos et le devant augmenter 7 fois 2 B moi j'en compte que 6, 2 B sur le devant 4 B sur le dos et 2 B sur le devant en taille L

16.05.2017 - 17:43

DROPS Design answered:

Bonjour Mme Coutarel, après le 1er rang d'augmentations, vous avez 50 B pour le dos + [ (7x2B) + (10x1B) x 2] = 98 B. Pour les devants, vous avez 18 B + [ (7x2B) + (10x1B) ] = 42 B. Le nombre de brides est juste quand ces augmentations sont faites. Bon crochet!

17.05.2017 - 08:27

country flag Coutarel wrote:

Comment on augmente 16 fois une bride sur les manches ?

16.05.2017 - 08:46

DROPS Design answered:

Bonjour Mme Coutarel, vous augmentez après A.2 au début de la manche en crochetant 1 B dans la 1ère B après A.2 et vous augmentez 1 B à la fin de la manche (avant A.2) en crochetant 1 B dans la dernière B avant A.2 - cf RAGLAN au début des explications. Bon crochet!

16.05.2017 - 09:18

country flag Madeleine Harding wrote:

I think you have just answered this in French but may I check? When I have finished the increasing I do not have enough stitches. I have a similar problem on each piece, (front, sleeves and back) but just looking at the sleeves I have 8tr+ 3tr (raglan)+ 15tr (15 rows of increasing x 1) = 26 tr. You say 38tr. similarly I have 26 (front) and 64 (back). Please help

28.10.2016 - 23:51

DROPS Design answered:

Dear Mrs Harding, on the sleeves you will inc 2 sts: 1 st after A.2 at the beg of sleeve + 1 st before A.2 at the end of sleeve (same with back piece = 2 sts inc on back piece). There were 8 sts between A.2 on sleeve + 1 st inc a total of 15 times on each side in sleeves = 30 sts inc + 8 = 38 sts. Happy crocheting!

31.10.2016 - 09:26

country flag Coutarel wrote:

Si j'ai bien compris les seules augmentations c'est pour former le raglan il n'y a pas d'augmentations sur chaque partie du gilet ? Merci de bien me le confirmer ?

29.08.2016 - 17:06

DROPS Design answered:

Bonjour Mme Coutarel, une fois que les augmentations du raglan commencent, ce sont effectivement les seules augmentations pour l'empiècement, quand elles sont faites, vous devez avoir: A.1 et 33-37-42-47-54-61 B pour chaque devant, A.2, 38-40-44-50-54-58 B et A.2 pour chaque manche, et 80-88-98-108-122-136 B pour le dos. Bon crochet!

29.08.2016 - 18:15

country flag Doris wrote:

Diagram shows up on computer, but not when I try to print

25.08.2016 - 17:00

country flag Doris wrote:

I can print the direction, but can't print the diagram for (Warm Apricot Cardigan)drops extra 0-1286. Diagram shows up on computer, but can't print. Please help. Thank you in advance

24.08.2016 - 23:02

DROPS Design answered:

Dear Doris, make sure you are printing all pages - there should be a total of 7 pages and diagrams are on page 5/7. Happy crocheting!

25.08.2016 - 10:06

country flag Coutarel wrote:

Comment répartissez vous les augmentations devant dos et manches AUGMENTER AINSI SUR LES DEVANTS ET SUR LE DOS: Augmenter 3-4-7-9-13-16 fois 2 B tous les rangs, puis 12-12-10-9-6-5 fois 1 B tous les rangs. AUGMENTER AINSI SUR LES MANCHES: Augmenter 0-0-1-3-4-4 fois 2 B tous les rangs, puis 15-16-16-15-15-17 fois 1 B tous les rangs. je fais la taille M merci

08.08.2016 - 16:20

DROPS Design answered:

Bonjour Mme Coutarel, ce sont les augmentations du raglan qui se font soit avant A.2 (sur l'endroit: devant gauche, manches, dos + sur l'envers: devant droit, manches, dos et sur l'envers: devant droit, dos, manches) soit après A.2 (sur l'endroit: manches, dos et devant droit et sur l'envers: manches, dos et devant gauche). Vous augmentez ainsi (cf RAGLAN) 4 x 2 B + 12 x 1 B tous les rangs pour chaque devant et le dos et pour les manches augm. 16 x 1B tous les rangs. Bon crochet!

09.08.2016 - 08:36

country flag Coutarel wrote:

Comment repartissez vous les augmentations 4 fois 2 mailles, 1 sur chaque devant et 2 dans le dos ?

05.08.2016 - 05:48

DROPS Design answered:

Bonjour Mme Coutarel, les augmentations pour le raglan se font avant A.2 (devant gauche), après A.2 et avant A.2 (dos) et après A.2 (devant droit) - vu sur l'endroit - voir aussi comment augmenter sous "RAGLAN" au début des explications. Bon crochet!

05.08.2016 - 09:50