
Popular categories
Looking for a yarn?


|
|||||||||||||||||||||||||||||||||||||||||||
Summer Bliss |
|||||||||||||||||||||||||||||||||||||||||||
|
|
|||||||||||||||||||||||||||||||||||||||||||
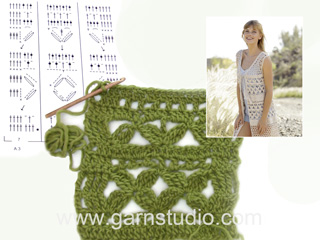
Crochet DROPS tunic with A-shape and lace pattern in ”Belle”. Size S-XXXL.
DROPS 167-18 |
|||||||||||||||||||||||||||||||||||||||||||
|
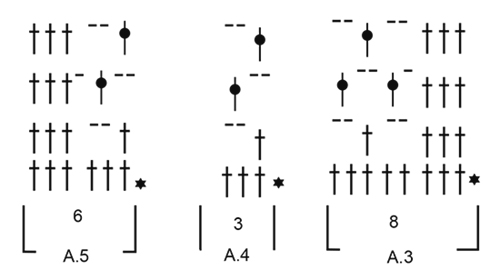
CROCHET INFO: On every tr round/row replace first tr with 4 ch. Finish round with 1 sl st in 4th ch at beg of round. PATTERN: See diagrams A.1 to A.5. DECREASE TIP: Dec 1 tr by working the next 2 tr tog as follows: Work 1 tr but wait with last pull through (= 2 loops on hook), then work next tr but on last pull through, pull yarn through all 3 loops on hook. DECREASE TIP CH-SPACES: Dec 1 ch-space at beg of row as follows seen from RS: Work 2 ch, skip the first ch-space, work 1 tr around next ch-space. On next row skip the last ch-space seen from WS (= first ch-space seen from RS). Dec 1 ch-space at end of row as follows seen from RS: Work until 1 ch-space remains, 2 ch, skip the last ch-space, work 1 st in each of the remaining sts. On next row skip the first ch-space, work 2 ch, and 1 tr around next ch-space seen from WS (= last ch-space seen from RS). ---------------------------------------------------------- TUNIC: Worked in the round, bottom up, then divide the piece into front piece and back piece and work back and forth up to shoulder. Work an edge at the bottom of with mesh pattern at the end. Beg of round = in the right side. Work 195-205-223-242-270-289 loose ch on hook size 4.5 mm with Belle and form a ring with 1 sl st. Work 4 ch – see CROCHET INFO! Then work as follows: Work 1 tr in each of the first 6-2-6-4-4-2 ch, * skip 1 ch, 1 tr in each of the next 6 ch *, repeat from *-* 26-28-30-33-37-40 more times = 168-176-192-208-232-248 tr + 4 ch at beg of round. Continue in the round with 1 tr in every tr until piece measures 5-5-6-6-7-7 cm. REMEMBER THE CROCHET TENSION! Now work pattern from 2nd round in diagram A.1 (= 8 tr) 21-22-24-26-29-31 times on round. NOTE: A.2 shows how round beg and ends. On last row in diagram dec 32 tr evenly in all sizes - READ DECREASE TIP = 136-144-160-176-200-216 tr + 4 ch at beg of round. Continue with 1 tr in every tr until piece measures 25-25-26-26-27-27 cm vertically. Then work A.1 as before from 2nd round in diagram but now work 17-18-20-22-25-27 repetitions on round. NOTE: A.2 shows how round beg and ends. Finish before the last 2 rows in diagram A.1. Now work 1 row with 1 tr in every tr and adjust no of sts to 132-136-154-166-190-198 tr. Cut the yarn. Insert a marker here. NOW MEASURE THE PIECE FROM HERE. Now divide piece in 2 for front and back piece. BACK PIECE: Skip 4-6-6-6-6-7 tr for armhole, work A.3 (= 8 tr), A.4 (= 3 tr) 16-16-19-21-25-26 times in width, work A.5 (= 6 tr) = 19-19-22-24-28-29 ch-spaces on first row. Continue as explained in the different sizes below: SIZE S and M: Continue back and forth with pattern as shown on 2nd and 3rd row in A.3 to A.5 until piece measures 14-15 cm – adjust so that next row is worked as 3rd row. SIZE L, XL, XXL and XXXL: Continue back and forth with pattern as shown on 2nd and 3rd row in A.3 to A.5, AT THE SAME TIME on next row dec for armhole in each side inside 3 sts - READ DECREASE TIP CH-SPACES. NOTE: Work 3 dtr instead of 3 tr in each side on the rows with dec (this is done to avoid tight edges). Repeat dec 0-1-2-2 more times (= 1-2-3-3 dec in total in each side) = 20-20-22-23 ch-spaces remain. Then continue with ch-spaces as shown on 2nd and 3rd row in diagram A.3 to A.5 until piece measures 16-17-18-19 cm – adjust so that next row is worked as 3rd row. Then continue as explained below in all sizes: Work 1 tr in each of the first 3 tr and 4-4-4-4-5-5 whole ch-spaces (i.e. ch-spaces with 2 ch), work 1 tr in next tr, then work 24-24-26-26-26-28 tr evenly over the next 10-10-11-11-11-12 ch-spaces from previous row, work 1 tr in next tr, and 1 tr around next ch-space, continue with 4-4-4-4-5-5 whole ch-spaces (i.e. ch-spaces with 2 ch) and 1 tr in each of the outermost 3 tr. There are now 26-26-28-28-28-30 tr consecutively in the middle of back piece. Then finish each shoulder separately. Turn and work as before over the first 4-4-4-4-5-5 ch-spaces, work 1 tr in each of the first 3 tr of the 26-26-28-28-28-30 tr. Turn and work 16-16-16-16-19-19 tr evenly on shoulder. Fasten off. Work the other shoulder the same way but reversed. Beg at the armhole, and work 1 tr in each of the outermost 3 tr, then work ch-spaces as before over the 4-4-4-4-5-5 ch-spaces, and 1 tr in each of the next 3 tr. Turn and work 16-16-16-16-19-19 tr evenly over shoulder. Fasten off. FRONT PIECE: Skip 4-6-6-6-6-7 tr for armhole. Work A.3 (= 8 tr), A.4 (= 3 tr) 16-16-19-21-25-26 times in width, work A.5 = 19-19-22-24-28-29 ch-spaces on first row and 4-6-6-6-6-7 tr remain until beg on back piece. Continue as explained in the different sizes below: SIZE S and M: Continue back and forth with 2nd and 3rd row in A.3 to A.5 until 5 rows have been worked in both sizes. Now work as follows: Work 1 tr in each of the first 3 tr and 4-4 whole ch-spaces (i.e. ch-spaces with 2 ch), work 1 tr in next tr, then work 24-24 tr evenly over the next 10-10 ch-spaces, work 1 tr in next tr, and 1 tr around next ch-space, continue with 4-4 whole ch-spaces (i.e. ch-spaces with 2 ch) and 1 tr in each of the outermost 3 tr = 26-26 tr for neck in the middle of front piece. SIZE L, XL, XXL, XXXL: Continue back and forth with 2nd and 3rd row in A.3 to A.5, AT THE SAME TIME on next row dec for armhole in each side as on back piece and when 5 rows with ch-spaces have been worked, work tr for neck in the middle of front piece as follows: Work 1 tr in each of the first 3 tr and 4-4-5-5 whole ch-spaces (i.e. ch-spaces with 2 ch), work 1 tr in next tr, then work 26-26-26-28 tr evenly over the next 11-11-11-12 ch-spaces from previous row, work 1 tr in next tr, and 1 tr around next ch-space, continue with 4-4-5-5 whole ch-spaces (i.e. ch-spaces with 2 ch) and 1 tr in each of the outermost 3 tr = 28-28-28-30 tr for neck in the middle of front piece. Now continue as explained below in all sizes: Then finish each shoulder separately. Turn and work ch-spaces as before over the first 4-4-4-4-5-5 ch-spaces, work 1 tr in each of the first 3 tr of the 26-26-28-28-28-30 tr. Turn and continue like this with ch-spaces and 3 tr in each side until piece measures 16-17-18-19-20-21 cm. Turn and work 16-16-16-16-19-19 tr evenly over shoulder. Fasten off. Work the other shoulder the same way but reversed. I.e. beg at the armhole. ASSEMBLY: Sew the shoulder seams tog. Sew one and one stitch neatly tog and make sure to avoid a tight seam. Fasten off. EDGE AT THE BOTTOM: Now work an edge at the bottom of tunic as follows: ROUND 1: Fasten yarn with 1 dc and 3 ch at beg of round. * 2 ch, skip approx. 1½ cm, 1 tr *, repeat from *-* the entire round but finish with 1 sl st in 3rd ch at beg of round = approx. 71-73-80-87-97-104 ch-spaces on round. ROUND 2: Work sl sts until first ch-space. Then work as follows: work 3 ch, * 2 ch, 1 tr around next ch-space *, repeat from *-* around the entire round but finish with 1 sl st in 3rd ch at beg of round. Repeat 2nd round until piece measures 78-80-82-84-86-88 cm in total (measured from shoulder) or to desired length. Fasten off. |
|||||||||||||||||||||||||||||||||||||||||||
Diagram explanations |
|||||||||||||||||||||||||||||||||||||||||||
|
|||||||||||||||||||||||||||||||||||||||||||

|
|||||||||||||||||||||||||||||||||||||||||||
|
|||||||||||||||||||||||||||||||||||||||||||
|
Have you made this or any other of our designs? Tag your pictures in social media with #dropsdesign so we can see them! Do you need help with this pattern?You'll find tutorial videos, a Comments/Questions area and more by visiting the pattern on garnstudio.com. © 1982-2024 DROPS Design A/S. We reserve all rights. This document, including all its sub-sections, has copyrights. Read more about what you can do with our patterns at the bottom of each pattern on our site. |
|||||||||||||||||||||||||||||||||||||||||||


With over 40 years in knitting and crochet design, DROPS Design offers one of the most extensive collections of free patterns on the internet - translated to 17 languages. As of today we count 304 catalogues and 11422 patterns - 11422 of which are translated into English (UK/cm).
We work hard to bring you the best knitting and crochet have to offer, inspiration and advice as well as great quality yarns at incredible prices! Would you like to use our patterns for other than personal use? You can read what you are allowed to do in the Copyright text at the bottom of all our patterns. Happy crafting!
Comments / Questions (42)
Hola, he comenzado ha hacer la parte de la espalda y tengo varías preguntas, al finalizar la primera parte de la labor tengo 136 puntos, por lo tanto, al dividir la pieza en dos, me quedan 68 puntos para la espalda y 68 para el frente. Si sumo los puntos de los gráficos 3, 4 y 5: A3(8p) + A4 (3p 16 veces= 48 p)+A5 (6p) me da 62 puntos + los 6 p sin trabajar del principio y los otros 6 del final, hacen un total de 74 puntos, me faltan 6 puntos ¿estoy haciendo mal las cuentas? Gracias
21.08.2021 - 17:50DROPS Design answered:
Hola Silvia, los 68 pts son: saltar 6 puntos + 8 puntos (A.3) + 3 x16 = 48 (A.4) + 6 puntos (A.5). Los 6 pts del inicio son para las sisas, restandose unos del delantero y otros de la espalda, por lo que no hay 6 puntos más al final.
23.08.2021 - 13:24I believe this pattern is worked from bottom up and the directions, after the 1st round, say to work a dc in each dc around until it measures 2&3/8 (for a large)? This isnt what is shown in the photo, at the bottom of the garment. Am i not understanding? I am finding these directions very confusing.
12.08.2021 - 08:01DROPS Design answered:
Dear Linda, pattern is right, you first work bottom up with a few rounds dc before lace pattern A.1, and afterwards you will work the bottom edge with diagrams A.3-A.5 - see chart showing the 2 crochet directions. Happy crocheting!
12.08.2021 - 08:52Buongiorno, Lavorando il davanti per le taglie L,XL,XXL,XXXL, mi sono accorta di un errore di traduzione per la lingua italiana. La frase “sono stati lavorati 5 archidi cat” andrebbe sostituita con “sono state lavorate 5 righe di archi di cat.”, come specificato nelle istruzioni inglesi. Il modello è molto bello!
23.06.2021 - 19:54DROPS Design answered:
Buonasera Mariangela, grazie per la segnalazione, abbiamo corretto il testo. Buon lavoro!
23.06.2021 - 23:49Ho comperato il filato da voi usato per cercare di realizzare il modello più vicino all’originale ma le spiegazioni sono sibilline , credo che sia opportuno dare delle spiegazioni più comprensibili ai comuni mortali .
27.01.2020 - 20:11Buon giorno, mi potreste dire le misure delle varie sezioni del vestito?
25.01.2020 - 11:33DROPS Design answered:
Buongiorno Dorina, purtroppo un'informazione così dettagliata non è disponibile. Buon lavoro!
25.01.2020 - 12:53Potreste darmi le misure di ogni sezione, mi piacerebbe sia più dettagliato. Grazie
25.01.2020 - 09:54DROPS Design answered:
Buongiorno Dorina, purtroppo un'informazione così dettagliata non è disponibile. Buon lavoro!
25.01.2020 - 12:53Sorry voor mijn vraag....heeft zich al opgelost
05.07.2019 - 17:59Ik wil maat L maken. Er staat...begin met 4 lossen....dan stk in elk van de volgende 6 lossen = 6 stk. Dan losse overslaan en 6 stk in volgende 6 lossen 30x= 180 stk. Ik kom op 186 stk plus 4 lossen. Jullie geven aan 192 stk. Volgend probleem 192 stk en 4 beginlossen is 193 stk. Voor de eerste toer A1 (hokjes met 1 losse ertussen) Betekent bij 193 stk dat je eindigt met 1 stk terwijl je de toer ook begonnen bent met 1 stk. Je moet toch eindigen met 1 losse? Hoeveel hokjes telt toer 1 bij maat L
05.07.2019 - 17:45DROPS Design answered:
Dag Hennie,
Het gedeelte tussen *_* wordt in totaal 31 keer gedaan, want er staat 'herhaal nog 30 keer, daardoor kom je op 192 stokjes. De 4 beginlossen worden niet meegerekend in het totaal aantal stokjes. A.1 gaat over 8 steken, deze herhaal je in totaal 24 keer. Daarnaast haak je A.2, deze komen boven de eerste 4 lossen (dus het 193e 'stokje')
08.07.2019 - 10:54I am starting the back section. I read the answer to a previous question about the back but I do not understand on the section of the back piece where it says to work A.5 then it has 19-29 chain spaces on first row. The chart does not show chain spaces until the second row, is there I am supposed to start? I love your patterns but they are sometimes hard to follow.
16.05.2019 - 00:55DROPS Design answered:
Dear Pat, when working A.3 you will have 2 ch-spaces (= 2 chains 2 times), then when repeating A.4 16-26 times in width you will have 16-26 times 2 chains and finishing row with A.5 you will have 1 chain-space (= 2 chains), so that there are 2 +16-26 + 1 = 19-29 ch-spaces (= 2 chains) at the end of this row. Happy crocheting!
16.05.2019 - 09:40I am starting the back A3,4,5. I am stuck. Can you please explain more detail how to do this? Thank you!
07.03.2018 - 02:11DROPS Design answered:
Dear Dawn, on back piece, start skipping 4-6-7 sts for armhole (see size), then crochet A.3 over the next 8 sts, repeat A.4 (= 3 sts) a total of 16-26 times in width and finish with A.5 (= 6 sts), there will be 4-6-7 sts unworked at the end of row for armhole. Start reading diagram from RS with the 2nd row in diagram (= 1st row in A.3,4,5 - the one with a star is the previous row), repeeat A.4 in width ans finish with A.5; turn and work row 2: A.5, repeat A.4 and finish with A.3. Happy crocheting!
07.03.2018 - 08:46