DROPS Brushed Alpaca Silk
77% Alpaca, 23% Silk
from 2.90 £ /25g
Get the yarn to make this pattern from 34.80£.

The yarn cost is calculated from the pattern’s smallest size and the yarn’s cheapest product type. Looking for an even better price? You might find it on the DROPS Deals!

DROPS SS24

Morning Hug

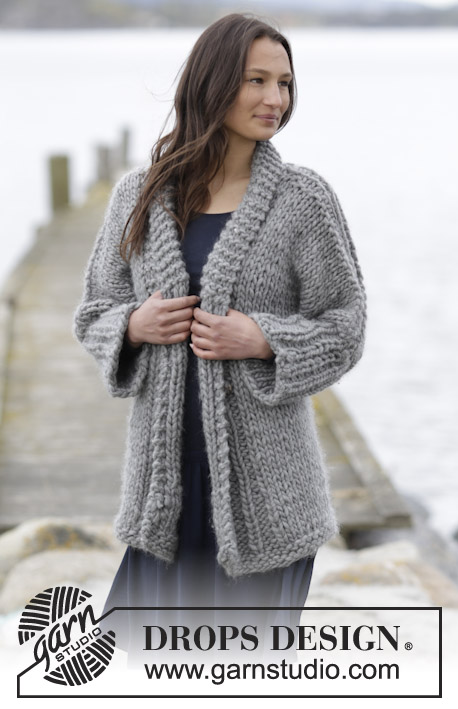
Knitted DROPS jacket with shawl collar in 2 strands ”Brushed Alpaca Silk” or 1 strand "Melody". Size: S - XXXL.

DROPS 164-24
DROPS design: Pattern no ml-003
Yarn group C+C (or D)
----------------------------------------------------------
Size: S - M - L - XL - XXL - XXXL
Materials:
DROPS BRUSHED ALPACA SILK from Garnstudio
300-350-375-425-450-500 g colour no 02, light grey
Or use:
DROPS MELODY from Garnstudio
300-350-400-450-450-500 g colour no 03, pearl grey

DROPS CIRCULAR NEEDLE (80 cm) SIZE 6 mm - or size needed to get 14 sts x 16 rows in stocking st with 2 strands Brushed Alpaca Silk or 1 strand Melody = 10 x 10 cm.

-------------------------------------------------------

Alternative Yarn – See how to change yarns here
Yarn Groups A to F – Use the same pattern and change the yarn here
Yarn usage using an alternative yarn – Use our yarn converter here

-------------------------------------------------------

DROPS Brushed Alpaca Silk
77% Alpaca, 23% Silk
from 2.90 £ /25g
Get the yarn to make this pattern from 34.80£.

The yarn cost is calculated from the pattern’s smallest size and the yarn’s cheapest product type. Looking for an even better price? You might find it on the DROPS Deals!

Pattern instructions

NOTE: This pattern is written in British English. All measurements in charts are in cm. For conversion from cm to inches - click here. There are different terms for crocheting in British and American English. If this pattern includes crochet, click for "crochet terms" here. For this pattern in American English, please click here.
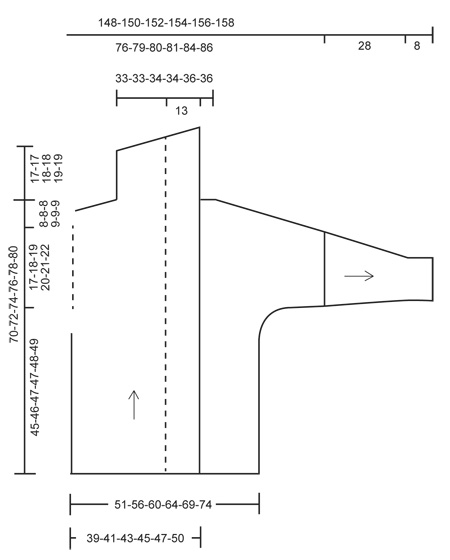
TIP:
If using Melody, cast on and work with 1 strand the entire piece.

GARTER ST (back and forth):
K all rows. 1 ridge = 2 rows K.

DECREASE TIP-1:
Dec 1 st by K 2 sts tog.

DECREASE TIP-2 (applies to sleeve):
Dec 1 st from RS inside 1 edge st as follows:
After 1 edge st: Slip 1 st as if to K, K 1, psso.
Before 1 edge st: K 2 tog.
----------------------------------------------------------

BACK PIECE:
Worked back and forth on circular needle. READ TIP!
Cast on 76-80-88-92-100-108 sts (incl 1 edge st in each side) on circular needle size 6 mm with 2 strands Brushed Alpaca Silk or 1 strand Melody. Work rib as follows (1st row = RS): 1 edge st in GARTER ST - see explanation above, * K 2, P 2 *, repeat from *-* until 3 sts remain, K 2, 1 edge st in garter st. Work rib for 3 cm. Work 1 row in stocking st with 1 edge st in garter st in each side of piece while AT THE SAME TIME dec 2-0-2-0-2-2 sts evenly - READ DECREASE TIP-1 = 74-80-86-92-98-106 sts. Continue in stocking st with 1 edge st in garter st in each side. REMEMBER THE KNITTING TENSION
When piece measures 40-41-42-42-43-44 cm, cast on new sts for sleeves at the end of every row in each side as follows: Cast on 3 sts 1 time, 2 sts 1 time, 1 st 1 time, 11-10-8-6-5-2 sts 1 time = 108-112-114-116-120-122 sts. Piece measures approx. 45-46-47-47-48-49 cm.
When piece measures 62-64-66-67-69-71 cm, cast off for diagonal shoulder at beg of every row in each side as follows: Cast off 5 sts 5-5-5-6-6-6 times in total and 6-8-8-4-5-6 sts 1 time = 46-46-48-48-50-50 sts. Cast off all sts on next row from RS. Piece measures approx. 70-72-74-76-78-80 cm.

LEFT FRONT PIECE:
Worked back and forth on circular needle.
Cast on 57-61-61-65-69-73 sts (incl 1 edge st in the side and 4 band sts towards mid front) on circular needle size 6 mm with 2 strands Brushed Alpaca Silk or 1 strand Melody. Work rib as follows (1st row = RS): 1 edge st in garter st, rib * P 2, K 2*, repeat from *-* the entire row. Work rib for 3 cm. Work next row as follows from RS: 1 edge st in garter st, stocking st until 4 sts remain, AT THE SAME TIME dec 2-3-0-1-2-2 sts evenly in the sts in stocking st, P 2, K 2 (= band sts) = 55-58-61-64-67-71 sts. Continue like this. When piece measures 40-41-42-42-43-44 cm, cast on new sts for sleeve at the end of each row from WS as on back piece = 72-74-75-76-78-79 sts. Piece measures approx. 45-46-47-47-48-49 cm. When piece measures 62-64-66-67-69-71 cm, cast off sts for diagonal shoulder at beg of every row from RS as on back piece = 41-41-42-42-43-43 sts remain for shawl collar. Piece measures approx. 70-72-74-76-78-80 cm. Then work short rows over these sts as follows (beg from WS): * Work 2 rows over all sts, 2 rows over the outermost 21-21-22-22-23-23 sts towards mid front *, repeat from *-* until shawl collar measures 17-17-18-18-19-19 cm in the shorter side (from the shoulder). Cast off.

RIGHT FRONT PIECE:
Cast on and work as left front piece but reversed. I.e. cast on sts for sleeve at the end of row from RS and cast off for diagonal shoulder at beg of each row from WS. Shawl collar beg from RS.

ASSEMBLY:
Sew shoulder seams in outer loops of edge sts up to shawl collar on front piece. Sew shawl collar tog mid back and sew on to neck line at the back of neck.

SLEEVE:
Worked back and forth on circular needle.
Pick up from RS 48-50-54-56-58-62 sts on circular needle size 6 mm with 2 strands Brushed Alpaca Silk or 1 strand Melody along the edge st on sleeve and cast on 1 st in each side of piece at the end of the next 2 row for edge st = 50-52-56-58-60-64 sts. Continue in stocking st with 1 edge sts in garter st in each side. When piece measures 1-2-2-4-4-1 cm, dec 1 st in each side - READ DECREASE TIP-2. Repeat dec every 3-2½-2½-2-2-2 cm 9-10-10-11-11-13 more times = 30-30-34-34-36-36 sts. When piece measures 28 cm, work rib K 2, P 2 with 1 edge st in garter st in each side. Cast off with K over K and P over P when rib measures 8 cm. Knit another sleeve the same way.

ASSEMBLY:
Sew the sleeve and side seams in one inside 1 edge st.

Diagram

symbols = knitting direction
diagram

Each of our patterns has specific tutorial videos to help you.

Do you have a question? See a list of frequently asked questions (FAQ)

Knitting tension is what determines the final measurements of your work, and is usually measured per 10 x 10 cm. It is provided like so: number of stitches in width x number of rows in height - eg: 19 stitches x 26 rows = 10 x 10 cm.

The knitting tension is very individual; some people knit/crochet loosely while others work tightly. You adjust the knitting tension with the needle size, which is why the suggested needle size is only meant as a guide! You need to adjust this (up or down) to ensure that YOUR knitting tension matches the knitting tension provided in the pattern. If you work with a different knitting tension than provided you will have a different yarn consumption, and your work will have different measurements than what the pattern suggests.

The knitting tension also determines which yarns can replace each other. As long as you achieve the same knitting tension you can replace one yarn with another.

See DROPS lesson: How to measure your tension/gauge

See DROPS video: How to make a gauge tension swatch

The required amount of yarn is provided in grams, eg: 450 g. To calculate how many balls you’ll need you first need to know how many grams are in 1 ball (25g, 50g or 100g). This information is available if you click on the individual yarn quality on our pages. Divide the amount required with the amount of each ball. For example, if each ball is 50g (the most common amount), the calculation will be as follows: 450 / 50 = 9 balls.

The important thing when changing from one yarn to another is that the knitting/crochet tension remains the same. This is so that the measurements of the finished piece will be the same as on the sketch provided. It is easier to achieve the same knitting tension using yarns from the same yarn group. It is also possible to work with multiple strands of a thinner yarn to achieve the knitting tension of a thicker one. Please try our yarn converter. We recommend you to always work a test swatch.

Please NOTE: when changing yarn the garment might have a different look and feel to the garment in the photo, due to individual properties and qualities of each yarn.

See DROPS lesson: Can I use a different yarn than the one mentioned in the pattern?

All our yarns are categorised into yarn groups (from A to F) according to thickness and knitting tension – group A contains the thinnest yarns and group F the thickest. This makes it easier for you to find alternative yarns to our patterns, should you wish to switch yarn. All yarns within the same group have a similar knitting tension and can easily replace each other. However, different yarn qualities have different structures and properties which will give the finished work a unique look and feel.

Click here for an overview of the yarns in each yarn group

At the top of all our patterns you’ll find a link to our yarn calculator, which is a helpful tool should you wish to use a different yarn than suggested. By filling in the yarn quality you wish to replace, the amount (in your size) and number of strands, the calculator will present good alternative yarns with the same knitting tension. Additionally it will tell you how much you’ll require in the new qualities and whether you’ll need to work with multiple strands. Most skeins are 50g (some are 25g or 100g).

If the pattern is worked with multiple colours, every colour will have to be calculated separately. Similarly, if the pattern is worked with several strands of different yarns (for example 1 strand Alpaca and 1 strand Kid-Silk) you will have to find alternatives for each, individually.

Click here to see our yarn calculator

Since different yarns have different qualities and textures we have chosen to keep the original yarn in our patterns. However, you can easily find options among our available qualities by using our yarn calculator, or simply pick a yarn from the same yarn group.

It is possible that some retailers still have discontinued yarns in stock, or that someone has a few skeins at home that they would like to find patterns for.

The yarn calculator will provide both alternative yarn as well as required amount in the new quality.

If you think it's hard to decide what size to make, it can be a good idea to measure a garment you own already and like the size of. Then you can pick the size by comparing those measures with the ones available in the pattern's size chart.

You'll find the size chart at the bottom of the pattern.

See DROPS lesson: How to read size chart

The needle size provided in the pattern serves only as a guide, the important thing is to follow the knitting tension. And since knitting tension is very individual, you will have to adjust the needle size to ensure that YOUR tension is the same as in the pattern – maybe you’ll have to adjust 1, or even 2 needle sizes, up or down to achieve the correct tension. For this, we recommend that you work test swatches.

Should you work with a different knitting tension than the one provided, the measurements of the finished garment might deviate from the measurement sketch.

See DROPS lesson: How to measure your tension/gauge

See DROPS video: How to make a tension/gauge swatch

Working a garment top-down provides more flexibility and room for personal adjustment. For example it is easier to try the garment on while working, as well as making adjustments to length of yoke and shoulder caps.

The instructions are carefully explaining every step, in the correct order. Diagrams are adjusted to the knitting direction and are worked as usual.

The diagram depicts all rows/rounds, and every stitch seen from the right side. It is read from bottom to top, from right to left. 1 square = 1 stitch.

When working back and forth, every other row is worked from the right side and every other row is worked from the wrong side. When working from the wrong side, the diagram will have to be worked reversed: from left to right, knit stitches are purled, purl stitches are knit etc.

When working in the round every round is worked from the right side and the diagram are worked from right to left on all rounds.

See DROPS lesson: How to read knitting diagrams

The diagram depicts all rows/rounds, and every stitch seen from the right side. It is worked from bottom to top, from right to left.

When working back and forth every other row is worked from the right side: from right to left and every other row is worked from the wrong side: from left to right.

When working in the round, every row in the diagram are worked from the right side, from right to left.

When working a circular diagram you start in the middle and work your way outwards, counter clockwise, row by row.

The rows usually start with a given number of chain stitches (equivalent to the height of the following stitch), this will either be depicted in the diagram or explained in the pattern.

See DROPS lesson: How to read crochet diagrams

Instructions for working several diagrams after each other on the same row/round, will often be written like so: “work A.1, A.2, A.3 a total of 0-0-2-3-4 times". This means you work A.1 once, then A.2 is worked once, and A.3 is repeated (in width) the number of times provided for your size – in this case like so: S = 0 times, M = 0 times, L=2 times, XL= 3 times and XXL = 4 times.

The diagrams are worked as usual: begin with the first row in A.1, then work the first row in A.2 etc.

See DROPS lesson: How to read knitting diagrams

See DROPS lesson: How to read crochet diagrams

The total width of the garment (from wrist-to-wrist) will be larger in the larger sizes, despite the actual sleeves being shorter. The larger sizes have longer sleeve caps and wider shoulders, so there will be a good fit in all sizes.

The measurement sketch/schematic drawing provides information regarding the full length of the garment. If it’s a jumper or a jacket the length is measured from the highest point on the shoulder closest to the neckline, and straight down to the bottom of the garment. It is NOT measured from the tip of shoulder. Similarly, the length of yoke is measured from the highest point on the shoulder and down to where yoke is split into body and sleeves.

On a jacket measures are never taken along bands, unless specifically stated. Always measure inside band stitches when measuring the length.

See DROPS lesson: How to read a schematic drawing

Diagrams are often repeated on the round or in height. 1 repeat is the diagram the way it appears in the pattern. If it says to work 5 repeats of A.1 in the round, then you work A.1 a total of 5 times after/next to each other in the round. If it says to work 2 repeats of A.1 vertically/in height you work the entire diagram once, then begin again at the start and work the entire diagram one more time.

Chain stitches are slightly narrower than other stitches and to avoid working the cast-on edge too tight, we simply chain more stitches to begin with. The stitch count will be adjusted on the following row to fit the pattern and measurement sketch.

The rib edge is more elastic and will contract slightly compared to, for example, stocking stitch. By increasing before the rib edge, you avoid a visible difference in width between the rib edge and the rest of the body.

It’s very easy to cast off too tightly, and by making yarn overs while casting off (and simultaneously casting these off) you avoid a too tight cast off edge.

See DROPS video: How to bind off with yarn overs (yo)

To achieve an even increase (or decrease) you can increase on, for example: every 3rd and 4th row alternately, like so: work 2 rows and increase on the 3rd row, work 3 rows and increase on the 4th. Repeat this until the increase is complete.

See DROPS lesson: Increase or decrease 1 st on every 3rd and 4th row alternately

Should you prefer to work in the round instead of back and forth, you may of course adjust the pattern. You’ll need to add steeks mid-front (usually 5 stitches), and follow the instructions. When you would normally turn and work from the wrong side, simply work across the steek and continue in the round. At the end you’ll cut the piece open, pick up stitches to work bands, and cover the cut edges.

See DROPS video: How to knit steeks and cut open

Should you prefer to work back and forth instead of in the round, you may of course adjust the pattern so you work the pieces separately and then assemble them at the end. Divide the stitches for the body in 2, add 1 edge stitch in each side (for sewing) and work the front and back pieces separately.

See DROPS lesson: Can I adapt a pattern for circular needles into straight needles?

Pattern repeats can vary slightly in the different sizes, in order to get the correct proportions. If you’re not working the exact same size as the garment in the photo, yours might deviate slightly. This has been carefully developed and adjusted so that the complete impression of the garment is the same in all sizes.

Make sure to follow instructions and diagrams for your size!

If you have found a pattern you like which is available in women’s size it’s not very difficult to convert it to men’s size. The biggest difference will be the length of sleeves and body. Start working on the women size that you think would fit across the chest. The additional length will be worked right before you cast off for the armhole/sleeve cap. If the pattern is worked top-down you can add the length right after the armhole or before the first decrease on sleeve.

Regarding additional yarn amount, this will depend on how much length you add, but it is better with a skein too many than too few.

All yarns will have excess fibres (from production) that might come off as lint or shedding. Brushed yarns (ie hairier yarns) have more of these loose, excess fibres, causing more shedding.

Shedding also depends on what is worn under or over the garment, and whether this pulls at the yarn fibres. It’s therefore not possible to guarantee that there will be no shedding

Below are some tips on how to get the best result when working with hairier yarns:

1. When the garment is finished (before you wash it) shake it vigorously so the looser hairs come off. NOTE: do NOT use a lint roller, brush or any method that pulls at the yarn.

2. Place the garment in a plastic bag and put it in your freezer - the temperature will cause the fibres to become less attached to each other, and excess fibres will come off easier.

3. Leave in the freezer for a few hours before taking it out and shaking it again.

4. Wash the garment according to the instructions on the yarn label.

Pilling is a natural process that happens to even the most exclusive of fibers. It's a natural sign of wear and tear that is hard to avoid, and that is most visible in high friction areas of your garment like a sweater's arms and cuffs.

You can make your garment look as new by removing the pilling, using a fabric comb or a pill/lint remover.

Still can't find the answer you need? Then scroll down and leave your question so one of our experts can try to help you. This will be done normally within 5 to 10 working days.
In the meantime, you can read the questions and answers that others have left to this pattern or join the DROPS Workshop on Facebook to get help from fellow knitters/crocheters!

You might also like...

Post a comment to pattern DROPS 164-24

We would love to hear what you have to say about this pattern!

If you want to leave a question, please make sure you select the correct category in the form below, to speed up the answering process. Required fields are marked *.

Comments / Questions (34)

country flag Laura wrote:

Bonjour, Pour le devant droit, faut-il également inverser la maille lisière et la bordure ? C'est à dire que pour le devant gauche, il est demandé de tricoter d'abord une maille lisière puis les côtes et après 3cm une maille lisière / jersey / bordure. Pour le devant droit, faut-il inverser ? et donc tricoter un rang de côtes puis la maille lisière sur 3cm et ensuite, d'abord la bordure puis jersey puis la maille lisière ? Merci !

16.12.2016 - 16:08

DROPS Design answered:

Bonjour Laura, pour le devant droit, on va effectivement inverser, c'est-à-dire commencer par les mailles de bordure devant et terminer par la m lis au point mousse ( côté couture). Bon tricot!

16.12.2016 - 17:05

country flag Martina Retzlaff wrote:

Der Schalkragen soll an der "hinteren Mitte" zusammen genaeht werden.Wo genau ist das?

23.04.2016 - 10:54

DROPS Design answered:

Liebe Martina, die hintere Mitte ist mitten am Nacken hinten, dort wo die beiden Kragenhälften aufeinandertreffen. Nähen Sie erst die beiden Kragenhälften zu einem Stück zusammen und nähen sie dann den Kragen an der Jacke fest.

26.04.2016 - 09:29

country flag Tullia wrote:

Bonjour Drops design, après avoir terminé (avec succès !) le modèle Brise d'été, je vous demande un petit éclaircissement sur ce modèle ml 003 : une fois l'ouvrage terminé, le col châle "ouvert" apparaîtra-t-il sur l'endroit ou sur l'envers ? Sur l'image il n'est pas possible de le distinguer. Logiquement ce serait sur l'envers... Dans ce cas serait-il possible d'inverser le sens du tricot en commençant ce col ? Merci infiniment.

27.03.2016 - 20:37

DROPS Design answered:

Bonjour Tullia, c'est effectivement la partie jersey envers qui est visible sur l'endroit quand le col châle est retourné. Nous ne sommes malheureusement pas en mesure de pouvoir adapter chaque modèle à chaque demande individuelle, pour toute assistance complémentaire, vous pouvez vous adresser à votre magasin DROPS. Bon tricot!

29.03.2016 - 10:01

country flag Laura wrote:

Hallo,ich bin mir wegen der Garnmenge unsicher! Reicht es, wenn ich 500g Big Merino kaufe, auch wenn ich diese Wolle dann doppelt nehme? also es erscheint mir doch so, dass ich dann doppelt soviel Wolle brauche? Also 20 Knäuel? Vielen dank!

15.02.2016 - 23:00

DROPS Design answered:

Zum Umrechnen müssen Sie immer auf die Lauflänge achten und die Garnmenge daran anpassen. Für die größte Größe benötigen Sie 500 g Brushed Alpaca Silk, das sind 20 x 25 g = 20 x 140 m = 2800 m. Big Merino gehört in die gleiche Garngruppe und wird daher auch doppelt genommen, darum benötigen Sie auch 2800 m. Big Merino hat 75 m pro 50 g, d.h. 2800 m geteilt durch 75 m = 37,3, d.h. 38 Knäuel Big Merino. Beachten Sie, dass sich bei einer anderen Garnqualität auch die Optik der Jacke ändert, zudem müssen Sie die Maschenprobe unbedingt einhalten.

17.02.2016 - 12:53

country flag Maike wrote:

Bei welchem Schwierigkeitsgrad würdet ihr die Jacke einstufen? Was sollte man können, um nicht zu verzweifeln? :)

10.02.2016 - 13:09

DROPS Design answered:

Da kein Muster gestrickt wird, ist die Jacke eher einfach einzustufen. Sie finden alle relevanten Techniken als Hilfsvideos im Kopf unter Videos, z.B. wie man seitlich neue M anschlägt. Sie können sich ruhig an der Jacke versuchen, auch wenn Sie noch nicht so viel gestrickt haben. Bei Fragen melden Sie sich einfach.

15.02.2016 - 10:35

country flag Karine wrote:

Je vais commencer ce gilet mais voilà, je voudrais faire un taille 38/40 et j'ai acheté 10 pelotes de Alpaga silk aurai assez ou dois je en recoomander au plus vite ??

13.01.2016 - 10:52

DROPS Design answered:

Bonjour Karine, en taille S, il faut 300 g Brushed Alpaca Silk/25 g = 12 pelotes - et 350 g en taille M soit 350/25=14 pelotes - pour trouver votre taille, comparez les mesures du schéma en bas de page à celles d'un vêtement similaire. Bon tricot!

13.01.2016 - 17:03

country flag Annie Bell wrote:

I'm sorry I don't understand how to do the shawl stitching? What happens after 2 rows of stitching?

01.01.2016 - 22:28

DROPS Design answered:

Dear Mrs Bell, to shape shawl collar, you are working short rows, ie 2 row over all sts, 2 rows over the first 21-23 sts (see size) towards mid front for 17-19 cm - measure towards shoulder, when piece is shorter. Happy knitting!

04.01.2016 - 10:43

country flag Gabriela wrote:

Hoe brei ik de shawlkraag? Ik begrijp de beschrijving niet. Brei ik de buitenste steken en haal ik de middelste steken gewoon over? Graag hulp :)

26.11.2015 - 15:57

DROPS Design answered:

Hoi Gabriela. Je hebt 41-42 of 43 st voor de sjaalkraag. Je breit nu verkorte toeren over deze st: Brei 2 nld over alle st, 2 nld over de buitenste 21-21-22-22-23-23 st middenvoor. Dus de 2 nld over de buitenste 21-22 of 23 st brei je alleen over deze st, de rest laat je op de nld staan tot je weer over alle st breit. Op deze manier wordt de ene kant breder dan de andere. Zie ook deze video:

30.11.2015 - 16:55

country flag Fabienne R wrote:

Rebonjour ! vous ne comprenez pas ma question. Je vous demande de me confirmer les augmentations de maille de manche pour la taille XXXL. Merci !

17.11.2015 - 21:53

DROPS Design answered:

Bonjour Fabienne, je vous confirme le nombre de mailles pour toutes les tailles: dans les grandes tailles, les épaules sont plus larges, le nbe de m pour les emmanchures sera plus petit. Bon tricot!

18.11.2015 - 09:25

country flag Fabienne R wrote:

Bonjour ! Vous n'avez pas répondu à ma question. Pouvez vous me donnez les augmentations de mailles pour faire l'emmanchure pour la taille XXXL ? Merci !!!

17.11.2015 - 13:41

DROPS Design answered:

Bonjour Fabienne, nous ne sommes pas en mesure de pouvoir adapter chaque modèle à chaque demande individuelle, je suis désolée. Vous pouvez recalculer sur la base des indications du modèle et de l'échantillon indiqué. Pour toute assistance individuelle complémentaire, merci de bien vouloir contacter votre magasin DROPS ou le forum DROPS. Bon tricot!

17.11.2015 - 13:48