
Popular categories
Looking for a yarn?


|
|||||||||||||
Starlet Rose |
|||||||||||||
|
|
|||||||||||||
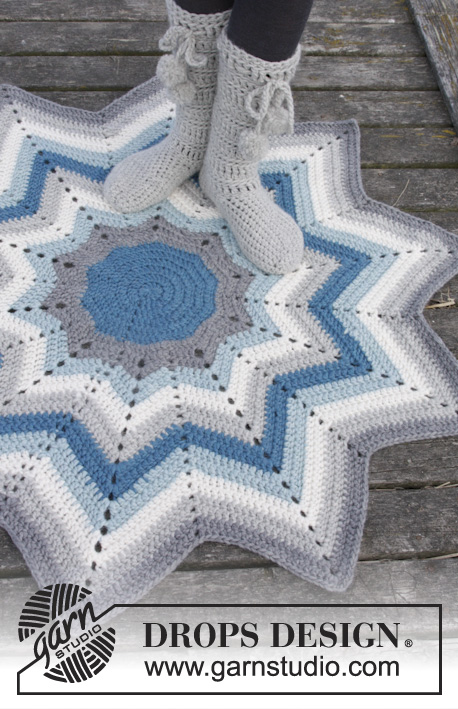
Crochet DROPS carpet with stripes and zig-zag pattern in "Snow".
DROPS 163-14 |
|||||||||||||
|
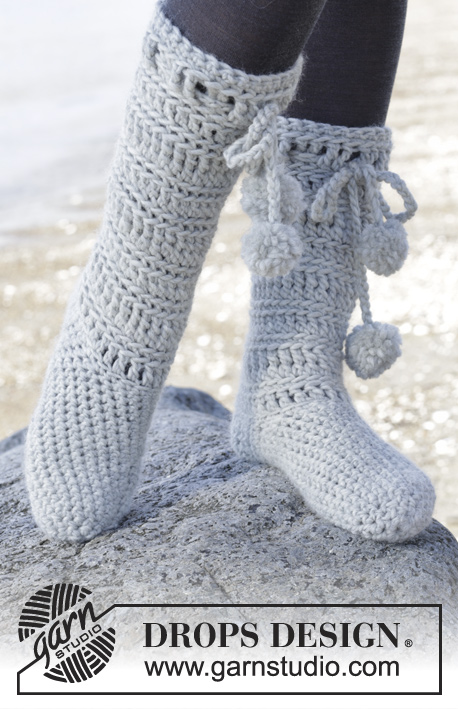
MAGIC CIRCLE: When piece is worked in the round, start with this technique to avoid hole in the middle (instead of ch-ring): Hold the yarn end and wind the yarn one time around the index finger to make a loop. Hold the loop with left thumb and middle finger, place the yarn over left index finger. Insert hook through the loop, make a YO and pull yarn through loop, work 3 ch, then work 11 tr around the loop. Pull the yarn end to tighten loop. Fasten the yarn end on the back side. CROCHET INFO: Replace first tr at beg of every tr round with 3 ch. Finish round with 1 sl st in 3rd ch at beg of round. PATTERN: See diagram A.1. STRIPES: Work piece in stripes, adjust so that every colour change is in a zig or zag or at beg of round - read COLOUR CHANGE. Work until 2 balls of yarn in each colour has been use in stripes as follows: STRIPE 1: Pastel pink. STRIPE 2: Old pink. STRIPE 3: Beige. STRIPE 4: Blue/violet. STRIPE 5: Light beige. STRIPE 6: Dark rose. STRIPE 7: Old pink. STRIPE 8: Beige. COLOUR CHANGE: To get a nice colour change when working, work last tr on round as follows: * Make a YO, insert hook in last st, get the yarn and pull it through st, make a YO and pull it through the 2 sts on hook, then make a YO with the new colour and pull it through the 2 sts on hook. ---------------------------------------------------------- CARPET: Worked in the round in light beige before working stripes and zig-zag. CIRCLE: Work a MAGIC CIRCLE - see explanation above, with 12 tr - READ CROCHET INFO-1, on hook size 7 mm with light beige. Continue to work as follows: ROUND 1: Work 2 tr in every tr = 24 tr. ROUND 2: Work * 2 tr in first tr, 1 tr in next tr *, repeat from *-* the entire round = 36 tr. REMEMBER THE CROCHET TENSION! ROUND 3: Work * 2 tr in first tr, 1 tr in each of the next 2 tr *, repeat from *-* the entire round = 48 tr. ROUND 4: Work * 2 tr in first tr, 1 tr in each of the next 3 tr *, repeat from *-* the entire round = 60 tr. ROUND 5: Work * 2 tr in first tr, 1 tr in each of the next 4 tr *, repeat from *-* the entire round = 72 tr. ROUND 6: Work * 2 tr in first tr, 1 tr in each of the next 3 tr *, repeat from *-* the entire round = 90 tr. Then work zig-zag. Switch to pastel pink - READ COLOUR CHANGE! ZIG-ZAG: Then work STRIPES - see explanation above - while AT THE SAME TIME working zig-zag as follows: Work A.1 5 times in total on round (= 10 tips). When A.1 has been worked 1 time vertically, repeat 3rd round in A.1. Continue until stripes are done. Piece measures approx. 112 cm in diameter (measured from tip to tip). Fasten off. ---------------------------------------------------------- Slippers: See DROPS 163-15 or "Related patterns" in pattern on website. ---------------------------------------------------------- |
|||||||||||||
Diagram explanations |
|||||||||||||
|
|||||||||||||

|
|||||||||||||
|
Have you made this or any other of our designs? Tag your pictures in social media with #dropsdesign so we can see them! Do you need help with this pattern?You'll find tutorial videos, a Comments/Questions area and more by visiting the pattern on garnstudio.com. © 1982-2024 DROPS Design A/S. We reserve all rights. This document, including all its sub-sections, has copyrights. Read more about what you can do with our patterns at the bottom of each pattern on our site. |
|||||||||||||


With over 40 years in knitting and crochet design, DROPS Design offers one of the most extensive collections of free patterns on the internet - translated to 17 languages. As of today we count 304 catalogues and 11422 patterns - 11422 of which are translated into English (UK/cm).
We work hard to bring you the best knitting and crochet have to offer, inspiration and advice as well as great quality yarns at incredible prices! Would you like to use our patterns for other than personal use? You can read what you are allowed to do in the Copyright text at the bottom of all our patterns. Happy crafting!
Comments / Questions (13)
Hej! Hoppas att ni skulle vilja förtydliga hur man ska inleda varven 1, 2 och 3 i diagrammet (A.1). Som jag läser diagrammet så ser det ut som att man ska börja med att hoppa över en stolpe från föregående varv, men jag får det inte helt att stämma med var man befinner sig efter att ha avslutat föregående varv. Hoppas ni kan förtydliga hur ni menar, tack!
29.10.2023 - 21:57DROPS Design answered:
Hej Maria, for at gøre det tydeligere kan du sætte et mærke i hver 9.maske, så bliver det tydeligt for dig at du skal hækle i de 8 st som er der imellem :)
31.10.2023 - 09:22Ich habe den Teppich Starlet Rose mit 28 Knäuel snow gehäkelt und dann in der Waschmaschine bei 40 Grad gefilzt. Er ist wunderbar geworden und ich würde Ihnen gerne zwei Fotos vorher/nachher schicken. Wohin kann ich es senden? Liebe Grüße Barbara Wallochny
07.01.2021 - 12:08DROPS Design answered:
Liebe Frau Wallochny, gerne können Sie Ihre Fotos in der Gruppe DROPS Workhop zeigen, und/oder auch mal in unserem DROPSfan Galerie - hier lesen Sie mehr. Viel Spaß beim häkeln!
07.01.2021 - 13:02Ich häkle gerade diesen Teppich und mit der Originalwolle von Algawo. Wieviel wird sie beim Filzen in der Waschmaschine eingehen. Danke Barbara
26.12.2020 - 11:17DROPS Design answered:
Liebe Frau Wallochny, dieser Teppich wird nicht gefiltzt - wenn Sie DROPS Snow filtzen möchten, dann lesen Sie mehr hier. Viel Spaß beim häkeln!
04.01.2021 - 08:32Moet je met pastel roze als eerste regel 1 van A.1 haken of de regel daaronder met het pijltje. Ik kom er met het plaatje ook niet helemaal uit.
25.02.2020 - 19:22DROPS Design answered:
Dag Annette,
Ja, inderdaad, waar de pijl begint, begint het zigzagpatroon en dus ook pastelroze.
28.02.2020 - 19:46Se volessi usare il disegno per realizzare una coperta andrebbero bene i filati Paris, safran o love you? Verrebbe molto più piccolo?
27.01.2017 - 13:44DROPS Design answered:
Buongiorno Federica, tanga conto che il tappeto lavorato con Eskimo misura 112 cm in diametro. Dovrebbe continuare il motivo a strisce per farlo più grande, nel caso volesse realizzare una coperta. In questo caso può scegliere il filato che preferisce e allargarlo fino a quando desidera. Buon lavoro!
27.01.2017 - 15:57Bonjour, je viens de terminer ce tapis mais n'y a t-il pas une erreur sur le diagramme A1?? car aprés avoir fait 4 rangs de rose ( coloris 30) le tapis n'est pas plat et "rebique" beaucoup vers le haut, le rond central en beige clair fait une bosse.... voici ma question : avez vous une astuce pour que le tapis ne glisse pas sur le sol ( carrelage)?? merci d'avance pour votre réponse. Cordialement Stéphanie
13.09.2016 - 11:12DROPS Design answered:
Bonjour Stéphanie, pensez à bien vérifier votre tension et à crocheter ensuite en conservant bien la même tension. La vidéo ci-dessous montre le cercle avant A.1 puis quelques tours réalisés en suivant A.1. Demandez conseil à votre magasin, il aura peut-être une astuce. Bon crochet!
13.09.2016 - 12:00Anne wrote:
Kan det passe man bare skal fortsætte med række 3 i diagrammet? Jeg hækler det, dog med nål nr. 10 og i garn af gamle lagener, men nu hvor jeg har hæklet række 3 i alt 5 gange, bliver mit tæppe til en skål. Dvs. det kan ikke lægges fladt på gulvet. Man må da skulle øge antallet af sting på en eller anden måde for at følge med omkredsen der bliver større og større.
02.08.2016 - 13:51DROPS Design answered:
Hej Anne. Du fortsaetter med raekke 3 i diagrammet, men du faar hele tiden flere st mellem hver punkt (2 st, 3 lm, 2 st) som haekles om buen hver gang.
02.08.2016 - 14:32Uit eindelijk toch gelukt. Bedankt.
28.04.2016 - 16:39Zal het weer proberen in elk geval bedankt voor het andwoord Marian
25.04.2016 - 13:02Is het de bedoeling van dit patroon Starlet Rose om het zelf uit te rekenen het aantal stokjes en punten, want ik krijg meerdere punten als ik het volgens het patroon doe.
24.04.2016 - 22:42DROPS Design answered:
Hoi Marian. Je krijgt 10 punten als je het patroon volgt. Je haakt dan door volgens A.1 (derde toer) tot alle strepen zijn gehaakt, wij geven hier niet aan hoeveel steken je dan hebt - volg het patroon voor de strepen en het meerderen voor de stk
25.04.2016 - 12:37