
Popular categories
Looking for a yarn?


Comments / Questions (49)
![]() Marianne wrote:
Marianne wrote:
Se ovanstående fråga om minskning för tårna. Jag upptäckte själv nu att jag ska minska på båda sidor om båda markörerna och då kommer det ju att stämma med maskantalet.. Sorry.
07.11.2024 - 23:16
![]() Marianne wrote:
Marianne wrote:
Vad har jag gjort för fel? Jag stickar storlek 44, när jag ska börja minska för tårna har jag 62 m. Därefter ska jag minska 2 maskor vartannat varv 5 ggr= 52 m kvar. Därefter 2 m varje varv 7 ggr = 38 maskor kvar, men enligt beskrivningen ska det då bara vara 14 maskor kvar. Förstår inte detta. Hjälp!
07.11.2024 - 22:06DROPS Design answered:
Hej Marianne. Så bra att det du kom på hur du ska göra. Mvh DROPS Design
08.11.2024 - 10:03
![]() Lisa wrote:
Lisa wrote:
Prøver lige igen, da mit tidligere spørgsmål ikke var skarpt nok. Jeg har nemlig taget masker ind på hver side, 2*15 og er nu på de 60 masker der står. Men her er 42 rib på toppen og kun 28 glatstrik på bunden. Disse skal deles i 30 og 30 og strikkes tå. Men der er 42 masker med rib, så ribben vil blive en del af underfoden og blive tvundet rundt om tåen. Sådan ser strømpen ikke ud på billedet, men mere at der er lige mange masker med rib ovenpå og glatstrik under foden.
23.05.2024 - 14:56DROPS Design answered:
Hej Lisa, vi ser hvad du mener, du har 42 masker rib ovenpå foden og kun 18 m glatstrik under foden. Det burde være lidt mere jævnt fordelt ... Når du tager ind til tå fortsætter du i glatstrik, så da skal du sørge for at få lige mange masker ovenpå og under. Vi sender spørgsmålet videre til design så vil de prøve at fordele det ribstrikkede mere jævnt - hold øje med opskriften :)
23.05.2024 - 15:18
![]() Lisa wrote:
Lisa wrote:
Hej Jeg strikker i str 41/43. Jeg kan ikke forstå at toppen strikkes rib i 42 masker og efter hælindtagning skal der kun være 18 masker på underfoden. Det virker helt forkert og når de så skal deles i 30-30 og lukkes af, så vil de yderste rib skulle ende på undersiden. Det må da være en fejl.
23.05.2024 - 00:24DROPS Design answered:
Hej Lisa, når du har strikket hælen, strikker du masker op på hver side, så du får 90 masker. Det er først nu du sætter mærket og tager ind i hver side, til sidst tager du ind i hver side til tå, så det stemmer :)
23.05.2024 - 14:23
![]() Zsuzsanna wrote:
Zsuzsanna wrote:
A magyar fordítás egy teljesen más zoknihoz tartozik. Kénytelen vagyik az angol minta alapján dolgozni. Kérem, korrigálják a hibát!
21.12.2021 - 18:57
![]() Ing-Marie wrote:
Ing-Marie wrote:
Hej Citerar Sticka sedan vidare tills arb mäter 7-8-9-9 (11-13-14-16) 18-19-22-24 cm från markören på hälen - det återstår nu 3-3-3-4 (4-4-4-4) 4-5-5-6 cm till färdig längd. Jag stickar efter storlek 38/40 om man räknar från markören blir ju hel färdig längd på foten 28 cm. Ska det inte vara 24 cm färdig hel längd på foten. Verkar för långt med 28 cm till mig. Ska man verkligen räkna 19 cm efter markören eller gå efter hel stickad längd?
06.10.2021 - 15:35DROPS Design answered:
Hej Ing-Marie. Arbetet ska mäta 19 cm från markören i storlek 38/40 och markören sitter längst bak på foten så den totala längden på foten blir 19+5 = 24 cm. Mvh DROPS Design
07.10.2021 - 08:15
![]() Suzy wrote:
Suzy wrote:
Bonjour, ce modèle a été corrigé, mais quelle sont les corrections, vous mettez que le modèle a été réécrit , dois-je suivre les explications du modèle . Merci cordialement
31.08.2021 - 09:13DROPS Design answered:
Bonjour Suzy, si vous avez imprimé ce modèle avant la date de la correction, il peut être sage d'imprimer de nouveau les explications, sinon, le modèle en ligne est juste ainsi. Bon tricot!
31.08.2021 - 11:59
![]() Pernilla wrote:
Pernilla wrote:
Jag har gjort en provlapp, men den blir lite för liten. Kan man öka till en större storlek på sockstorleken istället för att ta större stickor? Har nämligen redan stickor 2,75 mm och lappen blir 9*9 cm, och det är när jag stickar så löst jag bara kan...
24.11.2016 - 22:04DROPS Design answered:
Hej Pernilla. Pröv engang at vaske din pröve - da faar du den mest korrekte strikkefasthed. Ellers tror jeg godt du kan göre det i det her tilfaelde - men det er ikke noget jeg vil anbefale for en tröje eller jakke.
28.11.2016 - 17:10
![]() Saskia Lortz wrote:
Saskia Lortz wrote:
Kann es sen das die deutsche Anleitung nicht korrigiert wurde? Die Maschenzahl an der Ferse mach keinen Sinn und scheint noch das gleiche Problem zu haben wie bevor. Des weiteren ist die Anleitung auf englisch ganz anders? Ich weder jetzt einen Teil auftrennen und mit der englischen Anleitung weiterarbeiten.
18.10.2016 - 01:26DROPS Design answered:
Liebe Frau Lortz, die deutsche Anleitung wurde jetzt korrigiert. Danke für Ihren Nachricht.
18.10.2016 - 14:29
![]() Mina wrote:
Mina wrote:
Vi ringrazio ma le diminuzioni del tallone mi sono chiare, mi riferivo a quelle successive: vanno fatte "ogni lato" o "a ferri alterni"? E le faccio lavorando avanti e indietro o in circolo?
25.04.2016 - 16:58DROPS Design answered:
Buonasera Mina. Dopo aver ripreso le m, lavora in tondo fino alla fine. Inserisce 1 segnapunti prima e 1 dopo le 42 m del sopra del piede e diminusce un giro sì e uno no (a giri alterni). Per diminuire deve lavorare insieme a dir ritorto le 2 m prima del primo segnapunti e insieme a dir le 2 m dopo il secondo segnapunti. Buon lavoro!
25.04.2016 - 17:23
|
|
Sweet in Stripes#sweetinstripessocks |
|
|
|
|
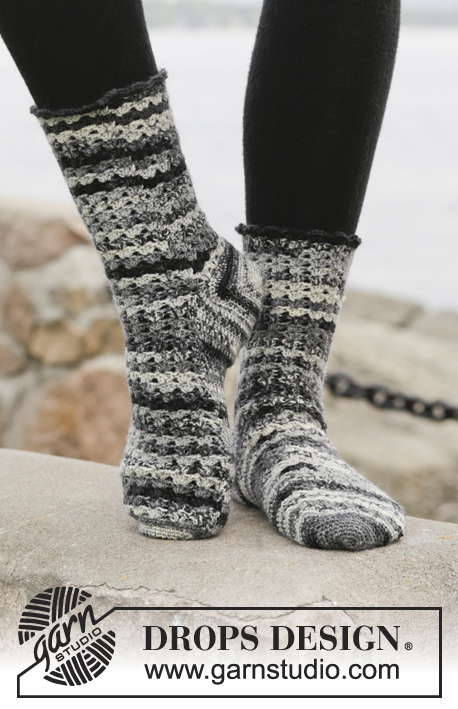
Knitted DROPS socks with rib in "Fabel". Size 15 - 46.
DROPS 158-46 |
|
|
HEEL DECREASE (worked in stocking st): Row 1 (= RS): Work until 6-7-7-7 (7-7-8-8) 7-7-8-10 sts remain, slip next st as if to K, K 1, psso, turn piece. Row 2 (= WS): Work until 6-7-7-7 (7-7-8-8) 7-7-8-10 sts remain, slip next st as if to P, P 1, psso, turn piece. Row 3 (= RS): Work until 5-6-6-6 (6-6-7-7) 6-6-7-9 sts remain, slip next st as if to K, K 1, psso, turn piece. Row 4 (= WS): Work until 5-6-6-6 (6-6-7-7) 6-6-7-9 sts remain, slip next st as if to P, P 1, psso, turn piece. Continue dec like this with 1 less st before each dec until 8-10-10-10 (10-10-12-12) 14-14-16-16 sts remain on needle. -------------------------------------------------------- SOCK: Worked in the round on double pointed needles. Cast on 44-48-52-52 (56-56-64-64) 64-68-72-76 sts evenly on double pointed needles size 2.5 mm with Fabel. Work rib = P 2/K 2. REMEMBER THE KNITTING TENSION! Continue with rib until piece measures 6-7-8-9 (10-11-12-13) 14-15-16-17 cm. Slip the first 22-22-26-26 (30-30-30-30) 30-34-34-34 sts on 1 stitch holder (= mid on top of foot) and keep the last 22-26-26-26 (26-26-34-34) 34-34-38-42 sts on needle (= heel sts). Work in stocking st back and forth over heel sts – AT THE SAME TIME decrease 4-4-4-4 (4-4-8-8) 8-8-8-8 sts evenly on first row = 18-22-22-22 (22-22-26-26) 26-26-30-34 sts. Work back and forth for 3-3½-4-4 (4½-4½-5-5) 5-5½-6-6 cm. Insert a marker in the piece. Now dec for heel - SEE HEEL DECREASE! After heel decrease, pick up 8-9-10-10 (11-12-12-13) 13-14-16-16 sts on each side of heel and slip the 22-22-26-26 (30-30-30-30) 30-34-34-34 sts from the stitch holder back on needle = 46-50-56-56 (62-64-66-68) 70-76-82-82 sts. Insert 1 marker in each side of the 22-22-26-26 (30-30-30-30) 30-34-34-34 sts on top of foot. Then work rib on top of foot and stocking st under foot AT THE SAME TIME dec in each side as follows: K the last 2 sts before the 22-22-26-26 (30-30-30-30) 30-34-34-34 on top of foot twisted tog (i.e. work in back loop of sts instead of front), K the first 2 sts after the 22-22-26-26 (30-30-30-30) 30-34-34-34 sts tog. Dec like this on every other round a total of 3-4-6-6 (7-8-8-9) 9-9-11-10 times = 40-42-44-44 (48-48-50-50) 52-58-60-62 sts. Continue working until piece measures 7-8-9-9 (11-13-14-16) 18-19-22-24 cm from the marker on the heel - 3-3-3-4 (4-4-4-4) 4-5-5-6 cm remain until piece is finished. Then insert 1 marker in each side so that there are 20-21-22-22 (24-24-25-25) 26-29-30-31 sts between the markers. Continue working stocking st over all sts while AT THE SAME TIME dec for toes on each side of both markers. Dec as follows before marker: K 2 tog. Dec as follows after marker: K 2 twisted tog. Dec like this in each side on every other round a total of 3-3-3-3 (4-4-4-5) 4-5-5-5 times and then on every round 4-5-5-5 (4-4-5-4) 5-5-6-7 times = 12-10-12-12 (16-16-14-14) 16-18-16-14 sts remain on needle. On next round work all sts tog 2 by 2. Cut the yarn and pull it through the remaining sts, tighten tog and fasten it on the inside of sock. Knit another sock. |
|
Have you finished this pattern?Tag your pictures with #dropspattern #sweetinstripessocks or submit them to the #dropsfan gallery. Do you need help with this pattern?You'll find 19 tutorial videos, a Comments/Questions area and more by visiting the pattern on garnstudio.com. © 1982-2025 DROPS Design A/S. We reserve all rights. This document, including all its sub-sections, has copyrights. Read more about what you can do with our patterns at the bottom of each pattern on our site. |


With over 40 years in knitting and crochet design, DROPS Design offers one of the most extensive collections of free patterns on the internet - translated to 17 languages. As of today we count 314 catalogues and 11821 patterns translated into English (UK/cm).
We work hard to bring you the best knitting and crochet have to offer, inspiration and advice as well as great quality yarns at incredible prices! Would you like to use our patterns for other than personal use? You can read what you are allowed to do in the Copyright text at the bottom of all our patterns. Happy crafting!
Post a comment to pattern DROPS 158-46
We would love to hear what you have to say about this pattern!
If you want to leave a question, please make sure you select the correct category in the form below, to speed up the answering process. Required fields are marked *.