DROPS Snow
DROPS Snow
100% Wool
from 2.65 $ /50g
Get the yarn to make this pattern from 34.45$.

The yarn cost is calculated from the pattern’s smallest size and the yarn’s cheapest product type. Looking for an even better price? You might find it on the DROPS Deals!

DROPS SS24

Virginia

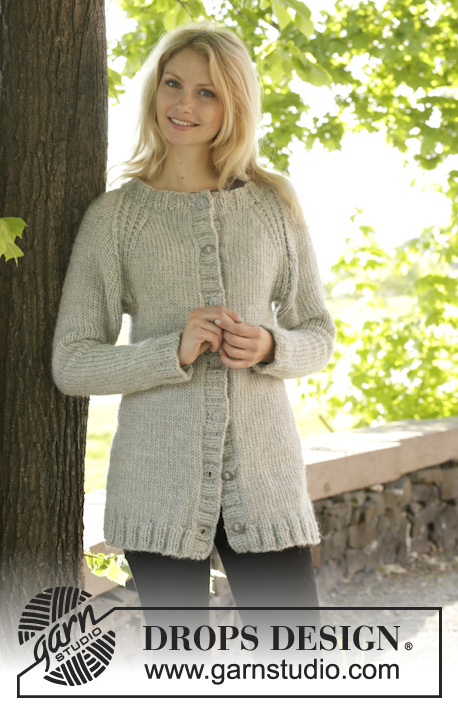
Knitted DROPS jumper with rib and raglan, worked top down in ”Snow”. Size: S - XXXL.

DROPS 157-29
DROPS design: Pattern no ee-504
Yarn group E or C + C
----------------------------------------------------------
Size: S - M - L - XL - XXL - XXXL
Finished measurements:
Bust: 80-88-96-108-116-130 cm / 31½"-34½"-37 3/4"-42½"-45 3/4"-51½"
Full length: 56-58-60-62-64-66 cm / 22''-22¾''-23 5/8''-24 3/8''-25¼''-26''

Materials:
DROPS SNOW from Garnstudio
650-700-750-850-950-1000 g color no 53, light gray

DROPS DOUBLE POINTED NEEDLES and CIRCULAR NEEDLE (80 cm / 32'') SIZE 8 mm / US 11 - or size needed to get 11 sts x 15 rows in stockinette st = 4'' x 4'' (10 x 10 cm).

-------------------------------------------------------

Alternative Yarn – See how to change yarns here
Yarn Groups A to F – Use the same pattern and change the yarn here
Yarn usage using an alternative yarn – Use our yarn converter here

-------------------------------------------------------

DROPS Snow
DROPS Snow
100% Wool
from 2.65 $ /50g
Get the yarn to make this pattern from 34.45$.

The yarn cost is calculated from the pattern’s smallest size and the yarn’s cheapest product type. Looking for an even better price? You might find it on the DROPS Deals!

Pattern instructions

NOTE: This pattern is written in American English. All measurements in charts are in cm. For conversion from inches to cm - click here. There are different terms for crocheting in American and British English. If this pattern includes crochet, click for "crochet terms" here. For this pattern in British English, please click here.
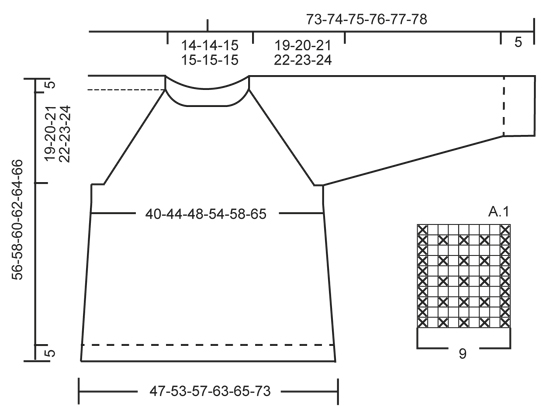
PATTERN:
See diagram A.1. The diagram shows all rows in pattern seen from RS.

RAGLAN:
Inc on each side of every A.1 by making 1 YO. On next round K YOs twisted (i.e. work in back loop of st instead of front) to avoid holes.

INCREASE TIP (applies to body):
Work until 1 st remains before marker, 1 YO, K 2, 1 YO = 2 sts inc. Repeat in the other side. On next round K YOs twisted (i.e. work in back loop of st instead of front) to avoid holes.

DECREASE TIP (applies to sleeves):
Dec before marker and 1 st as follows: K 2 tog.
Dec after marker and 1 st as follows: Slip 1 st as if to K, K 1, psso.
----------------------------------------------------------

JUMPER:
Worked in the round, top down.

YOKE:
Cast on 52-52-56-56-56-56 sts on circular needle size 8 mm / US 11 with Snow. Then work rib as follows from mid back: K 1, * P 2, K 2 *, repeat from *-* until 1 st remains, K 1. When rib has been worked for 3 cm / 1'', work 1 round in stockinette st while AT THE SAME TIME inc 10-10-8-8-10-10 sts evenly = 62-62-64-64-66-66 sts. Now work pattern as follows: 5-5-5-5-6-6 sts in stockinette st (= back piece), A.1, 3 sts in stockinette st (= sleeve), A.1, 10-10-11-11-12-12 sts in stockinette st (= front piece), A.1, 3 sts in stockinette st (= sleeve ), A.1, 5-5-6-6-6-6 sts in stockinette st (= back piece). There is now 1 repetition A.1 in each raglan. REMEMBER THE GAUGE! Continue with pattern like this AT THE SAME TIME on next round beg inc for RAGLAN – see explanation above! Inc differently on body and sleeves:
BODY:
Repeat inc every round 0-2-5-8-10-12 times, every other round 4-4-3-4-4-8 times and every 4th round 5-5-5-4-4-2 times.
SLEEVE:
Repeat inc every round 6-6-7-7-10-11 times, every other round 3-4-4-5-4-4 times and every 4th round 4 times in all sizes.

When all inc are done and piece measures 24-25-26-27-28-29 cm / 9½''-9 3/4''-10 1/4''-10 5/8''-11''-11 3/8'', there are 150-162-176-192-210-230 sts in total on needle. Then continue in stockinette st as follows: Work the first 18-20-22-25-28-32 sts, slip the next 39-41-43-45-49-51 sts on a stitch holder for sleeve, cast on 8 new sts under sleeve, insert a marker in the middle of these sts, work the next 36-40-45-51-56-64 sts, slip the next 39-41-43-45-49-51 sts on a stitch holder for sleeve, cast on 8 new sts under sleeve, insert a marker in the middle of these sts, work the remaining 18-20-23-26-28-32 sts. Work the new sts under each sleeve in stockinette st.

BODY:
There are now 88-96-106-118-128-144 sts for body. Continue in stockinette st. When piece measures 4 cm / 1½'' from the new sts under sleeve, beg inc on each side of markers - READ INCREASE TIP! Repeat inc every 5½-4½-5-5-6½-7 cm / 2 1/4"-1 3/4"-2"-2"-2½"-2 3/4" 3-4-4-4-3-3 more times = 104-116-126-138-144-160 sts. When piece measures 51-53-55-57-59-61 cm / 20''-21''-21 5/8''-22½''-23¼''-24''from shoulder, inc 0-0-2-2-0-0 sts = 104-116-128-140-144-160 sts. Now work rib from mid back as follows: K 1, * P 2, K 2 *, repeat from *-* until 1 st remains, K 1. Continue like this until rib has been worked for 5 cm / 2'', bind off with K over K and P over P.

SLEEVE:
Slip sts back on double pointed needles. Work in stockinette st and cast on 8 new sts at the end of row = 47-49-51-53-57-59 sts. Insert a marker in the middle of the new sts under the sleeve. NOW MEASURE THE PIECE FROM HERE. Then work in stockinette st in the round – AT THE SAME TIME dec 1 st on each side of marker – READ DECREASE TIP. Repeat dec every other round 2 more times in all sizes = 41-43-45-47-51-53 sts. Then dec every 4-3½-4-3½-3-3 cm / 1½"-1 1/4"-1½"-1 1/4"-1"-1" 9-10-9-10-12-11 times = 23-23-27-27-27-31 sts. When sleeve measures 42-42-41-41-41-41 cm / 16½"-16½"-16"-16"-16"-16", inc 1 st in all sizes = 24-24-28-28-28-32 sts. Continue with rib as follows: K 1, * P 2, K 2 *, repeat from *-* until 1 st remains, K 1. Continue like this until rib has been worked for 5 cm / 2''. Bind off with K over K and P over P.

ASSEMBLY:
Sew the holes under the sleeves.

Diagram

All measurements in charts are in cm.

symbols = K
symbols = P
diagram
Do you have a question? See a list of frequently asked questions (FAQ)

Knitting tension is what determines the final measurements of your work, and is usually measured per 10 x 10 cm. It is provided like so: number of stitches in width x number of rows in height - eg: 19 stitches x 26 rows = 10 x 10 cm.

The knitting tension is very individual; some people knit/crochet loosely while others work tightly. You adjust the knitting tension with the needle size, which is why the suggested needle size only serve as a guide! You need to adjust this (up or down) to ensure that YOUR knitting tension matches the knitting tension provided in the pattern. If you work with a different knitting tension than provided you will have a different yarn consumption, and your work will have different measurements than what the pattern suggests.

The knitting tension also determines which yarns can replace each other. As long as you achieve the same knitting tension you can replace one yarn with another.

See DROPS lesson: How to measure your tension/gauge

See DROPS video: How to make a gauge tension swatch

The required amount of yarn is provided in grams, eg: 450 g. To calculate how many balls you’ll need you first need to know how many grams are in 1 ball (25g, 50g or 100g). This information is available if you click on the individual yarn quality on our pages. Divide the amount required with the amount of each ball. For example, if each ball is 50g (the most common amount), the calculation will be as follows: 450 / 50 = 9 balls.

The important thing when changing from one yarn to another is that the knitting/crochet tension remains the same. This is so that the measurements of the finished piece will be the same as on the sketch provided. It is easier to achieve the same knitting tension using yarns from the same yarn group. It is also possible to work with multiple strands of a thinner yarn to achieve the knitting tension of a thicker one. Please try our yarn converter. We recommend you to always work a test swatch.

Please NOTE: when changing yarn the garment might have a different look and feel to the garment in the photo, due to individual properties and qualities of each yarn.

See DROPS lesson: Can I use a different yarn than the one mentioned in the pattern?

All our yarns are categorised into yarn groups (from A to F) according to thickness and knitting tension – group A contains the thinnest yarns and group F the thickest. This makes it easier for you to find alternative yarns to our patterns, should you wish to switch yarn. All yarns within the same group have a similar knitting tension and can easily replace each other. However, different yarn qualities have different structures and properties which will give the finished work a unique look and feel.

Click here for an overview of the yarns in each yarn group

At the top of all our patterns you’ll find a link to our yarn converter, which is a helpful tool should you wish to use a different yarn than suggested. By filling in the yarn quality you wish to replace, the amount (in your size) and number of strands, the converter will present good alternative yarns with the same knitting tension. Additionally it will tell you how much you’ll require in the new qualities and whether you’ll need to work with multiple strands. Most skeins are 50g (some are 25g or 100g).

If the pattern is worked with multiple colours, every colour will have to be converted separately. Similarly, if the pattern is worked with several strands of different yarns (for example 1 strand Alpaca and 1 strand Kid-Silk) you will have to find alternatives for each, individually.

Click here to see our yarn converter

Since different yarns have different qualities and textures we have chosen to keep the original yarn in our patterns. However, you can easily find options among our available qualities by using our yarn converter, or simply pick a yarn from the same yarn group.

It is possible that some retailers still have discontinued yarns in stock, or that someone has a few skeins at home that they would like to find patterns for.

The yarn converter will provide both alternative yarn as well as required amount in the new quality.

If you think it's hard to decide what size to make, it can be a good idea to measure a garment you own already and like the size of. Then you can pick the size by comparing those measures with the ones available in the pattern's size chart.

You'll find the size chart at the bottom of the pattern.

See DROPS lesson: How to read size chart

The needle size provided in the pattern serves only as a guide, the important thing is to follow the knitting tension. And since knitting tension is very individual, you will have to adjust the needle size to ensure that YOUR tension is the same as in the pattern – maybe you’ll have to adjust 1, or even 2 needle sizes, up or down to achieve the correct tension. For this, we recommend that you work test swatches.

Should you work with a different knitting tension than the one provided, the measurements of the finished garment might deviate from the measurement sketch.

See DROPS lesson: How to measure your tension/gauge

See DROPS video: How to make a gauge tension swatch

Working a garment top-down provides more flexibility and room for personal adjustment. For example it is easier to try the garment on while working, as well as making adjustments to length of yoke and shoulder caps.

The instructions are carefully explaining every step, in the correct order. Diagrams are adjusted to the knitting direction and are worked as usual.

The diagram depicts all rows/rounds, and every stitch seen from the right side. It is read from bottom to top, from right to left. 1 square = 1 stitch.

When working back and forth, every other row is worked from the right side and every other row is worked from the wrong side. When working from the wrong side, the diagram will have to be worked reversed: from left to right, knit stitches are purled, purl stitches are knit etc.

When working in the round every round is worked from the right side and the diagram are worked from right to left on all rounds.

See DROPS lesson: How to read knitting diagrams

The diagram depicts all rows/rounds, and every stitch seen from the right side. It is worked from bottom to top, from right to left.

When working back and forth every other row is worked from the right side: from right to left and every other row is worked from the wrong side: from left to right.

When working in the round, every row in the diagram are worked from the right side, from right to left.

When working a circular diagram you start in the middle and work your way outwards, counter clockwise, row by row.

The rows usually start with a given number of chain stitches (equivalent to the height of the following stitch), this will either be depicted in the diagram or explained in the pattern.

See DROPS lesson: How to read crochet diagrams

Instructions for working several diagrams after each other on the same row/round, will often be written like so: “work A.1, A.2, A.3 a total of 0-0-2-3-4 times". This means you work A.1 once, then A.2 is worked once, and A.3 is repeated (in width) the number of times provided for your size – in this case like so: S = 0 times, M = 0 times, L=2 times, XL= 3 times and XXL = 4 times.

The diagrams are worked as usual: begin with the first row in A.1, then work the first row in A.2 etc.

See DROPS lesson: How to read knitting diagrams

See DROPS lesson: How to read crochet diagrams

The total width of the garment (from wrist-to-wrist) will be larger in the larger sizes, despite the actual sleeves being shorter. The larger sizes have longer sleeve caps and wider shoulders, so there will be a good fit in all sizes.

The measurement sketch/schematic drawing provides information regarding the full length of the garment. If it’s a jumper or a jacket the length is measured from the highest point on the shoulder (usually closest to the neckline), and straight down to the bottom of the garment. It is NOT measured from the tip of shoulder. Similarly, the length of yoke is measured from the highest point on the shoulder and down to where yoke is split into body and sleeves.

See DROPS lesson: How to read a schematic drawing

Diagrams are often repeated on the round or in height. 1 repeat is the diagram the way it appears in the pattern. If it says to work 5 repeats of A.1 in the round, then you work A.1 a total of 5 times after/next to each other in the round. If it says to work 2 repeats of A.1 vertically/in height you work the entire diagram once, then begin again at the start and work the entire diagram one more time.

Chain stitches are slightly narrower than other stitches and to avoid working the cast-on edge too tight, we simply chain more stitches to begin with. The stitch count will be adjusted on the following row to fit the pattern and measurement sketch.

The rib edge is more elastic and will contract slightly compared to, for example, stocking stitch. By increasing before the rib edge, you avoid a visible difference in width between the rib edge and the rest of the body.

It’s very easy to cast off too tightly, and by making yarn overs while casting off (and simultaneously casting these off) you avoid a too tight cast off edge.

See DROPS video: How to bind off with yarn overs (yo)

To achieve an even increase (or decrease) you can increase on, for example: every 3rd and 4th row alternately, like so: work 2 rows and increase on the 3rd row, work 3 rows and increase on the 4th. Repeat this until the increase is complete.

See DROPS lesson: Increase or decrease 1 st on every 3rd and 4th row alternately

Should you prefer to work in the round instead of back and forth, you may of course adjust the pattern. You’ll need to add steeks mid-front (usually 5 stitches), and follow the instructions. When you would normally turn and work from the wrong side, simply work across the steek and continue in the round. At the end you’ll cut the piece open, pick up stitches to work bands, and cover the cut edges.

See DROPS video: How to knit steeks and cut open

Should you prefer to work back and forth instead of in the round, you may of course adjust the pattern so you work the pieces separately and then assemble them at the end. Divide the stitches for the body in 2, add 1 edge stitch in each side (for sewing) and work the front and back pieces separately.

See DROPS lesson: Can I adapt a pattern for circular needles into straight needles?

Pattern repeats can vary slightly in the different sizes, in order to get the correct proportions. If you’re not working the exact same size as the garment in the photo, yours might deviate slightly. This has been carefully developed and adjusted so that the complete impression of the garment is the same in all sizes.

Make sure to follow instructions and diagrams for your size!

If you have found a pattern you like which is available in women’s size it’s not very difficult to convert it to men’s size. The biggest difference will be the length of sleeves and body. Start working on the women size that you think would fit across the chest. The additional length will be worked right before you cast off for the armhole/sleeve cap. If the pattern is worked top-down you can add the length right after the armhole or before the first decrease on sleeve.

Regarding additional yarn amount, this will depend on how much length you add, but it is better with a skein too many than too few.

All yarns will have excess fibres (from production) that might come off as lint or shedding. Brushed yarns (ie hairier yarns) have more of these loose, excess fibres, causing more shedding.

Shedding also depends on what is worn under or over the garment, and whether this pulls at the yarn fibres. It’s therefore not possible to guarantee that there will be no shedding

Below are some tips on how to get the best result when working with hairier yarns:

1. When the garment is finished (before you wash it) shake it vigorously so the looser hairs come off. NOTE: do NOT use a lint roller, brush or any method that pulls at the yarn.

2. Place the garment in a plastic bag and put it in your freezer - the temperature will cause the fibres to become less attached to each other, and excess fibres will come off easier.

3. Leave in the freezer for a few hours before taking it out and shaking it again.

4. Wash the garment according to the instructions on the yarn label.

Pilling is a natural process that happens to even the most exclusive of fibers. It's a natural sign of wear and tear that is hard to avoid, and that is most visible in high friction areas of your garment like a sweater's arms and cuffs.

You can make your garment look as new by removing the pilling, using a fabric comb or a pill/lint remover.

Still can't find the answer you need? Then scroll down and leave your question so one of our experts can try to help you. This will be done normally within 5 to 10 working days.
In the meantime, you can read the questions and answers that others have left to this pattern or join the DROPS Workshop on Facebook to get help from fellow knitters/crocheters!

You might also like...

Post a comment to pattern DROPS 157-29

We would love to hear what you have to say about this pattern!

If you want to leave a question, please make sure you select the correct category in the form below, to speed up the answering process. Required fields are marked *.

Comments / Questions (59)

country flag Marie-France Dionne wrote:

Bonjour je suis au tout début et j'aimerais savoir combien de marqueur je met et ou je les mets merci

20.10.2017 - 13:08

DROPS Design answered:

Bonjour Madame Dionne, les augmentations indiquées avec les jetés de chaque côté des 2 m endroit se font lorsque l'on tricote le dos et le devant en rond, après avoir séparé les mailles des manches, pour le raglan, augmentez comme indiqué sous RAGLAN. Vous pouvez placer un marqueur avant et après chaque A.1 pour délimiter cette zone si vous le souhaitez. Bon tricot!

20.10.2017 - 14:20

country flag MARIE-FRANCE DIONNE wrote:

Bonjour je ne comprend pas cette instruction: Tricoter jusqu'à ce qu'il reste 1 m avant le marqueur, 1 jeté, 2 m end, 1 jeté = 2 m en plus. Comment je tricote 2 m end si j'arrete une maille avant le marqueur? merci (est ce que les 2 m end c'est une avant le marqueur et une apres?)

20.10.2017 - 04:19

DROPS Design answered:

Bonjour Mme Dionne, tout à fait, le marqueur se trouve entre ces 2 m end, soit ainsi: tricotez jusqu'à ce qu'il reste 1 m avant le marqueur, faites 1 jeté, tricotez 1 m end, glissez le marqueur, tricotez 1 m end et faites 1 jeté (= le marqueur est entre ces 2 m end et on a augmenté 1 m de chaque côté des 2 m end). Bon tricot!

20.10.2017 - 09:19

country flag Tina Torvik Hansen wrote:

Det står man skal øke på hver side av A1 med kast. Men så står det at man skal øke forskjellig på bol og erme. Når skal man bruke kast ved A1 og når skal man øke forskjellige ved bol og ermer? A1 strikkes jo på hver side av både bol og ermer.jeg har spurt mange og ingen skjønner hva som menes

14.10.2017 - 11:16

DROPS Design answered:

Hei Tina, Man skal bruke kast til å øke både på bolen og på ermene, men det er antall økninger som er forskjellige:BOL: Gjenta økningen på hver omg 0-2-5-8-10-12 ganger, på hver 2.omg 4-4-3-4-4-8 ganger og på hver 4.omg 5-5-5-4-4-2 ganger. ERME: Gjenta økningen på hver omg 6-6-7-7-10-11 ganger, på hver 2.omg 3-4-4-5-4-4 ganger og på hver 4.omg 4 ganger i alle str. God fornøyelse!

15.10.2017 - 13:29

country flag Jessica wrote:

Merci beaucoup pour votre réponse rapide ainsi que pour votre super site, complet, vos vidéos très explicites, vos patrons pour tous les goûts, les liens pour acheter la laine ! Le top! J'adore!

27.09.2017 - 20:25

country flag Jessica wrote:

Bonjour, je fais le modèle en taille L, j'ai fais l'empiècement sans problème, et le premier rang avec le raglan mais après je ne comprends pas du tout les augmentations raglan, dos/devant, manches, combien, comment, tous les rangs...? pourriez-vous me détailler les augmentations pour la taille L s'il vous plait? Merci d'avance!

27.09.2017 - 15:58

DROPS Design answered:

Bonjour Jessica, en taille L, vous allez augmenter pour le raglan du dos et du devant: 5 x tous les tours, 3 x tous les 2 tours et 5 x tous les 4 tours (soit 5+3+5=13 x 4 m = 52 m au total) + en même temps, vous augmentez pour les manches: 7x tous les tours, 4 x tous les 2 tours et 4x tous les 4 tours (soit 7+4+4 x 4 m au total = 60 m). Vous aviez 64 m + 52 + 60 = 176 m. Bon tricot!

27.09.2017 - 17:12

country flag Jane wrote:

Hallo, Beim Nachzählen der einzelnen aufzunehmenden Maschen ist mir aufgefallen, dass in der Anleitung zu wenig Maschen aufgenommen werden. stricke Modell in L müsste laut Anleitung 43 Maschen auf der Nadel haben, komme aber nur auf 33. 3 M zu beginn des Raglan, dann werden 14 aufgenommen, dann 8 und dann nochmals 8. wo bekomme ich die restlichen 10 Maschen her? Freue mich über eine schnelle Antwort. Viele Grüsse Jane

23.09.2017 - 12:25

DROPS Design answered:

Liebe Jane, in L wird es so zugenommen: Rumpfteil: in jeder Rd 5 x, danach in jeder 2. Rd 3 x und danach in jeder 4. Rd 5 x (= 4 M x 13 = 52) und Ärmel: in jeder Rd 7 x, danach in jeder 2. Rd 4 x und danach in jeder 4. Rd 4 x (= 4 M x 15 = 60). Es gab 64 M + 52 + 60 = 176 M. Viel Spaß beim stricken!

25.09.2017 - 09:55

country flag Clara wrote:

Bonjour je souhaiterais faire ce modèle avec 3 fils en même temps 2 delight et 1 brushed alpaca silk, j'ai 150 g coloris 05, beige/gris/rose, 150 g coloris 06, rose/mauve de delight et 75 g de DROPS BRUSHED ALPACA SILK beige, est-il possible de faire ce modèle ?

10.07.2017 - 10:30

DROPS Design answered:

Bonjour Clara, vous pouvez remplacer 1 fil du groupe E (= Eskimo) par 2 fils du groupe A + 1 fil du groupe C, donc c'est tout à fait possible (voir ici). Rappelez-vous juste que la composition des fils étant différente, vous aurez un résultat différent, votre magasin DROPS saura vous aider et vous conseiller si besoin. Bon tricot!

10.07.2017 - 10:52

country flag Marte Kjær Galtung wrote:

Jeg skjønner ikke økningen på bolen (etter ermene er satt på tråd).Det står øke to masker under hver arm tre ganger = 12 masker. Det er 88 masker i utgangspunktet, så det burde blitt 100 masker, men det står at det skal bli 104 i oppskriften. Kan dere hjelpe?

13.04.2017 - 15:53

DROPS Design answered:

Hei Marte. Når du har 88 masker til bol, fortsett du så videre i glstrikk. Når arb måler 4 cm fra de nye m under ermene starter økningen på hver side av merkene - LES ØKETIPS hvordan det skal gjøres. Når du har strikket en omgang med økningene skal dette gjentas for hver 5½.cm 3 ganger til, altså 4 ganger totalt. Altså du har 88 masker, øker 4 masker pr omgang 4 ganger = 16 økte masker + 88 masker = 104 masker. God Fornøyelse!

26.04.2017 - 13:06

country flag Stina wrote:

Hej! Upprepar man A1 någon gång? På bilden i mönstret ser det nämligen ut som att A1 mönstret fortgår i mer än 10 varv, men det står inget i beskrivningen om att det ska upprepas. Om det är så att man inte ska upprepa A1, hur vet man då var man ska göra raglan-ökningarna? Hälsningar Stina

20.02.2017 - 20:19

DROPS Design answered:

Hej Stina. Du gentager A.1 hele vejen mens de du tager ud til raglan. Det er först naar du er faerdig med raglan at du fortsaetter i kun glatstrik

21.02.2017 - 16:17

country flag Antonia Von Stumpff wrote:

Ich versteh Ihre Hilfestellung überhaupt nicht. Tut mir leid. Ich stricke in Größe M. Vielleicht können Sie es ein bisschen ausführlicher erklären. Vielen Dank :)

15.02.2017 - 23:25

DROPS Design answered:

Liebe Frau Von Stumpff, in Größe M werden Sie für Raglan so zunehmen: Rumpfteil: in jeder Rd 2x, in jeder 2. Rd: 3 x und in jeder 4. Rd 5 x Gleichzeitig nehmen Sie an den Ärmel so zu: in jeder Rd 6 x, in jeder 2. Rd 4x und in jeder 4. Rd 4x. Dh, bei den beiden ersten Runde werden Sie 8 M pro Runde zunehmen, dann an der nächsten Runde nehmen Sie nur an den Ärmeln zu (+ 4M)... Es wird dann nicht in jeder Zunahmen Runde 8 M zugenommen, aber manchmal nur 4, wie in der Anleitung beschrieben. Viel Spaß beim stricken!

16.02.2017 - 09:42