


Komentáře / Otázky (27)
![]() Kika napsala:
Kika napsala:
He leído que este hilo, Cotton Light, no es recomendable para una colcha de ganchillo. Pero es el que me viene bien por grosor. Crees que podría usarlo igualmente? Mil gracias
01.10.2024 - 13:44Odpověď DROPS Design :
Hola Kika, este hilo tiende a separarse debido a las características suaves y sedosas de las hebras. Pero el hilo se puede usar perfectamente para ganchillo, solo que se tiene que tener cuidado al trabajar y coger el hilo, asegurándose de coger todas las hebras del hilo al trabajar.
06.10.2024 - 14:20
![]() Vero napsala:
Vero napsala:
Is de eerste keer dat ik zo’n patroon volg (behalve dan kleding)… en het klopt volledig… leuk wel, echt niet moeilijk…
31.01.2022 - 23:19
![]() Jacoba napsala:
Jacoba napsala:
De tweede foto is de achterkant van het werk en bovendien onderste boven. Dat is om de steken te begrijpen niet zo handig! Het telpatroon begrijp ik, maar de beschrijving absoluut niet. Heb een proeflapje gemaakt en ga - zodra de katoen binnen is - beginnen!
24.06.2021 - 15:50
![]() Stephanie napsala:
Stephanie napsala:
Ist es richtig, dass ich eine Häkelnadel Nr. 5 verwenden soll? (auf dem Garn steht nämlich Häkelnadel Nr. 4)
13.05.2021 - 12:48Odpověď DROPS Design :
DROPS HÄKELNADEL NR. 5 – oder die benötigte Nadelstärke, um folgende Maschenprobe zu erhalten: 16 Stb in der waagerechten gemessen
14.05.2021 - 09:49
![]() Verena napsala:
Verena napsala:
Hallo! Ist es richtig das ich in Reihe 1. am Ende von * - * 5 LM überspringen muss?
03.07.2020 - 22:23Odpověď DROPS Design :
Liebe Verena, am Ende der 1. Reihe enden Sie mit 1 Stb in jede der 3 letzten Lm - beachten Sie, daß Luftmaschen werden bei dieser Reihe überspringen: Man überspringt in der ersten R in regelmäßigen Abständen 1 Lm, damit der Rand nicht zu stramm und eng wird und elastisch bleibt - in der Regel häkelt man die Lm etwas fester als später die M, um das auszugleichen, schlägt man mehr Lm an. Viel Spaß beim häkeln!
06.07.2020 - 08:04
![]() Marian Dijk napsala:
Marian Dijk napsala:
Goedenavond ik zou graag deze mooie deken willen maken maar dan voor een 2 persoonsbed. Hoeveel steken mag ik dan opzetten??? Groetjes
16.08.2017 - 22:19Odpověď DROPS Design :
Hallo Marian, Het hangt er een beetje vanaf hoe breed je hem wilt hebben. Deze deken is 80 cm breed en er zijn 7 herhalingen in de breedte van het telpatroon. Elke herhaling is 11,5 cm breed. Als je de eerste toer haakt worden er een aantal lossen over geslagen. Op basis van deze informatie kun je uitrekenen hoeveel lossen je op moet zetten.
20.08.2017 - 21:57
![]() Anne Johansen napsala:
Anne Johansen napsala:
Hei. På første omgang sier mønsteret at man skal hoppe over 1 lm mellom hver 3. st. Hva er hensikten med dette? Jeg får bare en "rar" løs kant nederst. Det blir også store rare hull der jeg hopper over 5 lm. Finnes det et bilde av kanten på teppet?
01.08.2017 - 16:58Odpověď DROPS Design :
Hei Anne. Det at du hopper over 1 lm mellom hver 3.stav på 1.rad er for å unngå at det strammer seg på oppleggskanten. Det skal bli et stort hull der du hopper over 5 lm, det er slik du danner sikk-sakk mønsteret, du vil det godt når du har heklet noen rader. God Fornøyelse.
07.08.2017 - 13:47
![]() Charlotte Rietveld napsala:
Charlotte Rietveld napsala:
Klopt dat je 197 losse eerst moet haken en later uitkomt op 126 steken en dan keren en dan heb je 70 steken? Ik begrijp dit niet zo ik hou een hele lap aan losse over hoe kan dit?
23.04.2017 - 20:26Odpověď DROPS Design :
Hallo Charlotte, Ik heb het 2 keer nagerekent en uitgetekent en het aantal lossen dat je op moet zetten klopt. Je moet 194 steken opzetten. In de eerste toer herhaal je het gedeelte tussen de sterretjes nog 5 keer, dus in totaal haak je dat gedeelte 6 keer. Dan kom je op een totaal van 194 lossen. Wellicht ben je ergens een herhaling vergeten?
03.05.2017 - 09:00
![]() Judy napsala:
Judy napsala:
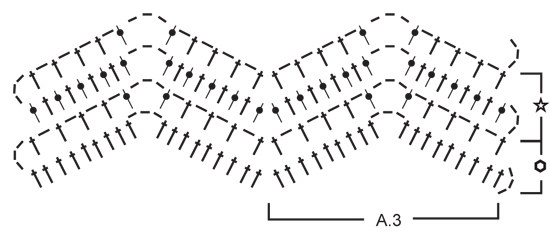
Row 3 is confusing to me...1 dbl crochet into ch and 1 dbl crochet into nxt dbl crochet? Are these stitches to be worked into the ch 1 space or into the actual stitches?..really need a bit of clarification...thx so much...
25.02.2016 - 15:13Odpověď DROPS Design :
Dear Judy, on row 3, you will crochet 1 dc around the ch-space andn 1 dc in next dc - see also diagram A.3 to see how the stitches will be. Happy crocheting!
26.02.2016 - 10:40Sandra napsala:
Kann es sein, dass in Diagramm A.3 ein Fehler ist? Am Beginn von Reihe 1 häkelt man laut Text 3 Wendeluftmaschen (= 1 Stäbchen) und 2 Stäbchen gefolgt von 2x 3er Gruppen Stäbchen, insgesammt also 9 Stäbchen, was dann auch die gleiche Anzahl wäre wie am Ende der Reihe. Im Diagramm sind allerdings 10 Stäbchen eingezeichnet.
02.02.2016 - 08:33Odpověď DROPS Design :
Liebe Sandra, haben Sie gesehen, dass in den ungerade Reihen die Wendeluftmaschen nicht als Stb zählen? Dann stimmt der Text doch mit dem Diagramm überein.
09.03.2016 - 13:46
|
||||||||||||||||||||||||||||||||||||||||||||||
Beach Party#beachpartyplanket |
||||||||||||||||||||||||||||||||||||||||||||||
|
|
||||||||||||||||||||||||||||||||||||||||||||||
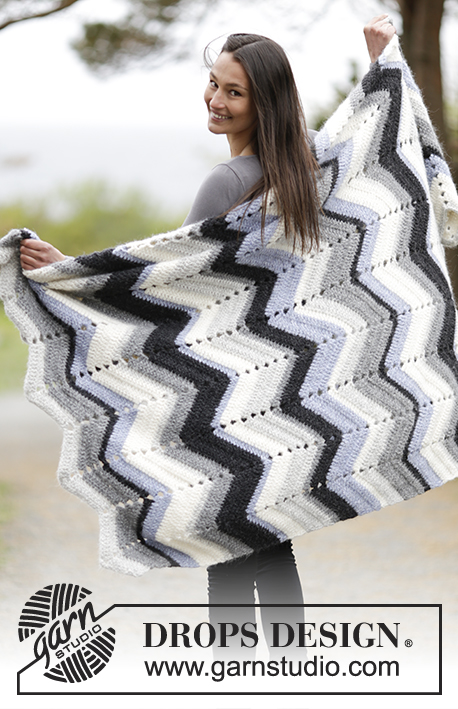
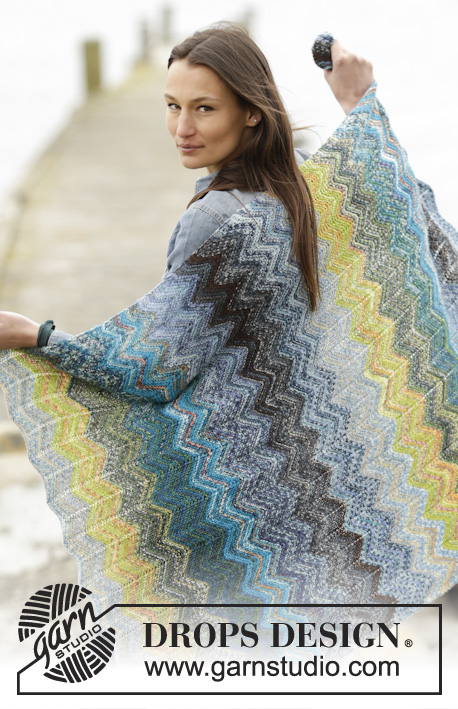
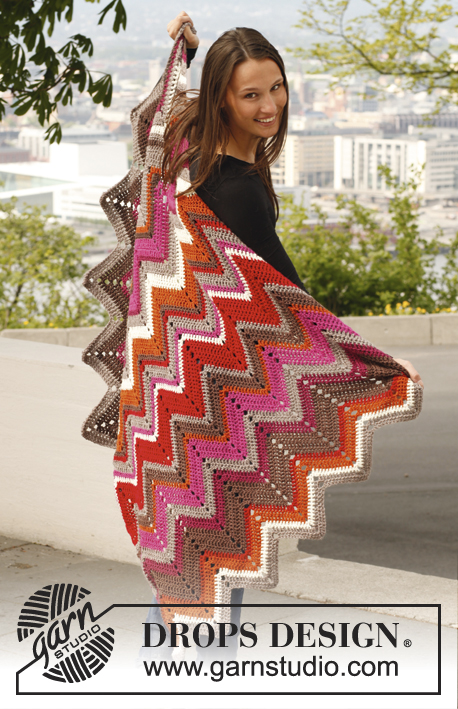
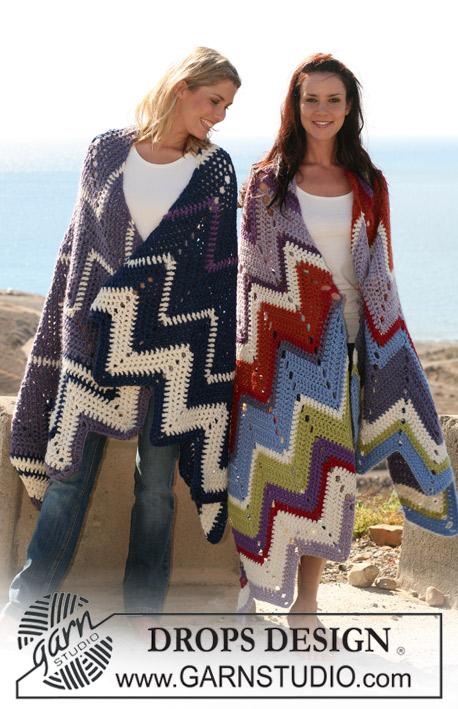
DROPS deka háčkovaná klikatým vzorem z příze "Cotton Light".
DROPS 155-37 |
||||||||||||||||||||||||||||||||||||||||||||||
|
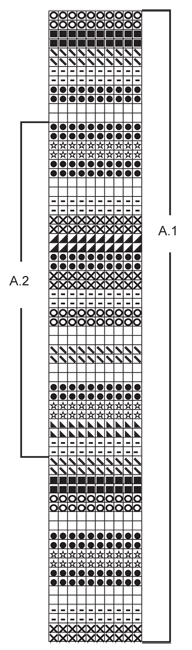
SLED PRUHŮ: Viz schémata A.1 a A.2. Vzor A.1 a vzor A.2 = celkem 52 pruhů. VZOR: Viz schéma A.3. Každý pruh = 2 řady. ---------------------------------------------------------- DEKA: Háčkujeme v řadách. Háčkem č.5 uháčkujeme tmavě růžovou přízí 194 VOLNÝCH řo (vč. 3 řo na otočení) - viz SLED PRUHŮ výše. Pak háčkujeme vzor A.3, tj. postupujeme takto: 1. ŘADA: 1 DS do 4. řo od háčku, po 1 DS do každého z následujících 2 řo, *1 řo, po 1 DS do každého z dalších 3 řo, 1 řo vynecháme, po 1 DS do každého z následujících 3 řo, 3 řo, 1 řo vynecháme, po 1 DS do každého z následujících 3 řo, 1 řo vynecháme, po 1 DS do každého z dalších 3 řo, 1 řo vynecháme, po 1 DS do každého z následujících 3 řo, 5 řo vynecháme, po 1 DS do každého z dalších 3 řo*, *-* opakujeme ještě 5x, 1 řo vynecháme, po 1 DS do každého z následujících 3 řo, 1 řo vynecháme, po 1 DS do každého z dalších 3 řo, 3 řo, 1 řo vynecháme, po 1 DS do každého z následujících 3 řo, 1 řo vynecháme, po 1 DS do každého z následujících 3 řo, 1 řo vynecháme, po 1 DS do každého z dalších 3 řo = 126 DS. Celkem máme 7 klikatých „zubů“. Práci otočíme. 2. ŘADA: 3 řo (= 1 DS), *1 DS do následujícího DS, 1 řo, 1 DS vynecháme, 1 DS do dalšího DS, 1 řo, 1 DS vynecháme, 1 DS do následujícího DS, 1 řo, 1 DS vynecháme, 1 DS do dalšího DS, 1 řo, 1 DS do obloučku z řo, 3 řo, 1 DS do téhož obloučku, 1 řo, 1 DS vynecháme, 1 DS do následujícího DS, 1 řo, 1 DS vynecháme, 1 DS do dalšího DS, 1 řo, 1 DS vynecháme, 1 DS do následujícího DS, 1 řo, 1 DS vynecháme, 1 DS do dalšího DS, 2 DS vynecháme*, *-* opakujeme ještě 6x = 70 DS. Práci otočíme a změníme barvu příze. 3. ŘADA: 3 řo, *1 DS do prvního řo, 1 DS do následujícího DS, 1 DS do následujícího řo, 1 DS do dalšího DS, 1 DS do dalšího řo, 1 DS do následujícího DS, 1 DS do následujícího řo, 1 DS do dalšího DS, 1 DS do obloučku z řo, 3 řo, 1 DS do téhož obloučku, 1 DS do následujícího DS, 1 DS do následujícího řo, 1 DS do dalšího DS, 1 DS do dalšího řo, 1 DS do následujícího DS, 1 DS do následujícího řo, 1 DS do dalšího DS, 1 DS do dalšího řo*, *-* opakujeme ještě 6x = 126 DS. Práci otočíme. 4. ŘADA: 3 řo (= 1 DS), *1 DS do následujícího DS, 1 řo, 1 DS vynecháme, 1 DS do dalšího DS, 1 řo, 1 DS vynecháme, 1 DS do následujícího DS, 1 řo, 1 DS vynecháme, 1 DS do dalšího DS, 1 řo, 1 DS do obloučku z řo, 3 řo, 1 DS do téhož obloučku, 1 řo, 1 DS vynecháme, 1 DS do následujícího DS, 1 řo, 1 DS vynecháme, 1 DS do dalšího DS, 1 řo, 1 DS vynecháme, 1 DS do následujícího DS, 1 řo, 1 DS vynecháme, 1 DS do dalšího DS, 2 DS vynecháme*, *-* opakujeme ještě 6x = 70 DS. Práci otočíme a změníme barvu příze. 3. a 4. řadu opakujeme, dokud neuháčkujeme i poslední řadu dle barevného schématu = celkem máme 52 pruhů. LEM: Po dokončení poslední řady vzoru A.2 háčkujeme lem světle béžovou přízí a podél počáteční řady (tj. první řady řo) stejný lem tmavě růžovou přízí, takto: po 1 KS do každého oka. Přízi odstřihneme a zapošijeme. Zapravíme všechny konce. |
||||||||||||||||||||||||||||||||||||||||||||||
Vysvětlivky ke schématu |
||||||||||||||||||||||||||||||||||||||||||||||
|
||||||||||||||||||||||||||||||||||||||||||||||
|
||||||||||||||||||||||||||||||||||||||||||||||
|
||||||||||||||||||||||||||||||||||||||||||||||
Dokončili jste tento model?Pak označte své fotky tagem #dropspattern #beachpartyplanket nebo je pošlete do galerie #dropsfan. Potřebujete s tímto návodem poradit?Otevřete-li si návod na stránce garnstudio.com, najdete tam 6 výukových video-ukázek, Komentáře/Dotazy a další užitečné informace. © 1982-2025 DROPS Design A/S. Vyhrazujeme si veškerá práva. Tento dokument, včetně všech jeho dílčích částí, podléhá autorským právům. Podrobnější komentář k možnostem užití našich návodů najdete dole pod každým návodem na našich stránkách. |
||||||||||||||||||||||||||||||||||||||||||||||


V oblasti pletené a háčkované módy působí DROPS Design více než 40 let. Díky tomu vám můžeme nabídnout jednu z nejrozsáhlejších kolekcí modelů s bezplatnými návody dostupnými na internetu - navíc v 17 jazycích. K dnešnímu dni máme na 314 katalogů a 11822 návodů celkem - z nich je už 7048 dostupných v [češtině].
Přidejte komentář k návodu DROPS 155-37
Rádi bychom věděli, co si o tomto modelu myslíte!
Pokud se chcete na něco zeptat, dbejte prosím na to, abyste ve formuláři níže vybrali správnou kategorii - díky tomu se dříve dozvíte, co potřebujete vědět. Povinná pole jsou označena *.