Matilda by DROPS Design

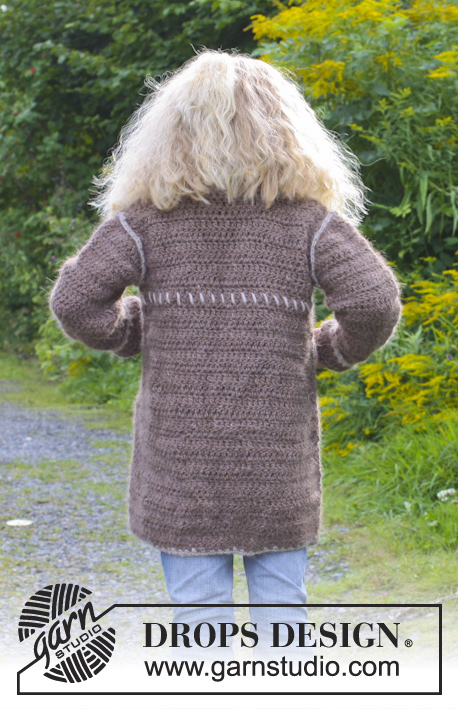
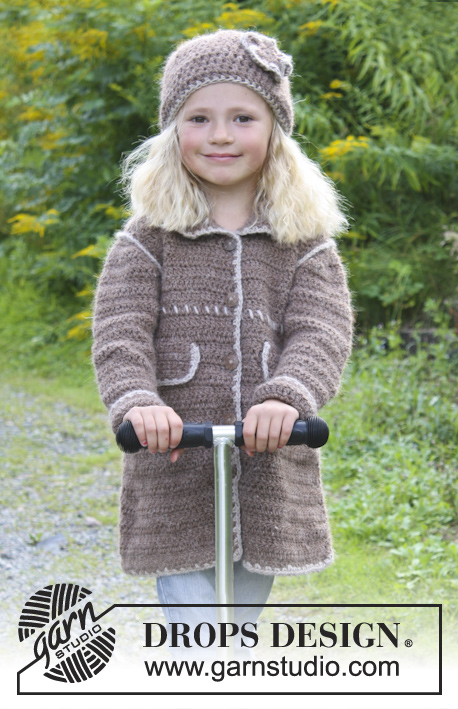
DROPS kabát a čepice s ozdobným obšitím háčkované z příze "DROPS ♥ YOU #4" nebo "Nepal".

DROPS Extra 0-938
DROPS design: model č. ne-015-bn
Skupina přízí: C
-----------------------------------------------------------
KABÁT:
Velikost: 3/4 - 5/6 - 7/8 - 9/10 - 11/12 let
Velikost v cm: 98/104 - 110/116 - 122/128 - 134/140 - 146/152

Materiál:
DROPS ♥ YOU #4 firmy Garnstudio
400-450-500-550-600 g, barva č.0607, světlá hnědá
50-50-50-50-50 g, barva č.0282, béžová
nebo:
DROPS NEPAL firmy Garnstudio
400-450-500-550-600 g, barva č.0618, camel
50-50-50-50-50, barva č.0206, světlá béžová.

DROPS HÁČEK č.6 – nebo velikosti potřebné k uháčkování zkušebního vzorku o rozměrech 12 DS x 6 řad = 10 x 10 cm.
DROPS KOKOSOVÝ KNOFLÍK č.515 (průměr 20 mm): 5-5-5-6-6 ks.

---------------------------------------

ČEPICE:
Velikost: 3/5 - 6/9 - 10/12 let
Obvod hlavy: 50/52 - 52/54 - 54/58 cm

Materiál:
DROPS ♥ YOU #4 firmy Garnstudio
100-100-100 g, barva č.0607, světlá hnědá
Zbytek v barvě č.0282, béžová – na ozdobení.
nebo:
DROPS NEPAL firmy Garnstudio
100-100-100 g, barva č.0618, camel
Zbytek v barvě č.0206, světlá béžová – na ozdobení.

DROPS HÁČEK č.6 – nebo velikosti potřebné k uháčkování zkušebního vzorku o rozměrech 12 DS x 6 řad = 10 x 10 cm.

-------------------------------------------------------

Náhradní příze – Podívejte se, jak změnit přízi
Skupina přízí A až F – Neměňte návod, změňte přízi
Spotřeba příze při použití náhradní příze – Využijte náš převodník

-------------------------------------------------------


65% vlna, 35% alpaka
od 50.00 Kč /50g
DROPS Nepal uni colour DROPS Nepal uni colour 50.00 Kč /50g
Příze a Jehlice
Objednat
DROPS Nepal mix DROPS Nepal mix 54.00 Kč /50g
Příze a Jehlice
Objednat
needles Jehlice a háčky
Přízi na tento model můžete mít už za 550Kč. Více zde.

Návod

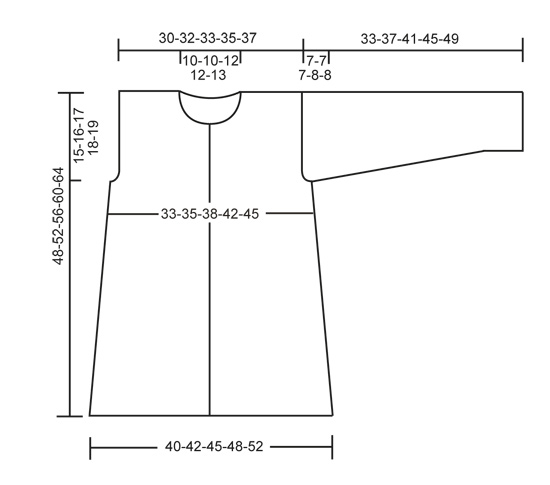
TIP - KABÁT:
První DS v řadě nahrazujeme 3 řo.

TIP – UJÍMÁNÍ (KABÁT):
1 DS ujmeme sháčkováním 2 DS dohromady, takto:
Háčkujeme 1 DS do prvního DS, ale nedokončíme jej – před posledním protažením příze začneme háčkovat další DS a při jeho dokončování protáhneme přízi všemi 3 smyčkami na háčku.
2 DS ujmeme sháčkováním 3 DS dohromady, takto:
Háčkujeme 1 DS do prvního DS, ale nedokončíme jej – před posledním protažením příze začneme háčkovat další DS, ale opět jej nedokončíme a před posledním protažením příze uháčkujeme 3. DS; při jeho dokončování pak protáhneme přízi všemi 4 smyčkami na háčku.

TIP - ČEPICE:
První DS na začátku každé kruhové řady DS nahrazujeme 3 řo. Každou kruhovou řadu končíme 1 pevným okem do 3. řo ze začátku kruhové řady.
První KS na začátku každé kruhové řady KS nahrazujeme 1 řo. Každou kruhovou řadu končíme 1 pevným okem do 1. řo ze začátku kruhové řady.

TIP – PŘIDÁVÁNÍ (ČEPICE):
Přidáváme rozháčkováním 1 DS na dva (tj. do 1 DS uháčkujeme 2 DS).
--------------------------------------------------------

KABÁT
ZADNÍ DÍL:
Háčkem č.6 uháčkujeme světle hnědou přízí 61-63-68-73-78 řo. Práci otočíme, uháčkujeme 1 DS do 4. řo od háčku a pokračujeme 1 DS do každého z následujících 2-4-4-4-4 řo, *1 řo vynecháme, po 1 DS do každého z následujících 4 řo*, *-* opakujeme v průběhu celé řady = 48-50-54-58-62 DS – viz TIP! Pokračujeme řadami DS.
Ve výši 15 cm ujmeme na každé straně 1 DS – sháčkujeme dohromady druhý a třetí DS a pak 2 DS od konce řady – viz TIP - UJÍMÁNÍ! Ujímání opakujeme vždy po 5-5-6-6-7 cm výšky ještě 3x = 40-42-46-50-54 DS. Ve výši 33-36-39-42-45 cm začneme tvarovat průramky – ujímáme na každé straně, takto: nad prvními 2-2-3-4-5 DS háčkujeme pevná oka, pokračujeme DS až po poslední 2-2-3-4-5 DS v řadě, práci otočíme. Pokračujeme DS, v řadě nyní máme 36-38-40-42-44 DS.
Pokračujeme do výše asi 47-51-55-59-63 cm. Nyní háčkujeme 1 řadu DS jen nad vnějšími 12-13-13-14-14 DS na každé straně dílu = náramenice (prostředních 12-12-14-14-16 DS = průkrčník). Přízi odstřihneme a zapošijeme.

PRAVÝ PŘEDNÍ DÍL:
Háčkem č.6 uháčkujeme světle hnědou přízí 34-36-38-41-43 řo. Práci otočíme, uháčkujeme 1 DS do 4. řo od háčku a pokračujeme 1 DS do každého z následujících 5-2-4-2-4 řo, *1 řo vynecháme, po 1 DS do každého z následujících 4 řo*, *-* opakujeme v průběhu celé řady = 27-28-30-32-34 DS. Pokračujeme řadami DS (3 krajní DS u okraje předního dílu = léga). Ve výši 15 cm začneme na boční straně ujímat – stejně jako u zadního dílu. Po dokončení ujímání zbývá v řadě 23-24-26-28-30 DS. Ve výši 33-36-39-42-45 cm přestaneme háčkovat nad krajními 2-2-3-4-5 DS na boční straně. Nad zbylými 21-22-23-24-25 DS háčkujeme dále řadami DS. Ve výši 43-47-50-54-57 cm přestaneme háčkovat nad krajními 7-7-8-8-9 DS u předního okraje. Na této straně dále ujímáme po 1 DS: v následujících 2 řadách sháčkujeme předposlední 2 DS dohromady = 12-13-13-14-14 DS náramenice.
Ve výši 48-52-56-60-64 cm přízi odstřihneme a zapošijeme.

LEVÝ PŘEDNÍ DÍL:
Háčkujeme stejně jako pravý přední díl, jen zrcadlově převrácený.

RUKÁV:
Háčkem č.6 uháčkujeme světle hnědou přízí 32-32-32-39-39 řo. Práci otočíme, uháčkujeme 1 KS do 2. řo od háčku a pokračujeme 1 KS do každého z následujících 5-5-5-2-2 řo, *1 řo vynecháme, po 1 KS do každého z následujících 4 řo*, *-* opakujeme v průběhu celé řady = 26-26-26-31-31 KS (první řo v řadě NEpočítáme jako KS). Práci otočíme a pokračujeme 1 DS do každého KS. Ve výši 10 cm přidáme na každé straně 1 DS – druhý a předposlední DS v řadě rozháčkujeme na 2. Přidávání opakujeme vždy po 2-2-2-3-3 řadách ještě 3-4-5-4-5x = 34-36-38-41-43 DS.
Ve výši 26-30-34-37-41 cm začneme tvarovat rukávovou hlavici: nad prvními 3 DS háčkujeme pevná oka, pokračujeme DS až po poslední 3 DS v řadě, práci otočíme. Uháčkujeme 3 řo, následující 3 DS sháčkujeme dohromady – viz TIP - UJÍMÁNÍ! Háčkujeme DS až po poslední 4 DS v řadě, následující 3 DS sháčkujeme dohromady, 1 DS do posledního DS. Takto pokračujeme – v každé řadě sháčkujeme poslední 3 DS v řadě dohromady – až do výše 33-37-41-45-49 cm. Přízi odstřihneme a zapošijeme.

DOKONČENÍ:
Sešijeme náramenice, postranní a rukávové švy. Vsadíme rukávy.
Na levý přední díl přišijeme knoflíky: horní knoflík umístíme asi 2 cm pod průkrčník (začátek límce), dolní knoflík asi 12 cm nad dolní okraj kabátu. Ostatní knoflíky rovnoměrně rozmístíme mezi tyto dva krajní. Knoflíky zapínáme do légy pravého předního dílu.

LÍMEC:
Háčkem č.6 uháčkujeme světle hnědou přízí po obvodu průkrčníku 35-50 KS. Pokračujeme řadami KS až je límec vysoký asi 6-7-7-8-8 cm. Pak přízi odstřihneme a zapošijeme.

ŠIKMÉ STEHY:
Béžovou přízí vyšijeme ozdobné šikmé stehy na hrudi i zádech, asi 1-2 cm pod průramky. Stehy by měly být dlouhé asi 1,5 cm a rozestupy mezi nimi by měly být asi 1,5 cm.

OZDOBNÉ KAPESNÍ KLOPA:
Háčkem č.6 uháčkujeme světle hnědou přízí 18-18-20-20-22-22 řo (vč. 1 řo na otočení).
1. řadu háčkujeme takto: 1 KS do 2. řo, po 1 KS do každého z následujících 2 řo, 1 řo vynecháme, *po 1 KS do každého z následujících 3 řo, 1 řo vynecháme*, *-* opakujeme a končíme 1 KS do každého z posledních 1-1-3-3-1-1 řo = 13-13-15-15-16-16 KS. Pokračujeme řadami KS až uháčkujeme asi 6-6-6-7-7-7 cm výšky. Pak přízi odstřihneme a zapošijeme. Stejným způsobem uháčkujeme i druhou klopu.
Klopy přišijeme asi 3-5 cm pod šikmé stehy na předních dílech – přišíváme je drobnými stehy po celé šířce horní hrany, nakonec ještě přichytíme oba dolní rohy klopy.

OBHÁČKOVÁNÍ:
Háčkem č.6 obháčkujeme béžovou přízí všechny okraje kabátu – začínáme uprostřed zadní strany límce. Uháčkujeme 1 KS, *1 řo, asi 1 cm vynecháme, 1 KS do následujícího oka*, *-* opakujeme podél celého límce, dolů podél předního dílu, kolem dolního okraje, nahoru podél druhého předního dílu a druhé strany límce. Končíme 1 pevným okem do KS ze začátku kruhové řady.
Stejným způsobem obháčkujeme okraje rukávů i kapesních klop.

OBHÁČKOVÁNÍ průramků:
Obháčkujeme průramky – v místech, kde jsou vsazovány rukávy (překryjeme tak vzniklý šev). Háčkujeme háčkem č.6 a začínáme uprostřed podpaží. Uháčkujeme 1 KS, *1 řo, asi 1 cm vynecháme, 1 KS*, *-* opakujeme po celém obvodu průramku a končíme 1 pevným okem do prvního KS ze začátku kruhové řady.

--------------------------------------------

ČEPICE:
Háčkujeme shora dolů, od vrcholku k lemu.
Háčkem č.6 uháčkujeme světle hnědou přízí 4 řo a spojíme je pevným okem do kroužku.
1. KRUHOVÁ ŘADA: Viz TIP! Do kroužku z řo uháčkujeme 8 DS.
2. KRUHOVÁ ŘADA: po 2 DS do každého DS v průběhu celé kruhové řady = 16 DS.
3. KRUHOVÁ ŘADA: *1 DS do prvního DS, 2 DS do následujícího DS*, *-* opakujeme v průběhu celé kruhové řady = 24 DS.
4. KRUHOVÁ ŘADA: *po 1 DS do každého z prvních 2 DS, 2 DS do následujícího DS*, *-* opakujeme v průběhu celé kruhové řady = 32 DS.
5. KRUHOVÁ ŘADA: *po 1 DS do každého z prvních 3 DS, 2 DS do následujícího DS*, *-* opakujeme v průběhu celé kruhové řady = 40 DS.
6. KRUHOVÁ ŘADA: *po 1 DS do každého z prvních 4 DS, 2 DS do následujícího DS*, *-* opakujeme v průběhu celé kruhové řady = 48 DS.
7. KRUHOVÁ ŘADA: *po 1 DS do každého z prvních 5 DS, 2 DS do následujícího DS*, *-* opakujeme v průběhu celé kruhové řady = 56 DS. Pro velikost 3/5 let zde přidávání končí.
8. KRUHOVÁ ŘADA – PLATÍ POUZE PRO VELIKOSTI 6/9 – 10/12 let: háčkujeme po 1 DS do každého DS a SOUČASNĚ přidáme rovnoměrně 3-6 DS (viz TIP - PŘIDÁVÁNÍ!) = 59-62 DS.
VŠECHNY VELIKOSTI: Nyní háčkujeme po 1 DS do každého DS v každé kruhové řadě až do výše asi 18-19-20 cm (= celková výše čepice). Přízi změníme na béžovou a háčkujeme po 1 KS do každého DS v průběhu celé kruhové řady. Přízi odstřihneme a zapošijeme.

KYTIČKA:
Háčkem č.6 uháčkujeme světle hnědou přízí 6 řo a spojíme je pevným okem do kroužku.
1. KRUHOVÁ ŘADA: 1 řo, do kroužku z řo 1 PDS, *7 řo, 1 pevné oko vpíchnuté pod 2 nitě na přední straně předcházejícího PDS, 2 PDS do kroužku z řo*, *-* opakujeme, až máme uháčkováno 5 obloučků z řo, 7 řo, 1 pevné oko vpíchnuté pod 2 nitě na přední straně předcházejícího PDS, 1 PDS do kroužku z řo a končíme 1 pevným okem do 1. řo ze začátku kruhové řady.
2. KRUHOVÁ ŘADA: pevná oka po první oblouček z řo, 1 řo, 12 PDS do obloučku z řo, *12 PDS do následujícího obloučku z řo*, *-* opakujeme u všech obloučků z řo a končíme 1 pevným okem do 1. řo ze začátku kruhové řady. Přízi odstřihneme a zapošijeme.
3. KRUHOVÁ ŘADA: přízi změníme na béžovou a háčkujeme 1 pevné oko do druhého PDS z 1. kruhové řady, 1 řo, 1 KS do téhož oka. Obloučky z řo ohneme směrem k sobě a za zadní stranu všech PDS háčkujeme po 1 KS – vpichujeme pod 1 nit na zadní straně každého PDS (přední strana PDS z předchozí kruhové řady vstoupí do popředí a je na přední straně jasně patrná). Mezi obloučky háčkujeme 1 velmi volný KS do druhého PDS z 1. kruhové řady. Končíme 1 pevným okem do prvního řo ze začátku kruhové řady. Přízi odstřihneme a zapošijeme.

DOKONČENÍ:
Kytičku přišijeme na čepici a zapošijeme konce přízí.

Schéma

diagram measurements

Potřebujete poradit s tímto návodem?

Děkujeme, že jste si vybrali návod DROPS Design. Zakládáme si na tom, že dáváme k dispozici návody ověřené a snadno srozumitelné. Všechny návody jsou přeložené z norského originálu a tak si můžete kdykoli srovnat rozměry a počty s původním návodem (DROPS Extra 0-938) .

Máte s návodem potíže? Níže najdete seznam odkazů, které vám pomohou dokončit vaše dílo co nejdříve - nebo se třeba přiučit něco nového.

signature-image signature

Máte s návodem potíže? Níže najdete seznam odkazů, které vám pomohou dokončit vaše dílo co nejdříve - nebo se třeba přiučit něco nového.

Máme takopodrobné rozpisy různých technik a postupů krok za krokem - najdete je zde.

1) Why is the knitting/crochet tension so important?

Knitting tension is what determines the final measurements of your work, and is usually measured per 10 x 10 cm. It is provided like so: number of stitches in width x number of rows in height - eg: 19 stitches x 26 rows = 10 x 10 cm.

The knitting tension is very individual; some people knit/crochet loosely while others work tightly. You adjust the knitting tension with the needle size, which is why the suggested needle size only serve as a guide! You need to adjust this (up or down) to ensure that YOUR knitting tension matches the knitting tension provided in the pattern. If you work with a different knitting tension than provided you will have a different yarn consumption, and your work will have different measurements than what the pattern suggests.

The knitting tension also determines which yarns can replace each other. As long as you achieve the same knitting tension you can replace one yarn with another.

See DROPS lesson: How to measure your tension/gauge

See DROPS video: How to make a gauge tension swatch

nahoru

2) What are the yarn groups?

All our yarns are categorised into yarn groups (from A to F) according to thickness and knitting tension – group A contains the thinnest yarns and group F the thickest. This makes it easier for you to find alternative yarns to our patterns, should you wish to switch yarn. All yarns within the same group have a similar knitting tension and can easily replace each other. However, different yarn qualities have different structures and properties which will give the finished work a unique look and feel.

Click here for an overview of the yarns in each yarn group

nahoru

3) Can I use a different yarn than what the pattern suggests?

The important thing when changing from one yarn to another is that the knitting/crochet tension remains the same. This is so that the measurements of the finished piece will be the same as on the sketch provided. It is easier to achieve the same knitting tension using yarns from the same yarn group. It is also possible to work with multiple strands of a thinner yarn to achieve the knitting tension of a thicker one. Please try our yarn converter. We recommend you to always work a test swatch.

Please NOTE: when changing yarn the garment might have a different look and feel to the garment in the photo, due to individual properties and qualities of each yarn.

See DROPS lesson: Can I use a different yarn than the one mentioned in the pattern?

nahoru

4) How do I use the yarn converter?

At the top of all our patterns you’ll find a link to our yarn converter, which is a helpful tool should you wish to use a different yarn than suggested. By filling in the yarn quality you wish to replace, the amount (in your size) and number of strands, the converter will present good alternative yarns with the same knitting tension. Additionally it will tell you how much you’ll require in the new qualities and whether you’ll need to work with multiple strands. Most skeins are 50g (some are 25g or 100g).

If the pattern is worked with multiple colours, every colour will have to be converted separately. Similarly, if the pattern is worked with several strands of different yarns (for example 1 strand Alpaca and 1 strand Kid-Silk) you will have to find alternatives for each, individually.

Click here to see our yarn converter

nahoru

5) Why do I get the wrong knitting tension with the suggested needle size?

The needle size provided in the pattern serves only as a guide, the important thing is to follow the knitting tension. And since knitting tension is very individual, you will have to adjust the needle size to ensure that YOUR tension is the same as in the pattern – maybe you’ll have to adjust 1, or even 2 needle sizes, up or down to achieve the correct tension. For this, we recommend that you work test swatches.

Should you work with a different knitting tension than the one provided, the measurements of the finished garment might deviate from the measurement sketch.

See DROPS lesson: How to measure your tension/gauge

See DROPS video: How to make a gauge tension swatch

nahoru

6) Why is the pattern worked top-down?

Working a garment top-down provides more flexibility and room for personal adjustment. For example it is easier to try the garment on while working, as well as making adjustments to length of yoke and shoulder caps.

The instructions are carefully explaining every step, in the correct order. Diagrams are adjusted to the knitting direction and are worked as usual.

nahoru

7) Why are the sleeves shorter in larger sizes?

The total width of the garment (from wrist-to-wrist) will be larger in the larger sizes, despite the actual sleeves being shorter. The larger sizes have longer sleeve caps and wider shoulders, so there will be a good fit in all sizes.

nahoru

8) What is a repeat?

Diagrams are often repeated on the round or in height. 1 repeat is the diagram the way it appears in the pattern. If it says to work 5 repeats of A.1 in the round, then you work A.1 a total of 5 times after/next to each other in the round. If it says to work 2 repeats of A.1 vertically/in height you work the entire diagram once, then begin again at the start and work the entire diagram one more time.

nahoru

9) How do I work according to a knitting diagram?

The diagram depicts all rows/rounds, and every stitch seen from the right side. It is read from bottom to top, from right to left. 1 square = 1 stitch.

When working back and forth, every other row is worked from the right side and every other row is worked from the wrong side. When working from the wrong side, the diagram will have to be worked reversed: from left to right, knit stitches are purled, purl stitches are knit etc.

When working in the round every round is worked from the right side and the diagram are worked from right to left on all rounds.

See DROPS lesson: How to read knitting diagrams

nahoru

10) How do I work according to a crochet diagram?

The diagram depicts all rows/rounds, and every stitch seen from the right side. It is worked from bottom to top, from right to left.

When working back and forth every other row is worked from the right side: from right to left and every other row is worked from the wrong side: from left to right.

When working in the round, every row in the diagram are worked from the right side, from right to left.

When working a circular diagram you start in the middle and work your way outwards, counter clockwise, row by row.

The rows usually start with a given number of chain stitches (equivalent to the height of the following stitch), this will either be depicted in the diagram or explained in the pattern.

See DROPS lesson: How to read crochet diagrams

nahoru

11) How do I work several diagrams simultaneously on the same row/round?

Instructions for working several diagrams after each other on the same row/round, will often be written like so: “work A.1, A.2, A.3 a total of 0-0-2-3-4 times". This means you work A.1 once, then A.2 is worked once, and A.3 is repeated (in width) the number of times provided for your size – in this case like so: S = 0 times, M = 0 times, L=2 times, XL= 3 times and XXL = 4 times.

The diagrams are worked as usual: begin with the first row in A.1, then work the first row in A.2 etc.

See DROPS lesson: How to read knitting diagrams

See DROPS lesson: How to read crochet diagrams

nahoru

12) Why does the piece start with more chain stitches than it’s worked with?

Chain stitches are slightly narrower than other stitches and to avoid working the cast-on edge too tight, we simply chain more stitches to begin with. The stitch count will be adjusted on the following row to fit the pattern and measurement sketch.

nahoru

13) Why increase before the rib edge when the piece is worked top-down?

The rib edge is more elastic and will contract slightly compared to, for example, stocking stitch. By increasing before the rib edge, you avoid a visible difference in width between the rib edge and the rest of the body.

nahoru

14) Why increase in the cast-off edge?

It’s very easy to cast off too tightly, and by making yarn overs while casting off (and simultaneously casting these off) you avoid a too tight cast off edge.

See DROPS video: How to bind off with yarn overs (yo)

nahoru

15) How do I increase/decrease on every 3rd and 4th row/round alternately?

To achieve an even increase (or decrease) you can increase on, for example: every 3rd and 4th row alternately, like so: work 2 rows and increase on the 3rd row, work 3 rows and increase on the 4th. Repeat this until the increase is complete.

See DROPS lesson: Increase or decrease 1 st on every 3rd and 4th row alternately

nahoru

16) Why is the pattern slightly different than what I see in the photo?

Pattern repeats can vary slightly in the different sizes, in order to get the correct proportions. If you’re not working the exact same size as the garment in the photo, yours might deviate slightly. This has been carefully developed and adjusted so that the complete impression of the garment is the same in all sizes.

Make sure to follow instructions and diagrams for your size!

nahoru

17) How can I work a jacket in the round instead of back and forth?

Should you prefer to work in the round instead of back and forth, you may of course adjust the pattern. You’ll need to add steeks mid-front (usually 5 stitches), and follow the instructions. When you would normally turn and work from the wrong side, simply work across the steek and continue in the round. At the end you’ll cut the piece open, pick up stitches to work bands, and cover the cut edges.

See DROPS video: How to knit steeks and cut open

nahoru

18) Can I work a jumper back and forth instead of in the round?

Should you prefer to work back and forth instead of in the round, you may of course adjust the pattern so you work the pieces separately and then assemble them at the end. Divide the stitches for the body in 2, add 1 edge stitch in each side (for sewing) and work the front and back pieces separately.

See DROPS lesson: Can I adapt a pattern for circular needles into straight needles?

nahoru

19) Why do you show discontinued yarns in the patterns?

Since different yarns have different qualities and textures we have chosen to keep the original yarn in our patterns. However, you can easily find options among our available qualities by using our yarn converter, or simply pick a yarn from the same yarn group.

It is possible that some retailers still have discontinued yarns in stock, or that someone has a few skeins at home that they would like to find patterns for.

The yarn converter will provide both alternative yarn as well as required amount in the new quality.

nahoru

20) How do I make a women’s size garment into a men’s size one?

If you have found a pattern you like which is available in women’s size it’s not very difficult to convert it to men’s size. The biggest difference will be the length of sleeves and body. Start working on the women size that you think would fit across the chest. The additional length will be worked right before you cast off for the armhole/sleeve cap. If the pattern is worked top-down you can add the length right after the armhole or before the first decrease on sleeve.

Regarding additional yarn amount, this will depend on how much length you add, but it is better with a skein too many than too few.

nahoru

21) How do I prevent a hairy garment from shedding?

All yarns will have excess fibres (from production) that might come off as lint or shedding. Brushed yarns (ie hairier yarns) have more of these loose, excess fibres, causing more shedding.

Shedding also depends on what is worn under or over the garment, and whether this pulls at the yarn fibres. It’s therefore not possible to guarantee that there will be no shedding

Below are some tips on how to get the best result when working with hairier yarns:

1. When the garment is finished (before you wash it) shake it vigorously so the looser hairs come off. NOTE: do NOT use a lint roller, brush or any method that pulls at the yarn.

2. Place the garment in a plastic bag and put it in your freezer - the temperature will cause the fibres to become less attached to each other, and excess fibres will come off easier.

3. Leave in the freezer for a few hours before taking it out and shaking it again.

4. Wash the garment according to the instructions on the yarn label.

nahoru

22) Where on the garment is the length measured?

The measurement sketch/schematic drawing provides information regarding the full length of the garment. If it’s a jumper or a jacket the length is measured from the highest point on the shoulder closest to the neckline, and straight down to the bottom of the garment. It is NOT measured from the tip of shoulder. Similarly, the length of yoke is measured from the highest point on the shoulder and down to where yoke is split into body and sleeves.

On a jacket measures are never taken along bands, unless specifically stated. Always measure inside band stitches when measuring the length.

See DROPS lesson: How to read a schematic drawing

nahoru

23) How do I know how many balls of yarn I need?

The required amount of yarn is provided in grams, eg: 450 g. To calculate how many balls you’ll need you first need to know how many grams are in 1 ball (25g, 50g or 100g). This information is available if you click on the individual yarn quality on our pages. Divide the amount required with the amount of each ball. For example, if each ball is 50g (the most common amount), the calculation will be as follows: 450 / 50 = 9 balls.

nahoru

Pořídili jste si přízi DROPS na tento model? Pak máte taky právo žádat po svém prodejci, u něhož jste nakoupili, pomoc a rady. Seznam DROPS obchodů najdete tady!
Pořád se nemůžete dobrat odpovědi, kterou hledáte? Pak posuňte stránku dolů a napište nám svůj dotaz, naši specialisté se vám pokusí poradit. Obvykle to zvládneme během 5 až 10 pracovních dnů.. Mezitím si můžete pročíst otázky a odpovědi, které k tomuto modelu položili ostatní, nebo navštívit skupinu DROPS Workshop na Facebooku, kde vám může poradit některá spřízněná duše!

Komentáře / Otázky (8)

country flag Ulrika wrote:

Hej jag kan inte hitta knapparna hos er? I kokos? Vilken storlek är det på dem? Och vilka är likvärdiga som dem? Mvh

15.02.2020 - 22:09

DROPS Design answered:

Hej Det är knapp 515 som är 20 mm i diameter och du hittar den under knappar på vår hemsida. Lycka till!

17.02.2020 - 09:27

country flag Ingrid wrote:

,Hejsan! Har gjort denna söta kappa till mitt barn-barn, stor succé. Nu skulle jag ville göra en likadan till mig själv? Hur ska man göra för att få till en stl 38-40?? Vänliga hälsningar Ingrid

14.04.2018 - 18:01

DROPS Design answered:

Tyvärr har vi inte just nu resurser att räkna om mönstret till vuxen stl. Se gärna på våra andra virkmönster i vuxen storlek.

17.04.2018 - 13:39

country flag Myriam Le Corre wrote:

Bonjour comment assemblez vous les côtés de la veste et des manches au crochet ou à l' aiguille à coudre? merci de votre aide

18.09.2016 - 17:40

DROPS Design answered:

Bonjour Mme Le Corre, les 2 peuvent être envisagés, au choix, en tous les cas à ce que la couture ne soit pas trop épaisse, quelle que soit la technique que vous choisissez. Bon crochet!

19.09.2016 - 09:49

country flag Anna wrote:

Ja det läste jag med i mönstret. Så det är inte meningen att man ska göra knapphål då?

04.11.2015 - 20:31

DROPS Design answered:

Nej det är inte meningen, de knäpps bara genom framkanten.

05.11.2015 - 12:20

country flag Anna wrote:

Hej. Ska det inte vara knapphål på kappan? Det står ingenstans att man ska göra knapphål men det står hur man ska sy i knapparna??! Ska knapparna knäppas genom maskorna i kappan bara??

31.10.2015 - 21:33

DROPS Design answered:

Hej Anna, ja precis "Knapparna knäpps genom framkanten på höger framst" Lycka till!

02.11.2015 - 10:07

country flag K.winnemuller wrote:

Ik heb dit vest voor mijn kleindochter gemaakt geweldig het staat haar zo mooi. Nu wil ik van dezelfde wol en voor een jongetje van bijna 2 jaar een truitje maken met een capuchon en voorsluitng met grote knopen. Hebben jullie daar een patroontje van?

21.11.2014 - 19:07

DROPS Design answered:

Hallo. Wij hebben maar een paar gehaakte truien/vesten, klik hier voor het zoekresultaat. Of u kunt proberen dit patroon aan te passen voor een jongetje.

27.11.2014 - 16:08

country flag Irene Heed Dalman wrote:

Hur ska man göra "knapphålen" på Matilda barnkappa?

09.11.2014 - 10:26

DROPS Design answered:

Hej Ireen. Knapparna knäpps genom framkanten på höger framst

10.11.2014 - 11:20

country flag Desiré wrote:

Ik heb deze als beginner gehaakt voor 3/5 jaar. Helaas vond ik hem met toer 7 erbij echt nog te groot. Daarna nog een x gehaakt, maar dan tot toer 6 en toen gestopt met meerderen. Heb er tot 2 x toe een roze toer doorheengehaakt. Resultaat is echt super!! De maat is perfect voor een 3-5 jarige en voor een beginner ook heel goed te haken dit!! Dit wordt echt mn favo muts patroon ben ik bang!! Dank je wel Garnstudio!

29.12.2013 - 18:57

Přidejte komentář k návodu DROPS Extra 0-938

Rádi bychom věděli, co si o tomto modelu myslíte!

Pokud se chcete na něco zeptat, dbejte prosím na to, abyste ve formuláři níže vybrali správnou kategorii - díky tomu se dříve dozvíte, co potřebujete vědět. Povinná pole jsou označena *.