
Popular categories
Looking for a yarn?


Comments / Questions (111)
![]() Andrea wrote:
Andrea wrote:
Liebes Drops-Team, ich habe heute die Wolle bekommen und freue mich auf ein neues Projekt. Gleich am Anfang ergeben sich schon 2 Fragen: - Werden keine Randmaschen gestrickt? Dh ab Reihe 3 werden die 1. und die 2. oder die 2. und die 3. Masche zusemmengestrickt? - Werden die zu vernähenden Fäden eingestrickt oder zum Schluss vernäht? Vielen Dank für eure Hilfe!
10.02.2022 - 11:02DROPS Design answered:
Liebe Andrea, jeder Fächer wird kraus rechts gestrickt, so sind keine extra Randmaschen dazu gezählt. Fäden vernähen Sie, wie Sie es am besten haben, entweder bei dem Farbewechsel oder ganz am Ende. Viel Spaß beim stricken!
10.02.2022 - 13:29
![]() Karin wrote:
Karin wrote:
Die Maschen für die Kreise direkt aus den Fächern , der zwei Hälften aufnehmen und von aussen nach innen stricken. Viel schöner als die Kreise anzunähen.
19.08.2020 - 13:24
![]() Karin wrote:
Karin wrote:
Wenn ich die decke größer stricken will und mehr Fächer in der Breite stricke, (plus 5 A UND 6 A ) geht sich das mit den Kreisen aus? Oder ist es besser in der Höhe? ( G, H, I, J) . Statt 5 kreisen dann 7. Danke
15.05.2020 - 07:16DROPS Design answered:
Liebe Karin, wahrscheinlich passt es in der Breite sowie in der Höhe, wie Sie es am liebsten haben. leider können wir jeder Anleitung nach jedem individuellen Frage anpassen und einzelne Modelle auf individuellen Wunsch hin umrechnen. Wenn sie Hilfe damit brauchen, wenden Sie sich bitte an Ihrem DROPS Laden, dort hilft man Ihnen gerne weiter. Viel Spaß beim stricken!
15.05.2020 - 08:54
![]() Dietje wrote:
Dietje wrote:
Goedendag, Ik vind deze deken echt prachtig, maar ben niet zo thuis in breien. Is er een soortgelijk patroon om te haken? De cirkels lukt wel maar hoe tel ik de waaiers uit? Ik ben benieuwd.
03.04.2019 - 17:31DROPS Design answered:
Dag Dietje
Helaas is er niet een dergelijk haakpatroon voor deze deken. Je kan natuurlijk wel even zoeken bij de haakpatronen voor dekens.
De waaiers worden gaandeweg tijdens het breien aan elkaar gebreid, tijdens het breien wordt dit wel duidelijk als je gewoon het patroon volgt. Onderaan het patroon staat een schema, zodat je kunt zien waar welke waaiers komen.
04.04.2019 - 08:06
![]() Ann wrote:
Ann wrote:
Når I nu har konstateret, at garnmængden på alpaca kun skal være 100 g, hvorfor retter I det så ikke oppe i toppen, hvor man finder oplysninger om garnforbrug? Nu har jeg lige bestilt garn, og kan regne ud, at jeg har købt 150 g for meget! Ret irriterende..
18.02.2019 - 21:39DROPS Design answered:
hei Ann. Beklager det, det var en glipp i den danske oppskriften. Det er nå blitt rettet. Jeg vil anta at du kan returnere det garnet som er kjøpt for mye og få pengene tilbake for det. Igjen, beklager det og god fornøyelse
20.02.2019 - 15:39
![]() Pitha wrote:
Pitha wrote:
Die kleur is niet olijfgroen. maar turqoise.
31.08.2018 - 22:33
![]() Karin Larsen wrote:
Karin Larsen wrote:
Hvor mange vifter skal man strikke , og hvor mange halv vifter skal man strikke
03.03.2017 - 15:35DROPS Design answered:
Hej Karin. Det er ikke angivet i opskriften, saa det ved jeg ikke. Du skal fölge opskriften til de maal der angives: 75 cm og afslutte med 4 hele og 2 halve vifter - du strikker 2 dele paa denne maade. Og de to dele forbinder du med 5 cirkler. Jeg synes at kunne se 7 eller 8 raekker paa billedet. Men er din strikkefasthed i orden og fölger opskriften, saa bliver det korrekt :)
06.03.2017 - 14:59
![]() Nanny Nørgård wrote:
Nanny Nørgård wrote:
Er meget tæt på at være færdig med tæppet, men mangler 1 række på sidste halvdel af tæppet. Har ikke mere DROPS DELIGHT, til gengæld 3 overskydende DROPS ALPACA. HVAD GØR JEG?? Så gi´r Pia ret i hendes kommentar 21.11.13, da jeg har fået det rigtige antal nøgler iflg. opskriften og min strikkefasthed stemmer. Med venlig hilsen Nanny Nørgård P.S.: Vil mene at jeg kan færdiggøre tæppet med 1 nøgle mere af DROPS DELIGHT farve nr. 10, oliven/rust/blomme
23.03.2015 - 14:56DROPS Design answered:
Hej Nanny, Vi skal lade din kommentar gå videre til design, jeg kan se at garnforbruget er rettet tidligere. God fornøjelse!
18.05.2015 - 11:23
![]() Kerstin wrote:
Kerstin wrote:
Habe jetzt die beiden Hälften dieser wunderbaren Decke gestrickt. Wofür benötige ich fünf Kreise? Wenn ich die beiden Hälften zusammenlege, sieht es aus als würde ich 4 Kreise und zwei halbe benötigen. Was mache ich falsch? Vielen Dank
25.06.2014 - 21:32DROPS Design answered:
Liebe Kerstin, am besten ist auf dem Foto zu sehen, wo Sie die 5 Kreise platzieren müssen bzw. wie sie angeordnet sind. Sie sehen ja ganz oben in der Mitte den ersten Kreis (der unterste 5. Kreis ist dann nicht mehr zu sehen, aber der untere Rand sieht ja wie der obere aus). Halbe Kreise benötigen Sie daher eigentlich nicht. Und in der Schemazeichnung unter der Anleitung sehen Sie, wie die halben Fächer am Rand angeordnet sind.
27.06.2014 - 14:41
![]() Ursula wrote:
Ursula wrote:
Habe diese Decke gestrickt, ging überraschend schnell. Meine Familie und Freunde sind begeistert.
03.05.2014 - 14:11
|
|
Over The Rainbow#overtherainbowblanket |
|
|
|
|
Knitted DROPS blanket with fans in "Delight" and "Alpaca".
DROPS 149-46 |
|
|
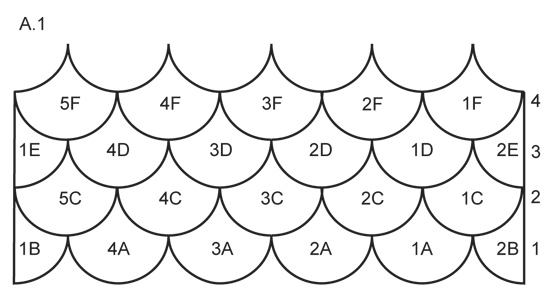
GARTER ST (back and forth on needle): K all rows. 1 ridge = 2 rows K. PATTERN: Diagram A.1 shows the entire bottom part on blanket with fan pattern, seen from RS. ---------------------------------------------------------- BLANKET: Blanket consists of several fans worked together along the way. Beg at the bottom of blanket in the order fans are numbered - see A.1. Work 2 parts that are sewn tog in the middle so that blanket is the same in both sides. Always pick up new sts from RS. The first 2 rows on every fan are worked with Alpaca, then finish fan with Delight. FAN 1A: Cast on 61 sts on circular needle size 4.5 mm with Alpaca and work as follows: Row 1 (= RS): K all sts. Row 2 (= WS): K all sts. Row 3: Switch to Delight, K 2 tog, K 9, * slip 1 st as if to K, K 2 tog, psso, K 6 *, repeat from *-* 5 times in total, K 3, K 2 tog = 49 sts. Row 4-10: K all sts. Row 11: K 2 tog, K 7, * slip 1 st as if to K, K 2 tog, psso, K 4 *, repeat from *-* 5 times in total, K 3, K 2 tog = 37 sts. Row 12-18: K all sts. Row 19: K 2 tog, K 5, * slip 1 st as if to K, K 2 tog, psso, K 7 *, repeat from *-* 2 times in total, slip 1 st as if to K, K 2 tog, psso, K 5, K 2 tog = 29 sts. Row 20-26: K all sts. Row 27: K 2 tog, K 3, * slip 1 st as if to K, K 2 tog, psso, K 5 *, repeat from *-* 2 times in total, slip 1 st as if to K, K 2 tog, psso, K 3, K 2 tog = 21 sts. Row 28-34: K all sts. Row 35: K 2 tog, K 7, slip 1 st as if to K, K 2 tog, psso, K 7, K 2 tog = 17 sts. Row 36-42: K all sts. Row 43: K 2 tog, K 5, slip 1 st as if to K, K 2 tog, psso, K 5, K 2 tog = 13 sts. Row 44-48: K all sts. Row 49: K 2 tog, K 3, slip 1 st as if to K, K 2 tog, psso, K 3, K 2 tog = 9 sts. Row 50-54: K all sts. Row 55: K 2 tog, K 1, slip 1 st as if to K, K 2 tog, psso, K 1, K 2 tog = 5 sts. Row 56-58: K all sts. Row 59: K 1, slip 1 st as if to K, K 2 tog, psso, K 1 = 3 sts. Row 60: K all sts. Row 61: Slip 1 st as if to K, K 2 tog, psso = 1 st. Cut the yarn, pull it through st and fasten. Work FAN 2A, 3A etc. on 1st row the same way. HALF FAN IN LEFT SIDE – FAN 1B: Cast on 31 sts on needle with Alpaca and work as follows: Row 1 (= RS): K all sts. Row 2 (= WS): K all sts. Row 3: Switch to Delight, K 2 tog, K 9, * slip 1 st as if to K, K 2 tog, psso, K 6 *, repeat from *-* 2 times in total, slip 1 st as if to K, K 1, psso = 25 sts. Row 4-10: K all sts. Row 11: K 2 tog, K 7, * slip 1 st as if to K, K 2 tog, psso, K 4 *, repeat from *-* 2 times in total, slip 1 st as if to K, K 1, psso = 19 sts. Row 12-18: K all sts. Row 19: K 2 tog, K 5, slip 1 st as if to K, K 2 tog, psso, K 7, slip 1 st as if to K, K 1, psso = 15 sts. Row 20-26: K all sts. Row 27: K 2 tog, K 3, slip 1 st as if to K, K 2 tog, psso, K 5, slip 1 st as if to K, K 1, psso = 11 sts. Row 28-34: K all sts. Row 35: K 2 tog, K 7, slip 1 st as if to K, K 1, psso = 9 sts. Row 36-42: K all sts. Row 43: K 2 tog, K 5, slip 1 st as if to K, K 1, psso = 7 sts. Row 44-48: K all sts. Row 49: K 2 tog, K 3, slip 1 st as if to K, K 1, psso = 5 sts. Row 50-54: K all sts. Row 55: K 2 tog, K 1, slip 1 st as if to K, K 1, psso = 3 sts. Row 56-60: K all sts. Row 61: Slip 1 st as if to K, K 2 tog, psso = 1 st. Cut the yarn, pull it through st and fasten. HALF FAN IN RIGHT SIDE – FAN 2B: Cast on 31 sts with Alpaca and work as fan 1B but reversed (i.e. on 3rd-11th-19th-27th-35th-43rd-49th-55th and 61st row read sentence backwards, but beg with K 2 tog and finish with slip 1 st as if to K, K 1, psso – E.g. work 3rd row as follows: K 2 tog, * K 6, slip 1 st as if to K, K 2 tog, psso *, repeat from *-* 2 times in total, K 9, slip 1 st as if to K, K 1, psso = 25 sts). First row with fans has now been worked. FAN 1C: Pick up 30 sts with Alpaca along FAN 2B's left edge (seen from RS), and pick up 31 sts along FAN 1A's right edge (seen from RS) = 61 sts on needle. Then work FAN 1A but from 2nd row (i.e. beg with K from WS). Work FAN 2C, 3C, 4C and 5C on 2nd row the same way – see placement in diagram A.1. Second row with fans has now been worked. Work FAN 1D, 2D, 3D and 4D on 3rd row the same way – see placement in diagram A.1, but when picking up, do as follows (example explains fan 1D): Pick up 30 sts with Alpaca along FAN 1C's left edge (seen from RS), pick up 1 st at the top of tip on FAN 1A and finally pick up 30 sts along FAN 2C's right edge (seen from RS) = 61 sts on needle. FAN 1E: Pick up 30 sts with Alpaca along left edge (seen from RS) on last fan on 2nd row, pick in addition up 1 st in the tip at the top on FAN 1B = 31 sts on needle. Then work FAN 1B but from 2nd row (i.e. beg with K from WS). FAN 2E: Pick up 1 st with Alpaca in the tip at the top on FAN 2B, then pick up 30 sts along FAN 1C's right edge (seen from RS) = 31 sts on needle. Then work FAN 2B but from 2nd row (i.e. beg with K from WS). Third row with fans has now been worked. FAN 1F: Pick up 30 sts with Alpaca along FAN 2E's left edge (seen from RS), pick up 1 st at the top of tip on FAN 1C and then pick up 30 sts along FAN 1D's right edge (seen from RS) = 61 sts on needle. Then work FAN 1A but from 2nd row (i.e. beg with K from WS). Work FAN 2F, 3F, 4F and 5F the same way. Continue like this upwards (repeat the last 2 rows with fans) until blanket measures 75 cm, finish after a row with 4 whole and 2 half fans. Put piece aside and knit another part the same way. CIRCLE: Work 5 circles that are sewn on to the middle of blanket. Work in the round on double pointed needles from centre and outwards. Cast on 6 sts evenly on 3 double pointed needles size 4.5 mm (= 2 sts per needle) with Delight. ROUND 1: P all sts. ROUND 2: K all sts. ROUND 3: Work * P 1, 1 YO *, repeat from *-* = 12 sts. ROUND 4: K all sts, K the YOs twisted (i.e. work in back loop of sts instead of front to avoid holes). ROUND 5: P all sts. ROUND 6: K all sts. Now continue to work on 7 double pointed needles. Distribute sts evenly on 6 double pointed needles so that there are 2 sts per needle. ROUND 7: Work * P 1, 1 YO, P 1, 1 YO *, repeat from *-* = 24 sts (= 4 sts per needle). ROUND 8-10: As 4th-6th round. ROUND 11: Work * P 1, 1 YO, P 3, 1 YO *, repeat from *-* = 36 sts. ROUND 12-14: As 4th-6th round. ROUND 15: Work * P 2, 1 YO, P 1, 1 YO, P 3 *, repeat from *-* = 48 sts. ROUND 16-18: As 4th-6th round. ROUND 19: Work * P 1, 1 YO, P 5, 1 YO, P 2 *, repeat from *-* = 60 sts. ROUND 20-22: As 4th-6th round. ROUND 23: Work * P 3, 1 YO, P 1, 1 YO, P 6 *, repeat from *-* = 72 sts. ROUND 24-26: As 4th-6th round. ROUND 27: Work * P 1, 1 YO, P 7, 1 YO, P 4 *, repeat from *-* = 84 sts. ROUND 28-30: As 4th-6th round. ROUND 31: Work * P 4, 1 YO, P 1, 1 YO, P 9 *, repeat from *-* = 96 sts. ROUND 32-34: As 4th-6th round. ROUND 35: Work * P 1, 1 YO, P 9, 1 YO, P 6 *, repeat from *-* = 108 sts. ROUND 36-38: As 4th-6th round. ROUND 39: Work * P 5, 1 YO, P 1, 1 YO, P 12 *, repeat from *-* = 120 sts. ROUND 40-42: As 4th-6th round. ROUND 43: Switch to Alpaca. Work * P 1, 1 YO, P 11, 1 YO, P 8 *, repeat from *-* = 132 sts. ROUND 44: LOOSELY cast off with K over all sts. Cut the yarn and keep approx. 50 cm for assembly. Fasten the two parts of blanket tog, with circles in the middle. |
|
|
|
Have you finished this pattern?Tag your pictures with #dropspattern #overtherainbowblanket or submit them to the #dropsfan gallery. Do you need help with this pattern?You'll find 14 tutorial videos, a Comments/Questions area and more by visiting the pattern on garnstudio.com. © 1982-2025 DROPS Design A/S. We reserve all rights. This document, including all its sub-sections, has copyrights. Read more about what you can do with our patterns at the bottom of each pattern on our site. |


With over 40 years in knitting and crochet design, DROPS Design offers one of the most extensive collections of free patterns on the internet - translated to 17 languages. As of today we count 314 catalogues and 11822 patterns translated into English (UK/cm).
We work hard to bring you the best knitting and crochet have to offer, inspiration and advice as well as great quality yarns at incredible prices! Would you like to use our patterns for other than personal use? You can read what you are allowed to do in the Copyright text at the bottom of all our patterns. Happy crafting!
Post a comment to pattern DROPS 149-46
We would love to hear what you have to say about this pattern!
If you want to leave a question, please make sure you select the correct category in the form below, to speed up the answering process. Required fields are marked *.