William by DROPS Design

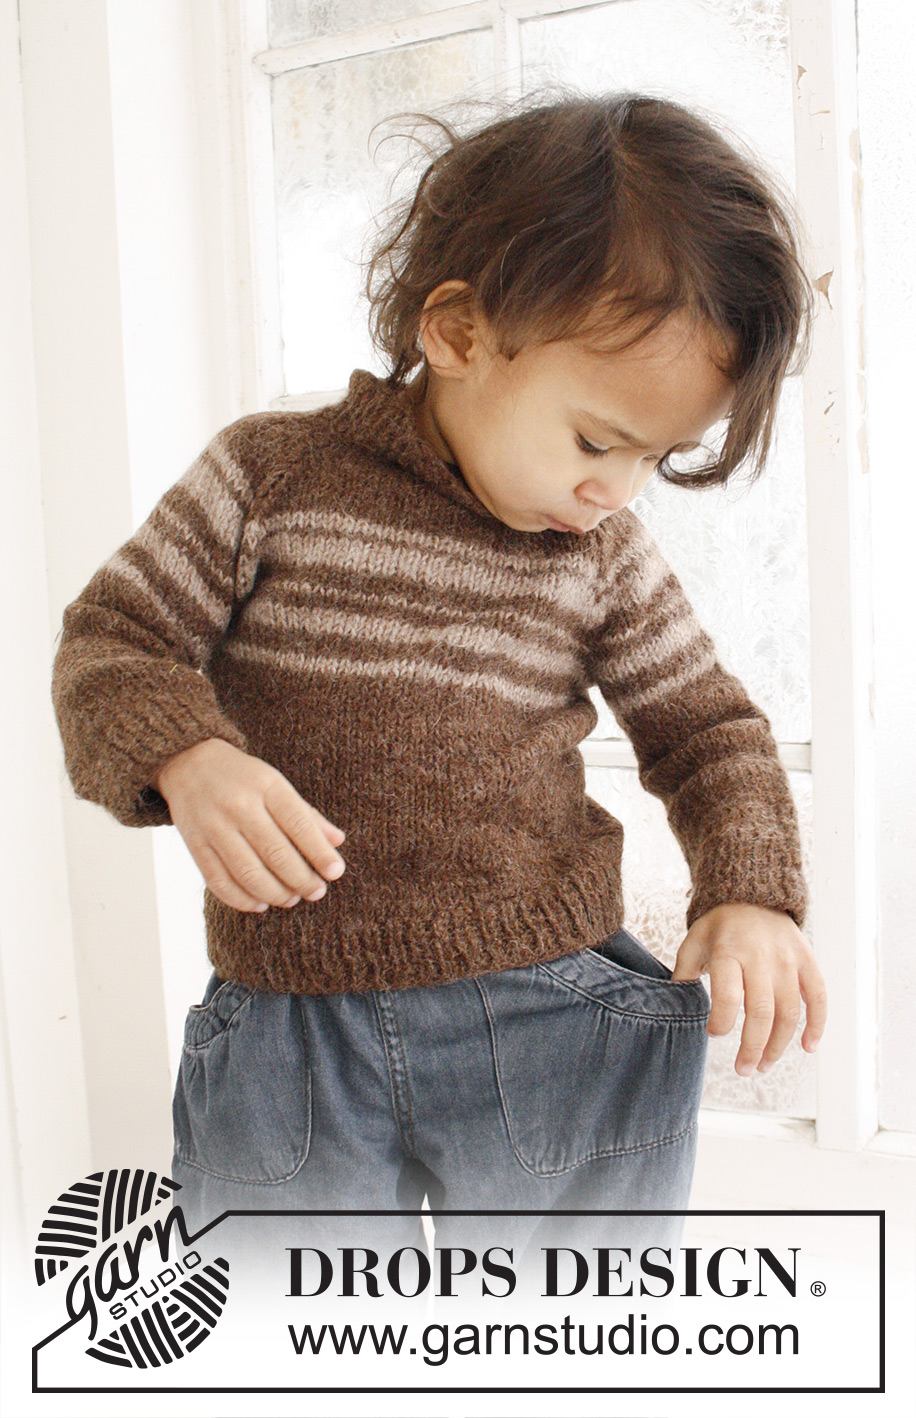
Dětský raglánový pulovr s pruhy pletený z příze DROPS Lima

DROPS Baby 21-29
DROPS Design: Návod č. LI-002-bn
Skupina přízí: B
-------------------------------------------------------

Velikost: 1/3 - 6/9 - 12/18 měsíců (2 - 3/4) roky
Velikost v cm: 56/62 - 68/74 - 80/86 (92 - 98/104)

SVETR:
Materiál: DROPS LIMA firmy Garnstudio
200-200-200 (250-250) g, barva č. 5610, hnědá
50-50-50 (50-50) g, barva č. 5310, světle hnědá

DROPS KRUHOVÁ JEHLICE a SADA PONOŽKOVÝM JEHLIC č. 4 - nebo velikost potřebná k upletení zkušebního vzorku o rozměrech 20 ok x 26 řad lícovým žerzejem = 10 x 10 cm.
DROPS KRUHOVÁ JEHLICE a SADA PONOŽKOVÝCH JEHLIC č. 3,5 (na lemy).
DROPS DŘEVĚNÝ KNOFLÍK, č. 503, 3 ks

-------------------------------------------------------

Zkušební vzorek – Podívejte se, jak ho měřit a proč
Náhradní příze – Podívejte se, jak změnit přízi
Skupina přízí A až F – Neměňte návod, změňte přízi
Spotřeba příze při použití náhradní příze – Využijte náš převodník

-------------------------------------------------------


65% vlna, 35% alpaka
od 50.00 Kč /50g
DROPS Lima uni colour DROPS Lima uni colour 50.00 Kč /50g
Příze a Jehlice
Objednat
DROPS Lima mix DROPS Lima mix 54.00 Kč /50g
Příze a Jehlice
Objednat
needles Jehlice a háčky
Přízi na tento model můžete mít už za 250Kč. Více zde.

Návod

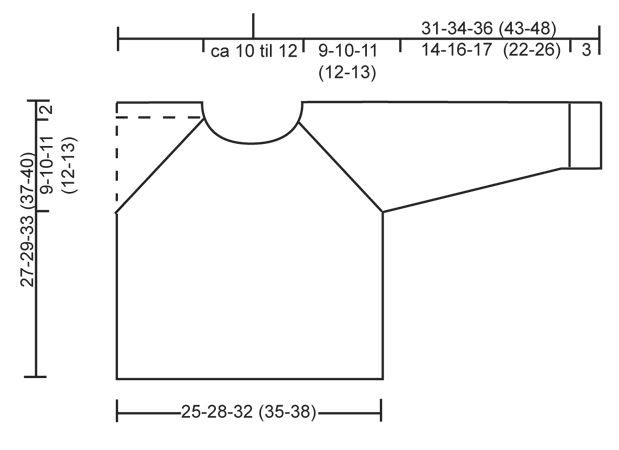
SVETR:
PATENT: *3 hladce, 3 obrace*, mezi *-* opakujeme.
PRUHY:
2 kruhové řady světle hnědou, 3 hnědou, 3 světle hnědou, 2 hnědou, 1 světle hnědou, 3 hnědou, 4 světle hnědou, 1 hnědou, 2 světle hnědou.
TIP NA UJÍMÁNÍ RAGLÁNŮ BEZ KNOFLÍKOVÝCH DÍREK:
2 splést hladce. * pleteme až zbývají 3 oka před značkou, 1 oko sejmeme hladce, 1 hladce, sejmuté přes něho přetáhneme, 2 hladce, 2 splést hladce*, mezi *- opakujeme přes další dvě značky, pleteme až na jehlici zbývají 4 oka, 1 oko sejmeme hladce, 1 hladce, sejmuté přes něho přetáhneme.
TIP NA UJÍMÁNÍ RAGLÁNŮ S KNOFLÍKOVÝMI DÍRKAMI
V LÍCOVÉ ŘADĚ UJÍMÁME: pleteme 4 oka vroubkovým vzorem – léga, 2 splést hladce. * pleteme až zbývají 3 oka přes značkou, 1 oko sejmeme hladce, 1 hladce, sejmuté přes něho přetáhneme, 2 hladce, 2 splést hladce*, mezi *-* opakujeme přes další dvě značky, pleteme až na jehlici zbývá 6 ok, 1 oko sejmeme hladce, 2 hladce, sejmuté přes něho přetáhneme, 4 oka vroubkovým vzorem – léga.
V RUBOVÉ ŘADĚ UJÍMÁME: pleteme 4 oka vroubkovým vzorem, 2 spleteme obrace, * pleteme až zbývají 3 oka před značkou, 2 oka spleteme obrace anglicky (tj. překříženě), 2 obrace, 2 spleteme obrace*, mezi *-* opakujeme před další dvě značky, pleteme, až na jehlici zbývá 6 ok, 2 oka spleteme anglicky obrace, 4 oka vroubkovým vzorem – léga. POZN. Ujistěte se, že oka leží v lícové řadě správně.
VROUBKOVÝ VZOR (lícové a rubové řady): stále hladce
KNOFLÍKOVÉ DÍRKY: Vypracováváme je v raglánovém švu nad oky légy.
KNOFLÍKOVÁ DÍRKA : 1 hladce, 2 splést hladce, 1x nahodit, 1 hladce. Knoflíkové dírky vypracováváme ve výšce:
velikost 1/3 měsíce: 2,5 a 8 cm
velikost 6/9 měsíců: 3,6 a 9 cm
velikost 12/18 měsíců: 3,7 a 10 cm¨
velikost 2 roky: 3,7 a 11 cm
velikost 3/4 roky: 4, 8 a 12 cm
----------------------------------------------------------------------

SVETR:
Na kruhovou jehlici č. 3,5 nahodíme přízí Lima 102-114-126 (138-150) ok. Pleteme jednu kruhovou řadu hladce, a dále pokračujeme PATENTEM do výšky 3 cm – viz popis výše. Změníme velikost jehlic na č. 4 a upleteme 1 kruhovou řadu lícovým žerzejem. V následujcí kruhové řadě pleteme: do prvního oka umístíme značku (= začátek kruhové řady), upleteme 50-56-62 (68-74) ok lícovým žerzejem, umístíme druhou značku (=boční šev), upleteme 50-56-62 (68-74) ok lícovým žerzejem.
Ve výšce 14-15-18 (21-23) cm začneme plést PRUHY – viz popis výše. SOUČASNĚ ve výšce 16-17-20 (23-25) cm uzavřeme pro průramky z každé strany 5 ok (= označené oko + 2 oka z každé strany značky) = 92-104-116 (128-140) ok.

RUKÁV:
Na ponožkové jehlice č. 3,5 nahodíme přízí Lima 30-30-36 (36-36) ok. Pleteme 1 kruhovou řadu lícovým žerzejem, pokračujeme PATENTEM do výšky 3 cm. Změníme velikost jehlic na č. 4 a pokračujeme lícovým žerzejem. Do prvního oka umístíme značku, SOUČASNĚ ve výšce 6 cm, přidáme z každé strany značky 1 oko. Přidávání opakujeme každých 3-2-3 (2.5-2.5) cm celkem 4-6-5 (7-9) krát = 38-42-46 (50-54) ok. Ve výšce 15-17-18 (23-27) cm začneme plést PRUHY. V výšce 17-19-20 (25-29) cm (přidáme řady tak, aby pruhy souhlasily s pruhy na předním díle), uzavřeme středovým 5 ok = 33-37-41 (45-49) ok. Rukáv odložíme a stejně upleteme druhý.

SEDLO:
Oka rukávů převedem zpět na kruhovou jehlici mezi uzavřená oka průramků na předním a zadním díle = 158-178-198 (218-238) ok. Značku umístíme mezi každý přechod rukávů a předního a zadního dílu. Pokračujeme v pletení, na jedné straně vypracováváme knoflíkové dírky, na druhé ne – viz popis výše.

SEDLO S KNOFLÍKY:
Díl dále pleteme v lícových a rubových řadách, začínáme od pravého “raglánového švu” na předním díle. Na předním díle nahodíme nově 4 oka (= knoflíková léga) = 162-182-202 (222-242) ok. PŘED POKRAČOVÁNÍM PROSÍM PŘEČTĚTE CELÝ NÁVOD! Pokračujeme lícovým žerzejem, pleteme pruhy, nad 4 oky pleteme VROUBKOVÝM VZOREM – léga na knoflíky. Současně tvarujeme raglan – viz TIP NA UJÍMÁNÍ – ujímáme v každé druhé řadě 11-11-12 (12-13) krát a dále potom v každé řadě 1-3-4 (6-7) krát. POZN.: SOUČASNĚ vypracováváme KNOFLÍKOVÉ DÍRKY – viz popis výše. Současně ve výšce 23-25-29 (32-35) cm, odložíme prostředních 13-13-13 (15-15) středových ok na pomocnou jehlici. Průkrčník dále tvarujeme v každé druhé řadě tak, že ujmeme: 1 krát 2 oka a 2-2-2 (3-3) krát 1 oko. Po dokončení tvarování raglanu a uzavření ok pro průkrčník zbývá na jehlici 45-49-53 (53-57) ok.

SEDLO BEZ KNOFLÍKŮ:
Pleteme v kruhových řadách, žerzejem a pruhy. Současně ujímáme raglánové průramky – viz TIP NA UJÍMÁNÍ – ujímáme v každé druhé řadě 11-11-12 (12-13) krát a v každé řadě 1-3-4 (6-7) krát. Současně ve výšce 23-25-29 (32-35) cm, odložíme středových 13-13-13 (15-15) ok na pomocnou jehlici. Pokračujeme ve tvarování průkrčníku tak, že v každé druhé řadě uzavřeme 1 krát 2 oka a 2-2-2 (3-3) krát 1 oko. Po dokončení tvarování raglanu a uzavření ok pro průkrčník zbývá na jehlici 41-45-49 (49-53) ok.

PRŮKRČNÍK:
Kolem předního průkrčníku nabereme asi 23- 27 ok (počet zahrnuje i oka z pomocné jehlice) hnědou barvou = 68 – 84 ok. Všechna oka přesuneme na ponožkové jehlice č. 4 a pleteme 1 kruhovou řadu lícovým žerzejem, SOUČASNĚ rovnoměrně ujmeme oka na celkový počet 64- 76 ok. Pleteme patentem 2 hladce/2 obrace do výšky 8 cm, oka VOLNĚ uzavřeme – lem přeložíme na polovinu do rubu a přišijeme skrytým stehem.

DOKONČENÍ:
Sešijeme otvory v podpaží. Pokud jsme pletli knoflíkové dírky: přeložíme légy přes sebe tak, že knoflíkové dírky leží nahoře a v rubu přišijeme. Přišijeme knoflíky.

Návod byl opraven.

Poslední úpravy: 14.02.2012
BODY:...insert a marker in the 1st st (= beg of round), K 50-56-62 (68-74) sts, insert a marker in next st (= mid in the side), K 50-56-62 (68-74) sts.

Schéma

diagram measurements

Potřebujete poradit s tímto návodem?

Děkujeme, že jste si vybrali návod DROPS Design. Zakládáme si na tom, že dáváme k dispozici návody ověřené a snadno srozumitelné. Všechny návody jsou přeložené z norského originálu a tak si můžete kdykoli srovnat rozměry a počty s původním návodem (DROPS Baby 21-29) .

Máte s návodem potíže? Níže najdete seznam odkazů, které vám pomohou dokončit vaše dílo co nejdříve - nebo se třeba přiučit něco nového.

signature-image signature

Máte s návodem potíže? Níže najdete seznam odkazů, které vám pomohou dokončit vaše dílo co nejdříve - nebo se třeba přiučit něco nového.

Každý náš návod je doprovázen speciálními video-ukázkami, které vás navedou.

Máme takopodrobné rozpisy různých technik a postupů krok za krokem - najdete je zde.

1) Why is the knitting/crochet tension so important?

Knitting tension is what determines the final measurements of your work, and is usually measured per 10 x 10 cm. It is provided like so: number of stitches in width x number of rows in height - eg: 19 stitches x 26 rows = 10 x 10 cm.

The knitting tension is very individual; some people knit/crochet loosely while others work tightly. You adjust the knitting tension with the needle size, which is why the suggested needle size only serve as a guide! You need to adjust this (up or down) to ensure that YOUR knitting tension matches the knitting tension provided in the pattern. If you work with a different knitting tension than provided you will have a different yarn consumption, and your work will have different measurements than what the pattern suggests.

The knitting tension also determines which yarns can replace each other. As long as you achieve the same knitting tension you can replace one yarn with another.

See DROPS lesson: How to measure your tension/gauge

See DROPS video: How to make a gauge tension swatch

nahoru

2) What are the yarn groups?

All our yarns are categorised into yarn groups (from A to F) according to thickness and knitting tension – group A contains the thinnest yarns and group F the thickest. This makes it easier for you to find alternative yarns to our patterns, should you wish to switch yarn. All yarns within the same group have a similar knitting tension and can easily replace each other. However, different yarn qualities have different structures and properties which will give the finished work a unique look and feel.

Click here for an overview of the yarns in each yarn group

nahoru

3) Can I use a different yarn than what the pattern suggests?

The important thing when changing from one yarn to another is that the knitting/crochet tension remains the same. This is so that the measurements of the finished piece will be the same as on the sketch provided. It is easier to achieve the same knitting tension using yarns from the same yarn group. It is also possible to work with multiple strands of a thinner yarn to achieve the knitting tension of a thicker one. Please try our yarn converter. We recommend you to always work a test swatch.

Please NOTE: when changing yarn the garment might have a different look and feel to the garment in the photo, due to individual properties and qualities of each yarn.

See DROPS lesson: Can I use a different yarn than the one mentioned in the pattern?

nahoru

4) How do I use the yarn converter?

At the top of all our patterns you’ll find a link to our yarn converter, which is a helpful tool should you wish to use a different yarn than suggested. By filling in the yarn quality you wish to replace, the amount (in your size) and number of strands, the converter will present good alternative yarns with the same knitting tension. Additionally it will tell you how much you’ll require in the new qualities and whether you’ll need to work with multiple strands. Most skeins are 50g (some are 25g or 100g).

If the pattern is worked with multiple colours, every colour will have to be converted separately. Similarly, if the pattern is worked with several strands of different yarns (for example 1 strand Alpaca and 1 strand Kid-Silk) you will have to find alternatives for each, individually.

Click here to see our yarn converter

nahoru

5) Why do I get the wrong knitting tension with the suggested needle size?

The needle size provided in the pattern serves only as a guide, the important thing is to follow the knitting tension. And since knitting tension is very individual, you will have to adjust the needle size to ensure that YOUR tension is the same as in the pattern – maybe you’ll have to adjust 1, or even 2 needle sizes, up or down to achieve the correct tension. For this, we recommend that you work test swatches.

Should you work with a different knitting tension than the one provided, the measurements of the finished garment might deviate from the measurement sketch.

See DROPS lesson: How to measure your tension/gauge

See DROPS video: How to make a gauge tension swatch

nahoru

6) Why is the pattern worked top-down?

Working a garment top-down provides more flexibility and room for personal adjustment. For example it is easier to try the garment on while working, as well as making adjustments to length of yoke and shoulder caps.

The instructions are carefully explaining every step, in the correct order. Diagrams are adjusted to the knitting direction and are worked as usual.

nahoru

7) Why are the sleeves shorter in larger sizes?

The total width of the garment (from wrist-to-wrist) will be larger in the larger sizes, despite the actual sleeves being shorter. The larger sizes have longer sleeve caps and wider shoulders, so there will be a good fit in all sizes.

nahoru

8) What is a repeat?

Diagrams are often repeated on the round or in height. 1 repeat is the diagram the way it appears in the pattern. If it says to work 5 repeats of A.1 in the round, then you work A.1 a total of 5 times after/next to each other in the round. If it says to work 2 repeats of A.1 vertically/in height you work the entire diagram once, then begin again at the start and work the entire diagram one more time.

nahoru

9) How do I work according to a knitting diagram?

The diagram depicts all rows/rounds, and every stitch seen from the right side. It is read from bottom to top, from right to left. 1 square = 1 stitch.

When working back and forth, every other row is worked from the right side and every other row is worked from the wrong side. When working from the wrong side, the diagram will have to be worked reversed: from left to right, knit stitches are purled, purl stitches are knit etc.

When working in the round every round is worked from the right side and the diagram are worked from right to left on all rounds.

See DROPS lesson: How to read knitting diagrams

nahoru

10) How do I work according to a crochet diagram?

The diagram depicts all rows/rounds, and every stitch seen from the right side. It is worked from bottom to top, from right to left.

When working back and forth every other row is worked from the right side: from right to left and every other row is worked from the wrong side: from left to right.

When working in the round, every row in the diagram are worked from the right side, from right to left.

When working a circular diagram you start in the middle and work your way outwards, counter clockwise, row by row.

The rows usually start with a given number of chain stitches (equivalent to the height of the following stitch), this will either be depicted in the diagram or explained in the pattern.

See DROPS lesson: How to read crochet diagrams

nahoru

11) How do I work several diagrams simultaneously on the same row/round?

Instructions for working several diagrams after each other on the same row/round, will often be written like so: “work A.1, A.2, A.3 a total of 0-0-2-3-4 times". This means you work A.1 once, then A.2 is worked once, and A.3 is repeated (in width) the number of times provided for your size – in this case like so: S = 0 times, M = 0 times, L=2 times, XL= 3 times and XXL = 4 times.

The diagrams are worked as usual: begin with the first row in A.1, then work the first row in A.2 etc.

See DROPS lesson: How to read knitting diagrams

See DROPS lesson: How to read crochet diagrams

nahoru

12) Why does the piece start with more chain stitches than it’s worked with?

Chain stitches are slightly narrower than other stitches and to avoid working the cast-on edge too tight, we simply chain more stitches to begin with. The stitch count will be adjusted on the following row to fit the pattern and measurement sketch.

nahoru

13) Why increase before the rib edge when the piece is worked top-down?

The rib edge is more elastic and will contract slightly compared to, for example, stocking stitch. By increasing before the rib edge, you avoid a visible difference in width between the rib edge and the rest of the body.

nahoru

14) Why increase in the cast-off edge?

It’s very easy to cast off too tightly, and by making yarn overs while casting off (and simultaneously casting these off) you avoid a too tight cast off edge.

See DROPS video: How to bind off with yarn overs (yo)

nahoru

15) How do I increase/decrease on every 3rd and 4th row/round alternately?

To achieve an even increase (or decrease) you can increase on, for example: every 3rd and 4th row alternately, like so: work 2 rows and increase on the 3rd row, work 3 rows and increase on the 4th. Repeat this until the increase is complete.

See DROPS lesson: Increase or decrease 1 st on every 3rd and 4th row alternately

nahoru

16) Why is the pattern slightly different than what I see in the photo?

Pattern repeats can vary slightly in the different sizes, in order to get the correct proportions. If you’re not working the exact same size as the garment in the photo, yours might deviate slightly. This has been carefully developed and adjusted so that the complete impression of the garment is the same in all sizes.

Make sure to follow instructions and diagrams for your size!

nahoru

17) How can I work a jacket in the round instead of back and forth?

Should you prefer to work in the round instead of back and forth, you may of course adjust the pattern. You’ll need to add steeks mid-front (usually 5 stitches), and follow the instructions. When you would normally turn and work from the wrong side, simply work across the steek and continue in the round. At the end you’ll cut the piece open, pick up stitches to work bands, and cover the cut edges.

See DROPS video: How to knit steeks and cut open

nahoru

18) Can I work a jumper back and forth instead of in the round?

Should you prefer to work back and forth instead of in the round, you may of course adjust the pattern so you work the pieces separately and then assemble them at the end. Divide the stitches for the body in 2, add 1 edge stitch in each side (for sewing) and work the front and back pieces separately.

See DROPS lesson: Can I adapt a pattern for circular needles into straight needles?

nahoru

19) Why do you show discontinued yarns in the patterns?

Since different yarns have different qualities and textures we have chosen to keep the original yarn in our patterns. However, you can easily find options among our available qualities by using our yarn converter, or simply pick a yarn from the same yarn group.

It is possible that some retailers still have discontinued yarns in stock, or that someone has a few skeins at home that they would like to find patterns for.

The yarn converter will provide both alternative yarn as well as required amount in the new quality.

nahoru

20) How do I make a women’s size garment into a men’s size one?

If you have found a pattern you like which is available in women’s size it’s not very difficult to convert it to men’s size. The biggest difference will be the length of sleeves and body. Start working on the women size that you think would fit across the chest. The additional length will be worked right before you cast off for the armhole/sleeve cap. If the pattern is worked top-down you can add the length right after the armhole or before the first decrease on sleeve.

Regarding additional yarn amount, this will depend on how much length you add, but it is better with a skein too many than too few.

nahoru

21) How do I prevent a hairy garment from shedding?

All yarns will have excess fibres (from production) that might come off as lint or shedding. Brushed yarns (ie hairier yarns) have more of these loose, excess fibres, causing more shedding.

Shedding also depends on what is worn under or over the garment, and whether this pulls at the yarn fibres. It’s therefore not possible to guarantee that there will be no shedding

Below are some tips on how to get the best result when working with hairier yarns:

1. When the garment is finished (before you wash it) shake it vigorously so the looser hairs come off. NOTE: do NOT use a lint roller, brush or any method that pulls at the yarn.

2. Place the garment in a plastic bag and put it in your freezer - the temperature will cause the fibres to become less attached to each other, and excess fibres will come off easier.

3. Leave in the freezer for a few hours before taking it out and shaking it again.

4. Wash the garment according to the instructions on the yarn label.

nahoru

22) Where on the garment is the length measured?

The measurement sketch/schematic drawing provides information regarding the full length of the garment. If it’s a jumper or a jacket the length is measured from the highest point on the shoulder closest to the neckline, and straight down to the bottom of the garment. It is NOT measured from the tip of shoulder. Similarly, the length of yoke is measured from the highest point on the shoulder and down to where yoke is split into body and sleeves.

On a jacket measures are never taken along bands, unless specifically stated. Always measure inside band stitches when measuring the length.

See DROPS lesson: How to read a schematic drawing

nahoru

23) How do I know how many balls of yarn I need?

The required amount of yarn is provided in grams, eg: 450 g. To calculate how many balls you’ll need you first need to know how many grams are in 1 ball (25g, 50g or 100g). This information is available if you click on the individual yarn quality on our pages. Divide the amount required with the amount of each ball. For example, if each ball is 50g (the most common amount), the calculation will be as follows: 450 / 50 = 9 balls.

nahoru

Pořídili jste si přízi DROPS na tento model? Pak máte taky právo žádat po svém prodejci, u něhož jste nakoupili, pomoc a rady. Seznam DROPS obchodů najdete tady!
Pořád se nemůžete dobrat odpovědi, kterou hledáte? Pak posuňte stránku dolů a napište nám svůj dotaz, naši specialisté se vám pokusí poradit. Obvykle to zvládneme během 5 až 10 pracovních dnů.. Mezitím si můžete pročíst otázky a odpovědi, které k tomuto modelu položili ostatní, nebo navštívit skupinu DROPS Workshop na Facebooku, kde vám může poradit některá spřízněná duše!

Komentáře / Otázky (30)

country flag Bertha wrote:

Ik brei kindertrui William, LI 002 by op een rondbreinaald. Voor de raglan moet je eerst om de naald minderen, en dan nog een paar keer elke naald. Als de steken voor de hals op een hulpdraad staan, moet je daardoor heen en weer op de naald, maar tevens elke naald minderen. Betekent dat dat je ook op de averechte naald moet minderen? Hoe dan? Als ik dezelfde mindermethode toepas op de averechte toer, staan de V tjes niet meer mooi de goede kant op.

05.02.2023 - 16:10

DROPS Design answered:

Dag Bertha,

In een van de bijgevoegde video's wordt uitgelegd hoe je de raglanminderingen aan de goede en de verkeerde kant maakt.

08.02.2023 - 11:36

country flag Manon wrote:

Je ne comprends la reprise des mailles encolure (sans bouton). Il faut relever de 23 à 27 sur le devant, mais dans la même phrase vous parler de 68 à 84, de quelles mailles s'agit-il ? et que signifie "dans le même tour répartir des diminutions/augmentations pour ajuster. Pour ajuster quoi ? puisque qu'on connait le nombre de mailles après les diminutions du raglan et du col. Merci de préciser s'il vous plait.

21.10.2022 - 11:48

DROPS Design answered:

Bonjour Manon, vous devez rabattre pour l'encolure les 13-15 m + de chaque côté: 1 x 2 m + 2 ou 3 x 1 m - pour le col, vous reprenez les 41 à 53 mailles qui restaient à la fin de l'empiècement et vous relevez en plus 23 à 27 mailles le long de l'encolure devant (les mailles en attente + les mailles rabattues) - vous devriez avoir 68 à 84 mailles; tricotez ensuite 1 tour jersey en ajustant le nombre de mailles à 64-76 (il doit être divisible par 4 = diminuez ou augmenter des mailles en fonction de celui que vous avez relevé). Bon tricot!

21.10.2022 - 16:09

country flag Johanna Smit wrote:

Ik wil een baby truitje breien met patentst op 2 naalden 4,5 voor 9 mnd maar kan gaan patroonvinden

16.10.2021 - 12:49

DROPS Design answered:

Dag Johanna,

Misschien dat dit patroon wat is? Deze wordt echter wel op de rondbreinaald gebreid van boven naar beneden.

Mocht je nog een ander patroon vinden die verder aan je wensen voldoet, maar op de rondbreinaald wordt gebreid dan kun je deze instructie raadplegen om het patroon aan te passen om met rechte naalden te breien. Helaas is dit niet voor ieder patroon geschikt.

17.10.2021 - 18:32

country flag Tina Hald wrote:

Hej Jeg strikker sweateren uden knap kan . Der står man skal sætte 15 masker på en tråd , så vidt så godt . Men hvordan kommer man så videre ? Ret naturligt ville jeg så begynde at stikke frem og tilbage ( man kan jo ikke bare hoppe over 15 masker ? ) . Men det står der kun i opskriften med knap man skal gøre . Så synes det er lidt misvisende . Men jeg har altså strikket frem og tilbage idet jeg ikke kunne se andre løsninger

12.12.2020 - 17:19

DROPS Design answered:

Hei Tine. Om man har valgt å strikke med knapp må man strikke frem og tilbake når man begynner på bærestykket, Men skal man strikke uten knapp strikker man rundt til der man setter masker på en tråd til hals og deretter må man strikke frem og tilbake et lite stykke. Så du har gjort det riktig. God Fornøyelse!

16.12.2020 - 14:38

country flag Vera Myhrman wrote:

Hej vilket annat garn kan jag ersätta Lima med? Konvertera hänvisar mig att skriva till er. Tacksam för hjälp Mvh Vera

15.08.2020 - 16:49

DROPS Design answered:

Hej Vera. Du kan ersätta Lima med ett annat garn ur garngrupp B. Du hittar en översikt över vilka garn som tillhör vilken garngrupp här. Tänk som vanligt bara på att få den stickfasthet som uppges i mönstret och att beräkna riktig garnåtgång med det alternativa garnet. Mvh DROPS Design

17.08.2020 - 10:52

country flag Johanna wrote:

Hej! Jag stickar tröjan utan knappar i strl 12/18 mån. Jag blir förvirrad när det ska maskas av mot halsen. I beskrivningen står ”sedan maskas av mot halsen....” vilket jag tolkar som att det görs EFTER minskningar till raglan (eftersom det annars står ”samtidigt”). Men i svar på frågor skriver ni att det ska göras samtidigt med minskningar för raglan? Vad stämmer? Undrar också om det är sammanlagt 8 maskor som ska avmaskas till halsen? Tack!

12.12.2019 - 10:02

DROPS Design answered:

Hej Johanna, du minskar till raglan och samtidigt när arb mäter 29 cm sätts de mittersta 13 m fram på 1 tråd till hals, nu minskar du även till halsen i början på varje varv enligt beskrivningen. Lycka till :)

16.12.2019 - 15:32

country flag Winnie Normann wrote:

Jeg strikker den største str. uden knapper og er kommet dertil hvor jeg skal sætte masker til hals på en snor, jeg kan ikke rigtig hitte ud af om hvorvidt, jeg så efterfølgende, skal strikke frem og tilbage på rundpinden, for at kunne lave indt. til hals og så også lave raglan indt. på vrang pinden,eller kan det gøres fra retsiden, i givet fald hvordan? ;-)

18.02.2019 - 16:18

DROPS Design answered:

Hei Winnie. Når du har satt maskene på en snor strikker du frem og tilbake fra den ene siden av halsen til den andre siden av halsen, snu og strikk tilbake fra vrangsiden. Du feller av de ytterste maskene (altså nærmest halsen) på begynnelsen av hver 2 pinne som forklart. Dette gjøres samtidig som fellingen til raglan pågår, og du må felle til raglan fra vrangsiden når det skal felles på hver pinne. Før merke: ta 1 maske løst av som om den skulle strikkes vrang, 1 vrang, løft den løse masken over. Etter merke: strikk 2 vrang sammen. God fornøyelse

21.02.2019 - 14:12

country flag Malika wrote:

Ich habe die Arbeit genau nach Anleitung gestrickt in der Größe 2 Jahre. Eigentlich stricke ich eher eng. Trotzdem ist der Pullover relativ breit/weit geworden. Das ist bei Wollsachen, die ja sowieso die Tendenz haben, mit der Zeit noch etwas weiter zu werden, schade. Außerdem fand ich die Erklärungen für die Passe mit Knöpfen sehr unpräzise.

16.01.2019 - 15:10

country flag Malika wrote:

Und ergänzend dazu: wie viele Reihen (hin und rück) der Passe habe ich noch zu stricken, wenn ich die Maschen auf den Hilfsfaden lege (also bis die Passe beendet ist und das Halsbündchen anfängt)?

13.01.2019 - 18:43

DROPS Design answered:

Liebe Malika, Sie stricken noch die Abnahmen für Halsausschnitt und gleichzeitig die Raglanabnahmen stricken Sie noch weiter, also je nach der Grösse müssen 41-57 M je nach Grösse und Passe bleiben. Viel Spaß beim stricken!

14.01.2019 - 12:03

country flag Malika wrote:

Ich stricke den Pullover mit der Passe mit Knöpfen. Zu den Maschen, die für den Halsausschnitt auf einen Hilfsfaden gelegt werden sollen, habe ich zwei Fragen: 1. Ist die Raglanabnahme dann schon vollständig abgeschlossen? 2. Von welchem Punkt stricke ich hin und zurück? Bislang war es die Öffnung zwischen rechtem Ärmel und Vorderteil. Jetzt habe ich eine zweite Öffnung auf beiden Seiten der Maschen auf dem Hilfsfaden. Das kann so nicht funktionieren, oder wo liegt mein Denkfehler? Danke.

12.01.2019 - 07:17

DROPS Design answered:

Liebe Malika, wenn die Maschen für den Hals stillgelegt sind, sind alle Raglanabnahme noch nicht fertig, stricken Sie nur jedes Teil weiter (nach und vor Öffnung) mit Raglanabnahmen wie zuvor und dazu die für den Hals. Viel Spaß beim stricken!

14.01.2019 - 13:22

Přidejte komentář k návodu DROPS Baby 21-29

Rádi bychom věděli, co si o tomto modelu myslíte!

Pokud se chcete na něco zeptat, dbejte prosím na to, abyste ve formuláři níže vybrali správnou kategorii - díky tomu se dříve dozvíte, co potřebujete vědět. Povinná pole jsou označena *.