DROPS Merino Extra Fine
100% Wool
from 3.50 £ /50g
Get the yarn to make this pattern from 21.00£.

The yarn cost is calculated from the pattern’s smallest size and the yarn’s cheapest product type. Looking for an even better price? You might find it on the DROPS Deals!

DROPS SS24

Igor

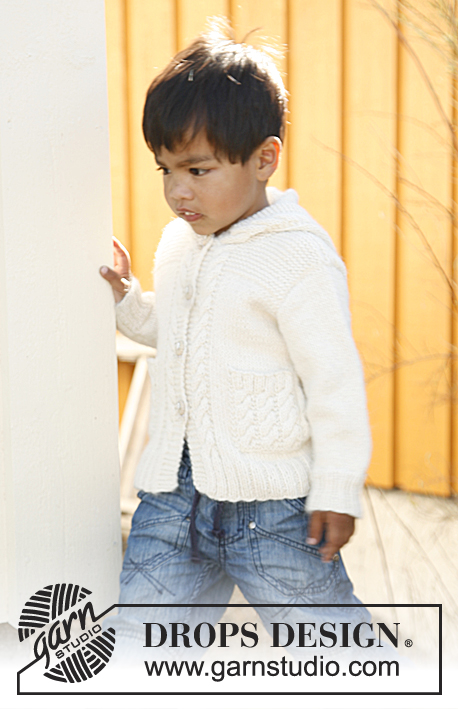
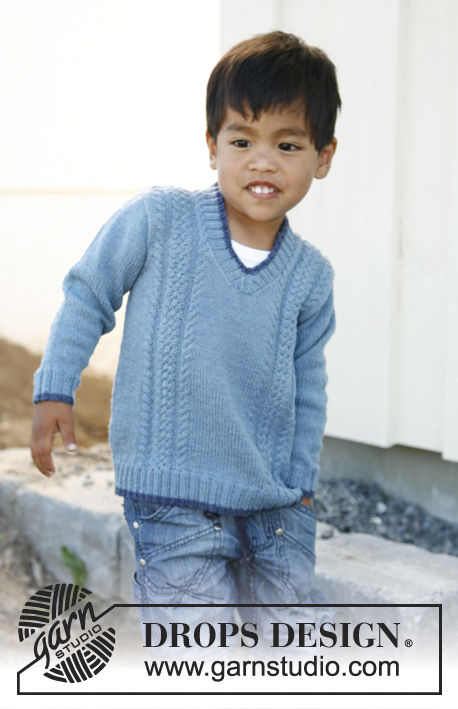
Knitted jumper with raglan, cables and double moss st in DROPS Merino Extra Fine. Size children 3 to 12 years

DROPS Children 22-43
DROPS design: Pattern no ME-001-bn
Yarn group B
----------------------------------------------------------
Size: 3/4 - 5/6 - 7/8 - 9/10 - 11/12 years
Size in cm: 98/104 - 110/116 - 122/128 - 134/140 - 146/152

Materials: DROPS MERINO EXTRA FINE from Garnstudio
300-350-400-450-500 g colour no 18, green

DROPS DOUBLE POINTED NEEDLES and CIRCULAR NEEDLE (60 cm) SIZE 4 mm - or size needed to get 21 sts x 28 rows in stocking st = 10 x 10 cm.
DROPS DOUBLE POINTED NEEDLES and CIRCULAR NEEDLE (60 cm) SIZE 3 mm - for rib.

-------------------------------------------------------

Alternative Yarn – See how to change yarns here
Yarn Groups A to F – Use the same pattern and change the yarn here
Yarn usage using an alternative yarn – Use our yarn converter here

-------------------------------------------------------

DROPS Merino Extra Fine
100% Wool
from 3.50 £ /50g
Get the yarn to make this pattern from 21.00£.

The yarn cost is calculated from the pattern’s smallest size and the yarn’s cheapest product type. Looking for an even better price? You might find it on the DROPS Deals!

Pattern instructions

NOTE: This pattern is written in British English. All measurements in charts are in cm. For conversion from cm to inches - click here. There are different terms for crocheting in British and American English. If this pattern includes crochet, click for "crochet terms" here. For this pattern in American English, please click here.
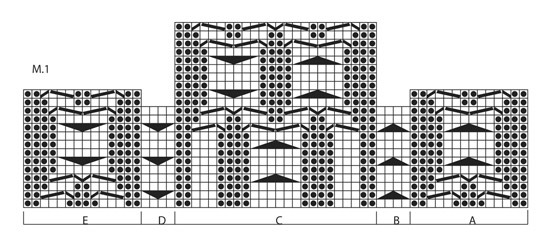
PATTERN:
See diagrams M.1 and M.2. The diagrams show the pattern from RS.

RAGLAN:
Dec on each side of all 4 markers, i.e. 8 dec per round.
Dec as follows from RS:
Work until 2 sts remain before marker, K 2 tog, marker, slip 1 st as if to K, K 1, psso.
Dec as follows from WS:
Work until 2 sts remain before marker, P 2 tog, marker, then P 2 twisted tog (i.e. work in back loop of st instead of front).
---------------------------------------------------------

BODY:
Worked in the round on circular needle.
Cast on 158-166-174-182-190 sts on circular needle size 3 mm with Merino. K 1 round, then work rib as follows: * P 2, K 2 *, repeat from *-* over 20 sts, K 2, repeat from *-* the rest of the round (there are 4 K sts mid front, i.e. round does not start in the side). When piece measures 5 cm, switch to circular needle size 4 mm. Work next round as follows: P 2, K 1, 1 YO, K 1, P 2 in each of the next 2 sts (= 4 P), K 1, 1 YO, K 1, P 2, K 2 in each of the next 2 sts (= 4 K), P 2, K 1, 1 YO, K 1, P 2 in each of the next 2 sts (= 4 P), K 1, 1 YO, K 2 (= mid front), 1 YO, K 1, P 2 in each of the next 2 sts (= 4 P), K 1, 1 YO, K 1, P 2, K 2 in each of the next 2 sts (= 4 K), P 2, K 1, 1 YO, K 1, P 2 in each of the next 2 sts (= 4 P), K 1, 1 YO, K 1, P 2. Work the rest of the round as follows:
SIZE 3/4 YEARS: K 1, * K 2 tog, K 4, K 2 tog, K 5 *, repeat from *-* the rest of round.
SIZE 5/6 YEARS: * K 2 tog, K 5 *, repeat from *-* the rest of round.
SIZE 7/8 YEARS: K 8, * K 2 tog, K 5 *, repeat from *-* the rest of round.
SIZE 9/10 YEARS: K 7, * K 2 tog, K 5, K 2 tog, K 6 *, repeat from *-* the rest of round.
SIZE 11/12 YEARS: K 6, * K 2 tog, K 6 *, repeat from *-* the rest of round.
There are now 160-168-176-184-192 sts on needle. Continue as follows: Diagram M.1 over the first 60 sts (i.e. part A over the first 14 sts, part B over the next 4 sts, part C over the next 24 sts, part D over the next 4 sts and part E over the last 14 sts), then diagram M.2 over the remaining sts NB: work the yarn over from previous round twisted to avoid holes. Count 14-16-18-20-22 sts outwards on each side of diagram M.1 and insert a marker (these marks the sides), there are 72-76-80-84-88 sts between markers on back piece.
REMEMBER THE KNITTING TENSION! When piece measures 26-29-32-35-38 cm, cast off 6 sts in each side (i.e. 3 sts on each side of each markers) = 148-156-164-172-180 sts remain on needle. Put piece aside and work the sleeves.

SLEEVE:
Worked in the round on double pointed needles.
Cast on 40-44-44-48-48 sts on double pointed needles size 3 mm with Merino. K 1 round, continue in rib = K 2/P 2 for 5 cm. Insert a marker in the middle of the first 2 K sts (= mid under sleeve). Switch to double pointed needles size 4 mm, continue to K the first 2 sts and work the remaining sts in diagram M.2 until finished measurements. AT THE SAME TIME when piece measures 8-8-9-9-10 cm, inc 1 st on each side of the 2 K sts mid under sleeve. Repeat inc every 3-3½-3-3½-3 cm a total of 7-7-9-9-11 times (work the inc sts in diagram M.2) = 54-58-62-66-70 sts. When piece measures 30-33-37-40-44 cm, cast off 6 sts mid under sleeve (i.e. 3 sts on each side of marker) = 48-52-56-60-64 sts remain on needle. Put piece aside and knit another sleeve.

YOKE:
Slip sleeves on to same circular needle as body where armholes were cast off = 244-260-276-292-308 sts. Insert a marker in all transitions between sleeves and body = 4 markers. Continue with 1 K st on each side of all markers and work the other sts as before. AT THE SAME TIME on 2nd round, beg to dec for RAGLAN – see explanation above! Repeat dec every other round a total of 15-15-16-17-18 times and then every 4th round a total of 4-6-7-7-8 times. AT THE SAME TIME when piece measures approx. 35-39-43-47-51 cm (adjust so that so that you are on a round with 6 K sts mid front in pattern), work the middle 14 sts tog 2 by 2 = 7 sts (the middle 6 sts K 2 tog and the 4 sts on each side P 2 tog). On next round, slip the middle 17 sts on a stitch holder for neck (= the entire diagram M.1C). Continue the piece back and forth from mid front until finished measurements - AT THE SAME TIME cast off at the beg of every row in each side: 2 sts 2 times and 1 st 2 times. After all dec for raglan and cast offs for neck, 56-56-56-64-64 sts remain on needle.

NECK:
Switch to double pointed needle size 3 mm, knit up approx. 29 to 35 sts at the front of neck (incl sts on stitch holder) = approx. 85 to 99 sts on needle. K 1 round while at the same time adjusting no of sts so that there are 8 sts over each sleeve, 24-28-28-32-32 sts over back piece and 35-35-35-43-43 sts over front piece (do not inc or dec over the middle 17 sts) = 75-79-79-91-91 sts on needle. Work rib as follows: Continue the 2 sts over each raglan in K 2, then P 2, K 2 and P 2 over each sleeve, work sts over back piece P 2/K 2, work the middle 17 sts over front piece as follows: P 2, K 3, P 2, K 3, P 2, K 3, P 2, work the other sts on each side K 2/P 2. When neck edge measures 5-6-6-7-7 cm, loosely cast off with K over K and P over P.

ASSEMBLY:
Sew the openings under the sleeves tog.

This pattern has been corrected.

Updated online: 09.11.2021
BODY:... Continue as follows: Diagram M.1 over the first 60 sts (i.e. part A over the first 14 sts, part B over the next 4 sts, part C over the next 24 sts, part D over the next 4 sts and part E over the last 14 sts), then diagram M.2 over the remaining sts - NB: work the yarn over from previous round twisted to avoid holes...

Diagram

symbols = K from RS, P from WS
symbols = P from RS, K from WS
symbols = slip 2 sts on cable needle behind piece, K 2, K 2 from cable needle
symbols = slip 2 sts on cable needle in front of piece, K 2, K 2 from cable needle
symbols = slip 3 sts on cable needle in front of piece, P 1, K 3 from cable needle
symbols = slip 1 st on cable needle behind piece, K 3, P 1 from cable needle
symbols = slip 3 sts on cable needle in front of piece, K 3, K 3 from cable needle
symbols = slip 3 sts on cable needle behind piece, K 3, K 3 from cable needle
diagram
diagram

Each of our patterns has specific tutorial videos to help you.

Do you have a question? See a list of frequently asked questions (FAQ)

Knitting tension is what determines the final measurements of your work, and is usually measured per 10 x 10 cm. It is provided like so: number of stitches in width x number of rows in height - eg: 19 stitches x 26 rows = 10 x 10 cm.

The knitting tension is very individual; some people knit/crochet loosely while others work tightly. You adjust the knitting tension with the needle size, which is why the suggested needle size is only meant as a guide! You need to adjust this (up or down) to ensure that YOUR knitting tension matches the knitting tension provided in the pattern. If you work with a different knitting tension than provided you will have a different yarn consumption, and your work will have different measurements than what the pattern suggests.

The knitting tension also determines which yarns can replace each other. As long as you achieve the same knitting tension you can replace one yarn with another.

See DROPS lesson: How to measure your tension/gauge

See DROPS video: How to make a gauge tension swatch

The required amount of yarn is provided in grams, eg: 450 g. To calculate how many balls you’ll need you first need to know how many grams are in 1 ball (25g, 50g or 100g). This information is available if you click on the individual yarn quality on our pages. Divide the amount required with the amount of each ball. For example, if each ball is 50g (the most common amount), the calculation will be as follows: 450 / 50 = 9 balls.

The important thing when changing from one yarn to another is that the knitting/crochet tension remains the same. This is so that the measurements of the finished piece will be the same as on the sketch provided. It is easier to achieve the same knitting tension using yarns from the same yarn group. It is also possible to work with multiple strands of a thinner yarn to achieve the knitting tension of a thicker one. Please try our yarn converter. We recommend you to always work a test swatch.

Please NOTE: when changing yarn the garment might have a different look and feel to the garment in the photo, due to individual properties and qualities of each yarn.

See DROPS lesson: Can I use a different yarn than the one mentioned in the pattern?

All our yarns are categorised into yarn groups (from A to F) according to thickness and knitting tension – group A contains the thinnest yarns and group F the thickest. This makes it easier for you to find alternative yarns to our patterns, should you wish to switch yarn. All yarns within the same group have a similar knitting tension and can easily replace each other. However, different yarn qualities have different structures and properties which will give the finished work a unique look and feel.

Click here for an overview of the yarns in each yarn group

At the top of all our patterns you’ll find a link to our yarn calculator, which is a helpful tool should you wish to use a different yarn than suggested. By filling in the yarn quality you wish to replace, the amount (in your size) and number of strands, the calculator will present good alternative yarns with the same knitting tension. Additionally it will tell you how much you’ll require in the new qualities and whether you’ll need to work with multiple strands. Most skeins are 50g (some are 25g or 100g).

If the pattern is worked with multiple colours, every colour will have to be calculated separately. Similarly, if the pattern is worked with several strands of different yarns (for example 1 strand Alpaca and 1 strand Kid-Silk) you will have to find alternatives for each, individually.

Click here to see our yarn calculator

Since different yarns have different qualities and textures we have chosen to keep the original yarn in our patterns. However, you can easily find options among our available qualities by using our yarn calculator, or simply pick a yarn from the same yarn group.

It is possible that some retailers still have discontinued yarns in stock, or that someone has a few skeins at home that they would like to find patterns for.

The yarn calculator will provide both alternative yarn as well as required amount in the new quality.

If you think it's hard to decide what size to make, it can be a good idea to measure a garment you own already and like the size of. Then you can pick the size by comparing those measures with the ones available in the pattern's size chart.

You'll find the size chart at the bottom of the pattern.

See DROPS lesson: How to read size chart

The needle size provided in the pattern serves only as a guide, the important thing is to follow the knitting tension. And since knitting tension is very individual, you will have to adjust the needle size to ensure that YOUR tension is the same as in the pattern – maybe you’ll have to adjust 1, or even 2 needle sizes, up or down to achieve the correct tension. For this, we recommend that you work test swatches.

Should you work with a different knitting tension than the one provided, the measurements of the finished garment might deviate from the measurement sketch.

See DROPS lesson: How to measure your tension/gauge

See DROPS video: How to make a tension/gauge swatch

Working a garment top-down provides more flexibility and room for personal adjustment. For example it is easier to try the garment on while working, as well as making adjustments to length of yoke and shoulder caps.

The instructions are carefully explaining every step, in the correct order. Diagrams are adjusted to the knitting direction and are worked as usual.

The diagram depicts all rows/rounds, and every stitch seen from the right side. It is read from bottom to top, from right to left. 1 square = 1 stitch.

When working back and forth, every other row is worked from the right side and every other row is worked from the wrong side. When working from the wrong side, the diagram will have to be worked reversed: from left to right, knit stitches are purled, purl stitches are knit etc.

When working in the round every round is worked from the right side and the diagram are worked from right to left on all rounds.

See DROPS lesson: How to read knitting diagrams

The diagram depicts all rows/rounds, and every stitch seen from the right side. It is worked from bottom to top, from right to left.

When working back and forth every other row is worked from the right side: from right to left and every other row is worked from the wrong side: from left to right.

When working in the round, every row in the diagram are worked from the right side, from right to left.

When working a circular diagram you start in the middle and work your way outwards, counter clockwise, row by row.

The rows usually start with a given number of chain stitches (equivalent to the height of the following stitch), this will either be depicted in the diagram or explained in the pattern.

See DROPS lesson: How to read crochet diagrams

Instructions for working several diagrams after each other on the same row/round, will often be written like so: “work A.1, A.2, A.3 a total of 0-0-2-3-4 times". This means you work A.1 once, then A.2 is worked once, and A.3 is repeated (in width) the number of times provided for your size – in this case like so: S = 0 times, M = 0 times, L=2 times, XL= 3 times and XXL = 4 times.

The diagrams are worked as usual: begin with the first row in A.1, then work the first row in A.2 etc.

See DROPS lesson: How to read knitting diagrams

See DROPS lesson: How to read crochet diagrams

The total width of the garment (from wrist-to-wrist) will be larger in the larger sizes, despite the actual sleeves being shorter. The larger sizes have longer sleeve caps and wider shoulders, so there will be a good fit in all sizes.

The measurement sketch/schematic drawing provides information regarding the full length of the garment. If it’s a jumper or a jacket the length is measured from the highest point on the shoulder closest to the neckline, and straight down to the bottom of the garment. It is NOT measured from the tip of shoulder. Similarly, the length of yoke is measured from the highest point on the shoulder and down to where yoke is split into body and sleeves.

On a jacket measures are never taken along bands, unless specifically stated. Always measure inside band stitches when measuring the length.

See DROPS lesson: How to read a schematic drawing

Diagrams are often repeated on the round or in height. 1 repeat is the diagram the way it appears in the pattern. If it says to work 5 repeats of A.1 in the round, then you work A.1 a total of 5 times after/next to each other in the round. If it says to work 2 repeats of A.1 vertically/in height you work the entire diagram once, then begin again at the start and work the entire diagram one more time.

Chain stitches are slightly narrower than other stitches and to avoid working the cast-on edge too tight, we simply chain more stitches to begin with. The stitch count will be adjusted on the following row to fit the pattern and measurement sketch.

The rib edge is more elastic and will contract slightly compared to, for example, stocking stitch. By increasing before the rib edge, you avoid a visible difference in width between the rib edge and the rest of the body.

It’s very easy to cast off too tightly, and by making yarn overs while casting off (and simultaneously casting these off) you avoid a too tight cast off edge.

See DROPS video: How to bind off with yarn overs (yo)

To achieve an even increase (or decrease) you can increase on, for example: every 3rd and 4th row alternately, like so: work 2 rows and increase on the 3rd row, work 3 rows and increase on the 4th. Repeat this until the increase is complete.

See DROPS lesson: Increase or decrease 1 st on every 3rd and 4th row alternately

Should you prefer to work in the round instead of back and forth, you may of course adjust the pattern. You’ll need to add steeks mid-front (usually 5 stitches), and follow the instructions. When you would normally turn and work from the wrong side, simply work across the steek and continue in the round. At the end you’ll cut the piece open, pick up stitches to work bands, and cover the cut edges.

See DROPS video: How to knit steeks and cut open

Should you prefer to work back and forth instead of in the round, you may of course adjust the pattern so you work the pieces separately and then assemble them at the end. Divide the stitches for the body in 2, add 1 edge stitch in each side (for sewing) and work the front and back pieces separately.

See DROPS lesson: Can I adapt a pattern for circular needles into straight needles?

Pattern repeats can vary slightly in the different sizes, in order to get the correct proportions. If you’re not working the exact same size as the garment in the photo, yours might deviate slightly. This has been carefully developed and adjusted so that the complete impression of the garment is the same in all sizes.

Make sure to follow instructions and diagrams for your size!

If you have found a pattern you like which is available in women’s size it’s not very difficult to convert it to men’s size. The biggest difference will be the length of sleeves and body. Start working on the women size that you think would fit across the chest. The additional length will be worked right before you cast off for the armhole/sleeve cap. If the pattern is worked top-down you can add the length right after the armhole or before the first decrease on sleeve.

Regarding additional yarn amount, this will depend on how much length you add, but it is better with a skein too many than too few.

All yarns will have excess fibres (from production) that might come off as lint or shedding. Brushed yarns (ie hairier yarns) have more of these loose, excess fibres, causing more shedding.

Shedding also depends on what is worn under or over the garment, and whether this pulls at the yarn fibres. It’s therefore not possible to guarantee that there will be no shedding

Below are some tips on how to get the best result when working with hairier yarns:

1. When the garment is finished (before you wash it) shake it vigorously so the looser hairs come off. NOTE: do NOT use a lint roller, brush or any method that pulls at the yarn.

2. Place the garment in a plastic bag and put it in your freezer - the temperature will cause the fibres to become less attached to each other, and excess fibres will come off easier.

3. Leave in the freezer for a few hours before taking it out and shaking it again.

4. Wash the garment according to the instructions on the yarn label.

Pilling is a natural process that happens to even the most exclusive of fibers. It's a natural sign of wear and tear that is hard to avoid, and that is most visible in high friction areas of your garment like a sweater's arms and cuffs.

You can make your garment look as new by removing the pilling, using a fabric comb or a pill/lint remover.

Still can't find the answer you need? Then scroll down and leave your question so one of our experts can try to help you. This will be done normally within 5 to 10 working days.
In the meantime, you can read the questions and answers that others have left to this pattern or join the DROPS Workshop on Facebook to get help from fellow knitters/crocheters!

You might also like...

Igor

Nina, Germany

Igor

Martina, Czech Republic

Igor

Yoshiko, Japan

Igor

Martina, Czech Republic

Post a comment to pattern DROPS Children 22-43

We would love to hear what you have to say about this pattern!

If you want to leave a question, please make sure you select the correct category in the form below, to speed up the answering process. Required fields are marked *.

Comments / Questions (49)

country flag Gaetane wrote:

Pourquoi après les rangs des côtes le rang suivant n’a que 157 mailles plutôt que 158 pour la grandeur 3/4ans alors j’arrive à la fin du rang avec une maille en trop

20.09.2020 - 18:27

DROPS Design answered:

Bonjour Gaetane, vérifiez bien votre nombre de mailles et vos augmentations, au début, vous tricotez les 40 premières mailles en augmentant 20 mailles = 60 mailles et dans la 2ème partie, vous tricotez les 117 m restantes à 100 = il doit bien vous rester 160 m. Bon tricot!

21.09.2020 - 14:23

country flag Pauletto Brigitte wrote:

Bonjour. Je réalise le modèle en 3 ans. Pour la manche après les 5 cm de côtes on soit faire les 2 premières mailles à l\'endroit et ensuite continuer en tricotant M2. On reprend alors avec 1 maille endroit ? Ce qui fait 3 mailles endroit de suite ?

22.07.2020 - 15:40

DROPS Design answered:

Bonjour Mme Pauletto, vous commencez le tour par 2 m end (avec le marqueur entre les 2 m end), puis vous tricotez M.2 (en commençant par 1 m end), vous aurez donc 3 m end au début du tour. Vous allez ensuite augmenter de chaque côté de ces 2 m end, et tricoter les augmentations en M.2, ainsi, le motif continuera de part et d'autre de ces 2 m end au milieu sous la manche. Bon tricot!

29.07.2020 - 12:36

country flag Milada Stočková wrote:

Hello, can you please tell me, where the row starts? in the midlle where the 4 K are? so all the instructions start from there?? thanks for response.

13.05.2020 - 19:08

DROPS Design answered:

Dear Mrs Stočková, round start just before the middle panel on front piece worked with cables and called M.1. Happy knitting!

14.05.2020 - 07:59

country flag Lelletta wrote:

Buonasera, vorrei fare questo modello con i ferri dritti, ma dalla spiegazione mi sembra di capire che la fine dei ferri termina sul davanti, per cui mi ritroverei a dover fare una cucitura proprio al centro. Sbaglio? Vi ringrazio molto per la Vostra disponibilità e nell'attesa Vi saluto cordialmente. Buon lavoro!

17.04.2020 - 23:44

DROPS Design answered:

Buongiorno Lelletta. Potrebbe essere più comodo lavorare il maglione in parti separate e poi cucire alla fine. A questo link trova indicazioni su come adattare un modello per una lavorazione in piano. Per un aiuto più personalizzato, può contattare il suo rivenditore Drops di fiducia. Buon lavoro!

18.04.2020 - 11:13

country flag Hélène wrote:

Bonjour, J'ai vérifié les explications en anglais, il y a bien une erreur en français. Au lieu de dire: "Tricoter 1 tour end, puis continuer en côtes ainsi : *2 m env, 2 m end*, répéter de *-* sur les 20 m suiv" (ce qui fait 24m en tout dont 2 appartenant au milieu devant) il aurait fallut écrire: "sur 20 m. au total" ou "répéter de *-* sur les 16 mailles suivantes". Telle Pénélope je déferai donc recommencer mon ouvrage :-)

19.12.2019 - 18:29

country flag Hélène wrote:

Bonjour, Quand je tricote: "*2 m env, 2 m end*, répéter de *-* sur les 20 m suiv, tricoter ensuite 2 m end..." j'ai donc 22 mailles avant le groupe de 4 m. end. du milieu devant. Or sur le premier tour après les côtes vous n'indiquez que 18 mailles, il m'en reste 4 avant les 4 m.end. du milieu devant? Y a-t-il une erreur? Merci d'avance

19.12.2019 - 18:16

DROPS Design answered:

Bonjour Hélène, en tricotant 20 mailles en côtes (2 m env, 2 m end) , puis 2 m end, vous avez 18 mailles en côtes 2 m env/2 m end + 4 m end = 22 m au total. Mais je ne saisis pas bien votre question, désolée. N'hésitez pas à en dire davantage sur votre taille, et le rang qui vous pose problème. Bon tricot!

20.12.2019 - 09:02

country flag W Van Den Houteh wrote:

Patroon children 22-43 het middengedeelte is groter dan het rechtse en linkse wanneer het middengedeelte beëindigd is moet je dan weer aan de onderkant beginnen of aansluiten op rechts en links

30.09.2019 - 12:55

DROPS Design answered:

Dag W Van Den Houteh ,

Het aantal naalden in de hoogte is inderdaad verschillend. Als je klaar bent met de rechter linker kabel begin je opnieuw met het telpatroon in de hoogte, terwijl je gewoon verder gaat met het middelste patroon van de kabel in de hoogte.

03.10.2019 - 13:36

country flag Lis E Nielsen wrote:

Når jeg har strikket diagram M.1 færdigt, d.v.s. A, B, D og E, hvis jeg strikker C færdig, og starter forfra på A,B,D og E, mangler der et par linier for at få det til at passe. eller hvad gør man lige her

30.09.2019 - 10:27

DROPS Design answered:

Hej Lis, du fortsætter med de små snoninger b og d på hver 4.omgang, og de andre snoninger ifølge de andre diagrammer. God fornøjelse!

01.10.2019 - 15:14

country flag Jane Bruno wrote:

Thank you for the response. Are you getting 4 rows because it says "each side"? 2 its 2 times -- so 1 time would be at the beginning of a row and at the beginning of the next row?

08.03.2019 - 21:14

DROPS Design answered:

Dear Mrs Bruno, yes you need 4 rows to cast off 2 sts 2 times on each side - then need 4 rows to cast off 1 st 2 times on each side. Happy knitting!

11.03.2019 - 09:17

country flag Jane Bruno wrote:

I am working on the yoke. It says "AT THE SAME TIME bind off at the beg of every row in each side: 2 sts 2 times and 1 st 2 times." Just need to clarify that it really is not EVERY row but rather 2 sts on one side then 2 sts at the beginning of the next row, then 1 st at the start of the next row and then 1 st at the start of the next.

07.03.2019 - 19:21

DROPS Design answered:

Hi Jane, Yes, this means that you bind off at the beginning of each row (so every row). So you bind off 2 stitches at the beginning of the next 4 rows, then bind off 1 stitch at the beginning of the next 4 rows, etc. Happy knitting!

08.03.2019 - 07:59