
Popular categories
Looking for a yarn?


Comments / Questions (15)
![]() Danielle wrote:
Danielle wrote:
Bonjour, Lorsqu'on tricote ce modèle dans une laine alternative, doit-on travailler avec le meme nombre de mailles ? En vous remerciant
04.11.2017 - 16:56DROPS Design answered:
Bonjour Danielle, pour tricoter ce modèle dans une alternative sans avoir à modifier les explications, vous devez avoir le même échantillon - vous trouverez ici des indications complémentaires sur les alternatives. Bon tricot!
06.11.2017 - 09:33
![]() Danielle wrote:
Danielle wrote:
Bonsoir, je souhaiterais réaliser ce pull avec un fil de qualité alternative à savoir brushed alpaga silk. Mais combien de pelotes dois-je commander pour la taille S ? en vous remerciant
23.10.2017 - 21:27DROPS Design answered:
Bonjour Danielle, vous trouverez ici toutes les infos nécessaires pour calculer la nouvelle quantité de laine, n'oubliez pas que, même du même groupe, des fils de composition différentes auront un aspect différent pour un même modèle. Bon tricot!
24.10.2017 - 08:36
![]() Regnier Adeline wrote:
Regnier Adeline wrote:
Bonjour, Petite question je ne vois pas sur la photo mais j'ai l'impression que le pull est en jersey et dans les explications les rangs en aller retour sont tricotés tous en points endroit ? Merci d'avance
23.08.2017 - 12:03DROPS Design answered:
Bonjour Adeline! Le pull est en jersey: en travaillant en aller retour, le rang sur l'endroit est toujours a l'endroit et le rang sur l'envers est toujours a l'envers. Bon tricot!
23.08.2017 - 12:30Nadine wrote:
Good day I enjoyed knitting this easy pattern, but I have reach the point of sewing the shoulder, side and arm seams. It is if the arm sleaves are to narrow for the opening at the sides, yet I have done everything just as said in the pattern. Where could I have gone wrong? Regards
24.08.2015 - 18:56DROPS Design answered:
Dear Nadine, pin sleeves around armholes/sleeve on body to fit sts easily and maintain in place before sewing. Happy knitting!
25.08.2015 - 09:30Marie Fairbairn wrote:
When I increase doesn't that throw off my ribbing?
12.12.2014 - 00:15DROPS Design answered:
Dear Mrs Fairbairn, when you inc in collar in P sections, the ribbing will be altered to P3, P4 ... in the increased sections and will remain P2 in remaining sections. Happy knitting!
12.12.2014 - 09:43
![]() BOURGOIN Michèle wrote:
BOURGOIN Michèle wrote:
Intéressée par le modèle drops 128-13 en Paris (coton) j'aimerai savoir dans quelle qualité de laine je pourrai le réaliser en respectant les mêmes mensurations. Merci d'avance
07.11.2013 - 18:59DROPS Design answered:
Bonjour Mme Bourgoin, la quantité de fil nécessaire est indiquée, au poids, dans l'ordre des tailles, à droite de la photo, ainsi en taille S par ex., il faut 650 g/ 50 g la pelote de Paris = 13 pelotes, sur la base de l'échantillon indiqué. Bon tricot!
08.11.2013 - 09:05
![]() Elaniamc wrote:
Elaniamc wrote:
Very classic - my favorite clasic type sweater.can't wait to be able to knit this
06.02.2011 - 18:04
![]() Maggioli wrote:
Maggioli wrote:
Bonjour, j'attends les explications avec impatience ! merci ;
17.01.2011 - 17:02
![]() Cattis wrote:
Cattis wrote:
Klassiskt snygg
15.01.2011 - 18:58
![]() Monika wrote:
Monika wrote:
Na ja, die Passform am Ausschnitt scheint noch nicht optimal zu sein.
07.01.2011 - 12:42
|
|
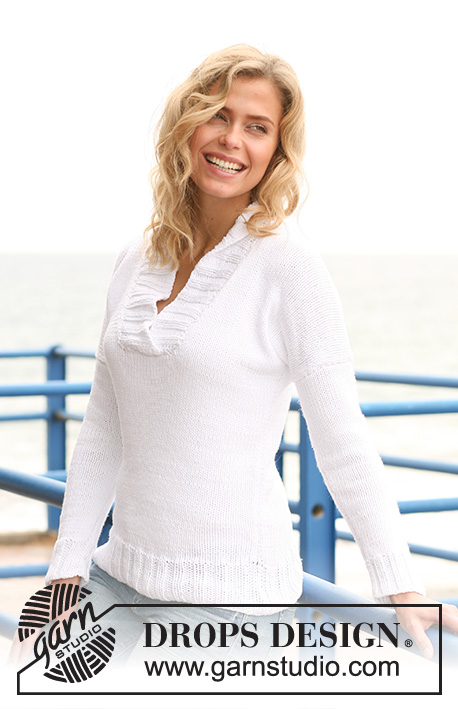
White Gem#whitegemsweater |
|
 |
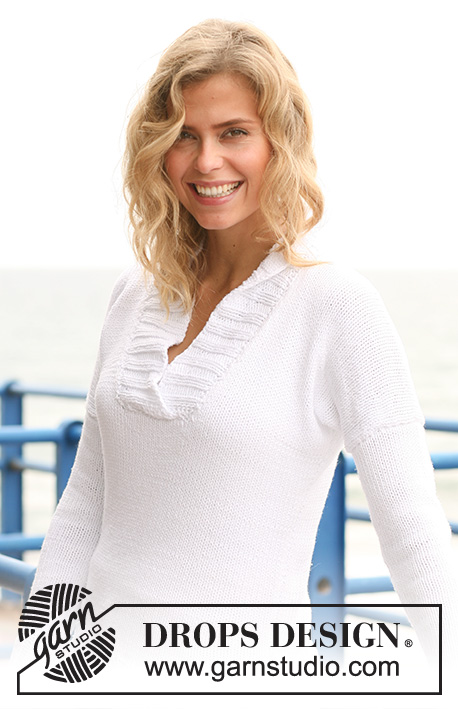 |
Knitted DROPS sweater with shawl collar in ”Paris”. Size: S - XXXL.
DROPS 128-13 |
|
|
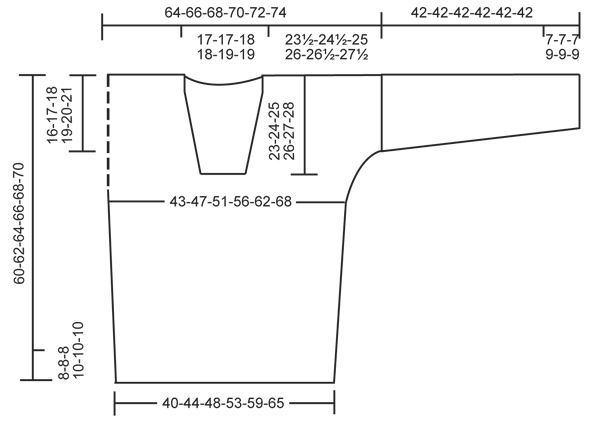
INCREASE TIP: All inc are done from RS. Inc 1 st by making 1 YO. On next row K YO twisted (i.e. work in the back loop of st instead of front) to avoid holes. DECREASE TIP (applies to neck dec): All dec are done from RS. Dec 1 st at beg of row as follows: K 1, slip 1 st as if to K, K 1, psso. Dec 1 st at end of row as follows: K until 3 sts remain, K 2 tog and K 1. GARTER ST (back and forth on needle): K all rows. -------------------------------------------------------- BODY: Worked in the round on circular needle. Cast on 136-152-164-180-200-220 sts with Paris on circular needle size 4.5 mm. Work rib as follows: * K 2, P 2 *, repeat from *-*. When piece measures 8-8-8-10-10-10 cm, switch to circular needle size 5 mm and continue in stocking st. Insert a marker at beg of round and a marker after 68-76-82-90-100-110 sts (these marks the sides). REMEMBER THE KNITTING TENSION! When piece measures 16-16-14-16-16-16 cm, inc 1 st on each side of each marker (= 4 new sts per inc) - READ INCREASE TIP. Repeat inc every 8-8-6-6-6-6 cm a total of 2-2-3-3-3-3 times = 144-160-176-192-212-232 sts. Continue to work until piece measures 32-33-34-35-36-37 cm. Now divide the piece at the markers and finish each part separately. BACK PIECE: = 72-80-88-96-106-116 sts. Continue to work back and forth on needle while AT THE SAME TIME on 1st row casting on 1 st for sleeve in each side. Repeat inc of 1 st in each side on every 4th-4th-4th-4th-4th-8th row a total of 4-4-4-4-6-3 times. Then cast on new sts at the end of every row in each side as follows: 1 st a total of 1-2-3-4-1-1 times, 2 sts a total of 4-3-2-1-0-0 times = 98-104-110-116-120-124 sts. Continue to cast on 5-4-3-2-1-1 new sts at the end of the next two rows = 108-112-116-120-122-126 sts. Continue to work until piece measures 58-60-62-64-66-68 cm. Now cast off the middle 24-24-26-26-28-28 sts for neck and finish each shoulder separately. Continue to cast off 2 sts on next row from neck = 40-42-43-45-45-47 sts remain on the shoulder. Cast off when piece measures 60-62-64-66-68-70 cm. FRONT PIECE: = 72-80-88-96-106-116 sts. READ ALL OF THE FOLLOWING SECTION BEFORE CONTINUING! Work as on back piece, AT THE SAME TIME when piece measures 37-38-39-40-41-42 cm, cast off the middle 16-16-16-18-18-18 sts for neck and finish each shoulder separately. RIGHT FRONT PIECE: Continue back and forth on needle. Then dec 1 st from neck - READ DECREASE TIP! - every 3 cm a total of 6-6-7-6-7-7 times. After all dec are done, 40-42-43-45-45-47 sts remain for shoulder. Continue to work until piece measures 60-62-64-66-68-70 cm, cast off. LEFT FRONT PIECE: Work as right front piece but reversed. SLEEVE: Worked in the round on double pointed needles. Cast on 40-44-44-48-48-48 sts with Paris on double pointed needles size 4.5 mm and work rib as follows: * K 2, P 2 *, repeat from *-*. When piece measures 7-7-7-9-9-9 cm, switch to double pointed needles size 5 mm and continue in stocking st, AT THE SAME TIME on 1st round from RS dec 0-2-0-2-2-0 sts evenly = 40-42-44-46-46-48 sts. Insert a marker at beg of round = mid under sleeve. When piece measures 10-10-10-11-11-11 cm, inc 1 st on each side of marker (= 2 new sts per inc). Repeat inc every 4½-4-3½-3-2½-2½ cm a total of 7-8-9-10-11-12 times = 54-58-62-66-68-72 sts. When piece measures 42-42-42-42-42-42 cm, cast off all sts. ASSEMBLY: Sew the shoulder seams tog. Sew underarm seams inside 1 edge st and sew in sleeves. SHAWL COLLAR: The collar is worked back and forth from mid front with Paris on circular needle size 4.5 mm. Knit up sts inside 1 edge st from RS. Start at the bottom towards the neck on right front piece. Knit up approx. 130 to 160 sts up along the neck on right front piece, back in the neck and down along the neck on left front piece. NOTE! Do not knit up sts over the 16-16-16-18-18-18 sts that were cast off for neck on front piece. K 1 row from WS while AT THE SAME TIME adjusting the no of sts to 138-142-146-150-154-158. Work rib on next row from RS as follows: 2 sts in Garter st - See explanation above, * K 2, P 2 *, repeat from *-*, finish with K 2 and 2 sts in garter st = 33-34-35-36-37-38 P-sections. Continue to work like this until rib measures approx. 4-4-4-5-5-5 cm. On next row from RS, inc 1 st in each of the middle 23-24-25-26-27-28 P-sections - READ INCREASE TIP!, i.e. do not inc in the first 5 and last 5 P-sections = 161-166-171-176-181-186 sts. Continue like this until rib measures approx. 7-7-7-8-8-8 cm. On next row from RS, inc 1 st in each of the middle 19-20-21-22-23-24 P-sections, i.e. do not inc in the first 7 and last 7 P-sections = 180-186-192-198-204-210 sts. Continue like this until rib measures approx. 9-9-9-11-11-11 cm. Now loosely cast off sts with K over K and P over P. Place the ribs on top of each other at the bottom of the neck opening and sew through both layers. |
|
|
|
Have you finished this pattern?Tag your pictures with #dropspattern #whitegemsweater or submit them to the #dropsfan gallery. Do you need help with this pattern?You'll find 24 tutorial videos, a Comments/Questions area and more by visiting the pattern on garnstudio.com. © 1982-2025 DROPS Design A/S. We reserve all rights. This document, including all its sub-sections, has copyrights. Read more about what you can do with our patterns at the bottom of each pattern on our site. |
|


With over 40 years in knitting and crochet design, DROPS Design offers one of the most extensive collections of free patterns on the internet - translated to 17 languages. As of today we count 314 catalogues and 11822 patterns translated into English (UK/cm).
We work hard to bring you the best knitting and crochet have to offer, inspiration and advice as well as great quality yarns at incredible prices! Would you like to use our patterns for other than personal use? You can read what you are allowed to do in the Copyright text at the bottom of all our patterns. Happy crafting!
Post a comment to pattern DROPS 128-13
We would love to hear what you have to say about this pattern!
If you want to leave a question, please make sure you select the correct category in the form below, to speed up the answering process. Required fields are marked *.