
Popular categories
Looking for a yarn?


|
||||||||||
Rumble |
||||||||||
 |
 |
|||||||||
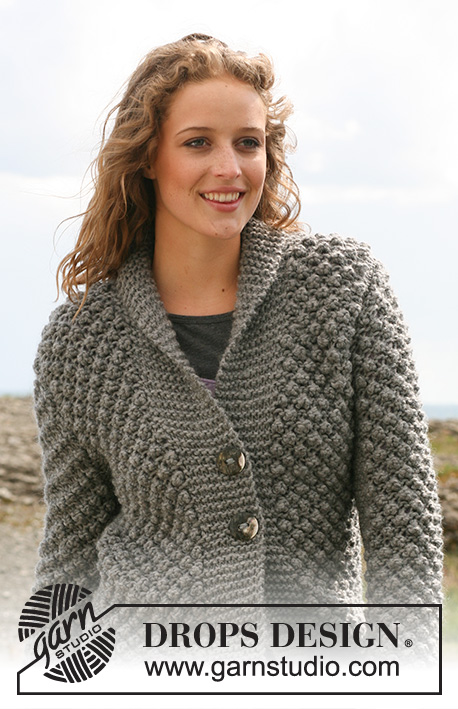
Knitted DROPS Jacket in ”Snow” with berry pattern. Size S - XXXL.
DROPS 110-29 |
||||||||||
|
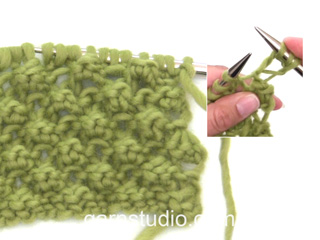
Pattern: See diagram M.1. Diagram shows the pattern from the RS. Note! Row 1 in M.1 = WS. Work sts not fitting into M.1 when dec in reverse stocking st. Buttonhole: Cast off for buttonholes on right front band. 1 buttonhole = cast off 3rd and 4th st from mid front and cast on 2 new sts on return row. Cast off for buttonholes when piece measures: Size S: 38 and 48 cm. Size M: 39 and 49 cm Size L: 40 and 50 cm. Size XL: 41 and 51 cm. Size XXL: 42 and 52 cm. Size XXXL: 43 and 53 cm. Back piece: Worked back and forth on needle. Cast on 64-68-72-80-84-92 sts (includes 1 edge st each side) with Snow on needle size 8 mm. K 1 row from WS, K 1 row from RS and continue as follows from WS: 1 edge st, K9, M.1 on the next 44-48-52-60-64-72 sts, K9, 1 edge st. Note! The 9 sts on either side of M.1 are K from WS and P from RS. Continue in pattern like this. Remember the knitting tension! When piece measures 10 cm dec 1 st each side on every 6.5-6.5-6.5-7-7-7 cm a total of 7 times = 50-54-58-66-70-78 sts. When piece measures 52-53-54-55-56-57 cm cast off for armhole each side at the beg of every row: 3 sts 1 time, 2 sts 1-1-1-2-3-5 times and 1 st 0-2-2-4-4-4 times = 40-40-44-44-44-44 sts. When piece measures 70-72-74-76-78-80 cm cast off the middle 12-12-16-16-16-16 sts for neck = 14-14-14-14-14-14 sts left on each shoulder. Cast off when piece measures 72-74-76-78-80-82 cm. Right front piece: Cast on 40-44-44-48-52-56 sts (includes 1 edge st at side and 10 front band sts towards mid front) on needle size 8 mm with Snow. K 1 row from WS, K 1 row from RS and continue as follows from WS: 1 edge st, K9, M.1 on the next 20-24-24-28-32-36 sts, 10 garter sts (= front band). NB! The 9 sts at side are K from WS and P from RS. Continue in pattern like this. When piece measures 10 cm dec at side as described for back piece = 33-37-37-41-45-49 sts. Rememeber buttonholes– see above. At the same time when piece measures 48-49-50-51-52-53 cm incl 1 st from berry pattern in front band (i.e. number of sts remain the same but no of sts in pattern dec and no of sts on front band inc) on every 6-4-4-3-3-3 cm a total of 4-6-6-6-8-8 times. At the same time when piece measures 52-53-54-55-56-57 cm cast off for armhole at side as described for back piece = 28-30-30-30-32-32 m. When piece measures 72-74-76-78-80-82 cm cast off the outermost 14-14-14-14-14-14 sts for shoulder and work remaining sts on row. Now continue on the remaining 14-16-16-16-18-18 sts for collar in garter st with shortened rows as follows: * work 2 rows on all sts, work 2 rows on the 7-8-8-8-9-9 sts towards mid front only *, repeat from *-* until collar measures 7.5-7.5-9.5-9.5-9.5-9.5 cm (measured on the shorter side) from shoulder. Cast off. Left front piece: Like right front piece, but mirrored. Sleeve: Worked back and forth on needle. Cast on 30-30-30-34-34-34 sts on needle size 8 mm with Snow. K 1 row from WS, K 1 row from RS and now continue in M.1 with 1 edge st each side – remember first row in M.1 = WS. When piece measures 10 cm inc 1 st each side on every 8-5.5-4.5-4.5-4-3 cm a total of 5-7-8-8-9-11 times – work inc sts in reverse stocking st = 40-44-46-50-52-56 sts. When piece measures 47-47-46-46-45-43 cm – less on the larger sizes because of longer sleeve cap and wider shoulders - cast off 3 sts each side for armhole. Cast off to shape the sleeve cap each side at the beg of every row: 2 sts 2 times, 1 st 1-2-2-3-4-6 times, then 2 sts each side until piece measures 55-56-55-56-57-58 cm, now cast off 3 sts each side 1 time and cast off remaining sts. Piece measures approx 56-57-56-57-58-59 cm. Assembly: Sew shoulder seams. Set in sleeves and sew side and sleeve seams inside 1 edge st. Sew collar tog mid back and sew to neck. Sew on buttons to left front piece. |
||||||||||
Diagram explanations |
||||||||||
|
||||||||||

|
||||||||||
|
Have you made this or any other of our designs? Tag your pictures in social media with #dropsdesign so we can see them! Do you need help with this pattern?You'll find tutorial videos, a Comments/Questions area and more by visiting the pattern on garnstudio.com. © 1982-2024 DROPS Design A/S. We reserve all rights. This document, including all its sub-sections, has copyrights. Read more about what you can do with our patterns at the bottom of each pattern on our site. |
||||||||||


With over 40 years in knitting and crochet design, DROPS Design offers one of the most extensive collections of free patterns on the internet - translated to 17 languages. As of today we count 304 catalogues and 11422 patterns - 11422 of which are translated into English (UK/cm).
We work hard to bring you the best knitting and crochet have to offer, inspiration and advice as well as great quality yarns at incredible prices! Would you like to use our patterns for other than personal use? You can read what you are allowed to do in the Copyright text at the bottom of all our patterns. Happy crafting!
Comments / Questions (30)
Bonjour, je me demande comment, après une diminution, commencer les rangs sur l\'endroit du point fantaisie, sans affecter le dessin...\r\nMerci
01.09.2018 - 05:42DROPS Design answered:
Bonjour Aline, tricotez les mailles à l'endroit sur l'endroit/à l'envers sur l'envers en fonction du niveau du point fantaisie où vous êtes, par ex si vous diminuez 1 m dans les 3 m à tricoter ens à l'env, vous tricoterez la dernière de ces mailles à l'envers. Bon tricot!
04.09.2018 - 11:31HILFE! Vorderteil Maschenabnahme!!! (XL) 48 M - 7 M( Seite) = 41 M/ +6 M(Blende) = 47 M/ \\r\\n- Armloch -1x3 M(44 M) -2x2 M(40 M) -4x1 M (36 M)!!! In der Beschreibung steht 30 M. Was mache ich falsch? Das passt sonst nicht mit dem Kragen und der Schulter. Danke
25.08.2018 - 09:42DROPS Design answered:
Lieber Herr Hantmann, es wird keine neuen Maschen für die Blende zugenommen, Sie sollen einfach 1 neue Masche mehr in Krausrippen stricken (= dh 1 M weniger im Muster stricken), so bleibt die Maschenanzahl gleich. Viel Spaß beim stricken!
05.09.2018 - 14:10Teen parhaillani etukappaletta. Olenko ymmärtynyt ohjeen väärin, kun olen tehnyt etureunan sileää nurjaa vai olisiko se pitänyt tehdä koko matkan ainaoikeaa neuletta??
26.04.2018 - 17:35DROPS Design answered:
Hei, tämä on kirjoitettu ohjeeseen huonolla tavalla, mutta etureunan silmukoilla neulotaan ainaoikeaa.
27.04.2018 - 12:35Sorry maar ik snap het niet zo goed. De mouwkop is toch 16 cm, is toch groter dan bij de kleine maten ??? Staat ook in het patroon....Als ik bij 43 cm hoogte moet beginnen met afkanten dan is de afstand van het begin waar ik begin met afkanten tot aan het boord toch maar 43 cm?? en dit zou 52/53 moeten zijn gezien de lange armen.
23.02.2018 - 19:26DROPS Design answered:
Hoi Mieke, Ja daar heb je gelijk aan. Mijn vorige antwoord is verwarrend (ik zal hem verwijderen). Als je de mouwlente vanf de boord tot de oksel langer wilt maken, kun je gewoon een aantal cm erbij breien (vanzelfsprekend wordt de totale mouwlengte daardoor ook groter) voordat je begint met afkanten voor de mouwkop. In de tekening onderaan het patroon zie je hoe de afmetingen zijn van de totale mouw en het armsgat.
26.02.2018 - 10:45Hallo, ik ben dit vest voor iemand in xxxl aan het breien. Bij de mouwen staat dat de grotere maten kortere mouwen hebben omdat de mouwkop langer is en de schouders breder. bij 43 cm moet al afgekant worden... Degene waar het vest voor is heeft lange armen en wil een lengte van 53 cm hebben, gemeten vanaf de oksel tot boord. Hoe los ik dit op? Graag advies.
22.02.2018 - 15:59DROPS Design answered:
23.02.2018 - 16:34Zie mijn reeds gestelde vraag. Ik had vergeten het juiste land te selecteren. Graag een antwoord. Bedankt alvast
05.07.2017 - 13:15DROPS Design answered:
Hoi Mieke, Als je op 9 cm uitkomt, zal het uiteindelijke kledingstuk ook wat (10% in dit geval) kleiner worden. Heb je al met naald 10 geprobeerd? Ik zou de naald nemen die het dichtst in de buurt komt. Je zou er ook wat braambessen (=4 steken) bij kunnen doen, bijvoorbeeld op elk voorpand 4 steken, op het achterpand 8 steken en op elke mouw 4 steken.
05.07.2017 - 16:02Als ik het proeflapje maak in braambessteek kom ik met zowel nld nr. 8 als 9 niet op 10 cm uit in de breedte maar op 9 cm. Normaal heb ik maat 42. Kan ik toch maat L aanhouden? Alle patronen van drops brei ik in L.
04.07.2017 - 22:49Angela Arias wrote:
Hola: No me queda claro como se hace el punto.
25.08.2014 - 21:18DROPS Design answered:
Hola Angela. La chaqueta se trabaja con PUNTO GARBANZO (PUNTO MORA) :
26.08.2014 - 11:41Danke für die Anleitung! Ich habe mir die Jacke gestrickt und sie ist inzwischen eines meiner Lieblings-Kleidungsstücke!
17.01.2010 - 23:58Très belle veste, attends avec hâte les explications.
30.06.2008 - 22:38