
Popular categories
Looking for a yarn?


Comments / Questions (35)
![]() Lina wrote:
Lina wrote:
Salve, se lo volessi fare con manica a tre quarti in cotone , come potrei adattare questo modello di manica?
10.03.2025 - 19:41DROPS Design answered:
Buonasera Lina, per un aiuto così personalizzato può rivolgersi al suo rivenditore DROPS di fiducia. Buon lavoro!
18.03.2025 - 21:11
![]() Nadja wrote:
Nadja wrote:
Vielen Dank für die Antwort. Es geht um die Umrandung am Ende des Projekts. Habe die Jacke fertig und die erste Reihe mit 1 FM, 4 DStb. 2 LM 4 Dstb.... umhäkelt. In der zweiten Reihe heißt es mit FM in jedes Dstb. umhäkeln, jedoch was ist mit dem Luftmaschenbogen wie wird dieser behäkelt? Und wie geht es in der 3. Runde weiter Stb. in jede FM?
01.10.2021 - 16:48DROPS Design answered:
Liebe Nadja, die Häkelkante bei der Umrandung am Ende besteht aus nur 1 Reihe (= 1 fM, * 2 cm überspringen, 4 D-Stb in die nächste Lm, 2 Lm, 4 D-Stb in dieselbe M., 2 cm überspringen, 1 fM in die nächste M. *, von *-* wiederholen.) oder misverstehe Ich Ihre Frage noch einmal (dann Verzeihung im voraus).
04.10.2021 - 09:14
![]() Nadja wrote:
Nadja wrote:
Bei der Umrandung am Schluß in der zweiten Runde, wie sind da die zwei Luftmaschen zu behäkeln? In der dritten Runde habe ich das gleiche Problem
01.10.2021 - 13:02DROPS Design answered:
Liebe Nadia, die Reihen lesen Sie so: Hinreihen (1., 3. usw) rechts nach links und Rückreihen (2., 4. usw) links nach rechts, z.B. Am Anfang 1. Reihe M.1 häkeln Sie 3 LM (= 1. Stb) + 2 Lm (1. Luftmaschenbogen), am Anfang 2. Reihe, 3 Lm und dann 2 Stb+ 2 Lm + 2 Stb in das nächste Stb) und enden Sie mit 1 Stb in das 3. Lm von Anfang der Reihe. Kann das Ihnen helfen?
01.10.2021 - 16:11
![]() Dipty wrote:
Dipty wrote:
Please help. With binding techniques
06.01.2019 - 03:39DROPS Design answered:
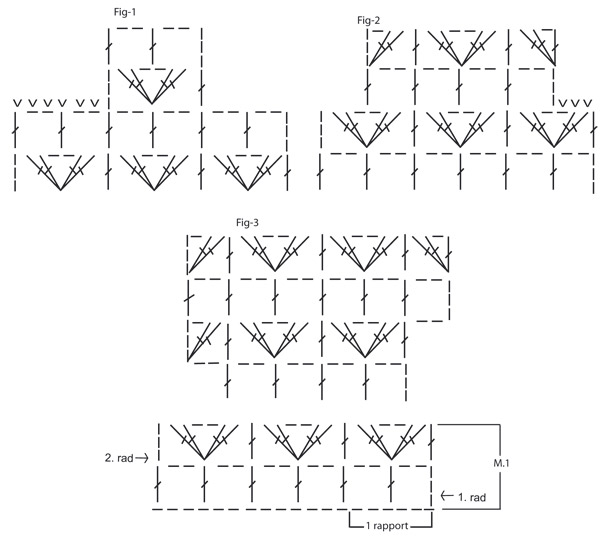
Dear Dipty, to bind off at full or 1/2 pattern repeat see figure-1 and -2 and "Binding off tip" at the beginning of the pattern. Happy crocheting!
07.01.2019 - 11:11
![]() Helena wrote:
Helena wrote:
I opskriften er farverne på ærmerne byttet om i forhold til mønster og farvevalg på resten. Kan det passe?
11.06.2017 - 19:36DROPS Design answered:
Hei Helena. Her er det blitt en liten feil i den danske oppskriften. Dette skal vi få ordnet opp i asap. Tusne takk for tilbakemeldigen. God Fornøyelse videre på denne flotte jakken.
12.06.2017 - 08:27
![]() Simone Van Den Tol wrote:
Simone Van Den Tol wrote:
Nav mijn vorige vraag, op een tablet of gsm is het onbegonnen werk om alles te vertalen via translate. Andere opmerking, bij de mouwen staat vermeld dat je na de boord naar gebroken wit moet gaan, deze kleur wordt niet biu de basis kleuren vermeld en maakt het daardoor verwarrend. Groetjes Simone
06.02.2016 - 21:25
![]() Simone wrote:
Simone wrote:
Is het mogelijk om de vragen die gesteld zijn automatisch te vertalen? Nu zie ik reacties in bv het Fins en dan zit er geen automatische vertaalknop op, dat zou wel erg helpen, zo voorkom je ook dubbele vragen.
31.01.2016 - 01:04DROPS Design answered:
Hoi Simone. Dat kunnen wij niet doen, maar je kan vertalen met Google translate bij voorbeeld.
01.02.2016 - 15:41
![]() Anna-maija Virkki wrote:
Anna-maija Virkki wrote:
Kohdassa takakappale 'Kun työn korkeus on 10 ja 20 cm' tarkoittaako tämä, että ensin kavennetaan kun 10cm virkattu ja uudestaan kun 20cm virkattuna? In english same question: In Back piece it says 'When piece measures 10 and 20 cm' does that mean first after you have done 10cm and then Again after 20cm?
03.05.2015 - 15:01DROPS Design answered:
Aivan oikein, kavennukset tehdään kun työ on 10 cm ja sitten uudestaan, kun työ on 20 cm.
04.05.2015 - 11:44
![]() Anne Kvilvang wrote:
Anne Kvilvang wrote:
Jeg lurer på om det stemmer at inntagningen op de fremre stykker skal begynne 5 cm høyer enn på bakstykket. iooskriften står det at jeg skal ta inn på 10 og 20 cm på bakstykket men på de to freme skal jeg ta inn på 15 og 25 cm . vil ikke det da bli skjevt . dette er mitt første plagg så jeg spør kanskje dumt. hilse anne kvilvang
21.06.2013 - 13:21DROPS Design answered:
Hej Anne. Jo, det stemmer at du skal tage ind forskudt.
04.07.2013 - 12:13
![]() Lili wrote:
Lili wrote:
Bonjour, Je suis en train de faire le dos, j'en suis au niveau des 8 cm à faire en brides. Ça augmente beaucoup la largeur ! J'espère que ça ne se verra pas lorsque tout sera monté. Est-ce normal ? Ne devrait-il pas y avoir de diminution afin que la zone en bride ne fasse pas plus large que le reste ? Merci !
28.05.2012 - 21:22DROPS Design answered:
Bonjour Lili, vous crochetez apparemment trop "lâche". Vérifiez votre échantillon et n'hésitez pas à prendre contact avec le magasin où vous avez acheté votre laine. Bon crochet !
31.05.2012 - 09:06
|
|||||||||||||
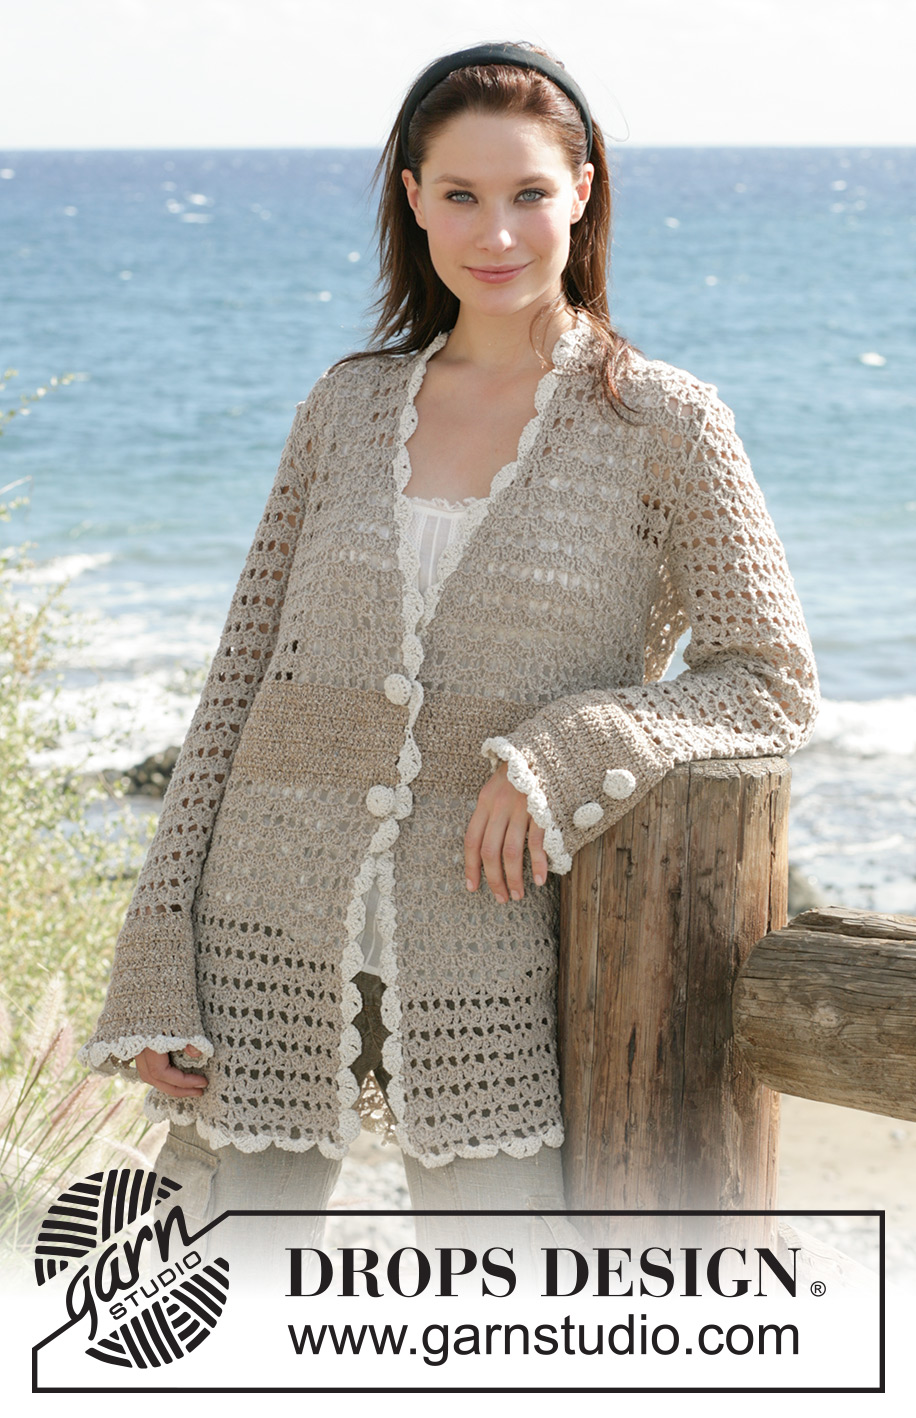
Seaside Stroll#seasidestrollcardigan |
|||||||||||||
|
|
|||||||||||||
DROPS Crochet jacket in ”Alpaca”. Sizes S - XXXL
DROPS 99-8 |
|||||||||||||
|
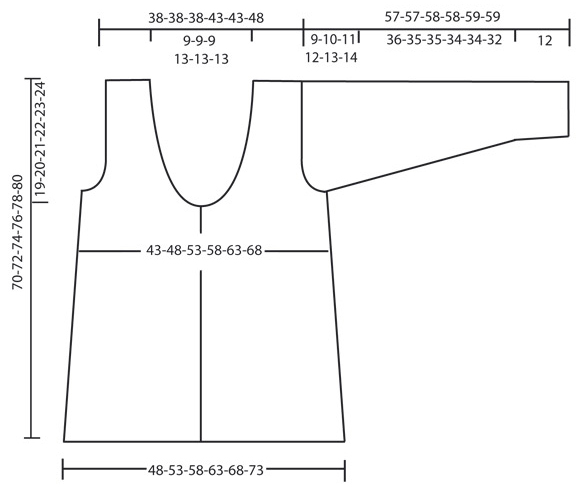
Crochet tension; 4 x 4 pattern repeats crochet with hook size 3.5 mm = 10 x 10 cm Crochet info: Substitute each tr in beginning of row with 3 ch. Pattern: See diagram M.1. Diagrams are seen from RS. English Translations for wording in diagrams are given at the bottom of pattern and they are given in the vertical order in which they appear in diagram. Closing off tips: Cast off at 1 or 1/2 pattern repeat – see figure 1 and figure 2. Cast off at beginning of row as follows: Substitute 1 pattern repeat with 6 sl st and ½ pattern repeat with 3 sl st. Cast off at end of row as follows: Turn when piece when either 1 or ½ pattern repeat is left. Increasing tip (applies to sleeve): Inc by ½ pattern repeat. Inc by turning with 5 ch instead of 3. Crochet ½ pattern repeat on next row over 2 extra ch - see figure 3. Back piece: Crochet 120-132-144-156-168-180 ch (incl 8 ch to turn with) on crochet hook size 3.5 mm with light camel. Crochet 1 tr in the 9th ch from hook, *2 ch, skip 2 ch, 1 tr in next ch *, repeat from *-* = 39-43-47-51-55-59 tr. Now crochet according to M.1 (1st row is crochet so begin with 2nd row) = 19-21-23-25-27-29 pattern repeats. When piece measures 10 and 20 cm cast off ½ pattern repeat on each side – read Casting off tips = 17-19-21-23-25-27 repeats. When piece measures 30-31-32-33-34-35 cm (stop after 1st row of M.1) change to light beige and continue in tr. - read Crochet info! Crochet 2 tr in each ch loop and 1 tr in each tr from M.1 = 103-115-127-139-151-163 tr. Crochet 1 tr in each tr until piece measures 38-39-40-42-43-44 cm, change back to light camel and crochet according to M.1. again. (Crochet first row in M.1 as follows: 3 ch in first tr, *2 ch, skip 2 tr, 1 tr in next tr*, repeat from *-*) = 17-19-21-23-25-27 pattern repeats. When piece measures 51-52-53-54-55-56 cm cast off for armhole on each side - each row – read Cast off tips: 1 pattern repeat 1-1-2-2-2-2 times in total, then ½ pattern repeat 0-2-2-2-4-4 times = 15-15-15-17-17-19 pattern repeat. When piece measures 68-70-72-74-76-78 cm crochet 1 row but only over outermost 6-6-6-6-6-7 pattern repeats on each side (do not crochet over middle 3-3-3-5-5-5 pattern repeats = neckline). Crochet 1 row back and cut thread, piece measures approx 70-72-74-76-78-80 cm. Right front piece: Crochet 66-72-78-84-90-96 ch (incl 8 ch to turn with) on crochet hook size 3.5 mm with light camel. Begin mid front and crochet towards side. Crochet 1 tr in the 9th ch from hook, *2 ch, skip 2 ch, 1 tr in next ch *, repeat from *-* = 21-23-25-27-29-31 tr. Now crochet after M.1 (1st row is crochet so begin with 2nd row) = 10-11-12-13-14-15 pattern repeats. When piece measures 15 and 25 cm cast off ½ pattern repeat on side as back piece = 9-10-11-12-13-14 pattern repeats. When piece measures 30-31-32-33-34-35 cm (stop after 1st row of M.1) change to light beige and continue in tr – read Crochet info. Crochet 2 tr in each ch loop and 1 tr in each tr from M.1 = 55-61-67-73-79-85 tr. Crochet 1 tr in each tr until piece measures 38-39-40-42-43-44 cm, change back to light camel and crochet after M.1 again. (Crochet first row in M.1 as follows: 3 ch in 1st tr, *2 ch, skip 2 tr, 1 tr in next tr*, repeat from *-* on entire row) = 9-10-11-12-13-14 pattern repeats. When piece measures approx 41-42-43-44-45-46 cm cast off for neck mid front on every other row: Cast of ½ pattern repeat 4-4-4-6-6-6 times in total – read Cast off tips. At the same time when piece measures 51-52-53-54-55-56 cm cast off for armhole on side as back piece. After all cast offs there are 6-6-6-6-6-7 pattern repeats on shoulder. Crochet until piece measures 70-72-74-76-78-80 cm, cut and sew thread. Left front piece: Crochet like right front piece. Begin mid front and crochet towards side. Sleeve: Crochet 65-65-72-72-79-79 ch (incl 4 ch to turn with) on crochet hook size 3.5 mm with light beige. Crochet 1 tr in 4th ch from crochet hook *1 tr in each of next 6 ch, skip 1 ch*, repeat from *-*, and finish off with 1 tr in each of the last 5 ch = 55-55-61-61-67-67 tr. Crochet 1 tr in each tr until piece measures 12 cm, change to light camel and crochet M.1. (Crochet first row in M.1 as follows: 3 ch in first tr, *2 ch, skip 2 tr, 1 tr in next tr*, repeat from *-* on entire row) = 9-9-10-10-11-11 pattern repeats. When piece measures 15-18-18-18-18-18 cm inc ½ pattern repeat on each side on every 8-4-4-4-4-4 rows 4-6-6-6-6-6 times in total – read Increasing tips = 13-15-16-16-17-17 pattern repeats. When piece measures 48-47-47-46-46-45 cm cast off 1 pattern repeat on each side to shape sleeve cap. Then cast off ½ pattern repeat on each side on every other row 0-0-0-0-2-2 times in total, then on every row 6-7-8-8-6-6 times in total = 5-6-6-6-7-7 pattern repeats – read Cast off tips. Crochet until piece measures 57-57-58-58-59-59 cm, cut and sew thread. Assembly: Sew shoulder seam tog. Sew in sleeves. Sew sleeves and side seam in one – sew outer edge with small, neat sts. Crochet edge: Crochet edge with crochet hook size 3.5 with light grey along left front piece, around neckline, down along right front piece, around along bottom edge and around bottom edge of sleeves as follows: Crochet 1 dc, *skip 2 cm, 4 dtr around next ch, 2 ch, 4 dtr around the same st, skip 2 cm, 1 dc around next st *, repeat from *-*. Button cover: Crochet cover for 6 buttons on crochet hook size 3.5 mm with 1 thread light grey as follows: Crochet 2 ch, then crochet 16 tr in the first of the 2 ch, finish off with 1 sl st in first tr of round (= 1st round). 2nd round: Crochet 1 dc in each tr and finish off with 1 sl st in first dc of round. 3rd round: Crochet 1 tr in every other dc and finish off with 1 sl st in first tr of round = 8 tr. Slip button inside cover, sew around edge and pull tog. Sew buttons on jacket. Sew 1 button in at bottom edge of tr part and 1 button at top edge. Sew in 2 buttons at bottom of sleeve. Sew in buttons at front part of sleeve, approx. 3 and 7 cm from bottom edge. English translations to diagrams: =ch =tr =tr group Crochet 2 tr in same st, 2 ch, crochet, 2 tr in same st =sl st |
|||||||||||||
Diagram explanations |
|||||||||||||
|
|||||||||||||
|
|||||||||||||
|
|||||||||||||
Have you finished this pattern?Tag your pictures with #dropspattern #seasidestrollcardigan or submit them to the #dropsfan gallery. Do you need help with this pattern?You'll find 9 tutorial videos, a Comments/Questions area and more by visiting the pattern on garnstudio.com. © 1982-2025 DROPS Design A/S. We reserve all rights. This document, including all its sub-sections, has copyrights. Read more about what you can do with our patterns at the bottom of each pattern on our site. |
|||||||||||||


With over 40 years in knitting and crochet design, DROPS Design offers one of the most extensive collections of free patterns on the internet - translated to 17 languages. As of today we count 314 catalogues and 11822 patterns translated into English (UK/cm).
We work hard to bring you the best knitting and crochet have to offer, inspiration and advice as well as great quality yarns at incredible prices! Would you like to use our patterns for other than personal use? You can read what you are allowed to do in the Copyright text at the bottom of all our patterns. Happy crafting!
Post a comment to pattern DROPS 99-8
We would love to hear what you have to say about this pattern!
If you want to leave a question, please make sure you select the correct category in the form below, to speed up the answering process. Required fields are marked *.