DROPS Melody uni colour 71% Alpaca, 25% Wool, 4% Polyamide |
4.25 £ /50g |
Order |
Clicking the ORDER button will redirect you to Wool Warehouse Direct Ltd website
The yarn cost is calculated from the pattern’s smallest size and the yarn’s cheapest product type. Looking for an even better price? You might find it on the DROPS Deals!
-------------------------------------------------------
Alternative Yarn – See how to change yarns here
Yarn Groups A to F – Use the same pattern and change the yarn here
Yarn usage using an alternative yarn – Use our yarn converter here
-------------------------------------------------------
DROPS Melody uni colour 71% Alpaca, 25% Wool, 4% Polyamide 4.25 £ /50g Order |
Clicking the ORDER button will redirect you to Wool Warehouse Direct Ltd website
The yarn cost is calculated from the pattern’s smallest size and the yarn’s cheapest product type. Looking for an even better price? You might find it on the DROPS Deals!
Each of our patterns has specific tutorial videos to help you.
These step-by-step tutorials might also help you:
Why is the knitting/crochet tension so important?
Knitting tension is what determines the final measurements of your work, and is usually measured per 10 x 10 cm. It is provided like so: number of stitches in width x number of rows in height - eg: 19 stitches x 26 rows = 10 x 10 cm.
The knitting tension is very individual; some people knit/crochet loosely while others work tightly. You adjust the knitting tension with the needle size, which is why the suggested needle size is only meant as a guide! You need to adjust this (up or down) to ensure that YOUR knitting tension matches the knitting tension provided in the pattern. If you work with a different knitting tension than provided you will have a different yarn consumption, and your work will have different measurements than what the pattern suggests.
The knitting tension also determines which yarns can replace each other. As long as you achieve the same knitting tension you can replace one yarn with another.
See DROPS lesson: How to measure your tension/gauge
See DROPS video: How to make a gauge tension swatch
How do I know how many balls of yarn I need?
The required amount of yarn is provided in grams, eg: 450 g. To calculate how many balls you’ll need you first need to know how many grams are in 1 ball (25g, 50g or 100g). This information is available if you click on the individual yarn quality on our pages. Divide the amount required with the amount of each ball. For example, if each ball is 50g (the most common amount), the calculation will be as follows: 450 / 50 = 9 balls.
Can I use a different yarn than what the pattern suggests?
The important thing when changing from one yarn to another is that the knitting/crochet tension remains the same. This is so that the measurements of the finished piece will be the same as on the sketch provided. It is easier to achieve the same knitting tension using yarns from the same yarn group. It is also possible to work with multiple strands of a thinner yarn to achieve the knitting tension of a thicker one. Please try our yarn converter. We recommend you to always work a test swatch.
Please NOTE: when changing yarn the garment might have a different look and feel to the garment in the photo, due to individual properties and qualities of each yarn.
See DROPS lesson: Can I use a different yarn than the one mentioned in the pattern?
What are the yarn groups?
All our yarns are categorised into yarn groups (from A to F) according to thickness and knitting tension – group A contains the thinnest yarns and group F the thickest. This makes it easier for you to find alternative yarns to our patterns, should you wish to switch yarn. All yarns within the same group have a similar knitting tension and can easily replace each other. However, different yarn qualities have different structures and properties which will give the finished work a unique look and feel.
How do I use the yarn calculator?
At the top of all our patterns you’ll find a link to our yarn calculator, which is a helpful tool should you wish to use a different yarn than suggested. By filling in the yarn quality you wish to replace, the amount (in your size) and number of strands, the calculator will present good alternative yarns with the same knitting tension. Additionally it will tell you how much you’ll require in the new qualities and whether you’ll need to work with multiple strands. Most skeins are 50g (some are 25g or 100g).
If the pattern is worked with multiple colours, every colour will have to be calculated separately. Similarly, if the pattern is worked with several strands of different yarns (for example 1 strand Alpaca and 1 strand Kid-Silk) you will have to find alternatives for each, individually.
Why do you show discontinued yarns in the patterns?
Since different yarns have different qualities and textures we have chosen to keep the original yarn in our patterns. However, you can easily find options among our available qualities by using our yarn calculator, or simply pick a yarn from the same yarn group.
It is possible that some retailers still have discontinued yarns in stock, or that someone has a few skeins at home that they would like to find patterns for.
The yarn calculator will provide both alternative yarn as well as required amount in the new quality.
What size should I knit?
If you think it's hard to decide what size to make, it can be a good idea to measure a garment you own already and like the size of. Then you can pick the size by comparing those measures with the ones available in the pattern's size chart.
You'll find the size chart at the bottom of the pattern.
See DROPS lesson: How to read size chart
Why do I get the wrong knitting tension with the suggested needle size?
The needle size provided in the pattern serves only as a guide, the important thing is to follow the knitting tension. And since knitting tension is very individual, you will have to adjust the needle size to ensure that YOUR tension is the same as in the pattern – maybe you’ll have to adjust 1, or even 2 needle sizes, up or down to achieve the correct tension. For this, we recommend that you work test swatches.
Should you work with a different knitting tension than the one provided, the measurements of the finished garment might deviate from the measurement sketch.
See DROPS lesson: How to measure your tension/gauge
See DROPS video: How to make a tension/gauge swatch
Why is the pattern worked top-down?
Working a garment top-down provides more flexibility and room for personal adjustment. For example it is easier to try the garment on while working, as well as making adjustments to length of yoke and shoulder caps.
The instructions are carefully explaining every step, in the correct order. Diagrams are adjusted to the knitting direction and are worked as usual.
How do I work according to a knitting diagram?
The diagram depicts all rows/rounds, and every stitch seen from the right side. It is read from bottom to top, from right to left. 1 square = 1 stitch.
When working back and forth, every other row is worked from the right side and every other row is worked from the wrong side. When working from the wrong side, the diagram will have to be worked reversed: from left to right, knit stitches are purled, purl stitches are knit etc.
When working in the round every round is worked from the right side and the diagram are worked from right to left on all rounds.
See DROPS lesson: How to read knitting diagrams
How do I work according to a crochet diagram?
The diagram depicts all rows/rounds, and every stitch seen from the right side. It is worked from bottom to top, from right to left.
When working back and forth every other row is worked from the right side: from right to left and every other row is worked from the wrong side: from left to right.
When working in the round, every row in the diagram are worked from the right side, from right to left.
When working a circular diagram you start in the middle and work your way outwards, counter clockwise, row by row.
The rows usually start with a given number of chain stitches (equivalent to the height of the following stitch), this will either be depicted in the diagram or explained in the pattern.
See DROPS lesson: How to read crochet diagrams
How do I work several diagrams simultaneously on the same row/round?
Instructions for working several diagrams after each other on the same row/round, will often be written like so: “work A.1, A.2, A.3 a total of 0-0-2-3-4 times". This means you work A.1 once, then A.2 is worked once, and A.3 is repeated (in width) the number of times provided for your size – in this case like so: S = 0 times, M = 0 times, L=2 times, XL= 3 times and XXL = 4 times.
The diagrams are worked as usual: begin with the first row in A.1, then work the first row in A.2 etc.
See DROPS lesson: How to read knitting diagrams
See DROPS lesson: How to read crochet diagrams
Why are the sleeves shorter in larger sizes?
The total width of the garment (from wrist-to-wrist) will be larger in the larger sizes, despite the actual sleeves being shorter. The larger sizes have longer sleeve caps and wider shoulders, so there will be a good fit in all sizes.
Where on the garment is the length measured?
The measurement sketch/schematic drawing provides information regarding the full length of the garment. If it’s a jumper or a jacket the length is measured from the highest point on the shoulder closest to the neckline, and straight down to the bottom of the garment. It is NOT measured from the tip of shoulder. Similarly, the length of yoke is measured from the highest point on the shoulder and down to where yoke is split into body and sleeves.
On a jacket measures are never taken along bands, unless specifically stated. Always measure inside band stitches when measuring the length.
See DROPS lesson: How to read a schematic drawing
What is a repeat?
Diagrams are often repeated on the round or in height. 1 repeat is the diagram the way it appears in the pattern. If it says to work 5 repeats of A.1 in the round, then you work A.1 a total of 5 times after/next to each other in the round. If it says to work 2 repeats of A.1 vertically/in height you work the entire diagram once, then begin again at the start and work the entire diagram one more time.
Why does the piece start with more chain stitches than it’s worked with?
Chain stitches are slightly narrower than other stitches and to avoid working the cast-on edge too tight, we simply chain more stitches to begin with. The stitch count will be adjusted on the following row to fit the pattern and measurement sketch.
Why increase before the rib edge when the piece is worked top-down?
The rib edge is more elastic and will contract slightly compared to, for example, stocking stitch. By increasing before the rib edge, you avoid a visible difference in width between the rib edge and the rest of the body.
Why increase in the cast-off edge?
It’s very easy to cast off too tightly, and by making yarn overs while casting off (and simultaneously casting these off) you avoid a too tight cast off edge.
See DROPS video: How to bind off with yarn overs (yo)
How do I increase/decrease on every 3rd and 4th row/round alternately?
To achieve an even increase (or decrease) you can increase on, for example: every 3rd and 4th row alternately, like so: work 2 rows and increase on the 3rd row, work 3 rows and increase on the 4th. Repeat this until the increase is complete.
See DROPS lesson: Increase or decrease 1 st on every 3rd and 4th row alternately
How can I work a jacket in the round instead of back and forth?
Should you prefer to work in the round instead of back and forth, you may of course adjust the pattern. You’ll need to add steeks mid-front (usually 5 stitches), and follow the instructions. When you would normally turn and work from the wrong side, simply work across the steek and continue in the round. At the end you’ll cut the piece open, pick up stitches to work bands, and cover the cut edges.
See DROPS video: How to knit steeks and cut open
Can I work a jumper back and forth instead of in the round?
Should you prefer to work back and forth instead of in the round, you may of course adjust the pattern so you work the pieces separately and then assemble them at the end. Divide the stitches for the body in 2, add 1 edge stitch in each side (for sewing) and work the front and back pieces separately.
See DROPS lesson: Can I adapt a pattern for circular needles into straight needles?
Why is the pattern slightly different than what I see in the photo?
Pattern repeats can vary slightly in the different sizes, in order to get the correct proportions. If you’re not working the exact same size as the garment in the photo, yours might deviate slightly. This has been carefully developed and adjusted so that the complete impression of the garment is the same in all sizes.
Make sure to follow instructions and diagrams for your size!
How do I make a women’s size garment into a men’s size one?
If you have found a pattern you like which is available in women’s size it’s not very difficult to convert it to men’s size. The biggest difference will be the length of sleeves and body. Start working on the women size that you think would fit across the chest. The additional length will be worked right before you cast off for the armhole/sleeve cap. If the pattern is worked top-down you can add the length right after the armhole or before the first decrease on sleeve.
Regarding additional yarn amount, this will depend on how much length you add, but it is better with a skein too many than too few.
How do I prevent a hairy garment from shedding?
All yarns will have excess fibres (from production) that might come off as lint or shedding. Brushed yarns (ie hairier yarns) have more of these loose, excess fibres, causing more shedding.
Shedding also depends on what is worn under or over the garment, and whether this pulls at the yarn fibres. It’s therefore not possible to guarantee that there will be no shedding
Below are some tips on how to get the best result when working with hairier yarns:
1. When the garment is finished (before you wash it) shake it vigorously so the looser hairs come off. NOTE: do NOT use a lint roller, brush or any method that pulls at the yarn.
2. Place the garment in a plastic bag and put it in your freezer - the temperature will cause the fibres to become less attached to each other, and excess fibres will come off easier.
3. Leave in the freezer for a few hours before taking it out and shaking it again.
4. Wash the garment according to the instructions on the yarn label.
Why does my garment pill?
Pilling is a natural process that happens to even the most exclusive of fibers. It's a natural sign of wear and tear that is hard to avoid, and that is most visible in high friction areas of your garment like a sweater's arms and cuffs.
You can make your garment look as new by removing the pilling, using a fabric comb or a pill/lint remover.
DROPS 2-11 |
|
|
|
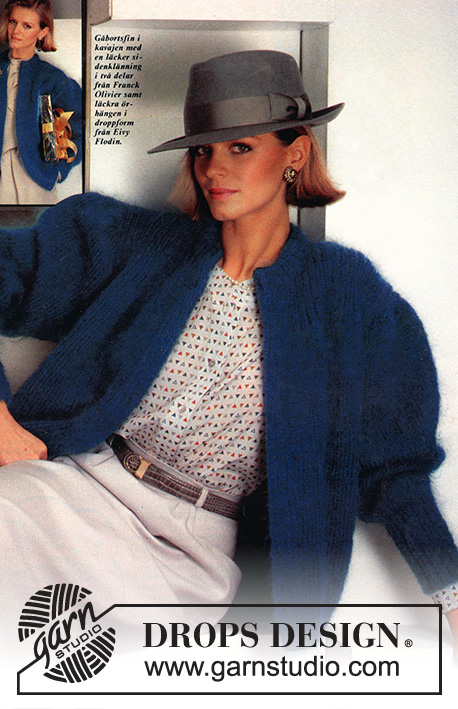
Knitted wide jacket in DROP Flores or DROPS Melody. Size M.
DROPS 2-11 |
|
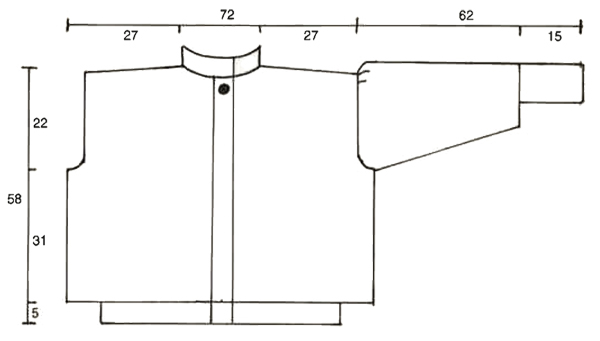
Rib: * K2 into back of loop, P1 *, repeat from *-*. Right front piece: Worked back and forth on needle. Cast on 79 sts on needle size 2.5 mm and work 5 cm rib. Now slip 22 sts on a stitch holder for front band. Change to needle size 5.5 mm and continue in stocking st on remaining sts. When piece measures 36 cm cast off for armhole at the side on every other row: 5 sts 1 time, 2 sts 2 times and 1 st 3 times. When armhole measures 11 cm change to needle size 2.5 mm and continue in rib. When rib measures 7.5 cm cast off to shape the neckline towards mid front on every other row: 4 sts 1 time, 3 sts 1 time, 2 sts 2 times and 1 st 4 times. Now cast off to shape the shoulder on every other row: 10 sts 1 time, 11 sts 1 time, 11 sts 1 time. Left front piece: Like right front piece, but mirrored. Back piece: Cast on 106 sts on needle size 2.5 mm and work 5 cm rib. Change to needle size 5.5 mm and continue in stocking st. When piece measures 36 cm cast off for armhole on every other row each side: 4 sts 1 time, 2 sts 1 time, 1 st 2 times. When armhole measures 11 cm change to needle size 2.5 mm and continue in rib. When rib measures 9 cm slip the middle 12 sts on a stitch holder and complete each side separately. Cast off to shape the neckline on every other row: 2 sts 1 time, 1 st 5 times, at the same time on row 6 with neckline dec cast off to shape the shoulder as described for front piece. Sleeve: Worked back and forth on pointed needles. Cast on 40 sts on needle size 2.5 mm and work 4 cm rib. Continue in rib, but now inc 1 st each side on every 4 cm a total of 3 times. When rib measures 15 cm change to needle size 5.5 mm and continue in stocking st, at the same time inc 1 st each side on every 4th row until there are 74 sts on row. When sleeve measures 46 cm cast off for sleeve cap each side on every other row: 5 sts 1 time, 2 sts 1 time, 1 st 2 times. Continue for 12 cm and now dec 1 st each side at the beg of every row 5 times and then at the beg and at the end of every row 5 times. Cast off remaining sts. Left front bands: Slip the 22 sts from stitch holder at front piece back on needle size 2.5 mm and work rib until front band fits front piece. Sew front band to front piece, fold it double towards WS and fasten. Right front band: Like left front band, but make 1 buttonhole 2 cm before neckline as follows: work 4 sts, cast off 4 sts, work 10 sts, cast off 4 sts, work 4 sts. Cast on 4 new sts over cast off sts on return row. Continue in rib until front band fits front piece. Fold front band double towards WS and fasten. Assembly: Sew shoulder seams. Pick up approx 96 sts round neckline on needle size 2.5 mm and work 9 cm rib, cast of. Fold neck double towards WS and fasten. Set in sleeves. Sew side and sleeve seams. Sew on button to left front piece to fit buttonhole. |
|
Have you made this or any other of our designs? Tag your pictures in social media with #dropsdesign so we can see them! Do you need help with this pattern?You'll find tutorial videos, a Comments/Questions area and more by visiting the pattern on garnstudio.com. © 1982-2024 DROPS Design A/S. We reserve all rights. This document, including all its sub-sections, has copyrights. Read more about what you can do with our patterns at the bottom of each pattern on our site. |
With over 40 years in knitting and crochet design, DROPS Design offers one of the most extensive collections of free patterns on the internet - translated to 17 languages. As of today we count 304 catalogues and 11422 patterns - 11422 of which are translated into English (UK/cm).
We work hard to bring you the best knitting and crochet have to offer, inspiration and advice as well as great quality yarns at incredible prices! Would you like to use our patterns for other than personal use? You can read what you are allowed to do in the Copyright text at the bottom of all our patterns. Happy crafting!
Comments / Questions (13)
Mary Sue wrote:
Thank you for getting back to me so quickly.
23.02.2024 - 23:50Mary Sue wrote:
Hi, I have knit the bottom rib, I now am asked to slip 22 stitches for band. Do I break the yarn and reattach to continue or do I fold the band (to wrong side) and use the yarn I have at the end of the row? Thank you!
15.02.2024 - 19:02DROPS Design answered:
Hi Mary Sue, To avoid cutting the yarn, work the band stitches in rib before placing them on a stitch holder, then continue working stocking stitch across the rest of the front piece. Happy knitting
16.02.2024 - 06:52Britta wrote:
Hej jeg forstår ikke rigtig hvordan forkanterne skal laves skal der bukkes ind så der kun er seks masker og hvordan syr jeg kanten fast skal der sys af to omgange eller en er ikke sikker på jeg har forstået det rigtig Vh Britta
18.07.2021 - 10:46DROPS Design answered:
Hej Britta, forkanten består af 22 masker, du bukker halvdelen altså de 11 masker ind mod vrangen og syr forkanten fast til forstykket efterhånden som du har strikket nogle cm ad gangen. På den anden forkant strikker du knaphuller, og det er du så nødt til at gøre på begge side, så knappen går igennem den dobbelte forkant. God fornøjelse!
04.08.2021 - 11:45Fafa wrote:
Hallo, ich bin grad beim rechten Vorderteil, bei Armausschnitt. Nach 11 cm, d.h. 2 Runde Abketten, habe ich 37 Maschen auf dem Nadel. Wenn ich jetzt weiter stricke, habe ich am Ende 10 Machen zu wenig. Was habe ich falsch gemacht? Musste ich beim Armausschnitt nur eine Runde 1x5 1x2 3x1 abketten? So hätte ich genug Maschen gehabt, aber 11 cm nicht erreicht...
03.02.2021 - 23:08DROPS Design answered:
Liebe Fafa, Sie schlagen 79 M an und legen die 22 M still = 57 M. Für Armausschnitt ketten Sie 10 M ab (= 5+2+3) = 47 M bleiben. Für den Hals Ketten Sie insgesamt 15 M und 32 M für den Schulter = 47-15-32= 0 Maschen. Hoffentlich kann es Ihnen helfen. Viel Spaß beim stricken!
04.02.2021 - 09:23Birgit Eriksen wrote:
Hej - kan du oplyse mig hvilket årstal opskriften er fra ?
15.11.2020 - 00:09DROPS Design answered:
Hei Birgit. Fra begynnelsen 1980-tallet. mvh DROPS design
16.11.2020 - 15:03Amalie wrote:
Hej Jeg er nået til ærmerne på denne, og nu har jeg et spørgsmål. Strikkes ærmerne rundt?
29.09.2020 - 10:41DROPS Design answered:
Hej Amalie, ærmet strikkes frem og tilbage ifølge opskriften (men kan strikkes rundt om du hellere vil det) :)
30.09.2020 - 11:51Åsa wrote:
Ok:) Tack før svar. Hur er det att byta Flores med Melody? Ser at det har lite mer mohair effekt. Fungerar det ? :)
02.09.2020 - 18:12DROPS Design answered:
Hej. Melody är ett tjockare garn (tillhör en annan garngrupp) så det fungerar dessvärre inte till detta mönster. Vi har dock flera mönster gjorda för DROPS Melody om du hellre vill sticka i det garnet. Mvh DROPS Design
03.09.2020 - 08:18Åsa wrote:
Hej:) Tenkte strikke denne i Drop Brushed alpaca silk. Hur många gram bør man beregne? Er stikkefasheten den samme som for Drops Flores? Tack!
01.09.2020 - 23:40DROPS Design answered:
Hej Åsa. De tillhör samma garngrupp så du ska kunna använda DROPS Brushed Alpaca Silk till detta mönster. Se bara till att få den stickfasthet som uppges i mönstret (du behöver kanske använda ett annat nummer på sticka för att få det). Flores var 100 m per 50 g så du får räkna för att se hur mycket garn du kommer behöva läs mer om det här. Mvh DROPS Design
02.09.2020 - 08:28Irena wrote:
Nie ma w opisie informacji jak przerabiać ściągacz na lewej stronie robótki. Jak przerabiać te dwa prawe przekręcone oczka i jedno lewe na lewej stronie?
14.06.2019 - 20:08DROPS Design answered:
Witaj Ireno! Na lewej stronie robótki 2 oczka prawe przekręcone powinny być przerabiane jak 2 oczka lewe przekręcone (tzn. wkłuwając drut z tyłu robótki zamiast z przodu). 1 oczko lewe z prawej strony robótki będzie przerabiane jako 1 oczko prawe na lewej stronie robótki. Miłej pracy!
17.06.2019 - 09:29Irena wrote:
Chcę do tego modelu wykorystać włóczkę Brushed Alpaca Silk. Czy przy tej włóczkę wystarczy dziergać 1 nitką Brushed Alpaca Silk?
01.06.2019 - 09:13DROPS Design answered:
Witaj Ireno! Do wykonania tego wzoru wystarczy 1 nitka włóczki DROPS Brushed Alpaca Silk. Pozdrawiamy!
03.06.2019 - 11:21