DROPS Alaska
DROPS Alaska
100% Wool
from 1.90 £ /50g
Get the yarn to make this pattern from 36.10£.

The yarn cost is calculated from the pattern’s smallest size and the yarn’s cheapest product type. Looking for an even better price? You might find it on the DROPS Deals!

DROPS SS24

DROPS 59-14

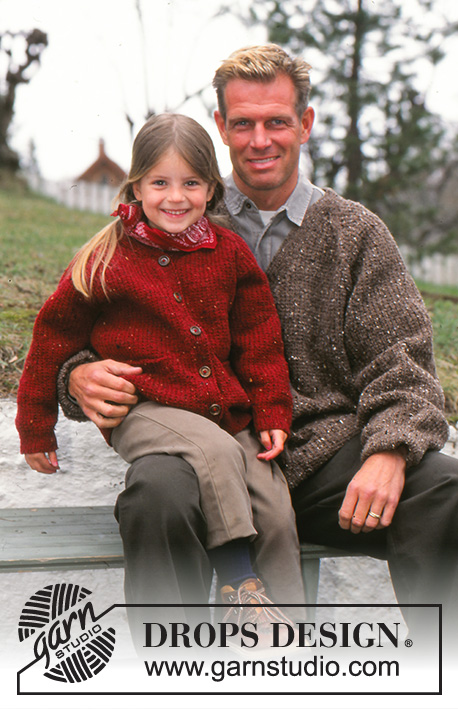
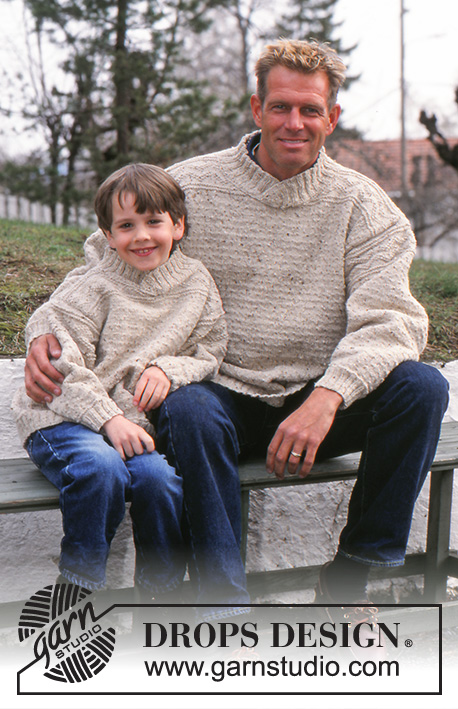
Knitted jacket for women, men and children in DROPS Alaska. Piece is worked with cable, collar and zipper. Women’s size S – L. Men’s size S – XXL. Children’s size 2 – 14 years.

DROPS 59-14
DROPS Design: Pattern x-241
Yarn group C
-------------------------------------------------------

SIZE WOMEN AND MEN:
Numbers in ( ) = men's sizes
S/M - M/L (S/M - M/L - XL - XXL)

MATERIALS WOMEN AND MEN:
DROPS ALASKA from Garnstudio (belongs to yarn group C)
950-1050 (1050-1150-1250-1350) g colour 05, coal grey

KNITTING TENSION WOMEN AND MEN:
17 stitches in width and 22 rows in height with diagram M.2 = 10 x 10 cm.

NEEDLES WOMEN AND MEN:
DROPS DOUBLE POINTED NEEDLES SIZE 5 MM.
DROPS CIRCULAR NEEDLE SIZE 5 MM: length 40 cm and 60 cm and 80 cm for stocking stitch.
DROPS DOUBLE POINTED NEEDLES SIZE 3.5 MM.
DROPS CIRCULAR NEEDLE SIZE 3.5 MM: length 60 cm or 80 cm for rib.
DROPS CABLE NEEDLE - for cables.
Needle size is only a guide. If you get too many stitches on 10 cm, change to a larger needle size. If you get too few stitches on 10 cm, change to a smaller needle size.

ZIPPER: 50 (60) cm, colour black

-------------------------------------------------------

SIZE CHILDREN:
2 - 3/4 - 5/6 - 7/8 - (9/10 - 11/12 - 13/14) years
Size equals approx. kid’s height in cm:
86/92 - 98/104 - 110/116 - 122/128 (134/140 - 146/152 - 158)

MATERIALS CHILDREN:
DROPS ALASKA from Garnstudio (belongs to yarn group C)
450-500-550-650 (700-750-850) g colour 04, grey

KNITTING TENSION CHILDREN:
17 stitches in width and 22 rows in height with diagram M.2 = 10 x 10 cm.

NEEDLES CHILDREN:
DROPS DOUBLE POINTED NEEDLES SIZE 5 MM.
DROPS CIRCULAR NEEDLE SIZE 5 MM: length 40 cm and 60 cm and 80 cm for stocking stitch.
DROPS DOUBLE POINTED NEEDLES SIZE 3.5 MM.
DROPS CIRCULAR NEEDLE SIZE 3.5 MM: length 60 cm or 80 cm for rib.
DROPS CABLE NEEDLE - for cables.
Needle size is only a guide. If you get too many stitches on 10 cm, change to a larger needle size. If you get too few stitches on 10 cm, change to a smaller needle size.

ZIPPER: 40-40-40-50 (50-50-50) cm, colour black

-------------------------------------------------------

Alternative Yarn – See how to change yarns here
Yarn Groups A to F – Use the same pattern and change the yarn here
Yarn usage using an alternative yarn – Use our yarn converter here

-------------------------------------------------------

DROPS Alaska
DROPS Alaska
100% Wool
from 1.90 £ /50g
Get the yarn to make this pattern from 36.10£.

The yarn cost is calculated from the pattern’s smallest size and the yarn’s cheapest product type. Looking for an even better price? You might find it on the DROPS Deals!

Pattern instructions

NOTE: This pattern is written in British English. All measurements in charts are in cm. For conversion from cm to inches - click here. There are different terms for crocheting in British and American English. If this pattern includes crochet, click for "crochet terms" here. For this pattern in American English, please click here.
----------------------------------------------------------

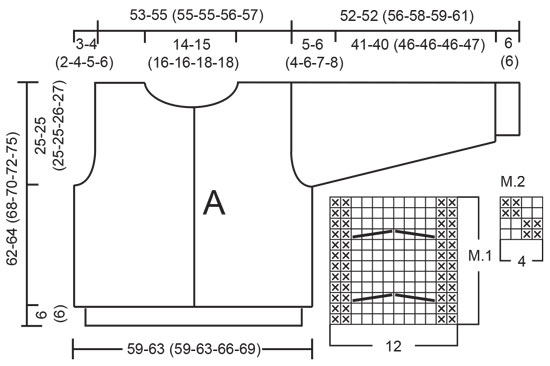
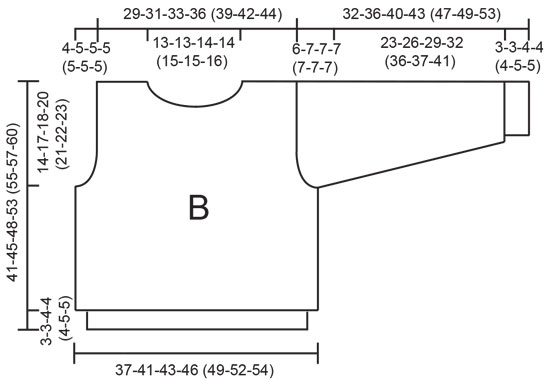
START THE PIECE WOMEN AND MEN:

----------------------------------------------------------

EXPLANATION FOR THE PATTERN WOMEN AND MEN:

PATTERN:
See diagrams M.1 and M.2. Diagram shows all rows in pattern seen from the right side.

RIB:
* knit 2 / purl 2 *. Repeat from *-*.

GARTER STITCH (back and forth):
Knit all rows. 1 ridge = 2 rows knit.

-------------------------------------------------------

Body: Cast on 216-228 (216-228-240-248) sts on smaller circular needles with and knit 6 cm rib, but always knit the 3 edge sts at each side (center front) in stockinette st. Change to larger circular needles and establish pattern as follows: 3 edge sts (stockinette st), Pattern 1, 186-198 (186-198-210-218) sts of Pattern 2, Pattern 1, 3 edge sts (stockinette st). Work in pattern as established until the work measures 37-39 (43-45-46-48) cm . Knit the next row as follows: 55-58 (55-58-61-63) sts for the front, bind off 4 sts for armhole, 98-104 (98-104-110-114) sts for the back, bind off 4 sts for armhole, 55-58 (55-58-61-63) sts for the front. Knit the rest of each part separately.

Front: = 55-58 (55-58-61-63) sts. Bind off for armholes every other row: 2 sts 1-1 (0-1-2-3) times, 1 st 2-3 (2-3-3-3) times = 51-53 (53-53-54-54) sts. On the row before the work measures 52-52 (62-62-62-62) cm , dec 4 sts (K 2 tog 4 times) over the cable at the center front. On the next row, bind off at each edge for the neck every other row: 8-9 (10-10-11-11) sts 1 time, 3 sts 1 time, 2 sts 1 time, 1 st 1 time = 33-34 (33-33-33-33) sts on the shoulder. Bind off when the work measures 62-64 (68-70-72-75) cm .

Back: = 98-104 (98-104-110-114) sts. Bind off for armholes as on the front = 90-94 (94-94-96-96) sts. When the work measures 60-62 (66-68-70-73) cm bind off the center 20-22 (24-24-26-26) sts for the neck. Bind off 2 sts at each neck edge on the next row. Bind off when the work measures 62-64 (68-70-72-75) cm .

Sleeves: Cast on 44-48 (48-48-52-52) sts on smaller double pointed needles; join and place a marker at the join. Knit 6 cm rib. Change to larger double pointed needles and knit Pattern 2 to finished dimensions. After the rib, inc 1 st each side of marker 20-18 (18-18-18-20) times:
Sizes S/M: every 4th row
Sizes M/L (XXL): alternately every 4th and 5th row
Sizes (s S/M + M/L + XL): every 5th row
= 84-84 (84-84-88-92) sts. Knit the increased sts into Pattern 2 as you go along. When the work measures 47-46 (52-52-52-53) cm , bind off 2 sts each side of marker and knit the rest back and forth on the needles. Then bind off for sleeve caps on each side every other row: 5-4 (5-4-3-3) sts 5-6 (5-7-8-9) times, bind off. The work measures 52-52 (56-58-59-61) cm .

Assembly: Sew shoulder seams.

Zipper pocket (optional): Pick up approx. 100-120 sts inside the 3 edge sts along the left front on smaller needles and knit 4 rows stockinette st, bind off. Repeat along the right front.

Collar: Pick up approx. 74-78 (82-86-90-94) sts (divisible by 4 sts + 2 sts) from the wrong side around the neck and a bit into the edge sts/zipper pockets on smaller needles and knit first row as follows: K 2 (edge sts knit in garter st throughout), * K 2, P 2 *, repeat from * - * until 4 sts remain on the row, K 2, K 2 (edge sts knit in garter st throughout). Then inc 1 st every other row each side inside the 2 edge sts. Knit the increased sts into the rib as you go along. When the collar measures 10 cm , knit 4 rows garter st over all sts, bind off.
Sew in the zipper and sleeves.


----------------------------------------------------------

START THE PIECE CHILDREN:

----------------------------------------------------------

EXPLANATION FOR THE PATTERN CHILREN:

PATTERN:
See diagrams M.1 and M.2. Diagram shows all rows in pattern seen from the right side.

RIB:
* knit 2 / purl 2 *. Repeat from *-*.

GARTER STITCH (back and forth):
Knit all rows. 1 ridge = 2 rows knit.

-------------------------------------------------------

Body: Cast on 132-144-152-164 (172-184-188) sts (including 3 edge sts at each side) on smaller circular needles and knit 3-3-4-4 (4-5-5) cm rib, keeping the 3 edge sts (center front) in stockinette st. Increase 8 sts evenly distributed on the last row = 140-152-160-172 (180-192-196) sts. Change to larger circular needles and knit pattern as follows: 3 edge sts (stockinette st), Pattern 1, 110-122-130-142 (150-162-166) sts of Pattern 2, Pattern 1, 3 edge sts (stockinette st). When the work measures 27-28-30-33 (34-35-37) cm , knit the next row as follows: 36-39-41-44 (46-49-50) sts for the front, bind off 4 sts for armhole, 60-66-70-76 (80-86-88) sts for the back, bind off 4 sts for armhole, 36-39-41-44 (46-49-50) sts for the front. Knit the rest of each part separately.

Front: = 36-39-41-44 (46-49-50) sts. Bind off for armholes every other row: 2 sts 1-2-2-2 (2-2-2) times, 1 st 3 times = 31-32-34-37 (39-42-43) sts. On the row before the work measures 35-39-41-46 (48-49-52) cm , dec 4 sts (K 2 tog 4 times) over the cable at the center front. When the work measures 35-39-41-46 (48-49-52) cm , bind off at each neck edge every other row: 7-7-8-8 (9-9-10) sts 1 time, 3 sts 1 time, 2 sts 1 time, 1 st 1 time = 14-15-16-19 (20-23-23) sts on the shoulder. Bind off when the work measures 41-45-48-53 (55-57-60) cm .

Back: = 60-66-70-76 (80-86-88) sts. Bind off for armholes as on the front = 50-52-56-62 (66-72-74) sts. When the work measures 39-43-46-51 (53-55-58) cm , bind off the center 18-18-20-20 (22-22-24) sts for the neck. Bind off 2 sts at each neck edge on the next row. Bind off when the work measures 41-45-48-53 (55-57-60) cm .

Sleeves: Cast on 32-36-36-40 (40-44-44) sts on smaller double pointed needles with grey; join and place a marker at join. Knit 3-3-4-4 (4-5-5) cm rib. Change to larger double pointed needles and knit Pattern 2 to finished dimensions. After the rib, inc 1 st each side of marker 8-11-13-14 (16-15-17) times:
Size 2 years: alternately every 5th and 6th row
Sizes 3/4 + 5/6 + 7/8 + 9/10 years: alternately every 4th and 5th row
Sizes 11/12 + 13/14 years: every 5th row
= 48-58-62-68 (72-74-78) sts. Knit the increased sts into Pattern 2 as you go along. When the work measures 26-29-33-36 (40-42-46) cm , bind off 2 sts each side of marker and knit the rest back and forth on the needles. Bind off for sleeve caps on each side every other row: 2-2-3-3 (3-3-3) sts 6-7-7-7 (7-7-7) times, bind off. The work measures approx. 32-36-40-43 (47-49-53) cm .

Assembly: Sew shoulder seams.

Zipper pocket (optional): Pick up approx. 60-65-70-80 (80-85-90) sts inside the 3 stockinette sts along the left front on smaller needles and knit 4 rows stockinette st, bind off. Repeat along the right front.

Collar: Pick up approx. 50-50-54-58 (62-66-74) sts (divisible by 4 + 2 sts) from the wrong side around the neck and a bit into the edge sts/zipper pockets on smaller needles and knit the first row as follows: K 2 (edge sts knit in garter st throughout), * K 2, P 2 *, repeat from * - * until 4 sts remain on the needles, K 2, K 2 (edge sts knit in garter st throughout). Then inc 1 st every other row inside the 2 edge sts on each side at the front. Knit the increased sts into the rib as you go along. When the collar measures 7-8-8-9 (9-10-10) cm , knit 4 rows garter st over all sts, bind off.
Sew in the zipper. Sew on the sleeves.

Diagram

symbols = K
symbols = P
symbols = 2 sts on a stitch holder in front of the work, K 2, K 2 from the stitch holder
symbols = 2 sts on a stitch holder behind the work, K 2, K 2 from the stitch holder
symbols = adult
symbols = child
diagram
diagram

Each of our patterns has specific tutorial videos to help you.

Do you have a question? See a list of frequently asked questions (FAQ)

Knitting tension is what determines the final measurements of your work, and is usually measured per 10 x 10 cm. It is provided like so: number of stitches in width x number of rows in height - eg: 19 stitches x 26 rows = 10 x 10 cm.

The knitting tension is very individual; some people knit/crochet loosely while others work tightly. You adjust the knitting tension with the needle size, which is why the suggested needle size is only meant as a guide! You need to adjust this (up or down) to ensure that YOUR knitting tension matches the knitting tension provided in the pattern. If you work with a different knitting tension than provided you will have a different yarn consumption, and your work will have different measurements than what the pattern suggests.

The knitting tension also determines which yarns can replace each other. As long as you achieve the same knitting tension you can replace one yarn with another.

See DROPS lesson: How to measure your tension/gauge

See DROPS video: How to make a gauge tension swatch

The required amount of yarn is provided in grams, eg: 450 g. To calculate how many balls you’ll need you first need to know how many grams are in 1 ball (25g, 50g or 100g). This information is available if you click on the individual yarn quality on our pages. Divide the amount required with the amount of each ball. For example, if each ball is 50g (the most common amount), the calculation will be as follows: 450 / 50 = 9 balls.

The important thing when changing from one yarn to another is that the knitting/crochet tension remains the same. This is so that the measurements of the finished piece will be the same as on the sketch provided. It is easier to achieve the same knitting tension using yarns from the same yarn group. It is also possible to work with multiple strands of a thinner yarn to achieve the knitting tension of a thicker one. Please try our yarn converter. We recommend you to always work a test swatch.

Please NOTE: when changing yarn the garment might have a different look and feel to the garment in the photo, due to individual properties and qualities of each yarn.

See DROPS lesson: Can I use a different yarn than the one mentioned in the pattern?

All our yarns are categorised into yarn groups (from A to F) according to thickness and knitting tension – group A contains the thinnest yarns and group F the thickest. This makes it easier for you to find alternative yarns to our patterns, should you wish to switch yarn. All yarns within the same group have a similar knitting tension and can easily replace each other. However, different yarn qualities have different structures and properties which will give the finished work a unique look and feel.

Click here for an overview of the yarns in each yarn group

At the top of all our patterns you’ll find a link to our yarn calculator, which is a helpful tool should you wish to use a different yarn than suggested. By filling in the yarn quality you wish to replace, the amount (in your size) and number of strands, the calculator will present good alternative yarns with the same knitting tension. Additionally it will tell you how much you’ll require in the new qualities and whether you’ll need to work with multiple strands. Most skeins are 50g (some are 25g or 100g).

If the pattern is worked with multiple colours, every colour will have to be calculated separately. Similarly, if the pattern is worked with several strands of different yarns (for example 1 strand Alpaca and 1 strand Kid-Silk) you will have to find alternatives for each, individually.

Click here to see our yarn calculator

Since different yarns have different qualities and textures we have chosen to keep the original yarn in our patterns. However, you can easily find options among our available qualities by using our yarn calculator, or simply pick a yarn from the same yarn group.

It is possible that some retailers still have discontinued yarns in stock, or that someone has a few skeins at home that they would like to find patterns for.

The yarn calculator will provide both alternative yarn as well as required amount in the new quality.

If you think it's hard to decide what size to make, it can be a good idea to measure a garment you own already and like the size of. Then you can pick the size by comparing those measures with the ones available in the pattern's size chart.

You'll find the size chart at the bottom of the pattern.

See DROPS lesson: How to read size chart

The needle size provided in the pattern serves only as a guide, the important thing is to follow the knitting tension. And since knitting tension is very individual, you will have to adjust the needle size to ensure that YOUR tension is the same as in the pattern – maybe you’ll have to adjust 1, or even 2 needle sizes, up or down to achieve the correct tension. For this, we recommend that you work test swatches.

Should you work with a different knitting tension than the one provided, the measurements of the finished garment might deviate from the measurement sketch.

See DROPS lesson: How to measure your tension/gauge

See DROPS video: How to make a tension/gauge swatch

Working a garment top-down provides more flexibility and room for personal adjustment. For example it is easier to try the garment on while working, as well as making adjustments to length of yoke and shoulder caps.

The instructions are carefully explaining every step, in the correct order. Diagrams are adjusted to the knitting direction and are worked as usual.

The diagram depicts all rows/rounds, and every stitch seen from the right side. It is read from bottom to top, from right to left. 1 square = 1 stitch.

When working back and forth, every other row is worked from the right side and every other row is worked from the wrong side. When working from the wrong side, the diagram will have to be worked reversed: from left to right, knit stitches are purled, purl stitches are knit etc.

When working in the round every round is worked from the right side and the diagram are worked from right to left on all rounds.

See DROPS lesson: How to read knitting diagrams

The diagram depicts all rows/rounds, and every stitch seen from the right side. It is worked from bottom to top, from right to left.

When working back and forth every other row is worked from the right side: from right to left and every other row is worked from the wrong side: from left to right.

When working in the round, every row in the diagram are worked from the right side, from right to left.

When working a circular diagram you start in the middle and work your way outwards, counter clockwise, row by row.

The rows usually start with a given number of chain stitches (equivalent to the height of the following stitch), this will either be depicted in the diagram or explained in the pattern.

See DROPS lesson: How to read crochet diagrams

Instructions for working several diagrams after each other on the same row/round, will often be written like so: “work A.1, A.2, A.3 a total of 0-0-2-3-4 times". This means you work A.1 once, then A.2 is worked once, and A.3 is repeated (in width) the number of times provided for your size – in this case like so: S = 0 times, M = 0 times, L=2 times, XL= 3 times and XXL = 4 times.

The diagrams are worked as usual: begin with the first row in A.1, then work the first row in A.2 etc.

See DROPS lesson: How to read knitting diagrams

See DROPS lesson: How to read crochet diagrams

The total width of the garment (from wrist-to-wrist) will be larger in the larger sizes, despite the actual sleeves being shorter. The larger sizes have longer sleeve caps and wider shoulders, so there will be a good fit in all sizes.

The measurement sketch/schematic drawing provides information regarding the full length of the garment. If it’s a jumper or a jacket the length is measured from the highest point on the shoulder closest to the neckline, and straight down to the bottom of the garment. It is NOT measured from the tip of shoulder. Similarly, the length of yoke is measured from the highest point on the shoulder and down to where yoke is split into body and sleeves.

On a jacket measures are never taken along bands, unless specifically stated. Always measure inside band stitches when measuring the length.

See DROPS lesson: How to read a schematic drawing

Diagrams are often repeated on the round or in height. 1 repeat is the diagram the way it appears in the pattern. If it says to work 5 repeats of A.1 in the round, then you work A.1 a total of 5 times after/next to each other in the round. If it says to work 2 repeats of A.1 vertically/in height you work the entire diagram once, then begin again at the start and work the entire diagram one more time.

Chain stitches are slightly narrower than other stitches and to avoid working the cast-on edge too tight, we simply chain more stitches to begin with. The stitch count will be adjusted on the following row to fit the pattern and measurement sketch.

The rib edge is more elastic and will contract slightly compared to, for example, stocking stitch. By increasing before the rib edge, you avoid a visible difference in width between the rib edge and the rest of the body.

It’s very easy to cast off too tightly, and by making yarn overs while casting off (and simultaneously casting these off) you avoid a too tight cast off edge.

See DROPS video: How to bind off with yarn overs (yo)

To achieve an even increase (or decrease) you can increase on, for example: every 3rd and 4th row alternately, like so: work 2 rows and increase on the 3rd row, work 3 rows and increase on the 4th. Repeat this until the increase is complete.

See DROPS lesson: Increase or decrease 1 st on every 3rd and 4th row alternately

Should you prefer to work in the round instead of back and forth, you may of course adjust the pattern. You’ll need to add steeks mid-front (usually 5 stitches), and follow the instructions. When you would normally turn and work from the wrong side, simply work across the steek and continue in the round. At the end you’ll cut the piece open, pick up stitches to work bands, and cover the cut edges.

See DROPS video: How to knit steeks and cut open

Should you prefer to work back and forth instead of in the round, you may of course adjust the pattern so you work the pieces separately and then assemble them at the end. Divide the stitches for the body in 2, add 1 edge stitch in each side (for sewing) and work the front and back pieces separately.

See DROPS lesson: Can I adapt a pattern for circular needles into straight needles?

Pattern repeats can vary slightly in the different sizes, in order to get the correct proportions. If you’re not working the exact same size as the garment in the photo, yours might deviate slightly. This has been carefully developed and adjusted so that the complete impression of the garment is the same in all sizes.

Make sure to follow instructions and diagrams for your size!

If you have found a pattern you like which is available in women’s size it’s not very difficult to convert it to men’s size. The biggest difference will be the length of sleeves and body. Start working on the women size that you think would fit across the chest. The additional length will be worked right before you cast off for the armhole/sleeve cap. If the pattern is worked top-down you can add the length right after the armhole or before the first decrease on sleeve.

Regarding additional yarn amount, this will depend on how much length you add, but it is better with a skein too many than too few.

All yarns will have excess fibres (from production) that might come off as lint or shedding. Brushed yarns (ie hairier yarns) have more of these loose, excess fibres, causing more shedding.

Shedding also depends on what is worn under or over the garment, and whether this pulls at the yarn fibres. It’s therefore not possible to guarantee that there will be no shedding

Below are some tips on how to get the best result when working with hairier yarns:

1. When the garment is finished (before you wash it) shake it vigorously so the looser hairs come off. NOTE: do NOT use a lint roller, brush or any method that pulls at the yarn.

2. Place the garment in a plastic bag and put it in your freezer - the temperature will cause the fibres to become less attached to each other, and excess fibres will come off easier.

3. Leave in the freezer for a few hours before taking it out and shaking it again.

4. Wash the garment according to the instructions on the yarn label.

Pilling is a natural process that happens to even the most exclusive of fibers. It's a natural sign of wear and tear that is hard to avoid, and that is most visible in high friction areas of your garment like a sweater's arms and cuffs.

You can make your garment look as new by removing the pilling, using a fabric comb or a pill/lint remover.

Still can't find the answer you need? Then scroll down and leave your question so one of our experts can try to help you. This will be done normally within 5 to 10 working days.
In the meantime, you can read the questions and answers that others have left to this pattern or join the DROPS Workshop on Facebook to get help from fellow knitters/crocheters!

You might also like...

Post a comment to pattern DROPS 59-14

We would love to hear what you have to say about this pattern!

If you want to leave a question, please make sure you select the correct category in the form below, to speed up the answering process. Required fields are marked *.

Comments / Questions (21)

country flag Steffi Peltzer wrote:

Ich habe bei der ärmelabnahme ein Problem es soll jede zweite Reihe am Schluss für die Kugel in hin und Rückreihen abgenommen werden das würde bedeuten dass es nur einseitig abgenommen wird und keine Kugel entsteht und im anderen Fall nehme ich auf jeder Seite ab gleichmäßig dann wird die Arbeit um 5 cm zu kurz ich bitte um hilfe

28.02.2024 - 10:19

DROPS Design answered:

Liebe Frau Peltzer, für die Armkugel soll man am Anfang jeder Reihe abketten, dh am Anfang der Hin- sowie am Anfang der nächste Rückreihe abketten, damit beide Seiten symmetrisch werden. Beachten Sie auch, daß Ihre Maschenprobe in der Höhe stimmt. Viel Spaß beim stricken!

28.02.2024 - 15:32

country flag Roz Sherris wrote:

Hi Jeanette I'm knitting DROPS 59-14, and mostly finding the instructions clear and easy to follow. But I don't quite understand how the zipper pocket works. Are the stitches picked up on the wrong side or right side of the work? And if they are worked in stockingette, do they not tend to curl up in the way a rolled collar does? A little more information would be very helpful - or even a diagram and/or photo. Thanks for your help - I hope! Roz

16.11.2023 - 18:27

DROPS Design answered:

Dear Roz, the stitches for the zipper are picked up from right side, they won't roll up as you will sew the zipper behind, so that the 4 rows stocking stitch will be sewn to the zipper. Happy knitting!

17.11.2023 - 08:22

country flag Sharlene Currin wrote:

Hi there. When you start knitting M1 and M2 the pattern says purl and knit and not knit from right side, purl from wrong side. Do I knit all the knit stitches on the right and wrong side?

20.03.2023 - 17:23

DROPS Design answered:

Dear Mrs Currin, the diagram text explains how to work the stitches, seen from RS, ie to get a K from RS you will P from WS (= white squares) and to get a P from RS you will K from WS (cross). Happy knitting!

21.03.2023 - 10:35

country flag Mihaela wrote:

Hello ! Please tell me if I can replace the Alaska thread with 1 Karisma thread + 1 Alpaca thread? (for this model). In this context, do the values given for Alaska correspond? Thank you !

05.02.2023 - 14:12

DROPS Design answered:

Dear Mihaela, you need to check if the gauge will match; in that case, you can use the Karisma and Alpaca yarns as substitutes and you can use the numbers and values calculated in the pattern. The final result will be slightly tighter than with Alaska, because you will probably need to work tighter with your 2 yarns than the Alaska thread to have the correct gauge. Happy knitting!

05.02.2023 - 23:38

country flag Gisèle Généreux wrote:

J'ai constaté que le motif M2 n'arrive pas pour la manche en tricotant en circulaire y a t'il une erreur. je commence par 2 mailles endroits et termine également avec 2 mailles endroits.

24.01.2022 - 23:57

DROPS Design answered:

Bonjour Mme Généreux, le nombre de mailles à monter pour les manches est multiple de 4, en taille enfant comme en taille adulte, autrement dit, vous avez suffisamment de mailles pour tricoter 8-9-9-10-10-11 fois M.2 en taille enfant (= 32-36-36-40-40-44-44 mailles) ou 11-12-12-12-13 fois M.2 en taille adulte (= 44-48-48-48-52-52 mailles). Notez que M.2 se tricote ainsi: 2 tours (2 m env, 2 m end) puis 2 tours (2 m end, 2 m env). Bon tricot!

25.01.2022 - 09:48

country flag Alain wrote:

Bonjour, Je désire faire le modèle Drops 59-14,mais je n'arrive pas à déterminer quelle taille prendre. Habituellement,je prends des tailles L ,mais les mesures de mes vestes actuelles sont inférieures aux mesures S/M de vos modèles.Et prendre une taille S/M me parait bizarre..Pouvez vous m'aider ? Merci

13.10.2020 - 11:35

DROPS Design answered:

Bonjour Alain, ce modèle date d'il y a quelques années et les mesures de l'époque étaient différentes (on taillait alors plus "ample/overisze"- Mesurez une veste similaire que vous avez et dont vous aimez la forme (plus ou moins ample par ex) et choisissez la taille en conséquence. Retrouvez plus d'infos sur les tailles ici. Bon tricot!

13.10.2020 - 12:56

country flag Adrija Laha Mukherji wrote:

Alaska yarn is not available in India. So if I have to choose a different yarn for a similar look of the finished cardigan, what would be number of ply for acrylic wool?

27.12.2019 - 19:41

DROPS Design answered:

Dear Adrija Laha Mukherji, Alaska wool is a thicker yarn that has 70 meters in a 50 gramm balls, and teh gauge these patterns are knitted with is: Gauge: 17 sts x 22 rows in Pattern 2 = 10 x 10 cm .I hope this helps comparing to the system of measuring yarn thickness in your country. Happy Crafting!

28.12.2019 - 07:22

country flag June Heaton wrote:

I have just down loaded the pattern 59-14. reading through it only gives 1 row of pattern and does not state that you need to turn at the end of the row even though this is being worked on a circular needle and that it is an open front cardigan. Are there any rows missing in the pattern?

01.11.2019 - 23:20

DROPS Design answered:

Hello June! Work in pattern as established on 1st row. Pattern chart M.1 and M.2 are given at the end of the text and you have to repeat them vertically. Happy knitting!

02.11.2019 - 21:36

country flag Nikki wrote:

Hello. I'm workimg a men's small/medium and need some clarification on the sleeve caps. "Bind off for sleeve caps on each side every other row: 5 stitches 5 times". Is it a total of 5 times which leaves me with 55 stitches or 5 times each side which leaves me with 30 stitches? Thank you in advance & for your many wonderful patterns.

31.07.2019 - 22:44

DROPS Design answered:

Hello Nikki. It's 5 times each side (30 sts left) . Happy knitting!

01.08.2019 - 09:04

country flag Annick wrote:

Bonjour est-il possible d'avoir une vidéo de la technique pour poser une fermeture éclaire ? je n'en ai pas trouvé dans vos vidéo.. merci de votre aide

24.04.2018 - 16:27

DROPS Design answered:

Bonjour Annick, relevez les mailles le long de chaque devant, après les 3 m jersey des bordures de devant et tricotez 4 rangs jersey et rabattez ensuite les mailles: on obtient ainsi 2 épaisseurs de jersey qui vont servir de housse à la glissière). Glissez la fermeture à glissière entre ces 4 rangs jersey et les 3 m jersey des bordures devant et faites la couture. Bon assemblage!

25.04.2018 - 07:36