
Popular categories
Looking for a yarn?


Comments / Questions (15)
![]() Effi Pasch wrote:
Effi Pasch wrote:
Hallo, Ich möchte gerne nur die Jacke stricken. Ändern sich dann die Mengenangaben? Hatte schon mal gefragt und warte gespannt auf Antwort, da ich bald anfangen will zu stricken. Herzlichen Dank!
31.01.2025 - 10:29DROPS Design answered:
Liebe Frau Pasch, die Garnmenge oben beim Tab "Anleitung" gilt nur für die Jacke - die Garnmenge für die Mütze und Pulswärmer befindet sich unten, nach der Jacke. Viel Spaß beim Stricken!
31.01.2025 - 15:48
![]() Katrin Fiedler wrote:
Katrin Fiedler wrote:
Moin, beim Stirnband werden 36 Maschen als Anschlag angegeben. Ist das so korrekt? Wären ja ein bisschen wenig . LG Katrin
16.01.2025 - 08:46DROPS Design answered:
Liebe Faru Fiedler, ja so ist es richgtig, man strickt hier "quer": man wird dann 44 cm (um den Kopf) über diese 36 Maschen (Breite vom Stirnband) stricken, und dann die Anschlagskante und die letzte Reihe zusammnenähen. Viel Spaß beim Stricken!
16.01.2025 - 16:42
![]() Effi Pasch wrote:
Effi Pasch wrote:
Hallo, ich möchte gern nur die Jacke stricken, ohne Stirnband, Stulpen und Schal. Wie ändern sich die Mengenangaben? Die Beschreibung für den Schal konnte ich unter der angegebnen Nummer nicht finden. Vielen Dank!
04.01.2025 - 19:57DROPS Design answered:
Liebe Frau Pasch, die Garnmenge für die Jacke finden Sie unter Tab "Anleitung", die Garnmenge für Stirnband, Stulpen und Schal ist nicht damit gerechnet, die finden Sie unten, nach der Anleitung der Jacke und vor jede Anleitung. Viel Spaß beim Stricken!
20.02.2025 - 12:12
![]() Victoria Eugenia Van Peborgh wrote:
Victoria Eugenia Van Peborgh wrote:
Me encanta drops, sus lanas y sus patrones. He tejido varios y las lanas siguen bien a pesar del uso intenso en invierno. Gracias !!!
03.01.2023 - 15:02
![]() Victoria Van Peborgh wrote:
Victoria Van Peborgh wrote:
Cuando en las instrucciones de la terminación dice: "Cuando la cenefa mida 10 cm aum 1 pt en el centro de las primeras tres secciones de 4 r. desde el centro de la espalda (visto por el LD) = 123-127-131-135-139 pts. Cuando la labor mida 14 cm aum 1 pt en el centro de las primeras tres secciones de 4 d. desde el centro de la espalda (visto por el LD) = 126-130-134-138-142 pts" entiendo que al aumentar puntos algunas franjas de la cenefa tendrán 5 puntos en vez de 4. Es así ?
03.01.2023 - 15:01DROPS Design answered:
Hola Victoria, sí, algunas de las franjas tendrán 5 pts.
07.01.2023 - 19:46
![]() Hilde Vercaeren wrote:
Hilde Vercaeren wrote:
Bij de beschrijving van knoopbies en kraag staat: bij h van 10cm, 1st meerderen in het midden van de eerste 4av vanaf het midden achterpand. Hoe kan ik dan in totaal 3st vermeerderd hebben op die rij?
12.10.2020 - 10:03DROPS Design answered:
Dag Hilde,
Het staat er niet duidelijk omschreven (dus ik zal het aanpassen), maar het is de bedoeling dat je in de eerste 3 delen met averecht mindert in het midden van de 4 steken.
18.11.2020 - 18:44
![]() Hilde Vercaeren wrote:
Hilde Vercaeren wrote:
Bij de beschrijving van knoopbies en kraag staat: bij h van 10cm, 1st meerderen in het midden van de eerste 4av vanaf het midden achterpand. Hoe kan ik dan in totaal 3st vermeerderd hebben op die rij?
12.10.2020 - 00:09
![]() DeeDee Ralph wrote:
DeeDee Ralph wrote:
Its me again! I am working on the right front at the decrease where it says to decrease 1st at center front edge for neckband every four rows 9 times. (is that 36 rows total?) I am at the stated length but I have only decreased 3 sts. at 2.5 sets of 4 rows. Am I not understanding the directions? Thank you for your help and patience with me!
13.04.2020 - 14:44DROPS Design answered:
Dear DeeDee Ralph, you will decrease for the neck 1 stitch on every 4th row a total of 9 times, this means you will have decreased 9 stitches after 36 rows (ca 21 cm). Happy knitting!
14.04.2020 - 12:50
![]() DeeDee Ralph wrote:
DeeDee Ralph wrote:
Working on the Time Out sweater and ready to start the rows at the armhole. Is there a video that shows how to do this? I am a newer knitter and not sure I understand. Thanks for any help!
08.04.2020 - 23:36DROPS Design answered:
Dear DeeDee Ralph, in 3rd size work as follows: from RS cast off the first 3 stitches, work to the end of the row, turn and cast off the first 3 sts at the beg of next row. turn cast off the first 2 sts at the beg of next RS row, work to the end of the row, cast off the first 2 sts and work to the end of row. Turn, cast off 1 stitch at the beg of next 2 rows and repeat these 2 rows a total of 4 times = you should have cast off 9 sts on each side (= 3 sts + 2 sts + 1 st x 4 times). Happy knitting!
09.04.2020 - 17:40
![]() DeeDee Ralph wrote:
DeeDee Ralph wrote:
I just started the Time Out Cardigan. I cast on 78 stitches but I am not coming out with the right amount ending the first row. I may have seen a comment about what to do (new Knitter!) but I cannot seem to find it now. Thank you!! DeeDee
01.04.2020 - 23:06DROPS Design answered:
Dear DeeDeeRalph, work the 78 sts as follows for back piece: from RS: K1 (edge st), K4, *P4, K4*, repeat from *-* a total of 9 times (= over the next 72 stitches), (1 stitch remains), finish with K1. From WS work: K1, *P4, K4*, repeat from *-* a total of 9 times, finish with P4, K1. Happy knitting!
02.04.2020 - 08:21
|
|
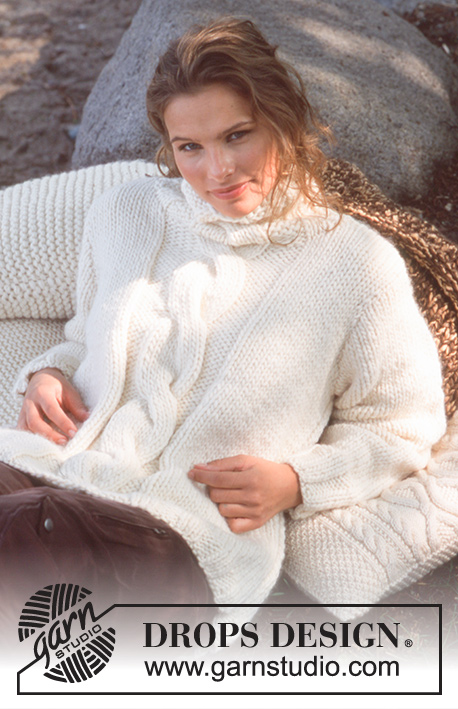
Time Out |
|
|
|
|
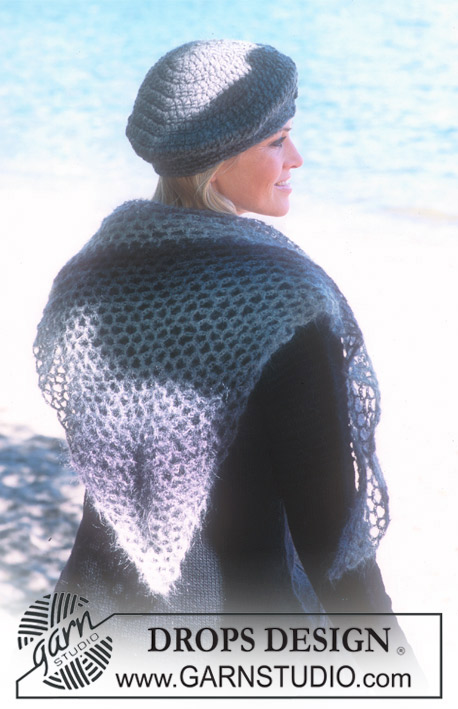
DROPS Cardigan in Angora-Tweed and Vivaldi or Lima and Brushed Alpaca Silk ; Hat and Wristwarmers in Angora-Tweed or Lima
DROPS 80-20 |
|
|
CARDIGAN: Gauge: 14 sts x 17 rows with 1 strand of each yarn in stockinette st = 10 x 10 cm. Rib: * K 4, P 4 *, repeat from * - *. Back: Cast on loosely 66-74-78-86-94 sts with 1 strand of each yarn. Knit 2 rows garter st. Then knit rib as follows Row 1 (right side): Size S: K 1 (edge st knit in garter st) and K 2, * P 4, K 4 *, repeat from * - * to the last 7 sts, P 4, K 2, K 1 (edge st knit in garter st). Size M: K 1 (edge st knit in garter st) and P 2, * K 4, P 4 *, repeat from * - * to the last 7 sts, K 4, P 2, K 1 (edge st knit in garter st). Size L and XXL: K 1 (edge st knit in garter st), K 4, * P 4, K 4 *, repeat from * - *, finish with K 1 (edge st knit in garter st). Size XL: K 1 (edge st knit in garter st) and P 4, * K 4, P 4 *, repeat from * - *, finish with K 1 (edge st knit in garter st). When the rib measures 4 cm change to stockinette st. When the piece measures 15 cm dec 1 st at each side every 12-12-20-20-20 cm a total of 3-3-2-2-2 times = 60-68-74-82-90 sts. When the piece measures 52-53-54-55-56 cm bind off for armhole at each side every other row: 3 sts 0-1-1-1-1 time, 2 sts 1-0-1-2-4 times and 1 st 1-4-4-5-4 times = 54-54-56-58-60 sts. When the piece measures 65-67-69-71-73 cm bind off the center 26-26-28-28-28 sts for the neck. Then bind off at each neck edge every other row: 3 sts 1 time, 2 sts 1 time and 1 st 3 times = 6-6-6-7-8 sts remain on each shoulder. Bind off when the piece measures 71-73-75-77-79 cm. Right front: Cast on 20-24-26-30-34 sts with 1 strand of each yarn and knit 2 rows garter st, then knit rib as follows (beginning of row is center front edge): Row 1 (right side): Size S: K 1 (edge st knit in garter st), * K 4, P 4 *, repeat from * - * 2 times, K 2, K 1 (edge st knit in garter st) . Size M: K 1 (edge st knit in garter st), K 4, * P 4, K 4 *, repeat from * - * 2 times, P 2, K 1 (edge st knit in garter st) . Size L: K 1 (edge st knit in garter st), * K 4, P 4 *, repeat from * - * 3 times, K 1 (edge st knit in garter st). Size XL: K 1 (edge st knit in garter st), K 4, * P 4, K 4 *, repeat from * - * 3 times, K 1 (edge st knit in garter st). Size XXL: K 1 (edge st knit in garter st), * K 4, P 4 *, repeat from * - * 4 times, K 1 (edge st knit in garter st). When the piece measures 4 cm change to stockinette st, keeping 1 edge st at each side in garter st. When the piece measures 15 cm dec 1 st at the side every 12-12-20-20-20 cm a total of 3-3-2-2-2 times = 17-21-24-28-32 sts. Neckband: When the piece measures 46-48-50-52-54 cm dec 1 st at center front edge for neckband every 4 rows 8-8-9-9-9 times. When the piece measures 52-53-54-55-56 cm bind off for armhole at the side as on back = 6-6-6-7-8 sts remain on shoulder. When the piece measures 71-73-75-77-79 cm bind off all sts. Left front: Cast on and knit the same as the right front, reversing all shaping. Sleeve: Cast on loosely 34-34-42-42-42 sts with 1 strand of each yarn and knit 2 rows garter st, then knit rib for 18 cm, keeping 1 edge st at each side in garter st. Then knit stockinette st to finished measurements. After the rib inc 1 st at each side every 4-3.5-4.5-3-2.5 cm a total of 8-9-7-9-10 times = 50-52-56-60-62 sts. When sleeve measures 51-49-48-46-44 cm bind off for sleeve cap at each side every other row: 4 sts 1 time, 3 sts 1 time, 2 sts 1-1-1-1-0 time and 1 st 0-1-2-4-7 times, then bind off 2 sts at each side until the piece measures 56 cm, then bind off 3 sts at each side 1 time. The piece measures approx. 57 cm, bind off the remaining sts. Assembly: Sew shoulder seams. Buttonband and collar: Pick up with 1 strand Angora-Tweed + 1 strand Vivaldi or 1 strand Lima + 1 strand Brushed Alpaca Silk starting at lower edge on right front and up to center back: 120-124-128-132-136 sts (divisible by 4). K 1 row from wrong side and then K 1 row from right side. Knit the next row as follows (begin row at center back) = wrong side: Sizes S, L and XXL: K 2, * P 4, K 4 *, repeat from * - *, finish with P 4 and K 2 (edge sts knit in garter st at lower edge). Sizes M and XL: P 2, * K 4, P 4 *, repeat from * - *, finish with K 2 (edge sts in garter st at lower edge). Continue the rib as established – from the right side the buttonband starts with K 2 (edge sts knit in garter st) and K 4 from lower edge. When buttonband measures 10 cm inc 1 st in the center of the first three P 4 ribs from center back edge (seen from the right side) = 123-127-131-135-139 sts. When the piece measures 14 cm inc 1 st in the center of each of the first three K 4 ribs from center back (seen from the right side) = 126-130-134-138-142 sts. When the collar measures 24 cm K 1 row from right side, increasing 8 sts evenly distributed over top 30 sts at back of the neck. Then K 1 row from wrong side and bind off. Repeat along left front. Sew the collar at center back. Sew in sleeves. Sew sleeve and side seams using edge sts as a seam allowance. Belt: Cast on 9 sts with 1 strand of each yarn. Knit rib = K 1, P 1, keeping 1 st in garter st at each side. Bind off in rib when belt measures approx. 120-140 cm. TUBE HAT AND WRISTWARMERS: Sizes: One-size Materials: DROPS ANGORA-TWEED from Garnstudio 100 gr nr 06, brown Or use: Garnstudio Lima from Garnstudio 150 gr nr 5310, light brown DROPS 4.5 mm needles, or size needed to obtain correct gauge. ---------------------------------------------------------------- Gauge: 20 sts x 40 rows garter st = 10 x 10 cm. Tube Hat: Cast on 36 sts and knit garter st until the piece measures 44 cm, bind off. Sew cast-on edge and bind-off edge to each other so that it forms a tube, approx. 18 cm. Wristwarmers: Cast on 30 sts. Knit garter st until the piece measures 18 cm, bind off. Sew cast-on edge and bind-off edge to each other so that it forms a tube, approx. 15 cm. Knit a second wristwarmer. ----------------------------------------------------------- |
|

|
|
Have you finished this pattern?Tag your pictures with #dropspattern or submit them to the #dropsfan gallery. Do you need help with this pattern?You'll find 20 tutorial videos, a Comments/Questions area and more by visiting the pattern on garnstudio.com. © 1982-2025 DROPS Design A/S. We reserve all rights. This document, including all its sub-sections, has copyrights. Read more about what you can do with our patterns at the bottom of each pattern on our site. |


With over 40 years in knitting and crochet design, DROPS Design offers one of the most extensive collections of free patterns on the internet - translated to 17 languages. As of today we count 314 catalogues and 11822 patterns translated into English (UK/cm).
We work hard to bring you the best knitting and crochet have to offer, inspiration and advice as well as great quality yarns at incredible prices! Would you like to use our patterns for other than personal use? You can read what you are allowed to do in the Copyright text at the bottom of all our patterns. Happy crafting!
Post a comment to pattern DROPS 80-20
We would love to hear what you have to say about this pattern!
If you want to leave a question, please make sure you select the correct category in the form below, to speed up the answering process. Required fields are marked *.