
Popular categories
Looking for a yarn?


Comments / Questions (6)
![]() Winnie Thomsen wrote:
Winnie Thomsen wrote:
Jeg kan ikke se, hvor mange nøgler, man skal bruge til en lang model. Og hvor lang er den lange model?
06.04.2019 - 08:47DROPS Design answered:
Hej Winnie, det er den lange model som beskrives i opskriften. God fornøjelse!
08.04.2019 - 08:45
![]() Els Verheyen wrote:
Els Verheyen wrote:
Ik heb een vraag over de mouwen. Er staat meerder 35 keer 2st midden in de ondermouw alle 3 naalden. Wat bedoelen jullie met midden in de ondermouw? Wat verder staat dan nog eens: kant als de mouw 44 cm is midden in de ondermouw 8 steken af. Al vast bedankt
05.04.2019 - 23:36DROPS Design answered:
Dag Els,
Met midden onder de mouw wordt de onderkant van de mouw bedoeld vanaf zeg maar de pols tot de oksel.
06.04.2019 - 20:57
![]() Andrea Müller wrote:
Andrea Müller wrote:
Ich würde die Jacke gerne mit einer Knopfleiste statt mit Reißverschluß stricken.Können Sie eine entsprechende Strickanleitung anbieten?
28.05.2018 - 11:59DROPS Design answered:
Liebe Frau Müller, wir können leider nicht jede unserer Anleitung nach jeder individuellen Anfrage anpassen, aber hier finden Sie Jacken mit einer ähnlichen Maschenprobe, davon können Sie sich inspirieren lassen, um Knopflöcher zu stricken. Viel Spaß beim stricken!
28.05.2018 - 13:11
![]() Maud Blomqvist wrote:
Maud Blomqvist wrote:
Vill gärna sticka den här koftan i det blåa garnet som framgår av bilden. Då jag inte hittar den färgen bland era varuprover så undrar jag om ni kan rekommendera mig ett annat garn som finns i kornblå.
26.02.2018 - 17:44DROPS Design answered:
Hej Maud, vi har färgen i DROPS Muskat, du kanske hittar en liknande tröja i Muskat 27.02.2018 - 13:41
![]() Linda wrote:
Linda wrote:
Bind off for neck inside the 3 sts worked in seed st - Is this an actual bind off or do you do a decrease?
15.08.2017 - 13:39DROPS Design answered:
Hi Linda, This is a bind off, not a decrease. Happy knitting!
15.08.2017 - 14:53
![]() Henriette wrote:
Henriette wrote:
Jeg synes det er en flot trøje, og ville gerne strikke den, men hvor meget garn skal jeg bruge? Jeg synes ikke, det fremgår af opskriften.
02.08.2007 - 21:00
|
||||||||||
DROPS 33-17 |
||||||||||
 |
 |
|||||||||
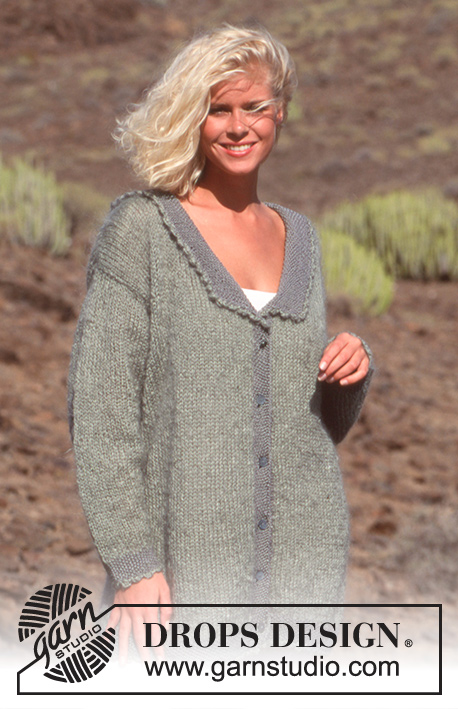
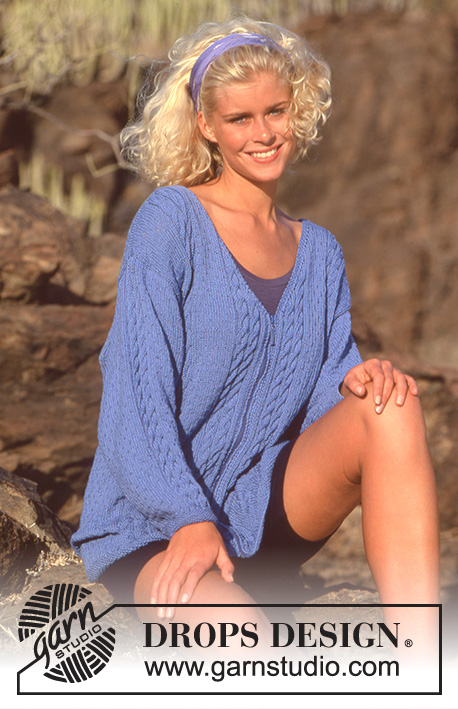
Drops jacket with zip in “Safran” Short or long version
DROPS 33-17 |
||||||||||
|
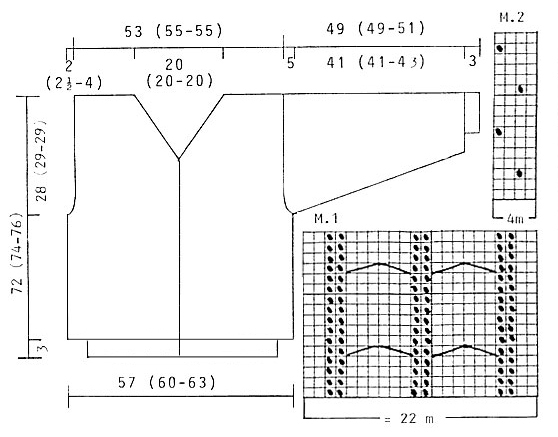
Knitting Tension: 23sts x 30 rows on needle size 3.5mm in stocking st = 10x10cm. Moss st: 1st row: K1, P1. 2nd row: Work K over P and P over K. Repeat rows 1 and 2. Pattern: See diagram (1 diagram = 1 repeat). Pattern is seen from RS. Short version: Body: Cast on 16 sts less and inc 16 sts more after the moss st. Measurement for arm hole, neck and casting off edge is reduced by 15 (16-18) cm, finished length = 57 (58-58) cm. Yarn requirement is reduced by 100 g. Body: Jacket is worked back and forth on circ needle. Cast on 256 (260-264) sts on long circ needle size 3mm with blue and work 3 cm in moss st. Change to circ needle size 3.5mm and inc 36 (44-56) sts evenly on 1st row= 292 (304-320) sts. Work next row as follows: Work 3 sts in moss st (=front band), M.1, 13 sts in M.2, M.1,172 (184-200) sts in M.2, M.1,13 sts in M.2, M.1, 3 sts in moss st (=front band). Remember to check knitting tension. Continue in pattern until body measures 44 (45-47) cm. Next row: Work 78 (81-85) sts across front, cast off 6 sts for arm hole, work 124 (130-138) sts across back, cast off 6 sts for arm hole, work 78 (81-85) sts across front. Finish each piece separately. Right front: = 78 (81-85) sts. Dec for arm hole on every other row as follows: 1 sts 1 (2-6) times = 77 (79-79) sts. Continue until piece measures 52 (54-56) cm. Cast off for neck inside the 3 sts worked in moss st on every other row as follows: 1 st 33 (33-33) times. Continue until piece measures 72 (74-76) cm. Cast off remaining 44 (46-46) sts. Left front: Work as right front. Back: = 124 (130-138) sts. Dec for arm hole as front = 122 (126-126) sts. Continue until piece measures 69 (71-73) cm. Work 3 rows in moss st across the centre 52 (52-52) sts on needle size 3mm. Cast off centre 46 (46-46) sts for neck. Continue working 3 sts in moss st each side of neck until piece measures 72 (74-76) cm. Cast off remaining 38 (40-40) sts. Sleeve: Cast on 50 (54-58) sts on double pointed needles size 3mm with blue. Work 3 cm in moss st. Change to double pointed needles size 3.5mm and inc 16 (14-12) sts evenly on 1st round = 66 (68-70) sts. Work next round as follows: Work 22 (23-24) sts in M.2, M.1, 22 (23-24) sts in M.2. Continue in pattern and at the same time inc underneath sleeve for S+M: every 3rd round, for L: alternatively on every 3rd and 4th round as follows: 2 sts 35 (36-35) times =136 (140-140) sts. Continue until piece measures 44 (44-46) cm. Cast off centre 8 sts under arm and finish working back and forth on needle. Dec each side on every other row as follows: 5 sts 6 times. Work measures 49 (49-51) cm. Cast off. Assembly: Sew shoulder seam and sew the sleeves to the body. Sew the zipper (about 50 cm long) in the outermost 3 moss sts at the front band. |
||||||||||
Diagram explanations |
||||||||||
|
||||||||||
|
||||||||||
Have you finished this pattern?Tag your pictures with #dropspattern or submit them to the #dropsfan gallery. Do you need help with this pattern?You'll find 17 tutorial videos, a Comments/Questions area and more by visiting the pattern on garnstudio.com. © 1982-2025 DROPS Design A/S. We reserve all rights. This document, including all its sub-sections, has copyrights. Read more about what you can do with our patterns at the bottom of each pattern on our site. |
||||||||||


With over 40 years in knitting and crochet design, DROPS Design offers one of the most extensive collections of free patterns on the internet - translated to 17 languages. As of today we count 314 catalogues and 11822 patterns translated into English (UK/cm).
We work hard to bring you the best knitting and crochet have to offer, inspiration and advice as well as great quality yarns at incredible prices! Would you like to use our patterns for other than personal use? You can read what you are allowed to do in the Copyright text at the bottom of all our patterns. Happy crafting!
Post a comment to pattern DROPS 33-17
We would love to hear what you have to say about this pattern!
If you want to leave a question, please make sure you select the correct category in the form below, to speed up the answering process. Required fields are marked *.