
Popular categories
Looking for a yarn?


|
|||||||||||||||||||
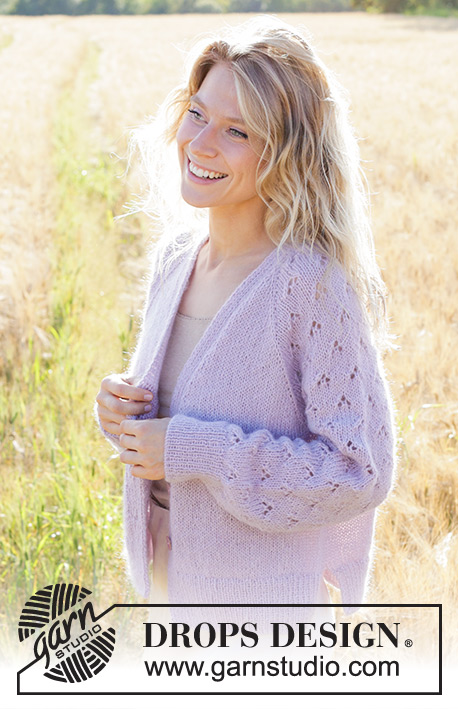
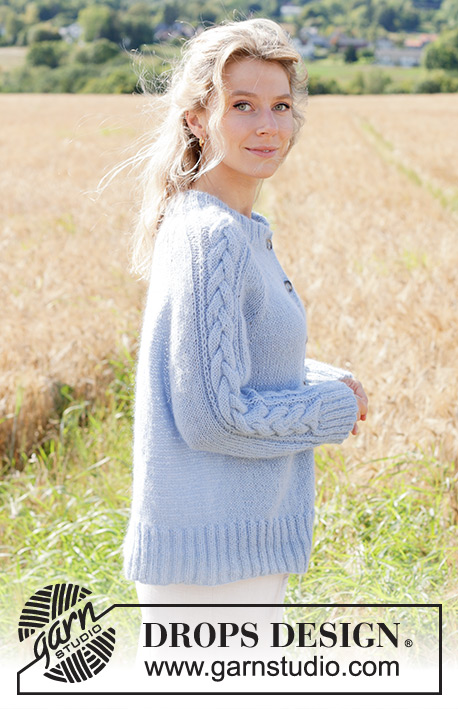
Aisling Cardigan |
|||||||||||||||||||
 |
 |
||||||||||||||||||
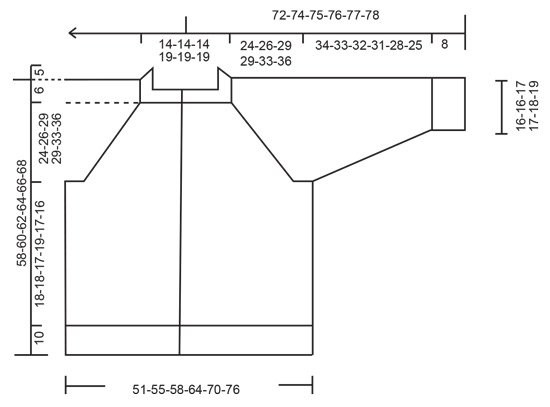
Knitted jacket in DROPS Alpaca and DROPS Kid-Silk. The piece is worked top down with raglan, cables, Fisherman’s rib on sleeves and double neck. Sizes S - XXXL.
DROPS 250-14 |
|||||||||||||||||||
|
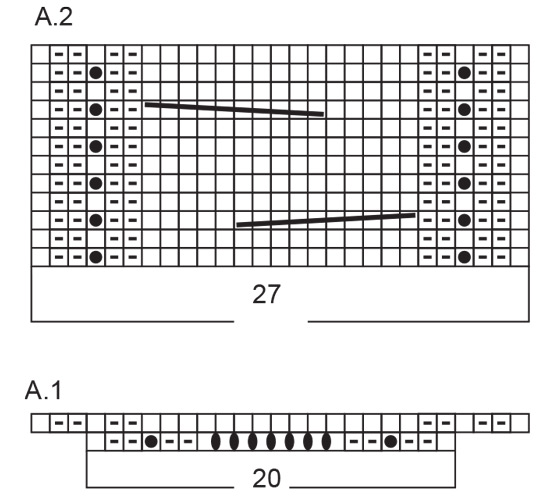
------------------------------------------------------- EXPLANATIONS FOR THE PATTERN: ------------------------------------------------------- GARTER STITCH (worked back and forth): Knit all rows. 1 ridge in height = knit 2 rows. PATTERN: See diagrams A.1 and A.2. The diagrams show all rows in the pattern from the right side. BANDS WITH I-CORD: START OF ROW: Work the band as follows: Slip 1 stitch purl-wise with yarn in front, knit 1, work 5 garter stitches. END OF ROW: Work the band as follows: Work until there are 7 stitches left on the row, work 5 garter stitches, slip 1 stitch purl-wise with yarn in front, knit 1. Work like this from both the right and wrong side. RAGLAN: Increase 1 stitch before/after 2 stitches in each transition between body and sleeves, marker-thread sits between these 2 stitches. Increase 1 stitch by making 1 yarn over which is worked twisted on the next row to avoid a hole. Then work the new stitches in stockinette stitch. BUTTONHOLES: Work buttonholes on the right band (when the garment is worn). Work from the right side when there are 4 stitches left on the row as follows: Make 1 yarn over, knit 2 together, slip 1 stitch purl-wise with strand in front, knit 1. On the next row (wrong side), knit the yarn over to leave a hole. The first buttonhole is worked on the first row after the neck. The other 5-5-5-6-6-6 buttonholes are worked with approx. 8-8½-9-7½ -8-8½ cm = 3⅛"-3¼"-3½"-2⅞" -3⅛"-3¼" between each one. DECREASE TIP (for sleeves): Start 3 stitches before the marker-thread, knit 2 together, knit 2 (marker-thread sits between these 2 stitches), slip 1 stitch knit-wise, knit 1 and pass the slipped stitch over the knitted stitch. ------------------------------------------------------- START THE PIECE HERE: ------------------------------------------------------- JACKET – SHORT OVERVIEW OF THE PIECE: The pattern uses both long and short needles; start with the length which fits the number of stitches and change when necessary. Stitches are cast on for the neckline, the piece is worked back and forth, increasing stitches on each side until the neckline is finished. The yoke is worked back and forth top down, with circular needle. When the yoke is finished, it is divided for the body and sleeves, the body continued back and forth while the sleeves wait. The sleeves are worked in the round, top down. Stitches are knitted up for the neck, which is then folded double to the inside and sewn down. NECKLINE: Cast on 70-70-70-78-78-78 stitches with circular needle size 5 MM = US 8 and 1 strand of each quality (2 strands). Insert 4 marker-threads without working the stitches; these are used when increasing for raglan. Each marker-thread is inserted between 2 stitches as follows: Count 3 stitches, insert 1 marker-thread, count 20 stitches (sleeve), insert 1 marker-thread, count 24-24-24-32-32-32 stitches (back piece), insert 1 marker-thread, count 20 stitches (sleeve), insert 1 marker-thread, count 3 stitches. Work back and forth as follows: ROW 1 (wrong side): Purl, cast on 2 stitches at end of row = 72-72-72-80-80-80 stitches. ROW 2 (right side): Knit the stitches on the front and back pieces, work A.1 over the 20 stitches on each sleeve and increase for RAGLAN on each side of all 4 marker-threads – read description above (8 stitches increased for raglan and 7 stitches increased in each A.1), cast on 2 stitches at end of row = 96-96-96-104-104-104 stitches. ROW 3 (wrong side): Work the last row in A.1 and purl the other stitches, cast on 2 stitches at end of row = 98-98-98-106-106-106 stitches. ROW 4 (right side): Knit the stitches on the front and back pieces, work A.2 over A.1 on the sleeves, increase for raglan on each side of all 4 marker-threads (8 increased stitches), cast on 2 stitches at end of row = 108-108-108-116-116-116 stitches. ROW 5 (wrong side): Work pattern and stockinette stitch as before, cast on 3 stitches at end of row = 111-111-111-119-119-119 stitches. ROW 6 (right side): Work pattern and stockinette stitch as before, increase for raglan on each side of all 4 marker-threads (8 increased stitches), cast on 3 stitches at end of row = 122-122-122-130-130-130 stitches. ROW 7 (wrong side): Work pattern and stockinette stitch as before, cast on 10-10-10-14-14-14 stitches at end of row = 132-132-132-144-144-144 stitches. ROW 8 (right side): Work BAND WITH I-CORD over the first 7 stitches, pattern and stockinette stitch as before, increase for raglan on each side of all 4 marker-threads (8 stitches increased), cast on 10-10-10-14-14-14 stitches at end of row = 150-150-150-166-166-166 stitches. ROW 9 (wrong side): Work pattern and stockinette stitch as before and BANDS WITH I-CORD (7 stitches) on each side – read description above. The neckline is now finished and you have increased 4 times for raglan. Work the yoke and BUTTONHOLES – read description above. YOKE: Work stockinette stitch, A.2 and band stitches, continue increasing for raglan 2 more times (a total of 6 times for raglan, including those on the neckline). Continue increasing for raglan every 2nd row (each row from the right side), but every 2nd increase is only on the front and back pieces, i.e., increase on the front and back pieces every 2nd row and on the sleeves every 4th row, alternately 4 and 8 increased stitches. Increase like this 18-22-26-26-30-30 times on the front and back pieces (9-11-13-13-15-15 times on the sleeves). Continue with stockinette stitch, A.2 and the bands increasing for raglan, but now only on the front and back pieces (the sleeve-increases are finished). Increase like this every 2nd row a total of 2-1-0-0-0-4 times (do not increase in sizes L, XL, XXL). A total of 26-29-32-32-36-40 times on the body and 15-17-19-19-21-21 times on the sleeves (including the increases on the neckline). There are 282-302-322-338-362-378 stitches. Continue with stockinette stitch, A.2 and the bands until the piece measures 24-26-29-29-33-36 cm = 9½"-10¼"-11⅜"-11⅜"-13"-14¼", measured mid-back. DIVIDE FOR BODY AND SLEEVES: Work the first 46-49-52-56-60-64 stitches (front piece), place the next 57-61-65-65-69-69 stitches on 1 thread for the sleeve, cast on 10-10-10-12-14-16 stitches (in side under sleeve), work the next 76-82-88-96-104-112 stitches (back piece), place the next 57-61-65-65-69-69 stitches on 1 thread for the sleeve, cast on 10-10-10-12-14-16 stitches (in side under sleeve), work the last 46-49-52-56-60-64 stitches (front piece). BODY: = 188-200-212-232-252-272 stitches. Work stockinette stitch and bands as before until the body measures 18-18-17-19-17-16 cm = 7"-7"-6¾"-7½"-6¾"-6¼" from the division. Work 1 row from the right side and increase 36-40-44-48-52-56 stitches evenly spaced (do not increase over the bands) = 224-240-256-280-304-328 stitches. Change to circular needle size 4 MM = US 6 and work as follows from the wrong side: 7 band stitches, * purl 2, knit 2 *, work from *-* until there are 9 stitches left, purl 2 and 7 band stitches. Continue this rib for 10 cm = 4". Bind off. The jacket measures approx. 58-60-62-64-66-68 cm = 22¾"-23⅝"-24⅜"-25¼"-26"-26¾" from the shoulder. SLEEVES: Place the 57-61-65-65-69-69 stitches from the thread on the one side of the piece on short circular needle/double pointed needles size 5 MM = US 8 and knit up 1 stitch in each of the 10-10-10-12-14-16 stitches cast on under the sleeve = 67-71-75-77-83-85 stitches. Insert a marker-thread in the middle of the new stitches. Work stockinette stitch and continue A.2 in the round. When the sleeve measures 4 cm = 1½", decrease 2 stitches under the sleeve – read DECREASE TIP. Decrease like this every 5-3½-2½-2½-2-1½ cm = 2"-1¼"-1"-1"-¾"-½" a total of 6-8-9-10-11-11 times = 55-55-57-57-61-63 stitches. Continue working until the sleeve measures 34-33-32-31-28-25 cm = 13⅜"-13"-12½"-12¼"-11"-9¾". Knit 1 round and increase 5-5-7-7-7-9 stitches evenly spaced = 60-60-64-64-68-72 stitches. Change to double pointed needles size 4 MM = US 6. Work rib (knit 2, purl 2) for 8 cm = 3⅛". Bind off. The sleeve measures approx. 42-41-40-39-36-33 cm = 16½"-16⅛"-15¾"-15¼"-14¼"-13" from the division. DOUBLE NECK: Knit up from the right side, with circular needle size 4 MM = US 6, 104 to 120 stitches around the neckline - stitch count must be divisible by 4 – making sure that the raglan-stitches continue as knitted stitches in the rib (seen from the right side). Work as follows from the wrong side: 7 band stitches, * purl 2, knit 2 *, work from *-* until there are 9 stitches left, purl 2 and 7 band stitches. Continue this rib back and forth for 5 cm = 2". At the beginning of the next 2 rows bind off 4 stitches. Continue the rib with 1 garter stitch on each side until the neck measures 10 cm = 4". Bind off a little loosely. Fold the neck double to the inside and sew down. Sew the openings on the bands mid-front with small stitches. ASSEMBLY: Sew the buttons onto the left band. |
|||||||||||||||||||
Diagram explanations |
|||||||||||||||||||
|
|||||||||||||||||||
|
|||||||||||||||||||
|
|||||||||||||||||||
|
Have you made this or any other of our designs? Tag your pictures in social media with #dropsdesign so we can see them! Do you need help with this pattern?You'll find tutorial videos, a Comments/Questions area and more by visiting the pattern on garnstudio.com. © 1982-2024 DROPS Design A/S. We reserve all rights. This document, including all its sub-sections, has copyrights. Read more about what you can do with our patterns at the bottom of each pattern on our site. |
|||||||||||||||||||


With over 40 years in knitting and crochet design, DROPS Design offers one of the most extensive collections of free patterns on the internet - translated to 17 languages. As of today we count 304 catalogs and 11422 patterns - 11417 of which are translated into English (US/in).
We work hard to bring you the best knitting and crochet have to offer, inspiration and advice as well as great quality yarns at incredible prices! Would you like to use our patterns for other than personal use? You can read what you are allowed to do in the Copyright text at the bottom of all our patterns. Happy crafting!
Comments / Questions (3)
Om man ska sticka med två olika Garner, hur kan det då i detta mönster vara olika garnåtgång?
25.02.2024 - 21:26DROPS Design answered:
Hej Anneli. Det är olika antal meter per nystan för dessa 2 garn - 167 m per 50 g alpaca, 210 m per 25 g kidsilk så därför blir det olika vikt. Mvh DROPS Design
27.02.2024 - 07:14I am working from the English version and when I got to row 9 of A2 there there is a mistake in the pattern (both English US and UK). For the first cable (row 3 of A2) it says place the cable needle in front. I see now from the Norwegian version that this should have been "place cable needle in back". My question is: Can I leave the first cable left leaning (cable in front") and now do a right leaning on row 9 of A2 (cable in back)? Or do I have to rip out everything back to row 3 of A2?
11.02.2024 - 16:34Flot snoning
19.01.2024 - 05:49