
Popular categories
Looking for a yarn?


Comments / Questions (39)
![]() Marjo wrote:
Marjo wrote:
Hallo, Wordt de eerste toer van rechts naar links van de tekening gehaakt en de tweede toer van links naar rechts en dan de derde toer van rechts naar links? Of wordt vanaf te tekening alle toeren van rechts naar links gehaakt. Groetjes Marjo
26.06.2025 - 17:40DROPS Design answered:
Dag Marjo,
De eerste toer wordt van rechts naar links gehaakt, de tweede toer van links naar rechts, en zo steeds heen en weer. Je leest de patronen van onder naar boven.
26.06.2025 - 20:07
![]() Silvia wrote:
Silvia wrote:
Sto iniziando le maniche e non mi sono chiare le seguenti istruzioni: saltare 2 maglie alte, * lavorare 2 maglie alte prima della maglia alta successiva (lavorate tra le maglie alte). Che significa ' lavorate tra le maglie alte'? Se salto 2 maglie alte come faccio a fare 2 maglie alte prima della maglia alta successiva? Grazie
07.06.2025 - 22:59
![]() Birgitta Löfgren wrote:
Birgitta Löfgren wrote:
Ska a1a, a1b o a1c virkas flera gånger. Vad är måttet på höger axel fram för storlek s? Skulle vara bra med en videobeskrivning på detta mönster.
27.04.2025 - 08:52DROPS Design answered:
Hei Birgitta. Du hekler A.1a/A.1b/A.1c 1 gang i høyden til høyre skulder foran, 1 gang til venstre skulder foran og 1 gang til bakstykket. Målene til gensren ser du på målskissen, nederst i oppskriften (ingen egen mål på kun A.1a/A.1b/A.1c 1 gang i høyden). Har dessverre ingen egen video på denne modellen, kun flere små generelle videoer, men ditt ønske er skrevet opp. mvh DROPS Design
05.05.2025 - 09:27
![]() Birgitta Löfgren wrote:
Birgitta Löfgren wrote:
Hej, om jag förstår rätt ska jag börja att virka första varvet med a1a, sen a1b, sen a1c. Fortsätter sen varv två med a1c, a1b och a1a. Vad betyder siffran ino klammer. Typ för a1a står det [2]? Så tacksam för svar. /Hälsningar Birgitta
25.04.2025 - 09:41DROPS Design answered:
Hej Birgitta. Ja det stämmer, du virkar först A.1A, sedan A.1B över det antal maskor som uppges för din storlek, och till sist A.1C. När du virkat första varvet virkar du på samma sätt men andra raden i diagrammen. Siffrorna i klammer visar hur många maskor du har längst ner på varje diagram. Mvh DROPS Design
25.04.2025 - 10:20
![]() Maria wrote:
Maria wrote:
I have finished the front and back but got stuck on the arms. I am struggling with the decrease. How can I keep to the pattern at the same time?
30.03.2025 - 09:40DROPS Design answered:
Dear Maria, the pattern will be slightly interrupted when decreasing. However, since this decrease is worked in the mid-under sleeve, the break will barely be noticeable, and the rest of the sleeve maintains the pattern. You decrease on rows where you are only working treble crochets, working the decreases as indicated in the DECREASE TIP, at the beginning and the end of the row. Then, you will adjust the pattern so that you work correctly over the central stitches of the sleeves while you skip or work incomplete repeats of the charts at the beginning/end of the row in mid-under sleeve. Happy crochetting!
30.03.2025 - 20:06
![]() Doni wrote:
Doni wrote:
Salve è normale che le catenelle lasche del dietro siano di più del davanti quando bisogna unire le spalle ? Grazie
28.02.2025 - 18:59DROPS Design answered:
Buonasera Doni, il davanti e il dietro hanno numeri di maglie diversi. Buon lavoro!
12.04.2025 - 17:58
![]() Dodo wrote:
Dodo wrote:
Kan det passe, at billedet ikke svarer helt til diagram A2? Det er som om dele af A2 er blevet gentaget undervejs på billedet (oppefra er der to brede, derefter to smalle kontraststriber, mens diagrammet giver to brede, en smal stribe.
13.09.2024 - 19:27DROPS Design answered:
Hej Dodo, farven med denim skal hækles for hver 6. række. Rækken bliver smal eller bred alt efter hvordan rækken ser ud ifølge diagrammet :)
17.09.2024 - 15:15
![]() Marianna Crow wrote:
Marianna Crow wrote:
Hello. I’m trying to make this Jewels Tide Sweater but can’t figure out the diagram. I’m intermediate in crochet, made few cardigans and shorts and toys. But new in reading diagram. I’m trying to figure out and learn from your instructions, but i believe your help will cut down on my frustrations ☺️ Thank you. I’m only hobby person, making things for me and my children. Not selling.
08.08.2024 - 15:03DROPS Design answered:
Dear Marianna, you can read the following lesson on how to follow our crochet diagrams: https://www.garnstudio.com/lesson.php?id=69&cid=19. You can also ask us about specific rows or charts and we can answer any doubts you have about them. Happy crochetting!
11.08.2024 - 13:17
![]() Pam wrote:
Pam wrote:
Can you tell me where to find the amount of yarn I need to purchase. I can't seem to find it. Thank you
03.08.2024 - 17:43DROPS Design answered:
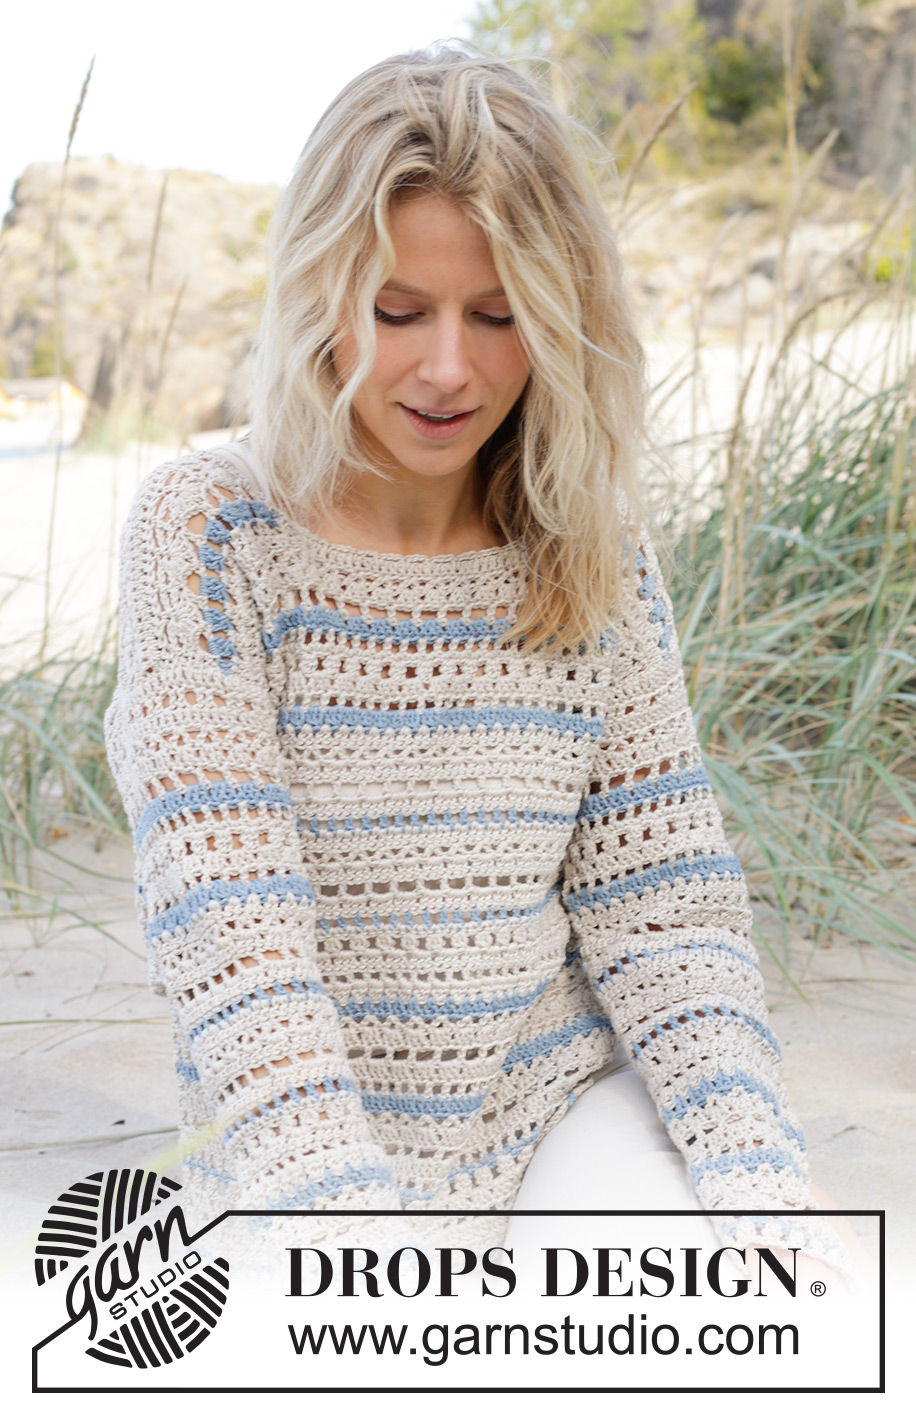
Dear Pam, you can find the yarn amount needed to make this modell, just next to the picture (on its right side) : you will need: DROPS MUSKAT from Garnstudio (belongs to yarn group B) 500-550-550-600-650-700 g colour 83, pearl 100-150-150-150-150-150 g colour 76, light denim Happy Knitting!
04.08.2024 - 18:23
![]() Hannah wrote:
Hannah wrote:
I diagram A1.B på række 2 forstår jeg ikke, hvordan jeg skal hækle de to luftmasker, der er angivet skråt som et omvendt v oven på de to fastmasker ved siden af hinanden. Det havde været rart med nærbilleder eller en forklaring.
31.07.2024 - 21:20DROPS Design answered:
Hej Hannah, den række læser du således: 2 lm, 1fm, 2 lm, 1 fm, 2 lm, 1 st osv
02.08.2024 - 11:13
|
||||||||||||||||||||||||||||
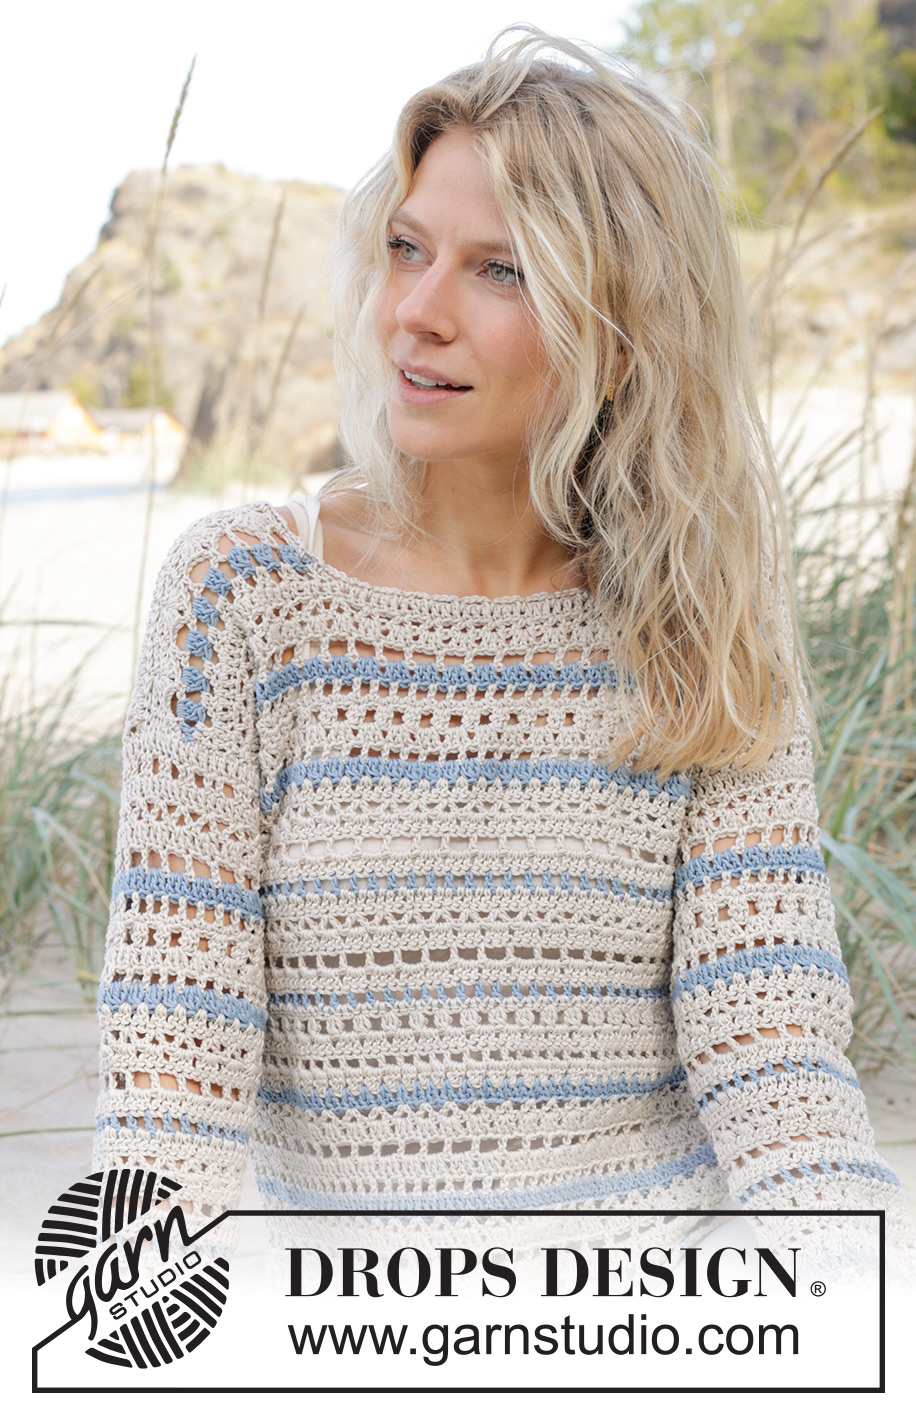
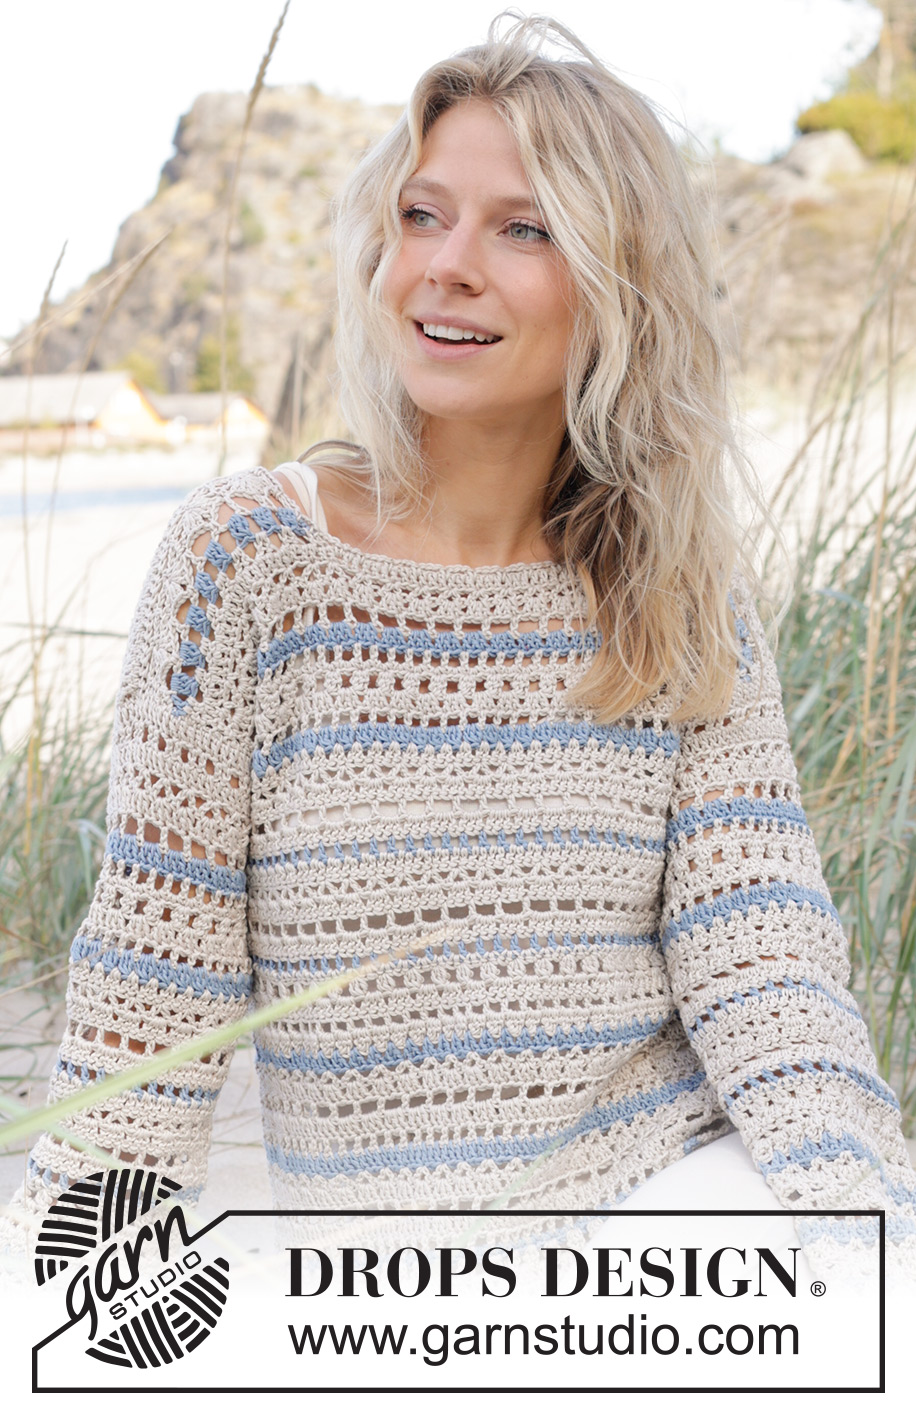
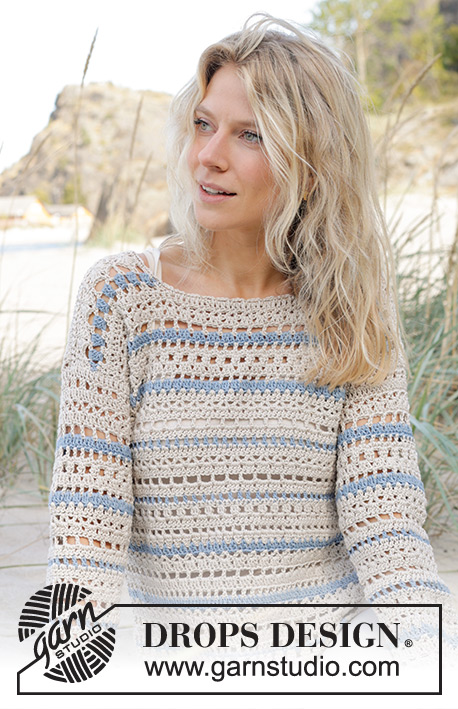
Jewels Tide Sweater#jewelstidesweater |
||||||||||||||||||||||||||||
 |
 |
|||||||||||||||||||||||||||
Crocheted jumper in DROPS Muskat. The piece is worked top down with lace pattern, stripes and split in sides. Sizes S – XXXL.
DROPS 239-22 |
||||||||||||||||||||||||||||
|
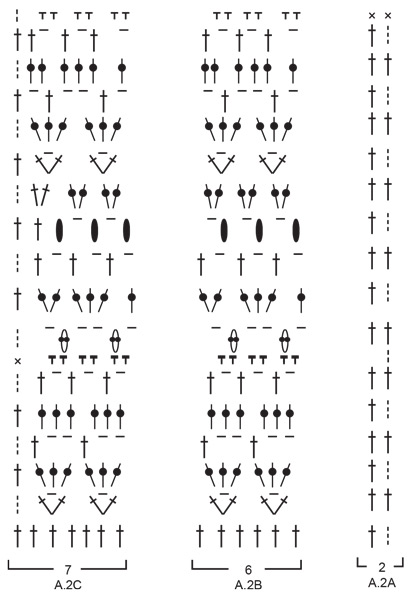
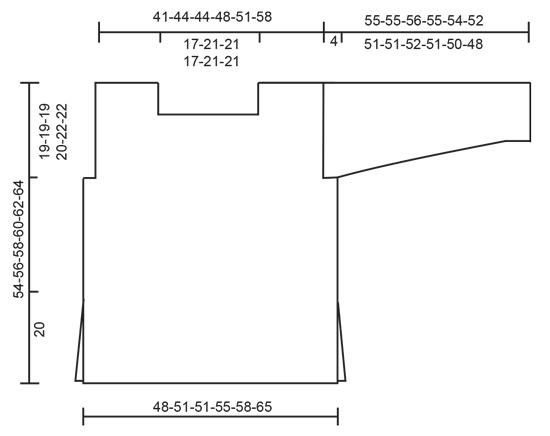
------------------------------------------------------- EXPLANATIONS FOR THE PATTERN: ------------------------------------------------------- CROCHET INFORMATION: At the beginning of each row of treble crochets work 3 chain stitches, which replace the first treble crochet. The round finishes with 1 treble crochet in the 3rd or 2nd chain stitch from the previous row (depending on whether the row started with 2 or 3 chain stitches). At the beginning of each row of double crochets work 2 chain stitches, which replace the first double crochet. The row finishes with 1 double crochet in the 3rd or 2nd chain stitch from the previous row. PATTERN: See diagrams A.1 and A.2. DECREASE TIP (for sleeves): Decrease on a row of treble crochets inside the 2 outermost stitches on each side. Decrease 1 stitch by working 2 treble crochets together as follows: * Make 1 yarn over, insert the hook through the next stitch, pick up the strand and pull it through the stitch, make 1 yarn over and pull it through the first 2 loops on the hook *, work from *-* 1 more time, make 1 yarn over and pull it through all 3 loops on the hook (1 stitch decreased). STRIPES Crochet stripes as follows: work 6 rows with colour pearl and the first row from the wrong side, * work 1 row with colour light denim and 5 rows with colour pearl*, repeat from *-* (the light denim row is always worked from the right side). To avoid cutting the pearl strand when working with light denim, lay the pearl strand over the stitches you are working, it is then hidden and carried along the row. ------------------------------------------------------- START THE PIECE HERE: ------------------------------------------------------- JUMPER - SHORT OVERVIEW OF THE PIECE: The front, back and sleeves are worked separately back and forth, top down. First work right shoulder on front piece increasing for neck, the work left soulder on front piece increasing for neck then join both pieces together to work front piece back and forth. Work back piece the same way. Sleeves are worked top down. The piece is sewn together and the neck worked to finish. RIGHT FRONT SHOULDER (when the garment is worn): Read CROCHET INFORMATION! Work 22-22-22-28-28-34 chain stitches with hook size 4 mm and DROPS Muskat colour pearl. Work STRIPES – read description above. Work the first row as follows from the right side: Work 1 treble crochet in the 4th chain stitch from the hook (2 treble crochets), work 1 treble crochet in each of the remaining chain stitches = 20-20-20-26-26-32 treble crochets. Turn and work 1 treble crochet in each treble crochet. Work from the right side as follows: A.1A, A.1B over the next 12-12-12-18-18-24 stitches, A.1C. Continue this pattern back and forth until A.1 is finished (2 stitches increased mid-front = 22-22-22-28-28-34 stitches). REMEMBER THE CROCHET TENSION! Lay the piece to one side and work the left shoulder. LEFT FRONT SHOULDER (when the garment is worn): Work 22-22-22-28-28-34 chain stitches with hook size 4 mm and colour pearl. Remember STRIPES – read description above. Work the first row as follows from the right side: Work 1 treble crochet in the 4th chain stitch from the hook (2 treble crochets), work 1 treble crochet in each of the remaining chain stitches = 20-20-20-26-26-32 treble crochets. Turn and work 1 treble crochet in each treble crochet. Work as follows from the right side: Work A.1D, A.1B over the next 6-6-6-12-12-18 stitches, A.1E. Continue this pattern back and forth until A.1 is finished (2 stitches increased mid-front = 22-22-22-28-28-34 stitches). At the end of the last row work 25-31-31-25-31-31 slightly loose chain stitches for the neck. Fasten the chain-stitch row with 1 slip stitch in the outermost stitch by the neck on the right shoulder (from the wrong side). Cut and fasten the strand. Now the front piece has been joined together. FRONT PIECE: Start from the right side on the right shoulder, continue over the chain stitches, then work the left shoulder as follows: Work A.2A, A.2B over the next 60-66-66-72-78-90 stitches, A.2C. NOTE: When working the chain stitches, work 1 treble crochet in each chain stitch = 69-75-75-81-87-99 stitches. Continue this pattern back and forth. A.2 is repeated in height. AT THE SAME TIME when the piece measures 19-19-19-20-22-22 cm (adjust so that next row is a row with treble crochets), work 8 chain stitches at the end of the row for one armhole. Turn and work 1 treble crochet in the 4th chain stitch from the hook, work 1 treble crochet in each of the other 4 chain stitches, work to the end of the row as before and work 8 chain stitches at the end of the row for the second armhole. Turn and work 1 treble crochet in the 4th chain stitch from the hook, work 1 treble crochet in each of the other 4 chain stitches, work to the end of the row as before = 81-87-87-93-99-111 stitches. Continue the pattern but now with 2 extra repeats of A.2B. Continue working until the piece measures 53-55-57-59-61-63 cm. Work 1 row of treble crochets. Cut and fasten the strand. The front piece measures approx. 54-56-58-60-62-64 cm from the shoulder. LEFT BACK SHOULDER (when the garment is worn): Remember STRIPES! Work 22-22-22-28-28-34 chain stitches with hook size 4 mm and colour pearl. Work the first row as follows from the right side: Work 1 treble crochet in the 4th chain stitch from the hook (2 treble crochets), work 1 treble crochet in each of the remaining chain stitches = 20-20-20-26-26-32 treble crochets. Turn and work 1 treble crochet in each treble crochet. Lay the piece to one side and work the right shoulder. RIGHT BACK SHOULDER (when garment is worn): Work 22-22-22-28-28-34 chain stitches with hook size 4 mm and colour pearl. Remember STRIPES! Work the first row as follows from the right side: Work 1 treble crochet in the 4th chain stitch from the hook (2 treble crochets), work 1 treble crochet in each of the remaining chain stitches = 20-20-20-26-26-32 treble crochets. Turn and work 1 treble crochet in each treble crochets. At the end of this row work 29-35-35-29-35-35 slightly loose chain stitches for the neck. Fasten the chain-stitch row with 1 slip stitch in the outermost stitch by the neck on the left shoulder (from the wrong side). Cut and fasten the strand. Now the back piece is joined. BACK PIECE: Start from the right side on the left back shoulder, and continue as follows from the right side continue over the chain stitches, then work the right back shoulder as follows: Work A.1A, A.1B over the next 60-66-66-72-78-90 stitches, A.1E. Continue this pattern back and forth. When A.1 is finished in height, work as follows: Work A.2A, A.2B over the next 60-66-66-72-78-90 stitches, A.2C. A.2 is repeated in height. AT THE SAME TIME, when the piece measures 19-19-19-20-22-22 cm, work 8 chain stitches at the end of the row for one armhole. Turn and work 1 treble crochet in the 4th chain stitch from the hook, work 1 treble crochet in each of the other 4 chain stitches, work to the end of the row as before and work 8 chain stitches at the end of the row for the second armhole. Turn and work 1 treble crochet in the 4th chain stitch from the hook, work 1 treble crochet in each of the other 4 chain stitches, work to the end of the row as before = 81-87-87-93-99-111 stitches. Continue the pattern but now with 2 extra repeats of A.2B. Continue working until the piece measures 53-55-57-59-61-63 cm. Work 1 row of treble crochets. Cut and fasten the strand. The back piece measures approx. 54-56-58-60-62-64 cm from the shoulder. SLEEVES: Work 65-65-65-71-77-77 chain stitches with hook size 4 mm and colour pearl. Remember STRIPES! Work the first row as follows from the right side: Work 1 treble crochet in the 4th chain stitch from the hook (2 treble crochets), work 1 treble crochet in each of the remaining chain stitches = 63-63-63-69-75-75 treble crochets. Work the next row as follows from the wrong side: 4 chain stitches (= 1 treble crochet + 1 chain stitch), skip 2 treble crochets, * work 2 treble crochets before the next treble crochet (worked between the treble crochets), 1 chain stitch, skip 3 treble crochets* work from *-* until there are 3 treble crochets left, work 2 treble crochets before the next treble crochet, 1 chain stitch, skip 2 treble crochets and finish with 1 treble crochet in the last treble crochet = 63-63-63-69-75-75 stitches. Work the next row as follows from the right side: Work A.2A, A.2B over the next 54-54-54-60-66-66 stitches, A.2C. Continue this pattern back and forth. A.2 is repeated in height. AT THE SAME TIME when the sleeve measures 6 cm decrease 1 stitch on each side – read DECREASE TIP (2 stitches decreased). Decrease like this every 6-6-6-5-4½-4½ cm a total of 8-8-8-9-11-10 times on each side = 47-47-47-51-53-55 stitches. When the sleeve measures 55-55-56-55-54-52 cm, cut and fasten the strand. Work the other sleeve in the same way. ASSEMBLY: Sew the shoulder seams. Sew the sleeve seams, leaving a split of 4 cm at the top. Sew the sleeve cap to the armhole. Sew the split at the top of the sleeve to the bottom of the armhole– see sketch. Sew the side seams, edge to edge in the outermost stitch, leaving a split of 20 cm at the bottom. NECK: Start on one shoulder, with hook size 4 mm and colour pearl: Work 1 double crochet in the first stitch, * 3 chain stitches, 1 double crochet around the next row/chain-stitch *, work from *-* around the neck, finish with 3 chain stitches and 1 slip stitch in the first double crochet at the beginning of the round. Cut and fasten the strand. |
||||||||||||||||||||||||||||
Diagram explanations |
||||||||||||||||||||||||||||
|
||||||||||||||||||||||||||||

|
||||||||||||||||||||||||||||
|
||||||||||||||||||||||||||||

|
||||||||||||||||||||||||||||
|
||||||||||||||||||||||||||||
Have you finished this pattern?Tag your pictures with #dropspattern #jewelstidesweater or submit them to the #dropsfan gallery. Do you need help with this pattern?You'll find 14 tutorial videos, a Comments/Questions area and more by visiting the pattern on garnstudio.com. © 1982-2025 DROPS Design A/S. We reserve all rights. This document, including all its sub-sections, has copyrights. Read more about what you can do with our patterns at the bottom of each pattern on our site. |
||||||||||||||||||||||||||||


With over 40 years in knitting and crochet design, DROPS Design offers one of the most extensive collections of free patterns on the internet - translated to 17 languages. As of today we count 314 catalogues and 11822 patterns translated into English (UK/cm).
We work hard to bring you the best knitting and crochet have to offer, inspiration and advice as well as great quality yarns at incredible prices! Would you like to use our patterns for other than personal use? You can read what you are allowed to do in the Copyright text at the bottom of all our patterns. Happy crafting!
Post a comment to pattern DROPS 239-22
We would love to hear what you have to say about this pattern!
If you want to leave a question, please make sure you select the correct category in the form below, to speed up the answering process. Required fields are marked *.