
Popular categories
Looking for a yarn?


|
||||||||||||||||||||||||||||
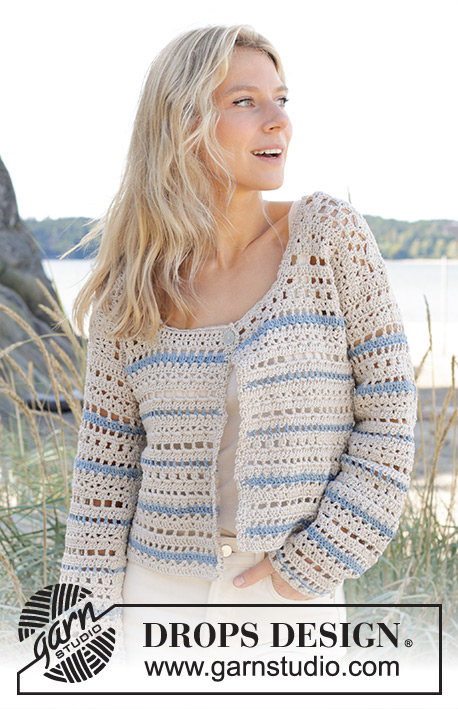
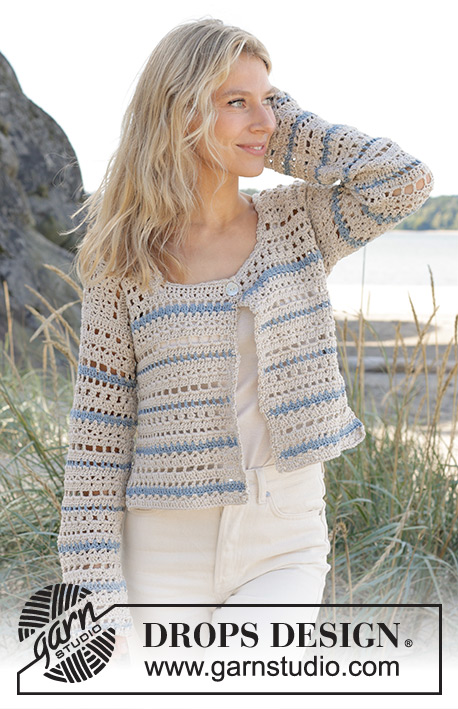
Jewels Tide Cardigan |
||||||||||||||||||||||||||||
 |
 |
|||||||||||||||||||||||||||
Crocheted jacket in DROPS Muskat. The piece is worked top down with lace pattern, stripes and split in sides. Sizes S – XXXL.
DROPS 239-21 |
||||||||||||||||||||||||||||
|
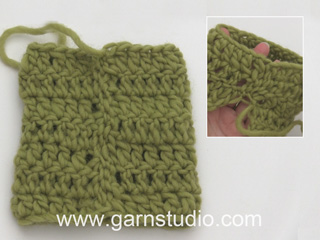
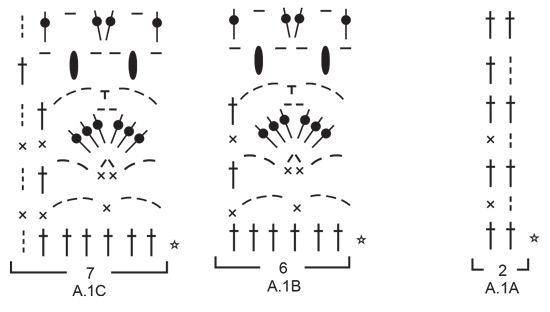
------------------------------------------------------- EXPLANATIONS FOR THE PATTERN: ------------------------------------------------------- CROCHET INFORMATION: At the beginning of each row of treble crochets work 3 chain stitches, which replace the first treble crochet. The row finishes with 1 treble crochet in the 3rd or 2nd chain stitch from the previous row (depending on whether the row started with 2 or 3 chain stitches). At the beginning of each row of double crochets work 2 chain stitches, which replace the first double crochet. The row finishes with 1 double crochet in the 3rd or 2nd chain stitch from the previous row. PATTERN: See diagrams A.1 and A.2. DECREASE TIP (for sleeves): Decrease on a row of treble crochets inside the 2 outermost stitches on each side. Decrease 1 stitch by working 2 treble crochets together as follows: * Make 1 yarn over, insert the hook through the next stitch, pick up the strand and pull it through the stitch, make 1 yarn over and pull it through the first 2 loops on the hook *, work from *-* 1 more time, make 1 yarn over and pull it through all 3 loops on the hook (1 stitch decreased). STRIPES BODY: Work with colour pearl until the piece measures 13-14-15-16-17-18 cm. Then work 5 rows with colour pearl and the first row from the wrong side, work 1 row with colour light denim (light denim row is always worked from the right side). Repeat these 6 rows to finished length. To avoid cutting the pearl strand when working with light denim, lay the pearl strand over the stitches you are working, it is then hidden and carried along the row. STRIPES SLEEVES: Work 5 rows with colour pearl and the first row from the wrong side, work 1 row with colour light denim (light denim row is always worked from the right side). Repeat these 6 rows to finished length. To avoid cutting the pearl strand when working with light denim, lay the pearl strand over the stitches you are working, it is then hidden and carried along the row. ------------------------------------------------------- START THE PIECE HERE: ------------------------------------------------------- JACKET - SHORT OVERVIEW OF THE PIECE: The front, back and sleeves are worked separately back and forth, top down. The piece is sewn together and the neck worked to finish. RIGHT FRONT PIECE Read CROCHET INFORMATION! Work 23-23-23-29-29-35 chain stitches with hook size 4 mm and DROPS Muskat colour pearl. Work the first row as follows from the right side: Work 1 treble crochet in the 4th chain stitch from the hook (2 treble crochets), work 1 treble crochet in each of the remaining chain stitches = 21-21-21-27-27-33 stitches. Turn and work 1 treble crochet in each treble crochet. Work STRIPES BODY – read description above. Work the next row as follows from the right side: Work A.1A (= 2 stitches), A.1B over the next 12-12-12-18-18-24 stitches, A.1C. Continue this pattern back and forth until A.1 is finished. Now work the next row as follows: A.2A, A.2B until there are 7 stitches left, A.2C. REMEMBER THE CROCHET TENSION! Continue working A.2 until the piece measures 10-11-12-13-14-15 cm. At the end of the next row from the right side work 20-26-26-20-26-26 loose chain stitches for the neck. Then work as follows from the wrong side: Work 1 treble crochet in the 4th chain stitch from the hook (2 treble crochets), work 1 treble crochet in each of the next 16-22-22-16-22-22 chain stitches, A.2C, A.2B until there are 2 treble crochets left, A.2A. Work the next row as follows from the right side: A.2A, A.2B until there are 7 treble crochets left, A.2C = 39-45-45-45-51-57 stitches. Continue this pattern back and forth. A.2 is repeated in height. AT THE SAME TIME when the piece measures 19-19-19-20-22-22 cm, work 8 chain stitches at the end of the next row from the wrong side for the armhole. Turn and work 1 treble crochet in the 4th chain stitch and 1 treble crochet in the other 4 chain stitches, work to the end of the row as before = 45-51-51-51-57-63 stitches. Continue the pattern but now with an extra repeat of A.2B in width. Continue working until the piece measures 43-45-47-49-51-53 cm. Work 1 row of treble crochets. Cut and fasten the strand. The front piece measures approx. 44-46-48-50-52-54 cm from the shoulder. LEFT FRONT PIECE: Work 23-23-23-29-29-35 chain stitches with hook size 4 mm and colour pearl. Work the first row as follows from the right side: Work 1 treble crochet in the 4th chain stitch from the hook (2 treble crochets), work 1 treble crochet in each of the remaining chain stitches = 21-21-21-27-27-33 stitches. Turn and work 1 treble crochet in each treble crochet. Work the next row as follows from the right side: Work A.1A (= 2 stitches), A.1B over the next 12-12-12-18-18-24 stitches, A.1C. Continue this pattern back and forth until A.1 is finished. Now work the next row as follows: A.2A, A.2B until there are 7 stitches left, A.2C. Continue working A.2 until the piece measures 10-11-12-13-14-15 cm. At the end of the next row from the wrong side work 20-26-26-20-26-26 loose chain stitches for the neck. Then work as follows from the right side: Work 1 treble crochet in the 4th chain stitch from the hook (2 treble crochets), work 1 treble crochet in each of the next 16-22-22-16-22-22 chain stitches, A.2A as before, A.2B until there are 7 stitches left, A.2C. Work the next row as follows from the wrong side: A.2C, A.2B until there are 2 stitches left, A.2A = 39-45-45-45-51-57 stitches. Continue this pattern back and forth. A.2 is repeated in height. Work stripes in the same way as on the right front piece. AT THE SAME TIME when the piece measures 19-19-19-20-22-22 cm, work 8 chain stitches at the end of the next row from the right side for the armhole. Turn and work 1 treble crochet in the 4th chain stitch and 1 treble crochet in the other 4 chain stitches, work to the end of the row as before = 45-51-51-51-57-63 stitches. Continue the pattern but now with an extra repeat of A.2B in width. Continue working until the piece measures 43-45-47-49-51-53 cm. Work 1 row of treble crochets. Cut and fasten the strand. The front piece measures approx. 44-46-48-50-52-54 cm from the shoulder. LEFT BACK SHOULDER (when the garment is worn): Work 23-23-23-29-29-35 chain stitches with hook size 4 mm and colour pearl. Work the first row as follows from the right side: Work 1 treble crochet in the 4th chain stitch from the hook (2 treble crochets), work 1 treble crochet in each of the remaining chain stitches = 21-21-21-27-27-33 stitches. Turn and work 1 treble crochet in each treble crochet. Lay the piece to one side and work the right back shoulder. RIGHT BACK SHOULDER: Work 23-23-23-29-29-35 chain stitches with hook size 4 mm and colour pearl. Work the first row as follows from the right side: Work 1 treble crochet in the 4th chain stitch from the hook (2 treble crochets), work 1 treble crochet in each of the remaining chain stitches = 21-21-21-27-27-33 stitches. Turn and work 1 treble crochet in each stitch. At the end of this row work 27-33-33-27-33-33 slightly loose chain stitches for the neck. Fasten the chain-stitch row with 1 slip stitch in the outermost stitch by the neck on the left back shoulder (from the wrong side). Cut and fasten the strand. Now the back piece is joined. Work stripes in the same way as on the front pieces. BACK PIECE: Start from the right side on the left shoulder, continue over the chain stitches, then work the right shoulder as follows: Work A.1A, A.1B over the next 60-66-66-72-78-90 stitches, A.1C = 69-75-75-81-87-99 stitches. Continue this pattern back and forth. When A.1 is finished in height, continue as follows: Work A.2A, A.2B over the next 60-66-66-72-78-90 stitches, A.2C. A.2 is repeated in height. The first treble crochet is replaced by 3 chain stitches as usual. AT THE SAME TIME when the piece measures 19-19-19-20-22-22 cm, work 8 chain stitches at the end of the next row for one armhole. Turn and work 1 treble crochet in the 4th chain stitch from the hook, work 1 treble crochet in each of the other 4 chain stitches, work to the end of the row as before and work 8 chain stitches at the end of the row for the second armhole. Turn and work 1 treble crochet in the 4th chain stitch from the hook, work 1 treble crochet in each of the other 4 chain stitches, work to the end of the row as before = 81-87-87-93-99-111 stitches. Continue the pattern but now with 2 extra repeats of A.2B. Continue working until the piece measures 43-45-47-49-51-53 cm. Work 1 row of treble crochets. Cut and fasten the strand. The back piece measures approx. 44-46-48-50-52-54 cm from the shoulder . SLEEVES: Work 65-65-65-71-77-77 chain stitches with hook size 4 mm and colour pearl. Work the first row as follows from the right side: Work 1 treble crochet in the 4th chain stitch from the hook (2 treble crochets), work 1 treble crochet in each of the remaining chain stitches = 63-63-63-69-75-75 treble crochets. Work the next row as follows from the wrong side: 4 chain stitches (= 1 treble crochet + 1 chain stitch), skip 2 treble crochets, * work 2 treble crochets before the next treble crochet (worked between the treble crochets), 1 chain stitch, skip 3 treble crochets* work from *-* until there are 3 treble crochets left, work 2 treble crochets before the next treble crochet, 1 chain stitch, skip 2 treble crochets and finish with 1 treble crochet in the last treble crochet = 63-63-63-69-75-75 stitches. Work the next row as follows from the right side: Work A.2A, A.2B over the next 54-54-54-60-66-66 stitches, A.2C. Continue this pattern back and forth. A.2 is repeated in height. Work STRIPES SLEEVES – read description above. AT THE SAME TIME when the sleeve measures 6 cm decrease 1 stitch on each side – read DECREASE TIP (2 stitches decreased). Decrease like this every 6-6-6-5-4½-4½ cm a total of 8-8-8-9-11-10 times on each side = 47-47-47-51-53-55 stitches. When the sleeve measures 55-55-56-55-54-52 cm, cut and fasten the strand. Work the other sleeve in the same way. ASSEMBLY: Sew the shoulder seams. Sew the sleeve seams, leaving a split of 4 cm at the top. Sew the sleeve cap to the armhole. Sew the split at the top of the sleeve to the bottom of the armhole– see sketch. Sew the side seams, edge to edge in the outermost stitch, leaving a split of 10 cm at the bottom. Sew the button at the top of the left front piece which is buttoned in the pattern on the right front piece. EDGE: Start at the bottom of the right front piece, using hook size 4 mm and colour pearl: Work 1 double crochet in the first stitch, * 3 chain stitches, 1 double crochet around the next row/chain-space *, work from *-* around the whole opening. Cut and fasten the strand. |
||||||||||||||||||||||||||||
Diagram explanations |
||||||||||||||||||||||||||||
|
||||||||||||||||||||||||||||
|
||||||||||||||||||||||||||||

|
||||||||||||||||||||||||||||

|
||||||||||||||||||||||||||||

|
||||||||||||||||||||||||||||
|
Have you made this or any other of our designs? Tag your pictures in social media with #dropsdesign so we can see them! Do you need help with this pattern?You'll find tutorial videos, a Comments/Questions area and more by visiting the pattern on garnstudio.com. © 1982-2024 DROPS Design A/S. We reserve all rights. This document, including all its sub-sections, has copyrights. Read more about what you can do with our patterns at the bottom of each pattern on our site. |
||||||||||||||||||||||||||||


With over 40 years in knitting and crochet design, DROPS Design offers one of the most extensive collections of free patterns on the internet - translated to 17 languages. As of today we count 304 catalogues and 11422 patterns - 11422 of which are translated into English (UK/cm).
We work hard to bring you the best knitting and crochet have to offer, inspiration and advice as well as great quality yarns at incredible prices! Would you like to use our patterns for other than personal use? You can read what you are allowed to do in the Copyright text at the bottom of all our patterns. Happy crafting!
Comments / Questions (11)
Drogs 239-21 När jag virkar framstycken så ska man utöka med 20 maskor för hals och sedan virka 18 stolpar i de 20 maskorna. Min fråga är om det ska stämma med mönsterdiagrammen A2c osv. Jag får det inte att stämma med mönstret i övrigt
13.02.2024 - 10:49DROPS Design answered:
Hej Britta, jo mønsteret skal stemme, du hækler de 3 masker i rapporten 6 gange over de nye 18 masker :)
23.02.2024 - 10:51Liebe Drops-Team, wunderschönes Jäckchen, bitte weiter so bei den Häkelanleitungen! Allerdings verstehe ich die Längenangabe "ab der Schulter" nicht ganz: Damit ich bei der Gesamtlänge auf 54 cm komme, müsste das Vorderteil ab dem Halsausschnitt (und nicht ab der Schulter, wie es in der Anleitung steht?) schlussendlich 44 cm messen. Stimmt das so?
11.01.2024 - 15:19Hallo, waarschijnlijk doe ik iets fout, maar snap niet wat. Blijf scheef uitkomen bij de hals v.h.voorpand. R. Voorpand. L.voorpand Recht +26 lossen. Recht Averecht averecht + 26 lossen Dit sluit niet aan op elkaar, wat doe ik fout? Vr.gr. Yvonne
19.04.2023 - 11:07DROPS Design answered:
Dag Yvonne,
Na het haken van de 26 lossen keer je het werk en haak je een stokje in de 4e losse van de haaknaald. Dan haak je 1 stokje in elk van de volgende 22 lossen en dan pak je het telpatroon weer op.
27.04.2023 - 08:29Hallo, als ik bij het linker voorpand moet meerderen voor de hals aan de verkeerde kant kom ik een toer lager uit als bij het rechter voorpand. Vr.gr. Yvonne
16.04.2023 - 09:44DROPS Design answered:
Dag Yvonne,
Je haakt de voorpanden precies op dezelfde manier, alleen bij het rechter voorpand ben je op de goede kant wanneer je lossen haakt voor de hals en bij het linker voorpand ben je op de verkeerde kant als je lossen haakt voor de hals. Je bent dus dan wel op dezelfde toer.
17.04.2023 - 20:59Als ik patroon a2 verder haak tot een bepaalde lengte, hoe tel ik dan de toeren. Ik begin de 1ste toer op de rechte kant en eindig met de laatste toer ook op de rechte kant (zijn 17 toeren) hoe begin ik het patroon in de volgende toer? Volgens het patroon zou ik weer op de rechte kant moeten beginnen maar ik zit dan weer op de averechtse kant. Vr.gr. Yvonne
02.04.2023 - 12:57DROPS Design answered:
Dag Yvonne,
Je begint A.2 weer opnieuw vanaf de eerste toer en het eerste stokje wordt vervangen door 3 lossen. Aan het eind haak je 1 stokje. Het maakt daarbij niet uit of je aan de goede of de verkeerde kant bent.
05.04.2023 - 10:06Al terminar la secuencia A2, se vuelve a comenzar por la primera fila? Si es así donde se hacen los puntos alto que no van envueltos?
28.03.2023 - 11:25DROPS Design answered:
Hola Julia, sí, se comienza en la primera fila de nuevo. El primer punto alto alrededor del arco de cadeneta se trabaja en la primera cadeneta (arco de 1 cadeneta) y el segundo punto alto alrededor del arco se trabaja en la tercera cadeneta (en una repetición hay 3 arcos de 1 cadeneta).
02.04.2023 - 16:15Hej Synes ikke rigtig jeg kan få mønstret til at passe nå jeg skal starte op igen efter at have strikket hele A2a A2b og A2c engang eller kan jeg bare ikke se det.
09.03.2023 - 12:20DROPS Design answered:
Hei Helle Litt vanskelig å vite uten å se arbeidet ditt. Gjelder det en av forstykkene, bakstykket eller erme? Hvilken str. hekler du etter? Har du heklet A.2a+b+c 1 gang i høyden? Når A.2a+b+c hekles flere ganger i høyden skal diagrammene passe over hverandre. mvh DROPS Design
13.03.2023 - 09:33Sandy beach
22.01.2023 - 11:18Garden Rows
21.01.2023 - 20:43Spa sablé
20.01.2023 - 08:55