
Popular categories
Looking for a yarn?


|
|||||||||||||||||||||||||
Cloud Catcher |
|||||||||||||||||||||||||
 |
 |
||||||||||||||||||||||||
Crocheted jumper in DROPS Cotton Merino. Piece is crocheted top down with raglan, lace pattern, bobbles and fan pattern. Size: S - XXXL
DROPS 230-32 |
|||||||||||||||||||||||||
|
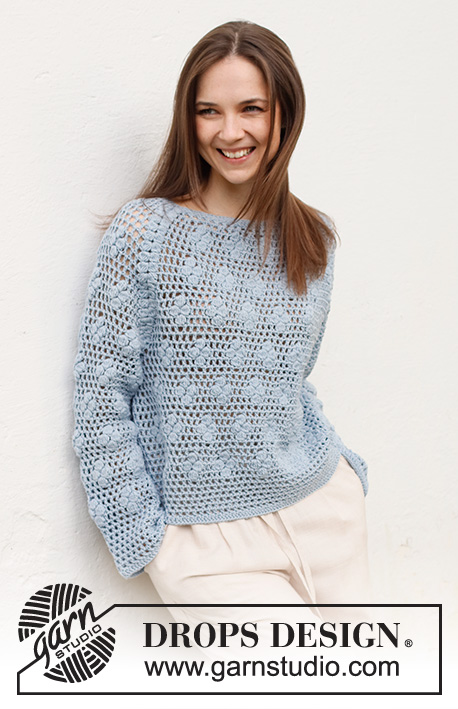
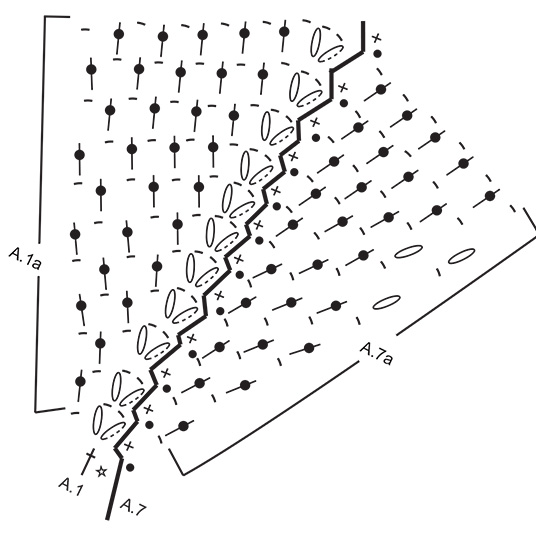
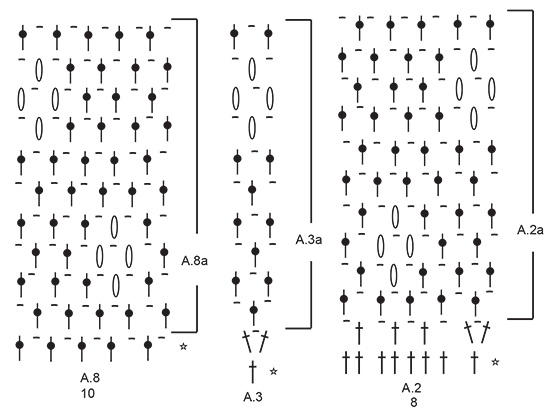
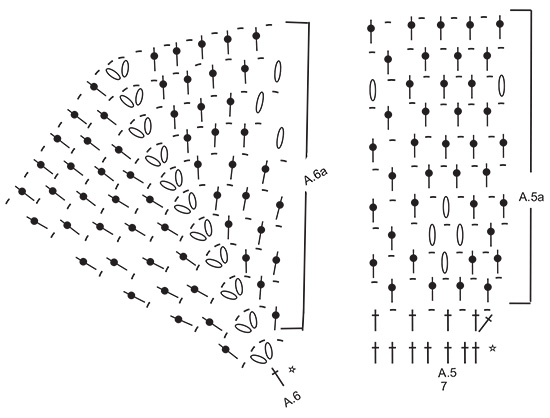
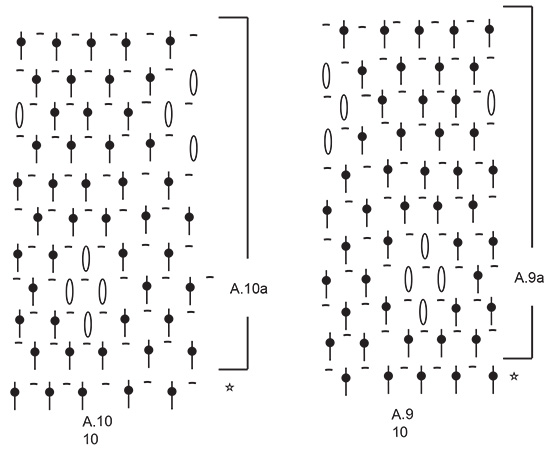
---------------------------------------------------------- EXPLANATION FOR THE PATTERN: ---------------------------------------------------------- PATTERN: See diagrams A.1 to A.10. CHAIN STITCH: If you work at the end of crochet hook the chain stitch will often be too tight. 1 chain stitch should be just as long as 1 double crochet/treble crochet is wide. CROCHET INFORMATION: On every round beginning with treble crochets replace first treble crochet with 3 chain stitches, finish round with 1 slip stitch in 3rd chain stitch. On every round beginning with double crochets replace first double crochet with 1 chain stitch and finish round with 1 slip stitch in first chain stitch. When working lace pattern (i.e. treble crochets and chain stitches) work as follows: When round begins with 1 treble crochet, replace first treble crochet with 3 chain stitches, and finish round with 1 slip stitch in 3rd chain stitch. When round begins with 1 chain stitch, replace last treble crochet on previous round with 3 chain stitches as follows: Work 3 chain stitches (replace last treble crochet), 1 chain stitch (first chain stitch in pattern), skip last treble crochet and finish round with 1 slip stitch in 3rd chain stitch, work 1 double crochet around first chain stitch (this is done to avoid the round from displacing). LACE PATTERN: Work pattern where the diagram do not fit over raglan line and under sleeve as follows: ROUND 1: Work * 1 treble crochet around next chain stitch, 1 chain stitch, skip 1 treble crochet *, work from *-*. ROUND 2: Work * 1 chain stitch, skip 1 treble crochet, 1 treble crochet around next chain stitch *, work from *-*. Adjust which round to begin on according to pattern in diagram. INCREASE TIP: Increase in a stitch mid under sleeve as follows: Adjust so that last round is a round where stitch mid under sleeve was worked as 1 chain stitch. Around this chain stitch work 1 treble crochet, 1 chain stitch and 1 treble crochet around same chain stitch (= 1 chain space increase). Increase like this in each side (= 2 chain spaces increased in total). DECREASE TIP (applies to sleeves): Work the first/last 2 treble crochets on round together as follows: Work 1 treble crochet but wait with last pull through, skip 1 treble crochet (i.e. do not work any chain stitches), 1 treble crochet around next chain stitch, but on last pull through pull yarn through all loops on hook (= 1 treble crochet and 1 chain stitch decreased). ---------------------------------------------------------- START THE PIECE HERE: ---------------------------------------------------------- JUMPER - SHORT OVERVIEW OF THE PIECE: Work yoke in the round, top down. Now divide yoke for body and sleeves. Continue body and sleeves in the round separately. YOKE: Work 84-86-90-98-100-104 CHAIN STITCHES - read explanation above, on hook size 4 mm with DROPS Cotton Merino and form a ring with 1 slip stitch in first chain stitch worked. Then work pattern as follows: Round begins in transition between left sleeve and back piece. Work 1 treble crochet in every chain stitch and increase 0-14-10-18-16-28 treble crochets evenly = 84-100-100-116-116-132 stitches. Work next round as follows: Work A.1, * A.2 4-5-5-6-6-7 times in total, A.3, A.4, A.5 *, A.6, work from *-* 1 more time and finish with A.7. Continue pattern like this. REMEMBER THE CROCHET TENSION! When pattern has been worked 1 time vertically, there are 208-228-228-248-248-268 stitches on last round (bobbles are counted as 1 stitch). Piece measures approx. 13 cm. SIZES S-M-L-XL: Work next round as follows: Work A.1a around chain space between the first 2 bobbles, * A.2a 5-6-6-7 times in total in width, A.3a, A.8a, A.4a around chain space between the 2 next bobbles, A.9a, A.5a, A.10a *, A.6a around chain space between the next 2 bobbles, work from *-* 1 more time and finish with A.7a. Work the first 5-5-8-9 rounds of the pattern. On next round (i.e. 6th-6th-9th-10th round in pattern) replace bobbles in raglan line (i.e. The first 2 bobbles in A.1a and in the middle of A.4a and A.6a) with treble crochets (i.e. 1 bobble = 1 treble crochet) = 256-276-300-328 stitches. SIZES XXL-XXXL: Work next round as follows: Work A.1a around chain space between the first 2 bobbles, * A.2a 7-8 times in total in width, A.3a, A.8a, A.4a around chain space between the 2 next bobbles, A.9a, A.5a, A.10a *, A.6a around chain space between the next 2 bobbles, work from *-* 1 more time and finish with A.7a. Continue pattern like this. Every time A.1a, A.4a, A.6a and A.7a are repeated vertically, work 1 repetition more of A.2a and A.8a in width on front piece/back piece and 1 repetition more of A.9a and A.10a in width on each sleeve (i.e. increase 80 stitches on 1 repetition vertically). Work A.1a to A.7a 2-2 times in total vertically = 328-348 stitches. Work the first 2-4 rounds of pattern 1 more time vertically. On next round (i.e. 3rd-5th round in pattern) replace bobbles in raglan line (i.e. The first 2 bobbles in A.1a and in the middle of A.4a and A.6a) with treble crochets (i.e. 1 bobble = 1 treble crochet) = 352-388 stitches. ALL SIZES: Piece measures approx. 20-20-23-24-28-30 cm. Work pattern as before, but over A.1a, A.4a, A.6a and A.7a work LACE PATTERN – read explanation above and read CROCHET INFO = 252-272-296-324-348-384 stitches. Continue pattern like this. I.e. Work lace pattern where the pattern does not fit and lace pattern and bobble according to diagram as before over stitches on back piece/front piece and sleeves. When piece measures 22-24-25-27-29-31 cm, fasten off. Now divide piece for body and sleeves as follows: Cut the yarn. Begin by counting from the middle stitch on back piece (i.e. in the middle of 2 raglan lines), count 37-40-43-47-51-57 stitches towards what was the beginning of round (i.e. count backwards), next round begins in/around next stitch. Work 1 double crochet in/around next stitch, 3 chain stitches, and work pattern as before over the next 74-80-86-94-102-114 stitches (back piece), skip the next 51-55-61-67-71-77 stitches for sleeve and work 10 chain stitches under sleeve, work pattern as before over the next 75-81-87-95-103-115 stitches (front piece), skip the last 51-55-61-67-71-77 stitches for sleeve (including the first 0-1-1-3-3-3 stitches that were skipped) and work 11-10-10-10-10-10 chain stitches under sleeve and finish round with 1 slip stitch in 3rd chain stitch at the beginning of round. BODY: = 170-182-194-210-226-250 stitches. In next round work pattern as before. Work lace pattern over stitches worked under sleeves and over stitches that do not fit the pattern begun. Work flower bobbles over stitches that fit the pattern over sleeves if you want. When piece measures 3 cm from division, increase 1 chain space in each side– read INCREASE TIP! Increase like this every 4-4-4-3-2½-2½ cm 3-4-4-5-6-6 times in total = 182-198-210-230-250-274 stitches. Continue the pattern as before, work the increased stitches in lace pattern as the remaining stitches that do not fit the diagrams. When piece measures 20-20-21-21-21-21 cm, work flower bobble already begun, then work piece in lace pattern. When body measures 24-24-25-25-25-25 cm from division, work 1 round with 1 treble crochet in every treble crochet and 1 treble crochet around every chain stitch. Cut and fasten the yarn. Jumper measures approx. 50-52-54-56-58-60 cm, measured from shoulder and down SLEEVE: Begin by working mid under sleeve as follows: Work 1 double crochet in the 5th chain stitch of the 10 chain stitches worked under sleeve, 3 chain stitches, work lace pattern over stitches that do not fit the diagrams, continue pattern as before over stitches mid on top of sleeve and work lace pattern over the last stitches on round that do not fit the diagrams, finish round with 1 chain stitch/treble crochet extra so that lace pattern fits in the round = 62-66-72-78-82-88 stitches. Work flower bobbles over stitches that fit the pattern over sleeves if you want. Replace bobbles that do not with an entire flower bobble with 1 treble crochet. Continue pattern in the round like this. Insert 1 marker in the middle stitch under sleeve. When sleeve measures 3 cm from division, decrease 2 stitches under sleeve at beginning of next round - read DECREASE TIP. Decrease like this alternately at the beginning and end of round every 4-3-2½-2-1½-1½ cm 7-9-11-14-15-16 times in total = 48-48-50-50-52-56 stitches. When piece measures 31-30-29-27-26-24 cm from division, finish flower bobble already begun, then work piece in lace pattern. When sleeve measures 40-39-38-36-35-33 cm from division, work 1 round with 1 treble crochet in every treble crochet and 1 treble crochet around every chain stitch. Cut and fasten the yarn. Sleeve measures approx. 41-40-39-37-36-34 cm from division. Work the other sleeve the same way. NECK EDGE: Work an edge around the neck by working 1 double crochet in every stitch. Cut and fasten the yarn. |
|||||||||||||||||||||||||
Diagram explanations |
|||||||||||||||||||||||||
|
|||||||||||||||||||||||||
|
|||||||||||||||||||||||||
|
|||||||||||||||||||||||||
|
|||||||||||||||||||||||||
|
|||||||||||||||||||||||||
|
|||||||||||||||||||||||||

|
|||||||||||||||||||||||||
|
Have you made this or any other of our designs? Tag your pictures in social media with #dropsdesign so we can see them! Do you need help with this pattern?You'll find tutorial videos, a Comments/Questions area and more by visiting the pattern on garnstudio.com. © 1982-2024 DROPS Design A/S. We reserve all rights. This document, including all its sub-sections, has copyrights. Read more about what you can do with our patterns at the bottom of each pattern on our site. |
|||||||||||||||||||||||||


With over 40 years in knitting and crochet design, DROPS Design offers one of the most extensive collections of free patterns on the internet - translated to 17 languages. As of today we count 304 catalogues and 11422 patterns - 11422 of which are translated into English (UK/cm).
We work hard to bring you the best knitting and crochet have to offer, inspiration and advice as well as great quality yarns at incredible prices! Would you like to use our patterns for other than personal use? You can read what you are allowed to do in the Copyright text at the bottom of all our patterns. Happy crafting!
Comments / Questions (36)
Ich verstehe Ihre Rechnung nicht. Laut Anleitung häkel ich doch in S zuerst einmal A1-A7 in der gesamten Höhe, dann noch A1a-A7a komplett und dann noch 5 Reihen von A1a-A7a. So lese ich das. Bitte rechnen sie mir das einmal vor. Ich gehe davon aus, das die Raglanzunahmen jeweils 2 Maschen neben den Noppen sind. Also 8 Maschen pro Runde.Das Muster kam nämlich auch, wie in den Diagrammen gezeichnet, immer aus. Sorry!
20.06.2022 - 21:59DROPS Design answered:
Liebe Annette, nach der 6. Reihe in A.4/A.6 haben Sie 18 Maschen in diesen Diagramme (bei der 1. Reihe werden diese Diagramme über 6 Maschen gehäkelt) = 12 Zunahmen in jedem A.4/A.6. Diese Diagramme A.4/A.6 häkeln Sie insgesamt, so haben Sie 4 Mal x 12 Maschen zugenommen: 208+48=256 Maschen. Viel Spaß beim häkeln!
29.06.2022 - 10:42Stimmen die angegebenen Maschenzahlen? Wenn das Muster 1 X in der Höhe gehäkelt wurde sind es in Größe S 208 Maschen und nach den 80 Maschen Rapportzunahmen immer noch 208?
17.06.2022 - 23:10DROPS Design answered:
Liebe Annette, in S häkeln Sie 1x die Diagramme dann die 5 ersten Runden = 256 Maschen. Die Arbeit misst jetzt ca 20 cm. Viel Spaß beim häkeln!
20.06.2022 - 08:55Die Häkelanleitung ist nach den ersten 13 cm unglücklich formuliert. Einfacher zu verstehen wäre es, wenn geschrieben Stände, dass man nun mit dem Muster nach Diagramm A1a fortfahren muss.
09.06.2022 - 11:49DROPS Design answered:
Liebe Annette, nach den ersten 13 cm sollen Sie auch die Noppen häkeln, also Sie wiederholen die Diagramme wie zuvor aber nur mit den "a" Teil. Viel Spaß beim häkeln!
09.06.2022 - 13:33Hallo noch einmal. Das Problem mit den Noppen habe ich erkannt. Um die LM muss ich häkeln. Ich verstehe nur den Hinweis bezüglich des Lochmusters nicht. Ich bin in Reihe 7 und bisher geht alles auf.
06.06.2022 - 15:30DROPS Design answered:
Liebe Annette, dies brauchen Sie später, wenn die Raglanzunahmen fertig sind, und wenn dann das Muster nicht immer beim Raglan schön passt, dann häkeln Sie einfach das Lochmuster anstatt das Muster mit Noppen, dh mit nur Stäbchen und Luftmaschen. Viel Spaß beim häkeln!
07.06.2022 - 10:11Die Noppen der zweiten Reihe im Raglan werden doch in die Luftmaschen der vorherigen Reihe gehäkelt. So lese ich die Anleitung. Die erste Noppe (Fächer) geht gut. Die zweite in der zweiten Luftmasche ist sehr schwierig. Oder mache ich da etwas falsch. Dazu ein Video wäre toll. Danke
03.06.2022 - 16:33DROPS Design answered:
Liebe Annette, nach der 1. Runde werden die Noppen um die 2-Luftmaschen-Bogen gehäkelt, dh nicht in 1 Luftmasche sondern um die Luftmaschen. Hoffentlich kann das Ihnen helfen. Viel Spaß beim häkeln!
07.06.2022 - 08:01Bonjour \r\nJe commence ce modèle je suis au deuxième tour avec les augmentations taille M 100 maille c petit on passe pas la tête merci de votre réponse
01.06.2022 - 17:36DROPS Design answered:
Bonjour Béatrice, pensez à bien vérifier votre tension (18 brides x 9 rangs de brides = 10x10 cm), veillez à bien crochetez souplement votre chaînette de base, si besoin, utilisez un crochet d'une taille au-dessus pour conserver l'élasticité nécessaire. Bon crochet!
02.06.2022 - 08:36Goedemiddag, na de opzet in maat M 100 stokjes Daarna A1=2 st. *A2= (5x8)= 40st. A3=1 st, A4=3st,A5=7st.* A6= 3 st. Totaal 56 st. Dan van *naar*herhalen A2=40, A3=1, A4=3 ,A5=7st. totaal 51 st. Eindigen met A7 1 st. Totaal 108 st. ?
03.05.2022 - 12:57DROPS Design answered:
Dag Marijke,
De eerste toer, dus de toer met de ster in het telpatroon wordt niet gehaakt, dit zijn de stokjes die je al gehaakt hebt en zijn er in getekend om aan te geven hoe je in de stokjes haakt. Na de eerste toer kom ik op 123 steken: A.1 (=3st), * 5xA.2(=8st), A.3 (=3st), A.4 (=4st), A.5 (=9st) (-> totaal 58 wat tussen de sterretjes staat), A.6 (=4st), *herhaling van de 58 steken tussen de sterretjes, A.7 (=0 st, namelijk een halve vaste in de derde losse van het begin van de toer).
11.05.2022 - 09:25El patrón en español no aparecen los gráficos , diagramas de puntos.
24.04.2022 - 01:44Bonjour, Je viens commencer ce modele et je pense que pour l empiècement il manque des explications. En effet on passe du 1er rang ( 100m) ou l on crochette les différents diagrammes a 13cm et 228m..comment fait-on pour obtenir ces 128m supplémentaires et comment crocheter les diagrammes ? Mon niveau en crochet et tricot est tres bon... Merci de votre reponse Mme artaud
23.04.2022 - 13:30DROPS Design answered:
Bonjour Mme Artaud, vous crochetez les diagrammes comme indiqué, soit en taille M/L: A.1 (début du tour), *5 x A.2, A.3, A.4, A.5*, A.6, crochetez encore 1 fois de *à* et terminez par A.7. Vous allez ainsi augmenter au 1er rang de tous les diagrammes y compris dans A.2, A.5 et A.7 et pour les raglans dans A.1, A.4 et A.6 - Vous avez ainsi au dernier rang des diagrammes: A.1 (15 m), *5 x A.2(=5x10m), A.3(3m), A.4(26 m), A.5(=9m)*, A.6(=26 m), crochetez encore 1 fois de *à* et terminez par A.7(=11 m) soit: 15+ (50+3+26+9) + 26 + (50+3+26+9) +11=228m. Bon crochet!
25.04.2022 - 07:21Wristle
24.02.2022 - 12:30