
Popular categories
Looking for a yarn?


|
|||||||||||||||||||||||||
Cloud Catcher |
|||||||||||||||||||||||||
 |
 |
||||||||||||||||||||||||
Crocheted jumper in DROPS Cotton Merino. Piece is crocheted top down with raglan, lace pattern, bobbles and fan pattern. Size: S - XXXL
DROPS 230-32 |
|||||||||||||||||||||||||
|
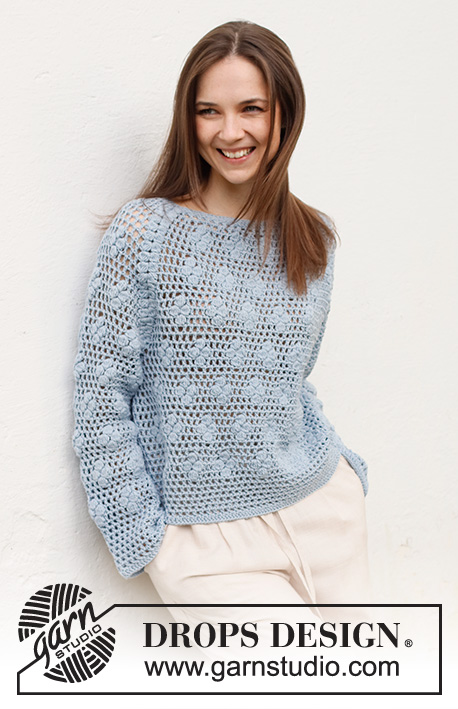
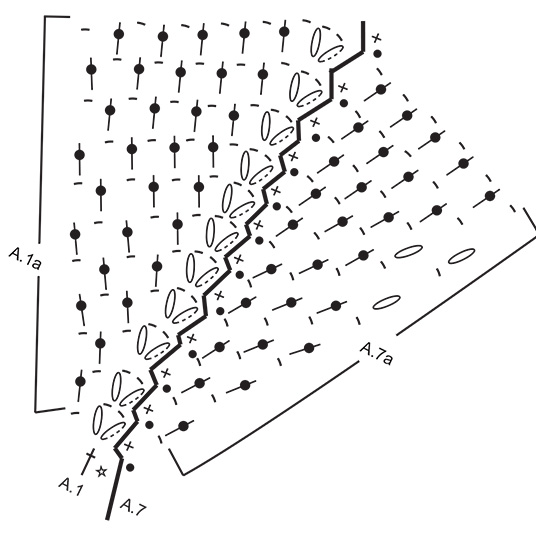
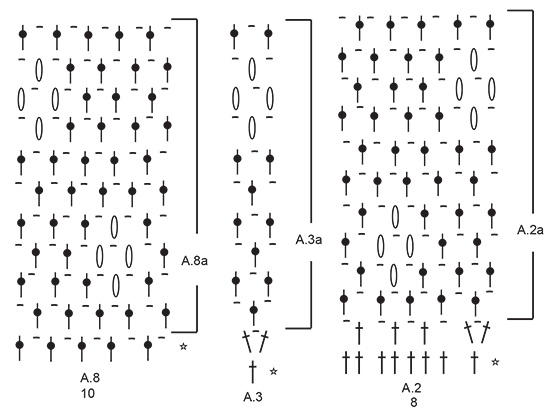
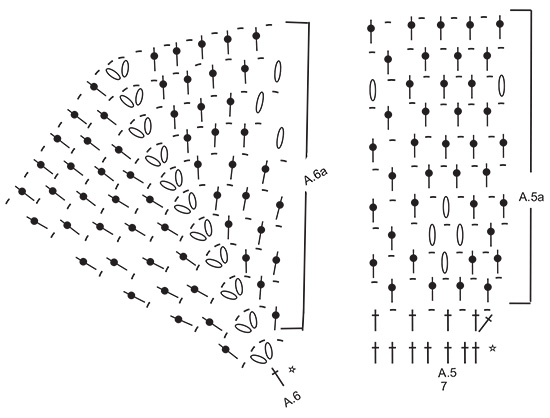
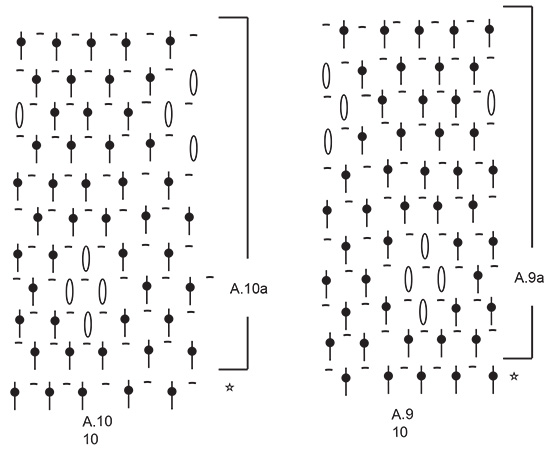
---------------------------------------------------------- EXPLANATION FOR THE PATTERN: ---------------------------------------------------------- PATTERN: See diagrams A.1 to A.10. CHAIN STITCH: If you work at the end of crochet hook the chain stitch will often be too tight. 1 chain stitch should be just as long as 1 double crochet/treble crochet is wide. CROCHET INFORMATION: On every round beginning with treble crochets replace first treble crochet with 3 chain stitches, finish round with 1 slip stitch in 3rd chain stitch. On every round beginning with double crochets replace first double crochet with 1 chain stitch and finish round with 1 slip stitch in first chain stitch. When working lace pattern (i.e. treble crochets and chain stitches) work as follows: When round begins with 1 treble crochet, replace first treble crochet with 3 chain stitches, and finish round with 1 slip stitch in 3rd chain stitch. When round begins with 1 chain stitch, replace last treble crochet on previous round with 3 chain stitches as follows: Work 3 chain stitches (replace last treble crochet), 1 chain stitch (first chain stitch in pattern), skip last treble crochet and finish round with 1 slip stitch in 3rd chain stitch, work 1 double crochet around first chain stitch (this is done to avoid the round from displacing). LACE PATTERN: Work pattern where the diagram do not fit over raglan line and under sleeve as follows: ROUND 1: Work * 1 treble crochet around next chain stitch, 1 chain stitch, skip 1 treble crochet *, work from *-*. ROUND 2: Work * 1 chain stitch, skip 1 treble crochet, 1 treble crochet around next chain stitch *, work from *-*. Adjust which round to begin on according to pattern in diagram. INCREASE TIP: Increase in a stitch mid under sleeve as follows: Adjust so that last round is a round where stitch mid under sleeve was worked as 1 chain stitch. Around this chain stitch work 1 treble crochet, 1 chain stitch and 1 treble crochet around same chain stitch (= 1 chain space increase). Increase like this in each side (= 2 chain spaces increased in total). DECREASE TIP (applies to sleeves): Work the first/last 2 treble crochets on round together as follows: Work 1 treble crochet but wait with last pull through, skip 1 treble crochet (i.e. do not work any chain stitches), 1 treble crochet around next chain stitch, but on last pull through pull yarn through all loops on hook (= 1 treble crochet and 1 chain stitch decreased). ---------------------------------------------------------- START THE PIECE HERE: ---------------------------------------------------------- JUMPER - SHORT OVERVIEW OF THE PIECE: Work yoke in the round, top down. Now divide yoke for body and sleeves. Continue body and sleeves in the round separately. YOKE: Work 84-86-90-98-100-104 CHAIN STITCHES - read explanation above, on hook size 4 mm with DROPS Cotton Merino and form a ring with 1 slip stitch in first chain stitch worked. Then work pattern as follows: Round begins in transition between left sleeve and back piece. Work 1 treble crochet in every chain stitch and increase 0-14-10-18-16-28 treble crochets evenly = 84-100-100-116-116-132 stitches. Work next round as follows: Work A.1, * A.2 4-5-5-6-6-7 times in total, A.3, A.4, A.5 *, A.6, work from *-* 1 more time and finish with A.7. Continue pattern like this. REMEMBER THE CROCHET TENSION! When pattern has been worked 1 time vertically, there are 208-228-228-248-248-268 stitches on last round (bobbles are counted as 1 stitch). Piece measures approx. 13 cm. SIZES S-M-L-XL: Work next round as follows: Work A.1a around chain space between the first 2 bobbles, * A.2a 5-6-6-7 times in total in width, A.3a, A.8a, A.4a around chain space between the 2 next bobbles, A.9a, A.5a, A.10a *, A.6a around chain space between the next 2 bobbles, work from *-* 1 more time and finish with A.7a. Work the first 5-5-8-9 rounds of the pattern. On next round (i.e. 6th-6th-9th-10th round in pattern) replace bobbles in raglan line (i.e. The first 2 bobbles in A.1a and in the middle of A.4a and A.6a) with treble crochets (i.e. 1 bobble = 1 treble crochet) = 256-276-300-328 stitches. SIZES XXL-XXXL: Work next round as follows: Work A.1a around chain space between the first 2 bobbles, * A.2a 7-8 times in total in width, A.3a, A.8a, A.4a around chain space between the 2 next bobbles, A.9a, A.5a, A.10a *, A.6a around chain space between the next 2 bobbles, work from *-* 1 more time and finish with A.7a. Continue pattern like this. Every time A.1a, A.4a, A.6a and A.7a are repeated vertically, work 1 repetition more of A.2a and A.8a in width on front piece/back piece and 1 repetition more of A.9a and A.10a in width on each sleeve (i.e. increase 80 stitches on 1 repetition vertically). Work A.1a to A.7a 2-2 times in total vertically = 328-348 stitches. Work the first 2-4 rounds of pattern 1 more time vertically. On next round (i.e. 3rd-5th round in pattern) replace bobbles in raglan line (i.e. The first 2 bobbles in A.1a and in the middle of A.4a and A.6a) with treble crochets (i.e. 1 bobble = 1 treble crochet) = 352-388 stitches. ALL SIZES: Piece measures approx. 20-20-23-24-28-30 cm. Work pattern as before, but over A.1a, A.4a, A.6a and A.7a work LACE PATTERN – read explanation above and read CROCHET INFO = 252-272-296-324-348-384 stitches. Continue pattern like this. I.e. Work lace pattern where the pattern does not fit and lace pattern and bobble according to diagram as before over stitches on back piece/front piece and sleeves. When piece measures 22-24-25-27-29-31 cm, fasten off. Now divide piece for body and sleeves as follows: Cut the yarn. Begin by counting from the middle stitch on back piece (i.e. in the middle of 2 raglan lines), count 37-40-43-47-51-57 stitches towards what was the beginning of round (i.e. count backwards), next round begins in/around next stitch. Work 1 double crochet in/around next stitch, 3 chain stitches, and work pattern as before over the next 74-80-86-94-102-114 stitches (back piece), skip the next 51-55-61-67-71-77 stitches for sleeve and work 10 chain stitches under sleeve, work pattern as before over the next 75-81-87-95-103-115 stitches (front piece), skip the last 51-55-61-67-71-77 stitches for sleeve (including the first 0-1-1-3-3-3 stitches that were skipped) and work 11-10-10-10-10-10 chain stitches under sleeve and finish round with 1 slip stitch in 3rd chain stitch at the beginning of round. BODY: = 170-182-194-210-226-250 stitches. In next round work pattern as before. Work lace pattern over stitches worked under sleeves and over stitches that do not fit the pattern begun. Work flower bobbles over stitches that fit the pattern over sleeves if you want. When piece measures 3 cm from division, increase 1 chain space in each side– read INCREASE TIP! Increase like this every 4-4-4-3-2½-2½ cm 3-4-4-5-6-6 times in total = 182-198-210-230-250-274 stitches. Continue the pattern as before, work the increased stitches in lace pattern as the remaining stitches that do not fit the diagrams. When piece measures 20-20-21-21-21-21 cm, work flower bobble already begun, then work piece in lace pattern. When body measures 24-24-25-25-25-25 cm from division, work 1 round with 1 treble crochet in every treble crochet and 1 treble crochet around every chain stitch. Cut and fasten the yarn. Jumper measures approx. 50-52-54-56-58-60 cm, measured from shoulder and down SLEEVE: Begin by working mid under sleeve as follows: Work 1 double crochet in the 5th chain stitch of the 10 chain stitches worked under sleeve, 3 chain stitches, work lace pattern over stitches that do not fit the diagrams, continue pattern as before over stitches mid on top of sleeve and work lace pattern over the last stitches on round that do not fit the diagrams, finish round with 1 chain stitch/treble crochet extra so that lace pattern fits in the round = 62-66-72-78-82-88 stitches. Work flower bobbles over stitches that fit the pattern over sleeves if you want. Replace bobbles that do not with an entire flower bobble with 1 treble crochet. Continue pattern in the round like this. Insert 1 marker in the middle stitch under sleeve. When sleeve measures 3 cm from division, decrease 2 stitches under sleeve at beginning of next round - read DECREASE TIP. Decrease like this alternately at the beginning and end of round every 4-3-2½-2-1½-1½ cm 7-9-11-14-15-16 times in total = 48-48-50-50-52-56 stitches. When piece measures 31-30-29-27-26-24 cm from division, finish flower bobble already begun, then work piece in lace pattern. When sleeve measures 40-39-38-36-35-33 cm from division, work 1 round with 1 treble crochet in every treble crochet and 1 treble crochet around every chain stitch. Cut and fasten the yarn. Sleeve measures approx. 41-40-39-37-36-34 cm from division. Work the other sleeve the same way. NECK EDGE: Work an edge around the neck by working 1 double crochet in every stitch. Cut and fasten the yarn. |
|||||||||||||||||||||||||
Diagram explanations |
|||||||||||||||||||||||||
|
|||||||||||||||||||||||||
|
|||||||||||||||||||||||||
|
|||||||||||||||||||||||||
|
|||||||||||||||||||||||||
|
|||||||||||||||||||||||||
|
|||||||||||||||||||||||||

|
|||||||||||||||||||||||||
|
Have you made this or any other of our designs? Tag your pictures in social media with #dropsdesign so we can see them! Do you need help with this pattern?You'll find tutorial videos, a Comments/Questions area and more by visiting the pattern on garnstudio.com. © 1982-2024 DROPS Design A/S. We reserve all rights. This document, including all its sub-sections, has copyrights. Read more about what you can do with our patterns at the bottom of each pattern on our site. |
|||||||||||||||||||||||||


With over 40 years in knitting and crochet design, DROPS Design offers one of the most extensive collections of free patterns on the internet - translated to 17 languages. As of today we count 304 catalogues and 11422 patterns - 11422 of which are translated into English (UK/cm).
We work hard to bring you the best knitting and crochet have to offer, inspiration and advice as well as great quality yarns at incredible prices! Would you like to use our patterns for other than personal use? You can read what you are allowed to do in the Copyright text at the bottom of all our patterns. Happy crafting!
Comments / Questions (36)
En fråga varför har ni inte beskrivet underarm bare att där skal 1 stm i Börje hörn i stmgruppen men vad med dom 2 lm imellan?????
13.03.2024 - 17:32DROPS Design answered:
Hej Dorthe, er de ikke tegnet ind i diagrammet? Forstår ikke rigtig hvor du er i opskriften... Skriv også gerne hvilken størrelse og mere nøjagtig hvor du er.
19.03.2024 - 11:33Bestaat er een diagram dat dit stukje tekst verduidelijkt, Als de toer begint met 1 losse, vervang dan het laatste stokje op de vorige toer met 3 lossen als volgt: Haak 3 lossen (vervangt het laatste stokje), 1 losse (eerste losse in het patroon), sla het laatste stokje over en eindig de toer met 1 halve vaste in de 3e losse, haak 1 vaste om de eerste losse (dit wordt gedaan om te voorkomen dat de toer verschuift). Dankjewel
12.03.2024 - 22:40Goede avond, hoe zorg ik dat de naad in de toeren van het lijfje recht loopt? Ik lijk door het kantpatroon telkens een steek verder te verspringen. Maw hoe start ik de nieuwe rij indien deze start met een losse. Ik begrijp de uitleg niet. Mvg Marleen
12.03.2024 - 21:17No entiendo como se hace esto en horizontal: Cada vez que se repite A.1a, A.4a, A.6a y A.7a en vertical, trabajar 1 repetición más de A.2a y A.8a en horizontal en el delantero/espalda y 1 repetición más de A.9a y A.10a en horizontal en cada manga (es decir, aumentar 80 puntos en una repetición en vertical). Gracias.
18.02.2024 - 19:25DROPS Design answered:
Hola Isabina, en vertical = repetición de todas las filas del diagrama. En horizontal = en la fila. En el caso indicado, quiere decir que tendrás espacio en la fila para trabajar 1 repetición más de A.2a y A.8a tanto en el delantero como en la espalda y 1 repetición más de A.9a y A.10a en cada manga. Si tienes que trabajar varias repeticiones del diagrama trabajas hasta el último punto y, después, comienzas nuevamente en el primer punto en la misma fila del diagrama.
18.02.2024 - 22:46In de derde toer staat A8a maar dat komt niet uit. Want er zijn tussen A3 en A4 van toer 2 niet genoeg stokjes over. Wat doe ik fout?
12.02.2024 - 11:27Habrá un video de cómo tejer y construir el raglán para este patrón?. No me queda claro lo de las motas en el raglán. Gracias
01.06.2023 - 01:14DROPS Design answered:
Hola Sandra, no tenemos un vídeo específico para el raglán de este patrón. Para la primera mota en A.1, trabajas 3 cadenetas y 5 puntos altos sin hacer la última lazada, terminando pasando el hilo por todos los bucles. En las otras motas, trabajas 6 puntos altos sin terminar y después pasas el hilo por todos los bucles en el ganchillo.
04.06.2023 - 19:28Hej igen og tak for svar på cloud catcher. Min hæklefasthed i højden passer, men efter arbejdet måler 20 cm står der i opskriften: fortsæt med mønster som før men over raglanlinjerne hækles hulmønster(altså 1 stm om næste lm, 1 lm, spring 1 stm over) til arbejdet måler 24 cm. Der tages ikke ud på de 4 cm, hvilket gør at arbejdet ligesom buler ud ved raglanlinjerne!! Det ser ikke pænt ud, så for første gang er jeg ved at opgive en af jeres opskrifter......
22.04.2023 - 16:32DROPS Design answered:
Hej Hanne, men du bør være klar med de 24 cm nu. Du skal måle helt oppefra skulderens øverste kant og så lige ned... :)
25.04.2023 - 14:48Hej, jeg hækler str M og kan ikke få flg til at passe: hækl de første 5 omgange af mønsteret i højden. På næste omgang erstattes boblerne i raglanlinjen til stm? Hækles 2 lm mellem stm i raglanlinjen? og kun på denne omgang? Kan ikke få det til at give 276 m? På billedet er der bobler på blusen i raglanlinjen helt ind under armen og her i opskriften stopper boblerne allerede når arbejdet er omkring 18 cm? Det ser ikke rigtigt ud. Håber I kan hjælpe.
06.04.2023 - 14:24DROPS Design answered:
Hei Hanne. Husk å sjekke at du får den oppgitte heklefastheten i høyden. Når arbeidet måler ca 13 cm hekler du 6 omganger av diagrammene som er forklart i oppskriften, men på den 6. omgang hekler du staver istedenfor bobler. Nå skal arbeidet måle ca 20 cm (og bobler er det hele raglanlinjen, bortsett fra den siste omgangen som er under ermet og ikke vises). mvh DROPS Design
17.04.2023 - 09:36Hvad betyder A. 1A i opskriften? Der mangler forklaringer på de tal. A.2a -A.3a, A.4a- A.8a-A.9a-A.10a? Mvh. Lone
25.03.2023 - 15:04Goededag! Ondanks de tips voor het haken, geraak ik er niet uit. Na 20 cm ga je aan de slag met het kantpatroon. Hoe controleer ik of ik met een stokje begin of met een losse. Als je het stokje op de vorige toer vervangt door 3 losse + extra losse dan krijg je toch een erg groot gat wat opvalt. Kan het patroon verduidelijkt worden?
13.03.2023 - 13:26