
Popular categories
Looking for a yarn?


|
|||||||
DROPS 83-8 |
|||||||
|
|
|||||||
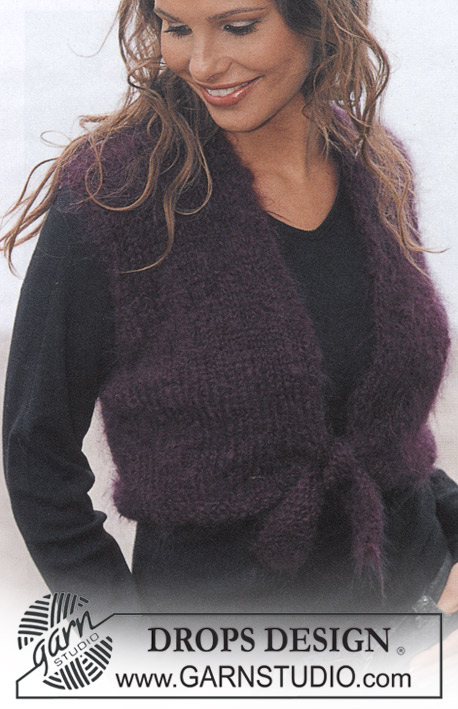
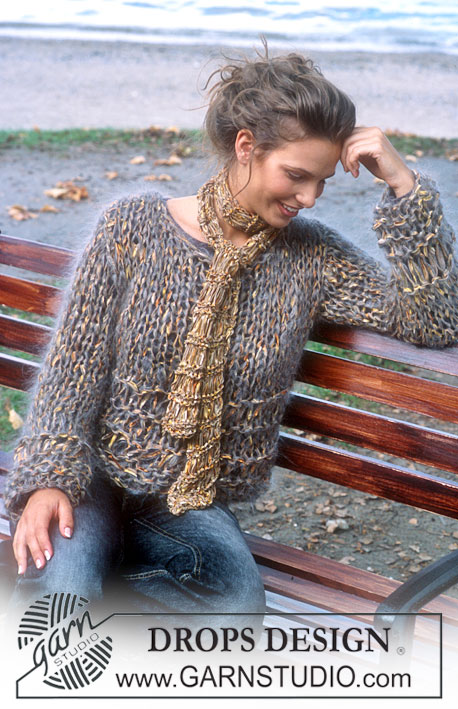
Knitted cardigan, hat and scarf in DROPS Alaska and DROPS Vivaldi (DROPS Brushed Alpaca Silk)
DROPS 83-8 |
|||||||
|
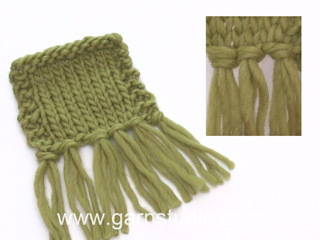
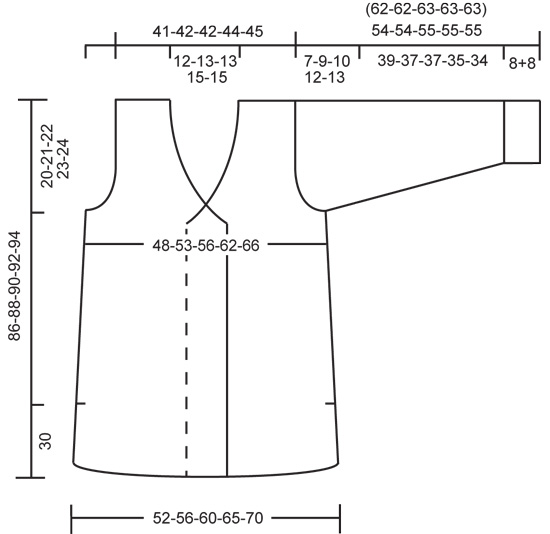
CARDIGAN: Gauge: 11 sts x 15 rows with 1 strand of each yarn (2 strands) in Pattern = 10 x 10 cm. Rib: * K 1, P 1 *, repeat * - *. Pattern: See chart. The pattern is seen from the right side. Row 1 (right side): Knit Rows 2, 3, 4: Purl Rows 5, 6, 7: Knit Repeat Rows 2-7. Measuring-tips: Measure length when the garment is held up, otherwise the cardigan will be too long when worn. Back: Cast on 57-62-66-72-77 sts with 1 strand Alaska + 1 strand Vivaldi or Brushed Alpaca Silk (= 2 strands). Knit 4 rows garter st, then follow Pattern 1. When the piece measures 30 cm cast on 1 new st at each side for seam allowance above side split = 59-64-68-74-79 sts. When the piece measures 35 and 50 cm dec 1 st at each side = 55-60-64-70-75 sts. When the piece measures 66-67-68-69-70 cm – see Measuring-tips above – bind off for armhole at each side every other row: 3 sts 1 time, 2 sts 0-0-1-2-3 times and 1 st 2-4-4-4-4 times = 45-46-46-48-49 sts. When the piece measures 84-86-88-90-92 cm bind off the center 11-12-12-14-15 sts for the neck. On the next row dec 1 st at each neck edge = 16 sts remain on each shoulder. Bind off when the piece measures 86-88-90-92-94 cm. Left front: Cast on 39-41-43-46-49 sts with 1 strand Alaska + 1 strand Vivaldi or Brushed Alpaca Silk (= 2 strands). Knit 4 rows garter st, then knit Pattern 1 over all sts. When the piece measures 30 cm cast on 1 new st at the side for seam allowance above side split = 40-42-44-47-50 sts. When the piece measures 35 and 50 cm dec 1 st at the side = 38-40-42-45-48 sts. Read the entire next section before knitting: Neckband: When the piece measures 62-63-64-65-66 cm dec 1 st at the center front every other row: 17-17-17-18-19 times. Armhole: When the piece measures 66-67-68-69-70 cm bind off for armhole at the side as on back. After all armhole and neck shaping is complete, 16 sts remain on shoulder. Bind off when the piece measures 86-88-90-92-94 cm. Right front: Cast on and knit the same as the left, reversing all shaping. Sleeve: The bottom 8 cm of garter st folds up for a cuff, but all length measurements include these 8 cm. Cast on 30-31-31-33-33 sts with 1 strand Alaska + 1 strand Vivaldi or Brushed Alpaca Silk (= 2 strands) and knit garter st. When the piece measures 8 cm, knit Pattern 1. When the piece measures 23 cm inc 1 st at each side every 5.5-4.5-4-3.5-3 cm a total of 6-7-8-8-9 times = 42-45-47-49-51 sts. When sleeve measures 55-53-53-51-50 cm bind off for sleeve cap at each side every other row: 3 sts 1 time, 2 sts 1-1-1-2-2 times and 1 st 1-2-2-3-5 times, then 2 sts at each side until the piece measures 61-61-62-62-62 cm, then bind off 3 sts 1 time at each side. Bind off the remaining sts, the piece measures approx. 62-62-63-63-63 cm (= 54-54-55-55-55 cm when cuffs are folded up). Assembly: Sew shoulder seams. Collar: Pick up from wrong side approx. 73-85 sts (divisible by 2 + 1) around the neck – start on left side at start of shaping and continue around neck down right side to start of shaping – with 1 strand Alaska + 1 strand Vivaldi or Brushed Alpaca Silk (= 2 strands) on circular needles. Knit rib, keeping 1 st at each edge in garter st and begin and end rib with K 1 at each side (as seen when the collar folds out). When the rib measures 12-14-14-16-16 cm K 2 rows (1st row right side row), then K and bind off all sts. Sew in sleeves. Sew sleeve and side seams using edge sts as a seam allowance, down to end of side split. Belt: Cast on 7 sts with 1 strand Alaska + 1 strand Vivaldi or Brushed Alpaca Silk. Knit 2 rows garter st (row 1 = wrong side), then knit rib keeping 1 st at each side in garter st + begin and end rib with K 1 (as seen from the right side). When the piece measures approx. 120-150 cm knit 2 rows garter st (row 1 = right side), then bind off all sts. Make a belt loop at each side of the cardigan. HAT AND SCARF: Sizes (hat): One-size Measurements (scarf): approx. 18 x 150 cm Materials: DROPS ULL-FLAMÉ from Garnstudio (been discontinued - substitute with SNOW) 50 gr nr 01, natural and use: DROPS VIENNA from Garnstudio 150 gr nr 49, plum 50 gr nr 07, lilac 50 gr nr 51 olive DROPS 10 mm needles, or size needed to obtain correct gauge. HAT: Gauge: 7 sts x 10 rows with 1 strand of each yarn (2 strands) in stockinette st = 10 x 10 cm. Stripe Pattern: 9 cm with 1 strand Ull-Flamé + 1 strand plum Vienna 5 cm with 1 strand Ull-Flamé + 1 strand lilac Vienna 4 cm with 1 strand Ull-Flamé + 1 strand olive Vienna then knit with 1 strand Ull-Flamé + 1 strand plum Vienna to finished measurements. Hat: Cast on 46 sts with 1 strand Ull-Flamé + 1 strand plum Vienna around 2 needles so that the cast-on edge will be loose. Pull out one needle. Knit stockinette st following Stripe Pattern – see instructions above – at the same time: K (on right side) or P (on wrong side) the 20th st and slip the 21st st on every row until the piece measures 8 cm (placing a marker at these sts may help). This creates a small ripple in the edge. When the piece measures 10 cm dec 4 sts evenly distributed on the row = 42 sts. When the piece measures 14 cm put in 6 markers with 7 sts between each – the first marker put after the 1st st – there will be 6 sts after the last marker. Now dec 1 st on the left side of each marker (= 6 decs per row) by K 2 tog. Dec every other row until there are 7 sts remaining. Cut yarn and pull through remaining sts, pull tight and fasten. Hat measures approx. 25 cm in height. Sew hat at center back. SCARF: Gauge: 6 sts x 12 rows with 2 strands Vienna in garter st = 10 x 10 cm. Scarf: Cast on 11 sts with 2 strands olive around 2 needles so that the cast-on edge will be loose. Knit garter st (on one needle) with 2 strands of yarn. After 4 rows garter st change to 2 strands plum. When the piece measures approx. 148 cm change to 2 strands lilac. Knit 4 rows garter st, then bind off. Fringe: Fasten 5 fringe tufts at each end. At the end with olive put fringe in lilac and at the end with lilac put fringe in olive – cut 3 strands 40 cm long, fold strands in half, pull folded end through outermost sts and pull ends through loop. |
|||||||
Diagram explanations |
|||||||
|
|||||||

|
|||||||
|
|||||||
|
Have you made this or any other of our designs? Tag your pictures in social media with #dropsdesign so we can see them! Do you need help with this pattern?You'll find tutorial videos, a Comments/Questions area and more by visiting the pattern on garnstudio.com. © 1982-2024 DROPS Design A/S. We reserve all rights. This document, including all its sub-sections, has copyrights. Read more about what you can do with our patterns at the bottom of each pattern on our site. |
|||||||


With over 40 years in knitting and crochet design, DROPS Design offers one of the most extensive collections of free patterns on the internet - translated to 17 languages. As of today we count 304 catalogues and 11422 patterns - 11422 of which are translated into English (UK/cm).
We work hard to bring you the best knitting and crochet have to offer, inspiration and advice as well as great quality yarns at incredible prices! Would you like to use our patterns for other than personal use? You can read what you are allowed to do in the Copyright text at the bottom of all our patterns. Happy crafting!
Comments / Questions (8)
Sandra May wrote:
I would like to knit this pattern using solely brushed alpaca silk. Am I right in thinking that I would use 3 threads of the wool throughout and how much wool would I need.
02.01.2019 - 12:32DROPS Design answered:
Dear Mrs May, you can replace Alaska with only 1 strand Brushed Alpaca Silk (both yarn group C), so you would need only 2 strands Brushed Alpaca Silk, but depending on your tension and the desired texture , you may like to work the both kind of swatch to check - see our yarn converter. Your DROPS store will also provide you any further individual assistance, even per mail or telephone. Happy knitting!
02.01.2019 - 12:59Bonjour Par quelle laine peut on remplacer vivaldi drop merci de votre reponse
14.02.2017 - 15:40DROPS Design answered:
Bonjour Mme Becker, vous pouvez la remplacer par DROPS Brushed Alpaca Silk ou 2 fils Kid-Silk - plus d'infos ici sur les alternatives. Bon tricot!
14.02.2017 - 16:43Hi I am not an experienced knitter and would like clarification about one point. When working the back (size M) the instructions say: when piece measures 35 and 50cm dec 1st at each side = 60 sts. However, I believe I should have 64 sts at this point so would expect it to dec to 62 sts. Please could you explain what I am meant to do? Many thanks, Jan
23.05.2015 - 13:57DROPS Design answered:
Dear Jan, you dec 1 st each side on 35 + 50 cm = 4 sts are dec, 60 sts remain. Happy knitting!
23.05.2015 - 14:23Kann ich diesen Mantel auch mit Andes stricken?
11.08.2014 - 22:01DROPS Design answered:
Liebe Claudia, ja, das geht, dann nehmen Sie einen Faden Andes (also den Faden nicht doppelt nehmen). Bitte beachten Sie, dass die Maschenprobe stimmen muss. Und die Garnmenge müssen Sie auch entsprechend neu berechnen, da Andes eine andere Lauflänge hat als Alaska/Vivaldi.
12.08.2014 - 08:53Y Yes of course. Alaska 70x15= 1050 m.Vivaldi 280x4= 1120 m.
13.07.2014 - 20:12Are both yarns used throughout the whole sweater? The amounts of the two yarns are not even close in yardage.
13.07.2014 - 19:05DROPS Design answered:
Dear Georgia, the jacket is entirely worked with 1 strand Alaska + 1 strand Vivaldi (on the basis of 11 sts = 10 cm), 1 ball Alaska= approx. 70 m, 1 ball Vivaldi= approx. 280 so that you will need in size S eg 15 balls (1050m) Alaska + 1120m Vivaldi. Happy knitting !
14.07.2014 - 09:56Alle Reihen - wie immer!
07.07.2012 - 20:00Zeigt das Diagram die Hin und Rückreihe oder nur die Hinreihen?
07.07.2012 - 11:32