DROPS Sky
DROPS Sky
74% Alpaca, 18% Polyamide, 8% Wool
from 5.10 £ /50g
Get the yarn to make this pattern from 35.70£.

The yarn cost is calculated from the pattern’s smallest size and the yarn’s cheapest product type. Looking for an even better price? You might find it on the DROPS Deals!

DROPS SS24

Spring Renaissance

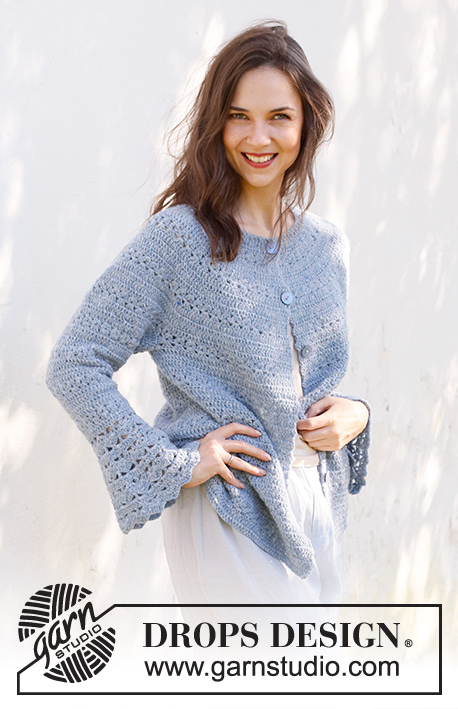
Crocheted jumper in DROPS Sky. The piece is worked top down with round yoke, lace and fan pattern and trumpet sleeves. Sizes S - XXXL.

DROPS 230-37
DROPS Design: Pattern sk-160
Yarn group B
-------------------------------------------------------

SIZES:
S - M - L - XL - XXL – XXXL

MATERIALS:
DROPS SKY from Garnstudio (belongs to yarn group B)
350-350-400-450-450-500 g colour 13, light jeans blue

CROCHET HOOK:
DROPS CROCHET HOOK SIZE 4 MM.

CROCHET TENSION:
18 treble crochets in width and 9 rows in height = 10 x 10 cm.
Hook size is only a guide. If you get too many stitches on 10 cm, change to a larger hook size. If you get too few stitches on 10 cm, change to a smaller hook size.

-------------------------------------------------------

Alternative Yarn – See how to change yarns here
Yarn Groups A to F – Use the same pattern and change the yarn here
Yarn usage using an alternative yarn – Use our yarn converter here

-------------------------------------------------------

DROPS Sky
DROPS Sky
74% Alpaca, 18% Polyamide, 8% Wool
from 5.10 £ /50g
Get the yarn to make this pattern from 35.70£.

The yarn cost is calculated from the pattern’s smallest size and the yarn’s cheapest product type. Looking for an even better price? You might find it on the DROPS Deals!

Pattern instructions

NOTE: This pattern is written in British English. All measurements in charts are in cm. For conversion from cm to inches - click here. There are different terms for crocheting in British and American English. If this pattern includes crochet, click for "crochet terms" here. For this pattern in American English, please click here.
-------------------------------------------------------

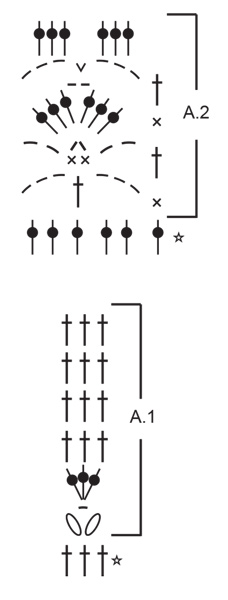
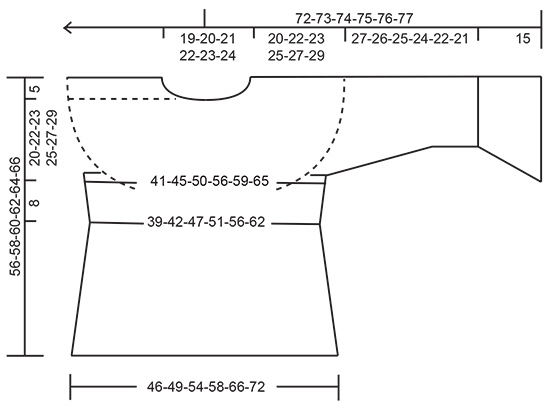
EXPLANATIONS FOR THE PATTERN:

-------------------------------------------------------

PATTERN:
See diagrams A.1 and A.2.

CHAIN STITCH:
If you work outermost on the hook the chain stitch will often be too tight; 1 chain stitch should be as long as 1 double/treble crochet is wide.

CROCHET INFORMATION:
At the beginning of each round of treble crochets, work 3 chain stitches which do not replace the first treble crochet. Finish the round with 1 slip stitch in the 3rd chain stitch at the beginning of the round.
At the beginning of each round of double crochets, work 1 chain stitch which does not replace the first double crochet. Finish the round with 1 slip stitch in the first chain stitch at the beginning of the round.

INCREASE TIP:
Increase 1 stitch by working 2 treble crochets in the same stitch.
To work out how to increase evenly, count the number of stitches on the round (e.g. 108 stitches) and divide by the number of increases to be made (e.g. 15 stitches) = 7.2.
In this example, increase by working 2 treble crochets in approx. every 7th stitch.

DECREASE TIP:
Work 2 treble crochets together as follows: * Make 1 yarn over, insert the hook through the next stitch, pick up the strand, make 1 yarn over and pull it through the first 2 loops on the hook *, work from *-* 1 more time, make 1 yarn over and pull it through all 3 loops on the hook (= 1 stitch decreased).

CROCHET TIPS:
The piece is turned after each round; alternate rounds are worked from the right and wrong side:
First round is worked from the right side. Finish with 1 slip stitch in the 3rd chain stitch at the beginning of the round. Turn and work back from the wrong side. Finish with 1 slip stitch in the 3rd chain stitch at the beginning of the round. Turn and work the next round from the right side.
Continue back and forth like this, with alternately a round from the right side and a round from the wrong side.

-------------------------------------------------------

START THE PIECE HERE:

-------------------------------------------------------

JUMPER – SHORT OVERVIEW OF THE PIECE:
The neck and yoke are worked in the round, top down. The yoke is divided for the body and sleeves, which are then finished separately in the round.

YOKE:
Work 104-108-112-116-118-122 CHAIN STITCHES – read description above, with hook size 4 mm and DROPS Sky. Form them into a ring with 1 slip stitch in the first chain stitch worked.
Turn – read CROCHET TIP and CROCHET INFORMATION and work as follows:
1 treble crochet in each chain stitch = 104-108-112-116-118-122 stitches.
Work 1 round with 1 treble crochet in each stitch and increase 13-15-11-7-17-19 treble crochets evenly spaced – read INCREASE TIP = 117-123-123-123-135-141 stitches.
Work A.1 over all stitches and increase as follows:
On each 3rd and 5th round in A.1, increase 24-27-33-33-30-33 treble crochets evenly spaced on the round (48-54-66-66-60-66 treble crochets increased during 1 repeat in height). Repeat A.1 onwards. REMEMBER THE CROCHET TENSION!
Increase a total of 5-5-5-6-7-7 times = 237-258-288-321-345-372 stitches.

Work until the piece measures 20-22-23-25-27-29 cm; adjust so the next round is a round with just treble crochets. Divide for the body and sleeves as follows:
Work A.1 over 64-72-81-91-97-108 stitches, skip 54-57-63-69-75-78 stitches for the sleeve, work 9 chain stitches under the sleeve, work A.1 over 65-72-81-92-98-108 stitches, skip 54-57-63-69-75-78 stitches for the sleeve and work 9 chain stitches under the sleeve.

BODY:
= 147-162-180-201-213-234 stitches.
Continue working A.1 over all stitches (49-54-60-67-71-78 repeats in width).

When the piece measures 3 cm from the division, decrease 3-6-6-9-6-6 stitches on the next round of treble crochets – read DECREASE TIP = 144-156-174-192-207-228 stitches.
When the piece measures 6 cm from the division, decrease 3-6-6-9-6-6 stitches evenly on the next round of treble crochets = 141-150-168-183-201-222 stitches.
When the piece measures 8 cm from the division, increase 6-9-9-9-9-9 stitches evenly on the next round of treble crochets. Increase like this every 5-6-7-7-5-5 cm a total of 4-3-3-3-4-4 times = 165-177-195-210-237-258 stitches.
When the piece measures 31-31-32-32-32-32 cm from the division, adjust so you finish after a round of treble crochets, cut and fasten the strand. The jumper measures approx. 56-58-60-62-64-66 cm, measured from the shoulder down.

SLEEVES:
The sleeves are worked in the round, back and forth.
Work the 54-57-63-69-75-78 skipped stitches on one side of the piece as follows:
Work 1 double crochet in the 5th chain stitch worked under the sleeve. Work 3 chain stitches, then A.1 over all stitches = 63-66-72-78-84-87 stitches.
When the piece measures 2 cm, adjust so the next round is a round of treble crochets, decrease 3 stitches evenly spaced.
Decrease like this every 3-3-2½-2-1½-1½ cm a total of 7-7-9-10-11-12 times = 42-45-45-48-51-51 stitches.
When the sleeve measures 27-26-25-24-22-21 cm from the division, work trumpet sleeves with a fan pattern as follows:
Work 1 round of treble crochets and increase 0-3-3-0-3-3 stitches evenly spaced = 42-48-48-48-54-54 stitches.
Continue working in the round, without turning after each round (all rounds worked from the right side).
Work A.2 over all stitches.
On the last round in A.2, increase 12 stitches evenly spaced (increase by working extra treble crochets around the chain-spaces) = 54-60-60-60-66-66 stitches.
Work A.2 a total of 3 times in height, increase 12 stitches evenly on the last round in each repetition = 78-84-84-84-90-90 stitches. Each time you increase, you work A.2 two more times in width.
Work the first 3 rounds in A.2, one more time. The sleeve measures approx. 42-41-40-39-37-36 cm from the division.
Work the other sleeve in the same way.

NECK:
Work an edge around the neck as follows:
1 double crochet in each stitch. Cut and fasten the strand.

Diagram

symbols = chain stitch - If you work outermost on the hook the chain stitch will often be too tight; 1 chain stitch should be as long as 1 double/treble crochet is wide
symbols = work 2 treble crochets together as follows: * Make 1 yarn over, insert the hook through the next stitch, pick up the strand, 1 yarn over and pull it through the first 2 loops on the hook *, work from *-* 1 more time, 1 yarn over and pull it through all 3 loops on the hook
symbols = treble crochet in stitch below
symbols = treble crochet around chain stitch/chain-space below
symbols = double crochet in stitch below
symbols = double crochet around chain-space below
symbols = this round has already been worked; it shows how the next round is worked in the stitches
diagram
diagram
Do you have a question? See a list of frequently asked questions (FAQ)

Knitting tension is what determines the final measurements of your work, and is usually measured per 10 x 10 cm. It is provided like so: number of stitches in width x number of rows in height - eg: 19 stitches x 26 rows = 10 x 10 cm.

The knitting tension is very individual; some people knit/crochet loosely while others work tightly. You adjust the knitting tension with the needle size, which is why the suggested needle size is only meant as a guide! You need to adjust this (up or down) to ensure that YOUR knitting tension matches the knitting tension provided in the pattern. If you work with a different knitting tension than provided you will have a different yarn consumption, and your work will have different measurements than what the pattern suggests.

The knitting tension also determines which yarns can replace each other. As long as you achieve the same knitting tension you can replace one yarn with another.

See DROPS lesson: How to measure your tension/gauge

See DROPS video: How to make a gauge tension swatch

The required amount of yarn is provided in grams, eg: 450 g. To calculate how many balls you’ll need you first need to know how many grams are in 1 ball (25g, 50g or 100g). This information is available if you click on the individual yarn quality on our pages. Divide the amount required with the amount of each ball. For example, if each ball is 50g (the most common amount), the calculation will be as follows: 450 / 50 = 9 balls.

The important thing when changing from one yarn to another is that the knitting/crochet tension remains the same. This is so that the measurements of the finished piece will be the same as on the sketch provided. It is easier to achieve the same knitting tension using yarns from the same yarn group. It is also possible to work with multiple strands of a thinner yarn to achieve the knitting tension of a thicker one. Please try our yarn converter. We recommend you to always work a test swatch.

Please NOTE: when changing yarn the garment might have a different look and feel to the garment in the photo, due to individual properties and qualities of each yarn.

See DROPS lesson: Can I use a different yarn than the one mentioned in the pattern?

All our yarns are categorised into yarn groups (from A to F) according to thickness and knitting tension – group A contains the thinnest yarns and group F the thickest. This makes it easier for you to find alternative yarns to our patterns, should you wish to switch yarn. All yarns within the same group have a similar knitting tension and can easily replace each other. However, different yarn qualities have different structures and properties which will give the finished work a unique look and feel.

Click here for an overview of the yarns in each yarn group

At the top of all our patterns you’ll find a link to our yarn calculator, which is a helpful tool should you wish to use a different yarn than suggested. By filling in the yarn quality you wish to replace, the amount (in your size) and number of strands, the calculator will present good alternative yarns with the same knitting tension. Additionally it will tell you how much you’ll require in the new qualities and whether you’ll need to work with multiple strands. Most skeins are 50g (some are 25g or 100g).

If the pattern is worked with multiple colours, every colour will have to be calculated separately. Similarly, if the pattern is worked with several strands of different yarns (for example 1 strand Alpaca and 1 strand Kid-Silk) you will have to find alternatives for each, individually.

Click here to see our yarn calculator

Since different yarns have different qualities and textures we have chosen to keep the original yarn in our patterns. However, you can easily find options among our available qualities by using our yarn calculator, or simply pick a yarn from the same yarn group.

It is possible that some retailers still have discontinued yarns in stock, or that someone has a few skeins at home that they would like to find patterns for.

The yarn calculator will provide both alternative yarn as well as required amount in the new quality.

If you think it's hard to decide what size to make, it can be a good idea to measure a garment you own already and like the size of. Then you can pick the size by comparing those measures with the ones available in the pattern's size chart.

You'll find the size chart at the bottom of the pattern.

See DROPS lesson: How to read size chart

The needle size provided in the pattern serves only as a guide, the important thing is to follow the knitting tension. And since knitting tension is very individual, you will have to adjust the needle size to ensure that YOUR tension is the same as in the pattern – maybe you’ll have to adjust 1, or even 2 needle sizes, up or down to achieve the correct tension. For this, we recommend that you work test swatches.

Should you work with a different knitting tension than the one provided, the measurements of the finished garment might deviate from the measurement sketch.

See DROPS lesson: How to measure your tension/gauge

See DROPS video: How to make a tension/gauge swatch

Working a garment top-down provides more flexibility and room for personal adjustment. For example it is easier to try the garment on while working, as well as making adjustments to length of yoke and shoulder caps.

The instructions are carefully explaining every step, in the correct order. Diagrams are adjusted to the knitting direction and are worked as usual.

The diagram depicts all rows/rounds, and every stitch seen from the right side. It is read from bottom to top, from right to left. 1 square = 1 stitch.

When working back and forth, every other row is worked from the right side and every other row is worked from the wrong side. When working from the wrong side, the diagram will have to be worked reversed: from left to right, knit stitches are purled, purl stitches are knit etc.

When working in the round every round is worked from the right side and the diagram are worked from right to left on all rounds.

See DROPS lesson: How to read knitting diagrams

The diagram depicts all rows/rounds, and every stitch seen from the right side. It is worked from bottom to top, from right to left.

When working back and forth every other row is worked from the right side: from right to left and every other row is worked from the wrong side: from left to right.

When working in the round, every row in the diagram are worked from the right side, from right to left.

When working a circular diagram you start in the middle and work your way outwards, counter clockwise, row by row.

The rows usually start with a given number of chain stitches (equivalent to the height of the following stitch), this will either be depicted in the diagram or explained in the pattern.

See DROPS lesson: How to read crochet diagrams

Instructions for working several diagrams after each other on the same row/round, will often be written like so: “work A.1, A.2, A.3 a total of 0-0-2-3-4 times". This means you work A.1 once, then A.2 is worked once, and A.3 is repeated (in width) the number of times provided for your size – in this case like so: S = 0 times, M = 0 times, L=2 times, XL= 3 times and XXL = 4 times.

The diagrams are worked as usual: begin with the first row in A.1, then work the first row in A.2 etc.

See DROPS lesson: How to read knitting diagrams

See DROPS lesson: How to read crochet diagrams

The total width of the garment (from wrist-to-wrist) will be larger in the larger sizes, despite the actual sleeves being shorter. The larger sizes have longer sleeve caps and wider shoulders, so there will be a good fit in all sizes.

The measurement sketch/schematic drawing provides information regarding the full length of the garment. If it’s a jumper or a jacket the length is measured from the highest point on the shoulder closest to the neckline, and straight down to the bottom of the garment. It is NOT measured from the tip of shoulder. Similarly, the length of yoke is measured from the highest point on the shoulder and down to where yoke is split into body and sleeves.

On a jacket measures are never taken along bands, unless specifically stated. Always measure inside band stitches when measuring the length.

See DROPS lesson: How to read a schematic drawing

Diagrams are often repeated on the round or in height. 1 repeat is the diagram the way it appears in the pattern. If it says to work 5 repeats of A.1 in the round, then you work A.1 a total of 5 times after/next to each other in the round. If it says to work 2 repeats of A.1 vertically/in height you work the entire diagram once, then begin again at the start and work the entire diagram one more time.

Chain stitches are slightly narrower than other stitches and to avoid working the cast-on edge too tight, we simply chain more stitches to begin with. The stitch count will be adjusted on the following row to fit the pattern and measurement sketch.

The rib edge is more elastic and will contract slightly compared to, for example, stocking stitch. By increasing before the rib edge, you avoid a visible difference in width between the rib edge and the rest of the body.

It’s very easy to cast off too tightly, and by making yarn overs while casting off (and simultaneously casting these off) you avoid a too tight cast off edge.

See DROPS video: How to bind off with yarn overs (yo)

To achieve an even increase (or decrease) you can increase on, for example: every 3rd and 4th row alternately, like so: work 2 rows and increase on the 3rd row, work 3 rows and increase on the 4th. Repeat this until the increase is complete.

See DROPS lesson: Increase or decrease 1 st on every 3rd and 4th row alternately

Should you prefer to work in the round instead of back and forth, you may of course adjust the pattern. You’ll need to add steeks mid-front (usually 5 stitches), and follow the instructions. When you would normally turn and work from the wrong side, simply work across the steek and continue in the round. At the end you’ll cut the piece open, pick up stitches to work bands, and cover the cut edges.

See DROPS video: How to knit steeks and cut open

Should you prefer to work back and forth instead of in the round, you may of course adjust the pattern so you work the pieces separately and then assemble them at the end. Divide the stitches for the body in 2, add 1 edge stitch in each side (for sewing) and work the front and back pieces separately.

See DROPS lesson: Can I adapt a pattern for circular needles into straight needles?

Pattern repeats can vary slightly in the different sizes, in order to get the correct proportions. If you’re not working the exact same size as the garment in the photo, yours might deviate slightly. This has been carefully developed and adjusted so that the complete impression of the garment is the same in all sizes.

Make sure to follow instructions and diagrams for your size!

If you have found a pattern you like which is available in women’s size it’s not very difficult to convert it to men’s size. The biggest difference will be the length of sleeves and body. Start working on the women size that you think would fit across the chest. The additional length will be worked right before you cast off for the armhole/sleeve cap. If the pattern is worked top-down you can add the length right after the armhole or before the first decrease on sleeve.

Regarding additional yarn amount, this will depend on how much length you add, but it is better with a skein too many than too few.

All yarns will have excess fibres (from production) that might come off as lint or shedding. Brushed yarns (ie hairier yarns) have more of these loose, excess fibres, causing more shedding.

Shedding also depends on what is worn under or over the garment, and whether this pulls at the yarn fibres. It’s therefore not possible to guarantee that there will be no shedding

Below are some tips on how to get the best result when working with hairier yarns:

1. When the garment is finished (before you wash it) shake it vigorously so the looser hairs come off. NOTE: do NOT use a lint roller, brush or any method that pulls at the yarn.

2. Place the garment in a plastic bag and put it in your freezer - the temperature will cause the fibres to become less attached to each other, and excess fibres will come off easier.

3. Leave in the freezer for a few hours before taking it out and shaking it again.

4. Wash the garment according to the instructions on the yarn label.

Pilling is a natural process that happens to even the most exclusive of fibers. It's a natural sign of wear and tear that is hard to avoid, and that is most visible in high friction areas of your garment like a sweater's arms and cuffs.

You can make your garment look as new by removing the pilling, using a fabric comb or a pill/lint remover.

Still can't find the answer you need? Then scroll down and leave your question so one of our experts can try to help you. This will be done normally within 5 to 10 working days.
In the meantime, you can read the questions and answers that others have left to this pattern or join the DROPS Workshop on Facebook to get help from fellow knitters/crocheters!

You might also like...

Post a comment to pattern DROPS 230-37

We would love to hear what you have to say about this pattern!

If you want to leave a question, please make sure you select the correct category in the form below, to speed up the answering process. Required fields are marked *.

Comments / Questions (20)

country flag Pia Husted wrote:

Jeg kan simpelthen ikke forstå første og anden række i diagram A1. Kan i "skære det ud i pap" for mig?

16.01.2023 - 20:35

country flag Angel wrote:

How do I know how many things off yarn I need to get? The material list I'm not quite getting.

20.11.2022 - 23:18

DROPS Design answered:

Dear Angel, you need to get those amounts of yarn of DROPS Sky. For example, for the smallest size you need 350gr of DROPS Sky. Each ball of Sky weighs 50 gr, so you need 350/50 = 7 balls of DROPS Sky for the smallest size. The other amounts indicated are for the other sizes (350-M, 400-L, 450-XL and XXL and 500-XXXL) and are calculated in the same way. Happy crocheting!

21.11.2022 - 01:06

country flag Maya wrote:

Hello, is main stitch here for example in the gauge and A1 treble or double crochet? Some days pattern says treble but some days I come back to the website for the pattern and it say double crochet. Thank you!

19.11.2022 - 14:02

DROPS Design answered:

Dear Maya, you work in treble crochet (UK version)/ double crochet (US version). Each version has different terms for the same stitches, so you should check which version you are working, the US or UK English versions, so as to not get confused. Happy crocheting!

21.11.2022 - 00:41

country flag Christin wrote:

Ich finde die Anleitung sehr gut, nur hätte ich mir das Diagramm 1 klarer und mit mehr als 1 Mustersatz Wiederholung gewünscht. So sowie es jetzt ist , ist nicht klar das zwischen den einzelnen 2 Stäbchen , die zusammen abgemascht werden und mit der Luftmasche in der Mitte 3 Maschen bilden, man in der vorherigen Reihe 3 Maschen überspringen muss, ansonsten nimmt in jeder dieser ersten Runden von A1 zu!.

22.08.2022 - 16:51

country flag Lori wrote:

In the beginning of the pattern, when you say to increase a double crochet on rows 3 and 5 of A1, do you mean to add stitches in between each A1 or add stitches to A1?

20.07.2022 - 00:35

DROPS Design answered:

Dear Lori, you increase over the double crochets from A.1, not in between the A.1 repeats. You can see the increasing tip for how to spread the increases across the row. Happy crocheting!

20.07.2022 - 17:20

country flag Anna wrote:

Beste Drops, bij informatie voor het haken staat: Op het begin van elke toer van stokjes, haakt u 3 lossen welke het eerste stokje niet vervangt. Eindig de toer met 1 halve vaste in de 3e losse op het begin van de toer. Als de eerste 3 lossen NIET als steek tellen maar ik daarin wel de toer moet eindigen, zal ik telkens een steek meerderen. Is dat de bedoeling? Ik hoor het graag.

15.06.2022 - 09:49

DROPS Design answered:

Dag Anna,

Aan het eind van de toer, wanneer je de toer sluit met een halve vaste in de derde losse van de drie lossen, keer je het werk en haak je weer 3 lossen. Daarna haak je drie lossen boven de drie lossen van de vorige toer en vervolgens haak je de eerste steek volgens patroon in de laatst gehaakte steek van de vorige toer. Dit doe je elke toer. De 3 lossen die je telkens haakt zijn dus aanvullend op het patroon, maar je meerdert hierdoor geen steken.

26.06.2022 - 12:16

country flag Benedicta wrote:

Aw. Just Beautiful!

17.02.2022 - 14:17

country flag Dianne wrote:

Crochet Blue

17.01.2022 - 22:32

country flag Rebecca Gibbs wrote:

This truly is beyond stunning 😍 AND ITS CROCHETED 🧶 YEAH !!!!! HOW LUCKY 🍀 ARE WE. I can not begin to thank you for such lovely designs this season. You are all THE BEST 💖

17.01.2022 - 14:04

country flag Micaela Olivetti wrote:

Sporty Coquette

14.01.2022 - 14:26