
Popular categories
Looking for a yarn?


Comments / Questions (23)
![]() Kathrin wrote:
Kathrin wrote:
Ich habe das gleiche Problem wie Maria. Nach dem Muster war ich schon bei über 7 cm Länge. Daher bin ich von 7 cm ab Bund ausgegangen. Die Antwort auf Marias Frage empfinde ich persönlich als nicht sehr hilfreich. Oder soll man wirklich noch im Mustersatz abnehmen? Das Muster ist wirklich schön und die Anleitung für fortgeschrittenere Stricker:innen okay.
25.12.2024 - 19:31
![]() Maria wrote:
Maria wrote:
Liebes Drops Team, ich verstehe einen Punkt in der Anleitung nicht - recht weit oben. Da steht: "Bei einer Länge von 7 cm je 1 Masche beidseitig des Markierungsfadens abnehmen" --> 7cm ab wo genau gemessen? Der elastische Bund misst 3cm, danach kommen 3 Runden glatt Rechts, dann das Muster mit ca. 4 cm Höhe. Das sind bei mir schon mehr als 7cm. Ist damit gemeint, dass man gleich nach dem Muster anfängt links und rechts vom Markierungsfaden abzunehmen? Viele Grüße Maria
18.12.2024 - 12:01DROPS Design answered:
Liebe Maria, diese Abnahmen werden 7 cm nach Anschlag bearbeitet, dh je nach Ihrer Maschenprobe in der Höhe vor Ende A.1 oder nach A.1. Viel Spaß beim Stricken!
19.12.2024 - 08:49
![]() Rita Reimann wrote:
Rita Reimann wrote:
Warum sehe ich keine Bilder zu den Anleitungen?
15.12.2024 - 06:02DROPS Design answered:
Liebe Frau Reimann, vielleicht wegen einem vorübergehenden Bug? Bilder kann ich heute sehen. Viel Spaß beim Stricken!
16.12.2024 - 10:37
![]() Helga Bragadottir wrote:
Helga Bragadottir wrote:
Hvernig prjona eg hæl á sokka?
29.11.2024 - 13:06DROPS Design answered:
Blessuð Helga. Það eru góðar leiðbeiningar í uppskriftinni hvernig hællinn er prjónaður og efst við hverja uppskrift getur þú smellt á hlekk með myndböndum og kennsluleiðbeiningum. Gangi þér vel.
01.12.2024 - 10:05
![]() Alessia wrote:
Alessia wrote:
Salve, con quale dimensione di punte è stato lavorato il pattern? Grazie mille
15.11.2024 - 00:30DROPS Design answered:
Buonasera Alessia, le calze sono lavorate con i ferri n° 2,5 mm o con il numero di ferri che vi permette di ottenere il campione indicato. Buon lavoro!
16.11.2024 - 22:25
![]() Coralie wrote:
Coralie wrote:
Puis je utilisé la technique du magic loop ?
26.10.2024 - 11:38DROPS Design answered:
Bonjour Coralie, tout à fait. Bon tricot!
28.10.2024 - 08:09
![]() Elizabeth Durand wrote:
Elizabeth Durand wrote:
What is the reason for casting on extra stitches for the cuff ribbing and then decreasing 8 stitches before beginning the leg? I have not done that, or seen that, before. I usually use the same number of stitches all the way through.
13.08.2024 - 21:38DROPS Design answered:
Dear Mrs Durand, you need more stitches working rib than working stocking stitch for the same width, reason why you should decrease after rib. Happy knitting!
14.08.2024 - 07:34
![]() Cecilia wrote:
Cecilia wrote:
Gentili buongiorno, Vorrei provare a fare questo modello ma in cotone , potete suggerirmi un filato adatto? Grazie mille!
08.08.2024 - 10:45DROPS Design answered:
Buonasera Cecilia, può provare ad usare Safran. Buon lavoro!
09.08.2024 - 21:25
![]() Monika Seidemann wrote:
Monika Seidemann wrote:
Hallo Ihr Fleißigen, ich finde die Möglichkeit der Kennzeichnung der Maschen und Reihen für die einzelnen Größen prima/super. Gibt es diese Kennzeichnung nur für bestimmte Anleitungen? Ist dies neu? Freu mich auf eine Rückantwort. Viele Grüße
31.05.2024 - 17:31
![]() Susana wrote:
Susana wrote:
Hola estoy siguiendo este patrón forest por primera vez, pero en las instrucciones no entiendo cuando en el talón después de las disminuciones pone recoger, en mi caso 13 puntos, a lo largo del lado del talón dentro de 1 punto orillo.... yo eso no lo entiendo porque no lo he hecho nunca, ¿hay algun video que me explique esto? Muchas gracias
19.04.2024 - 20:26DROPS Design answered:
Hola Susana, puedes ver cómo hacer esto en el siguiente video: https://www.garnstudio.com/video.php?id=69&lang=es
22.04.2024 - 00:09
|
|||||||
Forest Spell#forestspellsocks |
|||||||
 |
 |
||||||
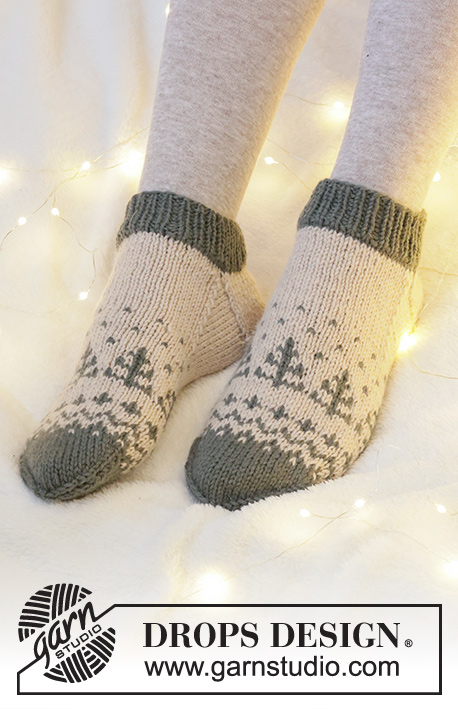
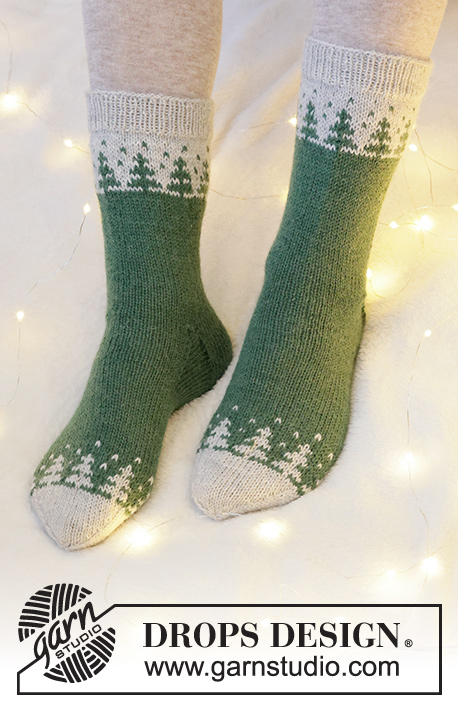
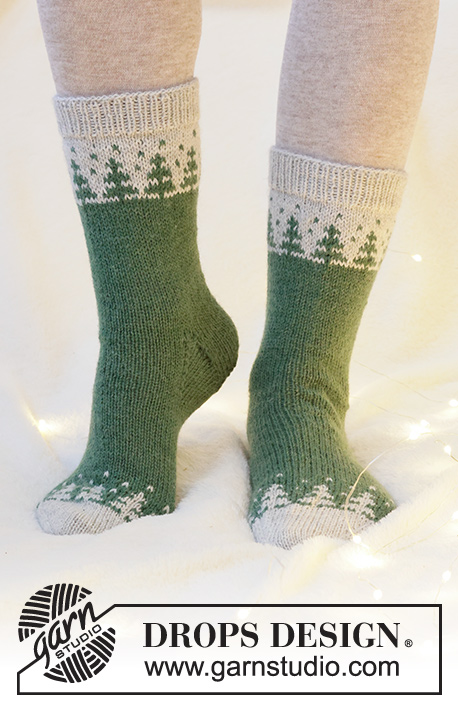
Knitted socks with Nordic pattern / Christmas trees in DROPS Nord. Size 35 to 43 Theme: Christmas.
DROPS Extra 0-1553 |
|||||||
|
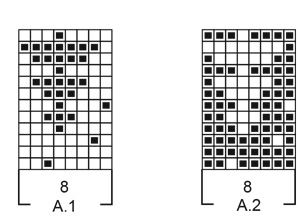
---------------------------------------------------------- EXPLANATION FOR THE PATTERN: ---------------------------------------------------------- DECREASE/INCREASE TIP (evenly): To calculate how to decrease/increase evenly, use the total number of stitches on row (e.g. 72 stitches) and divide stitches by number of decreased/increases to be done (e.g. 8) = 9. In this example decrease by knitting every 8th and 9th stitch together. When increasing make in this example 1 yarn over after every 9th stitch. On next round knit yarns over twisted to avoid holes. PATTERN: See diagrams A.1 and A.2. Work the entire pattern in stocking stitch. KNITTING TIP-1 (applies to pattern): To avoid the garment losing elasticity when working pattern, it is important not to tighten the strands on back side of piece. Switch to a higher needle number when working pattern if the pattern is somewhat tight. KNITTING TIP-2 (applies to heel): To get a stronger heel the entire heel and heel decrease can be worked in 2 strands as follows: Use strand inside and outside of ball and work 1 stitch alternately with one and the other strand. This way you get a thicker heel without working with double strand. DECREASE TIP-1 (applies to mid back on sock): Decrease 1 stitch on each side of marker thread as follows: Work until 4 stitches remain before marker and knit 2 together, knit 4 (marker thread is in the middle of these 4 stitches), slip 1 stitch knitwise, knit 1, pass slipped stitch over stitch worked (= 2 stitches decreased). DECREASE TIP-2 (applies to toe): Decrease 1 stitch on each side of each marker as follows: Work until 3 stitches remain before marker, knit 2 together, knit 2 stitches (marker is between these 2 stitches), slip 1 stitch knitwise, knit 1, pass slipped stitch over stitch worked (= 2 stitches decreased). HEEL DECREASE: ROW 1 (= right side): Knit until 7-8-8 stitches remain, slip next stitch as if to knit, knit 1, pass slipped stitch over stitch knitted, turn piece. ROW 2 (= wrong side): Purl until 7-8-8 stitches remain, slip next stitch as if to purl, purl 1, pass slipped stitch over stitch purled, turn piece. ROW 3 (= right side): Knit until 6-7-7 stitches remain, slip next stitch as if to knit, knit 1, pass slipped stitch over stitch knitted, turn piece. ROW 4 (= wrong side): Purl until 6-7-7 stitches remain, slip next stitch as if to purl, purl 1, pass slipped stitch over stitch purled, turn piece. Continue decrease like this with 1 stitch less before each decrease until there are 14-14-16 stitches on needle. ---------------------------------------------------------- START THE PIECE HERE: ---------------------------------------------------------- SOCKS - SHORT OVERVIEW OF THE PIECE: Worked in the round on double pointed needles, top down. SOCK: Cast on 72-80-80 stitches on double pointed needles size 2.5 mm with colour pearl grey in DROPS Nord. Work 1 round in stocking stitch. Then work rib in the round (= knit 1/purl 1) for 3 cm. Work 3 rounds in stocking stitch and decrease at the same time 8 stitches evenly on first round – read INCREASE/DECREASE TIP = 64-72-72 stitches. Insert a marker thread at the beginning of round (= mid back). Move the marker thread upwards when working - marker thread should be used for decrease mid back on sock. Read KNITTING TIP-1 and work A.1 in the round (= 8-9-9 repetitions in width of 8 stitches). REMEMBER THE KNITTING TENSION! When diagram has been worked, continue in stocking stitch with colour forest green. AT THE SAME TIME on 2nd round decrease 0-4-0 stitches evenly = 64-68-72 stitches. When piece measures 7 cm, decrease 1 stitch on each side of marker thread – read DECREASE TIP-1. Decrease like this every 2-2½-2½ cm 5 times in total = 54-58-62 stitches. Work until piece measures 17-18-19 cm from cast-on edge (or desired length of leg). Now work heel as explained below. Keep the first 13-14-15 stitches on needle for heel, slip the next 28-30-32 stitches on 1 thread without working the stitches (= mid on top of foot), and keep the last 13-14-15 stitches on needle for heel = 26-28-30 stitches for heel. Cut the yarn. Read KNITTING TIP-2, and work in stocking stitch back and forth over heel stitches with forest green for 5-5½-6 cm. Insert a marker in the middle of last row – marker should be used later to measure the length of foot. Work in HEEL DECREASE - read explanation above. After heel decrease work next round as follows: Work in stocking stitch over the 14-14-16 heel stitches, pick up 13-14-16 stitches along the side of heel inside 1 edge stitch, work in stocking stitch over the 28-30-32 stitches from thread on top of foot, and pick up 13-14-16 stitches along the other side of heel inside 1 edge stitch = 68-72-80 stitches. Work until mid under heel, round now begins here. Insert 1 marker on each side of the 28-30-32 stitches mid on top of foot. Work in stocking stitch in the round - AT THE SAME TIME decrease on each side of the 28-30-32 stitches on top of foot as follows: Knit the last 2 stitches BEFORE the 28-30-32 stitches on top of foot together and knit the first 2 stitches AFTER the 28-30-32 stitches on top twisted of foot together (= 2 stitches decreased). Decrease like this every other round 8-8-10 times in total = 52-56-60 stitches. Work until piece measures 14½-15½-17½ cm from marker on heel – measured under foot. 7½-8½-9½ cm remain until finished measurements. Try the sock and work to desired length. Work 1 round in stocking stitch while increasing 4-0-4 stitches evenly - remember DECREASE/INCREASE TIP = 56-56-64 stitches. Now work A.2 in the round (= 7-7-8 repetitions in width of 8 stitches). When diagram has been worked vertically, piece measures approx. 18-19-21 cm from marker on heel - measured under foot (approx. 4-5-6 cm remain until finished measurements - work in colour pearl grey to desired length before toe). Remove the old markers, and insert 1 new marker in each side so that there are 28-28-32 stitches on top of foot and 28-28-32 stitches under foot. Work in stocking stitch in the round with colour pearl grey, and decrease for toes on each side of both markers - read DECREASE TIP-2 (= 4 stitches decreased). Decrease like this every other round 5-8-10 times in total, and then on every round 5-2-1 times in total = 16-16-20 stitches remain. On next round knit all stitches together 2 by 2 = 8-8-10 stitches remain. Cut the yarn and pull yarn through the remaining stitches, tighten together and fasten. Sock measures approx. 22-24-27 cm from marker on heel. Work the other sock the same way. |
|||||||
Diagram explanations |
|||||||
|
|||||||
|
|||||||
Have you finished this pattern?Tag your pictures with #dropspattern #forestspellsocks or submit them to the #dropsfan gallery. Do you need help with this pattern?You'll find 24 tutorial videos, a Comments/Questions area and more by visiting the pattern on garnstudio.com. © 1982-2025 DROPS Design A/S. We reserve all rights. This document, including all its sub-sections, has copyrights. Read more about what you can do with our patterns at the bottom of each pattern on our site. |
|||||||


With over 40 years in knitting and crochet design, DROPS Design offers one of the most extensive collections of free patterns on the internet - translated to 17 languages. As of today we count 314 catalogues and 11822 patterns translated into English (UK/cm).
We work hard to bring you the best knitting and crochet have to offer, inspiration and advice as well as great quality yarns at incredible prices! Would you like to use our patterns for other than personal use? You can read what you are allowed to do in the Copyright text at the bottom of all our patterns. Happy crafting!
Post a comment to pattern DROPS Extra 0-1553
We would love to hear what you have to say about this pattern!
If you want to leave a question, please make sure you select the correct category in the form below, to speed up the answering process. Required fields are marked *.