
Popular categories
Looking for a yarn?


Comments / Questions (16)
![]() Sylvia wrote:
Sylvia wrote:
Vielen Dank für die Antwort. Ja, es bleibt dann die gleiche M-Zahl und wird ein schöner Puff-Ärmel.
10.10.2024 - 16:08
![]() Sylvia wrote:
Sylvia wrote:
Sorry, Reihe 6, also die erste Reihe von A4 meine ich.
10.10.2024 - 09:46
![]() Sylvia wrote:
Sylvia wrote:
Hallo, eine Frage zu A4. Werden in Reihe 5 nochmal M zugenommen? Lt Häkelschrift sind es im Rapport 2M mehr. Ich habe am Ende von Reihe 5 114M in Gr. M, also bei 11 Rapports. Ist das richtig? VG
10.10.2024 - 09:43DROPS Design answered:
Liebe Sylvia, wenn man A.4 häkelt hat man bei der 1. Reihe mehr Maschen als die 8 M (wo 1. Reihe gehäkelt wird), aber dann sollen Sie immer die gleiche Maschenanzahl haben (keine weitere Zunahme). Viel Spaß beim Häkeln!
10.10.2024 - 15:54
![]() Karina wrote:
Karina wrote:
Hejsa. I skriver i hækleinformation at man skal afslutte med en stangmaske i tredje luftmaske. Men diagrammet a2 siger man skal afslutte hver række med en kædemaske i tredje luftmaske. Det forstår jeg ikke? Håbe I kan hjælpe. Vh Karina
09.07.2024 - 09:56DROPS Design answered:
Hej Karina, hvis du starter omgangen med 3 luftmasker, så afslutter du med 1 kædemaske i 3.luftmaske :)
31.07.2024 - 11:39
![]() Steffi wrote:
Steffi wrote:
Vielen lieben Dank für die schnelle Antwort. Tatsächlich habe ich die Anleitung wegen der Puffärmel ausgesucht.... Ihr habt mir aber bestätigt, dass ich eigentlich mit der Anzahl der V-Maschen usw.alles richtig gemacht habe. Ich habe für mich jetzt einfach entschieden, in die V-Maschen nur eine Luftmasche, anstatt wie in A4 angegeben, 2 Luftmaschen zu machen und jetzt passt die Breite mehr wie im Diagramm angegeben und sieht trotzdem noch "puffig" aus. Herzliche Grüße
03.05.2022 - 09:16
![]() Steffi wrote:
Steffi wrote:
Hallo, ich habe Probleme mit dem Ärmel. Die 92 Maschen (M) sind erreicht und ich fange mit dem Muster in A3 an....bei ca,20 cm habe ich bemerkt, dass der Ärmel viel zu breit wird (ca.27cm statt 19cm wie im Bild) wo liegt mein Fehler? Ich habe es mehrere Male versucht, aber wenn ich A3 einhalte wird der Ärmel immer so breit. Toll wäre die Maschenanzahl nach der ersten Reihe von A3. Vielen Dank und Grüße
02.05.2022 - 15:30DROPS Design answered:
Liebe Steffi, die 92 Maschen häkelnSie so: A.3 (= 1 Stb), wiederholen Sie A.4 insgesamt 11 Mal (= über die nächsten 88 Maschen = 2 "V-Maschen"), häkeln Sie noch die 2 ersten Maschen in A.4 (1 "V-Masche") und A.5 = 1+88+2+1=92 Maschen; und es sind dann 1 Stb + 23 "V-Maschen" + 1 Stb. Die Ärmel sind her Puffärmel - deshalb sind es etwas breiter. Viel Spaß beim häkeln!
02.05.2022 - 16:29
![]() Cécile wrote:
Cécile wrote:
Bonjour, je fais le L et je ne comprends pas le rythme des diminutions emmanchures. J'ai déjà diminué2x2 mailles du bord de chaque côté à 2 rangs consecutifs. Puis 1x2 de chque côté et je dois encore faire 1x2 de chaque côté 4 fois tous les 4 rangs...ca fait presque 16 rangs, presque 15 cm ? Ça fait beaucoup non ? Qu'est ce que je ne comprends pas ? Je vous remercie encore une fois de votre aide.
28.05.2021 - 19:31DROPS Design answered:
Bonjour Cécile, effectivement, ces diminutions doivent se faire encore 4 fois (en L) tous les rangs, pas tous les 4 rangs, la correction a été faite. Bonne continuation!
31.05.2021 - 07:16
![]() Cécile wrote:
Cécile wrote:
Bonjour, je fais le L et je ne comprends pas comment on fait les diminutions des emmanchures et au rang 3 et 4 du motif... "Une bride dans chaque bride du tour précédent qui ne peuvent se crocheter en un motif complet de A2"? Pouvez vous m'expliquer s'il vous plaît ? A2 c'est bien le schéma qui indique comment commencer et finir les rangs ? Je vous remercie de votre aide.
27.05.2021 - 23:22DROPS Design answered:
Bonjour Cécile et merci pour votre retour, il fallait lire "A.1", correction faite. Aux rangs 3 et 4 deA.1 on crochète sur 3 m: sauter 1 m, crocheter 1 b, 1 ml, 1 b dans la m suivante, sauter 1 m; si vous avez diminué 1 de ces 3 m, crochetez 1 b dans les 2 mailles restantes, si vous avez diminué 2 de ces m, crochetez 1 b dans la m restante (car il n'y a pas assez de place pour crocheter ce motif complet). Bon crochet!
28.05.2021 - 08:19
![]() Cécile wrote:
Cécile wrote:
Bonjour, je fais le L, je commence les emmanchures mais ne comprends pas comment faire les diminutions-2au au début de rang alors que la première bride est toujours remplacée par 3 mailles en l'air? Je vous remercie de votre aide.
23.05.2021 - 18:09DROPS Design answered:
Bonjour Cécile, en début de rang, crochetez 2 mailles en l'air (au lieu de 3), crochetez la bride suivante et au dernier jeté, écouler les 3 boucles sur le crochet - au rang suivant, crochetez bien dans cette bride (et pas dans le haut des 2 mailles en l'air). Bon crochet!
25.05.2021 - 08:00
![]() Eveline wrote:
Eveline wrote:
Aanpassing op mijn vraag : 5 x 2 steken samen haken iedere 4 toer.
11.05.2021 - 14:00
|
||||||||||||||||||||||
Bright Prairie#brightprairiesweater |
||||||||||||||||||||||
 |
 |
|||||||||||||||||||||
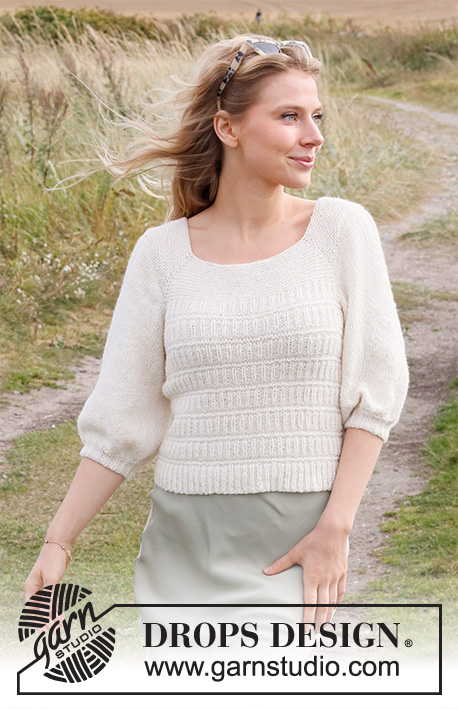
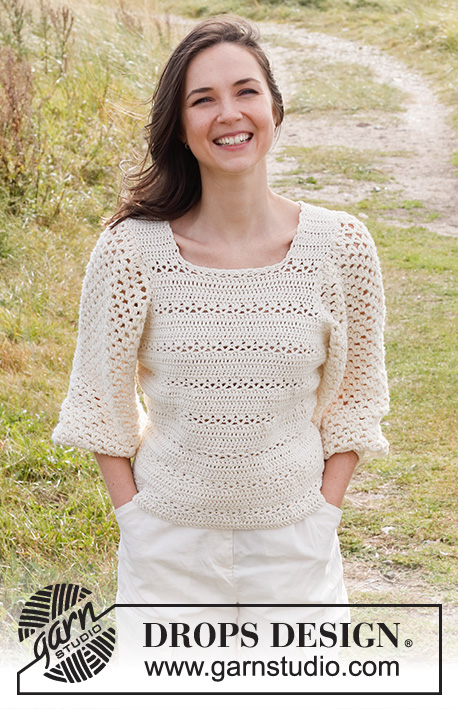
Crocheted jumper in DROPS Cotton Merino. The piece is worked with textured pattern and puffed sleeves. Sizes S - XXXL.
DROPS 222-40 |
||||||||||||||||||||||
|
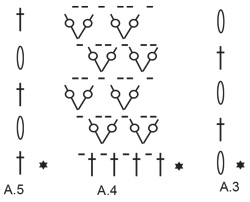
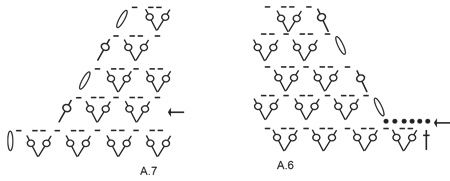
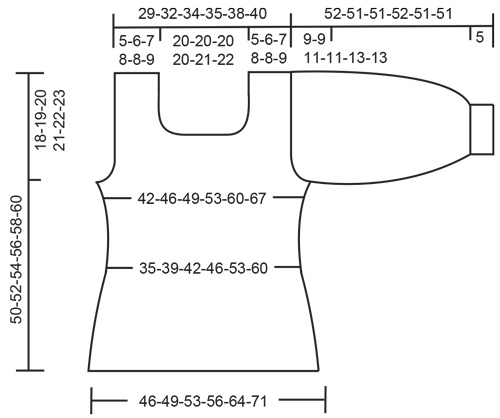
------------------------------------------------------- EXPLANATIONS FOR THE PATTERN: ------------------------------------------------------- PATTERN: See diagrams A.1 to A.7. CROCHET INFORMATION: At the beginning of each row of double crochets, start with 1 chain stitch (does not replace the first double crochet). At the beginning of each row of treble crochets, start with 3 chain stitches (do not replace the first treble crochet). Finish the row with 1 treble crochet in the 3rd chain stitch; this treble crochet makes the pattern symmetrical on both sides and is skipped on the next row. CHAIN STITCH: If you work outermost on the hook the chain stitch will often be too tight; 1 chain stitch should be as long as 1 double/treble crochet is wide. DECREASE TIP-1: Decrease 1 treble crochet by working 2 treble crochets together as follows: Work 1 treble crochet in the first stitch, but wait with the last yarn over and pull through (= 2 loops on the hook), work 1 treble crochet in the next stitch and pull the last yarn over through all 3 loops on the hook (= 1 treble crochet decreased). DECREASE TIP-2 (for decrease for arm holes): Always decrease by crocheting 2 and 2 treble crochets together - remember DECREASE TIP-1. Due to this on 3rd and 4th row in A.1; crochet 1 treble crochet in each treble crochet from round below over the stitches which don’t fit in a whole repeat of A.1 (1 report A.1 = 3 stitches in width). DECREASE/INCREASE TIP (evenly spaced): To work out how to decrease evenly, count the total number of stitches (i.e. 156 stitches) and divide by the number of decreases to be made (e.g. 6) = 26. In this example, work each 25th and 26th stitch together. When increasing, work 2 stitches in each 26th stitch. ------------------------------------------------------- START THE PIECE HERE: ------------------------------------------------------- JUMPER – SHORT OVERVIEW OF THE PIECE: The piece is worked in the round, bottom up. The piece is turned after each round and is worked back and forth to maintain the textured pattern. After dividing for the armholes, the piece is continued back and forth. The sleeves are worked back and forth and sewn together. A decorative neck-edge is worked to finish. JUMPER: Work 156-168-180-192-216-240 chain stitches – read CHAIN STITCH, with hook size 4 mm and Cotton Merino. Form them into a ring with 1 slip stitch in the first chain stitch. Work 1 treble crochet in each chain stitch; the first treble crochet is replaced by 3 chain stitches - read CROCHET INFORMATION = 156-168-180-192-216-240 stitches. Continue in the round according to A.1. Continue working in the round, but turning after each round so you work both from the right and from the wrong side. This is done to maintain the pattern throughout the jumper. A.2 shows how the rounds start and finish. When the piece measures approx. 4-5-6-7-8-9 cm – adjust so the next round is round 1, 5 or 6 in A.1, decrease 6 treble crochets evenly spaced - read DECREASE TIP and DECREASE/INCREASE TIP. Decrease like this every time you work rounds 1, 5 and 6 a total of 6 times = 120-132-144-156-180-204 stitches. REMEMBER THE CROCHET TENSION! Continue working until the piece measures approx. 18-19-20-21-22-23 cm – adjust so that the next round is round 1, 5 or 6, in A.1. Increase 6 treble crochets evenly on the next round by working 2 treble crochets in 1 stitch. Increase like this each time rounds 1 and 5 are worked a total of 4 times = 144-156-168-180-204-228 stitches. Continue the pattern until the piece measures approx. 32-33-34-35-36-37 cm – adjust so the next round is round 1, 5 or 6, and divide the piece for the front and back pieces, inserting marker threads as follows: Insert 1 marker thread at the beginning of the round, skip the next 72-78-84-90-102-114 stitches insert the other marker thread. There are 72-78-84-90-102-114 stitches left after the second marker thread. Front and back pieces are finished separately, working back and forth – remember CROCHET INFORMATION. FRONT PIECE: Work slip stitches over the first 4-5-4-5-6-7 stitches, then work until there are 4-5-4-5-6-7 stitches left before the second marker thread, turn. On next row start decrease for arm holes - read DECREASE TIP-2. Work the 4 outermost stitches in each side together 2 and 2. Repeat this decrease each row 0-0-1-1-2-3 more times. On the next row work the 2 outermost stitches together and repeat this decrease every row 4-4-4-5-6-7 more times. After all the decreases there are 50-54-58-60-64-68 stitches. When the piece measures 40-41-43-44-46-47 cm, finish each shoulder separately - adjust so that the next row is worked from right side. Now finish piece by working 1 treble crochet in each treble crochet, no longer working pattern according to A.1. SHOULDER: Work treble crochets over the first 15-17-19-20-21-22 stitches from the right side, turn and work the first 4 stitches together 2 and 2 for the neck, then work to the end of the row. Turn and work until there are 4 stitches left and work these stitches together 2 and 2, turn. Work the first 2 stitches together and work to the end of the row, turn. Work until there are 2 stitches left and work these 2 stitches together, turn. Work the first 2 stitches together and work to the end of the row = 8-10-12-13-14-15 stitches. Continue working until the piece measures 50-52-54-56-58-60 cm, cut the strand. Work the other shoulder in the same way, but reversed (i.e. start from the right side and the decreases from the neck are worked at the end of rows from the wrong side and at the beginning of rows from the right side). BACK PIECE: As the front piece. SLEEVES: Work 44-46-48-50-52-54 chain stitches – remember CHAIN STITCH, with hook size 4 mm and Cotton Merino. Turn and work back and forth as follows: ROW 1: Work 3 chain stitches, 1 treble crochet in each chain stitch = 44-46-48-50-52-54 treble crochets. ROWS 2- 4: Work 1 treble crochet in each treble crochet. Now increase as follows: Work 2 treble crochets in the first treble crochet, * 1 chain stitch, 1 treble crochet in the next treble crochet *, work from *-* until there is 1 treble crochet left, work 2 treble crochets in the last treble crochet = 88-92-96-100-104-108 stitches. Now work pattern as follows: A.3 over the first treble crochet, A.4 until there is 1 treble crochet left, A.5 over the last treble crochet. Continue back and forth like this. When the diagrams have been completed, repeat the last 2 rows until the piece measures 43-42-40-41-38-38 cm – adjust so the next row is from the right side! Now work the sleeve cap as follows: Work from the row with an arrow in A.6, (i.e. work slip stitches over the first 6 stitches), continue with the last stitch in A.6, continue with pattern until there are 4 treble-crochet groups left, then work as shown in the row with an arrow in A.7. There are 6 stitches left at the end of the row. Continue back and forth with A.6, A.7 and pattern as before over the middle stitches. When the diagrams have been completed in height, repeat the last 2 rows 2-2-3-3-4-4 more times = 8-8-10-10-12-12 rows with decreases on each side. The next row is worked as follows: Work 3 chain stitches, * 2 chain stitches, skip the next treble crochet, work 1 treble crochet around the next chain stitch/chain-space *, work from *-* to the end of the row. Cut and fasten the strand. Work the sleeve seam from the wrong side as follows: Fasten the strand with 1 slip stitch at the bottom of the sleeve and work through both layers, * 2 chain stitches, skip 1 cm, 1 double crochet *, work from *-* up to the beginning of the sleeve cap. Cut and fasten the strand. Work the other sleeve in the same way. ASSEMBLY: Sew the shoulder seams edge to edge so the seam is flat. Sew in the sleeves. DECORATIVE EDGE: Work around the neck with hook size 4 mm and Cotton Merino as follows: 1 double crochet, * 3 chain stitches, 1 treble crochet in the 3rd chain stitch from the hook, skip 1 cm, 1 double crochet *. Work from *-* to the end of the round and work 1 slip stitch in the first double crochet at the beginning of the round. |
||||||||||||||||||||||
Diagram explanations |
||||||||||||||||||||||
|
||||||||||||||||||||||

|
||||||||||||||||||||||
|
||||||||||||||||||||||
|
||||||||||||||||||||||
|
||||||||||||||||||||||
Have you finished this pattern?Tag your pictures with #dropspattern #brightprairiesweater or submit them to the #dropsfan gallery. Do you need help with this pattern?You'll find 14 tutorial videos, a Comments/Questions area and more by visiting the pattern on garnstudio.com. © 1982-2025 DROPS Design A/S. We reserve all rights. This document, including all its sub-sections, has copyrights. Read more about what you can do with our patterns at the bottom of each pattern on our site. |
||||||||||||||||||||||


With over 40 years in knitting and crochet design, DROPS Design offers one of the most extensive collections of free patterns on the internet - translated to 17 languages. As of today we count 314 catalogues and 11821 patterns translated into English (UK/cm).
We work hard to bring you the best knitting and crochet have to offer, inspiration and advice as well as great quality yarns at incredible prices! Would you like to use our patterns for other than personal use? You can read what you are allowed to do in the Copyright text at the bottom of all our patterns. Happy crafting!
Post a comment to pattern DROPS 222-40
We would love to hear what you have to say about this pattern!
If you want to leave a question, please make sure you select the correct category in the form below, to speed up the answering process. Required fields are marked *.