
Popular categories
Looking for a yarn?


|
|||||||||||||||||||
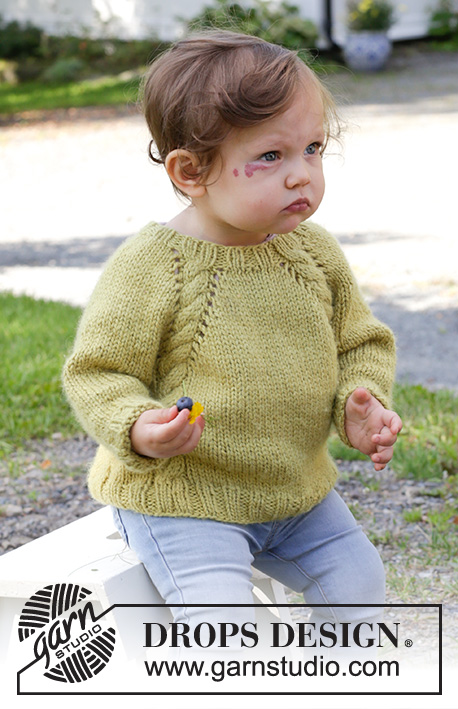
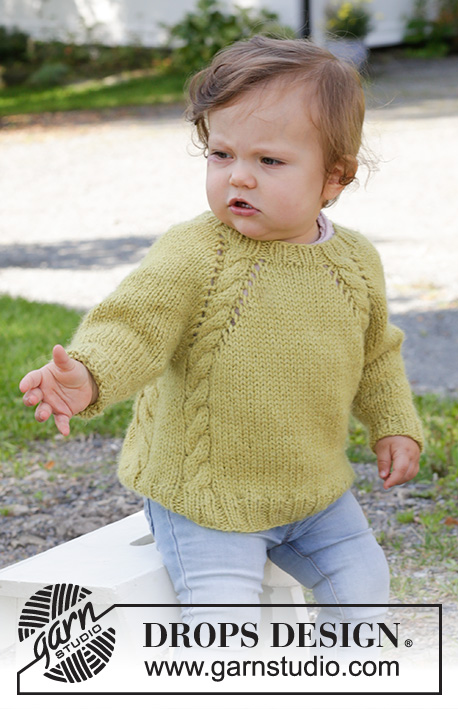
Baby Leaf Sweater |
|||||||||||||||||||
 |
 |
||||||||||||||||||
Knitted sweater for baby and kids in DROPS Alaska. Piece is knitted with raglan and cables, top down. Size 6 month - 8 years
DROPS Baby & Children 38-9 |
|||||||||||||||||||
|
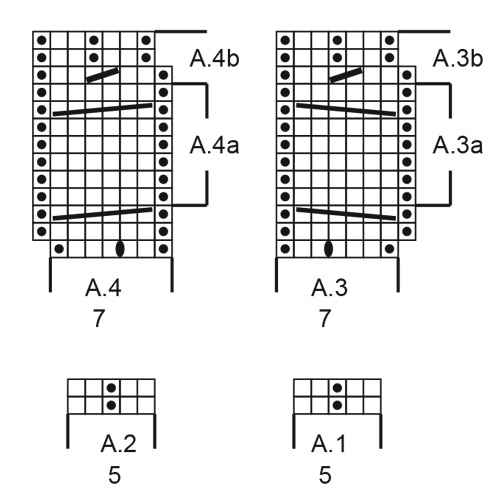
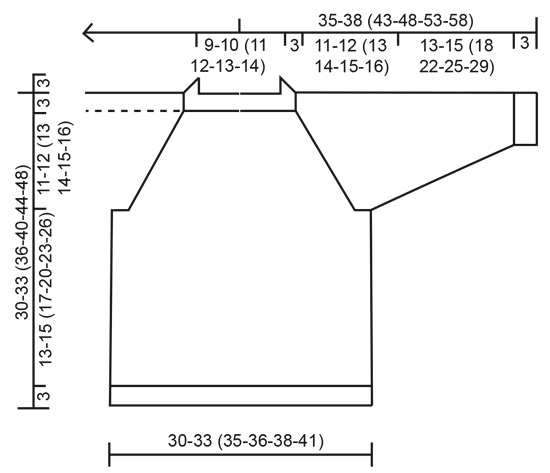
------------------------------------------------------- EXPLANATION FOR THE PATTERN: ------------------------------------------------------- PATTERN: See diagrams A.1 to A.4. DECREASE TIP (applies to sleeves): Decrease 1 stitch on each side of marker as follows: Work until 3 stitches remain before marker, knit 2 together, knit 2 (marker is between these stitches), slip 1 stitch knitwise, knit 1, pass slipped stitch over stitch worked. BIND-OFF TIP: To avoid a tight bind-off edge you may use a larger needle size. If this also is too tight, work a 1 yarn over after approx. every 4th stitch while binding off (bind off yarn overs as regular stitches). ------------------------------------------------------- START THE PIECE HERE: ------------------------------------------------------- SWEATER - SHORT OVERVIEW OF THE PIECE: Worked top down. Work neck edge in the round on double pointed needles/a short circular needle. Work yoke with cables and raglan increase on circular needle. Divide piece for body and sleeves. Continue body in the round on circular needle with cables. Work sleeves in the round on double pointed needles. NECK EDGE: Cast on 52-52 (60-60-68-68) stitches on double pointed needles/circular needle size 4.5 MM = US 7 with Alaska. Knit 1 round. Round starts approx. mid back. Then work rib as follows: Half back piece: * Knit 2, purl 2 *, work from *-* over 4-4 (4-4-8-8) stitches, A.1 (= 5 stitches). Right sleeve: * Purl 2, knit 2 *, work from *-* over the next 6-6 (10-10-10-10) stitches (i.e. begin and end with purl 2). Front piece: A.2 (= 5 stitches), * purl 2, knit 2 *, work from *-* over the next 10-10 (10-10-14-14) stitches (i.e. begin and end with purl 2), A.1 over 5 stitches. Left sleeve: * Purl 2, knit 2 *, work from *-* over the next 6-6 (10-10-10-10) stitches (i.e. begin and end with purl 2). Half back piece: A.2 over 5 stitches, * purl 2, knit 2 *, over the last 6 stitches (i.e. begin and end with purl 2). Continue with knit over knit and purl over purl until piece measures 3 cm = 1⅛". Insert 1 marker at the beginning of round, measure from this marker! Switch to circular needle size 5.5 MM = US 9 and work yoke as follows: YOKE: Work next round as follows: Half back piece: Knit 3-3 (3-3-7-7) while increasing 0-1 (2-3-1-3) stitches evenly, 1 yarn over, A.3 (= 7 stitches). Right sleeve: 1 yarn over, knit 4-4 (8-8-8-8) while increasing 4-4 (0-2-2-2) stitches evenly, 1 yarn over. Front piece: A.4 (= 7 stitches), 1 yarn over, knit 8-8 (8-8-12-12) while increasing 0-2 (4-6-2-6) stitches evenly, 1 yarn over, A.3 over 7 stitches. Left sleeve: 1 yarn over, knit 4-4 (8-8-8-8) while increasing 4-4 (0-2-2-2) stitches evenly, 1 yarn over. Half back piece: A.4 over 7 stitches, 1 yarn over, knit 5 while increasing 0-1 (2-3-1-3) stitches evenly. 8-12 (8-16-8-16) stitches have been increased evenly in total, 1 yarn over on each side of A.3/A.4 (= 8 stitches increased in total for raglan) and 1 stitch in every A.3/A.4 (= 4 stitches) = 72-76 (80-88-88-96) stitches in total on row. Knit yarn overs on each side of A.3/A.4 on next round to make holes. Do work the other yarn overs twisted to avoid holes. Continue with A.3 and A.4 and stockinette stitch over the remaining stitches and increase every other round 10-11 (12-12-13-14) times in total (including the first increase explained above)= 144-156 (168-176-184-200 ) stitches. When A.3a and A.4a have been worked 1 time vertically, repeat A.3a and A.4a vertically.REMEMBER THE KNITTING GAUGE! After all increases piece measures approx. 10-11 (12-12-13-14) cm = 4"-4⅜" (4¾"-4¾"-5⅛"-5½") from marker. Then work as before without increases until piece measures 11-12 (13-14-15-16) cm = 4⅜"-4¾" (5⅛"-5½"-6"-6¼"). Now divide the piece for body and sleeves on next round as follows: Work over the first 21-23 (25-26-29-32) stitches as before, slip the next 28-30 (32-34-36-38) stitches on a stitch holder for sleeve and cast on 6 stitches under sleeve, work as before over the next 44-48 (52-54-56-62) stitches, slip the next 28-30 (32-34-36-38) stitches on a stitch holder for sleeve and cast on 6 stitches under sleeve and work the last 23-25 (27-28-27-30) stitches as before. BODY: = 100-108 (116-120-124-136) stitches. Continue in the round with stockinette stitch and A.3/A.4 as before. Work stitches cast on under sleeve in in stockinette stitch. When piece measures 13-15 (17-20-23-26) cm = 5⅛"-6" (6¾"-8"-9"-10¼") from division (approx. 3 cm = 1⅛" remain), work next round as follows: Knit 13-15 (17-18-21-24) while increasing 0-2 (4-3-4-1) stitches evenly, A.3a as before, knit 6 while increasing 2 stitches evenly, A.4a as before, knit 28-32 (36-38-40-46) while increasing 4-4 (4-6-4-6) evenly, A.3a as before, knit 6 while increasing 2 stitches evenly, A.4a as before, knit 15-17 (19-20-19-22) while increasing 4-2 (0-3-0-5) stitches evenly = 112-120 (128-136-136-152) stitches. Switch to circular needle size 4.5 MM = US 7. Then work rib as follows: * Purl 2, knit 2 *, work from *-* over the first 12-16 (20-20-24-24) stitches, purl 1, A.3b over A.3a, purl 1, * knit 2, purl 2 *, work from *-* over 6 stitches, purl 1, A.4b over A.4a, purl 1, * knit 2, purl 2 *, work from *-* over 30-34 (38-42-42-50) stitches, purl 1, A.3b over A.3a, purl 1, * knit 2, purl 2 *, work from *-* over 6 stitches, purl 1, A.4b over A.4a, purl 1, * knit 2, purl 2 *, work from *-* over 18-18 (18-22-18-26) stitches (i.e. begin and end with knit 2). Continue with knit over knit and purl over purl until piece measures 16-18 (20-23-26-29) cm = 6¼"-7" (8"-9"-10¼"-11⅜") from division. Bind off with knit over knit and purl over purl - read BIND-OFF TIP. Sweater measures approx. 30-33 (36-40-44-48) cm = 11¾"-13" (14¼"-15¾"-17¼"-19") from shoulder and down. SLEEVES: Slip the 28-30 (32-34-36-38) stitches from stitch holder in one side of piece on double pointed needles size 5.5 MM = US 9 and pick up 1 stitch in each of the 6 stitches cast on under sleeve = 34-36 (38-40-42-44) stitches. Insert 1 marker in the middle of the 6 new stitches under the sleeve. Decrease on each side of this marker later. Work in stockinette stitch in the round. When sleeve measures 3 cm = 1⅛" from division, decrease 1 stitch on each side of marker - read DECREASE TIP (= 2 stitches decreased). Decrease like this every 3-2½ (3½-5-5½-6) cm = 1⅛"-1" (1¼"-2"-2⅛"-2⅜") 3-4 (4-4-4-4) times in total = 28-28 (30-32-34-36) stitches. When piece measures 13-15 (18-22-25-29) cm = 5⅛"-6" (7"-8¾"-9¾"-11⅜") from division, increase 0-0 (2-0-2-0) stitches evenly = 28-28 (32-32-36-36) stitches. Switch to double pointed needles size 4.5 MM = US 7. Work rib (= knit 2/purl 2). Bind off with knit over knit and purl over purl when sleeve measures 16-18 (21-25-28-32) cm = 6¼"-7" (8¼"-9¾"-11"-12½") from division. Work the other sleeve the same way. |
|||||||||||||||||||
Diagram explanations |
|||||||||||||||||||
|
|||||||||||||||||||
|
|||||||||||||||||||
|
|||||||||||||||||||
|
Have you made this or any other of our designs? Tag your pictures in social media with #dropsdesign so we can see them! Do you need help with this pattern?You'll find tutorial videos, a Comments/Questions area and more by visiting the pattern on garnstudio.com. © 1982-2024 DROPS Design A/S. We reserve all rights. This document, including all its sub-sections, has copyrights. Read more about what you can do with our patterns at the bottom of each pattern on our site. |
|||||||||||||||||||


With over 40 years in knitting and crochet design, DROPS Design offers one of the most extensive collections of free patterns on the internet - translated to 17 languages. As of today we count 304 catalogs and 11422 patterns - 11417 of which are translated into English (US/in).
We work hard to bring you the best knitting and crochet have to offer, inspiration and advice as well as great quality yarns at incredible prices! Would you like to use our patterns for other than personal use? You can read what you are allowed to do in the Copyright text at the bottom of all our patterns. Happy crafting!
Comments / Questions (71)
Bonjour, je fais le tricot de la taille 12-18 mois, donc 52 mailles. J’arrive à l’empiècement, aux augmentations, et j’aimerais savoir combien de mailles j’aurai à la fin du premier tour d’augmentations (76?). Combien de mailles aussi au tour suivant (156?).Je ne suis pas certaine où je dois faire les jetés. Merci.
01.02.2022 - 22:49DROPS Design answered:
Bonjour Louise, à la fin de ce premier tour vous aurez effectivement 76 mailles car vous avez augmenté dans chaque pièce (1 m 1/2 dos + 4 m pour chaque manche + 2 m devant + 1 m 1/2 dos = 12 augm) + 1 maille de chaque côté de chaque A.3/A.4 (= raglan) + 1 m dans chaque A.3/A.4 soit 52+ 12+8 (augm raglan) + 4 (augm diagrammes) = 76 m. Continuez ensuite en jersey avec les diagrammes A.3 et A.4 et augmentez pour le raglan avant/après chaque A.3/A.4 (= 8 augmentations tous les 2 tours). Bon tricot!
02.02.2022 - 08:02Bom dia! Quero começar o tamanho de 2 anos. Tenho pouca experiêcia em seguir instruções. Não entendo o que se quer dizer na gola por exemplo: monto 60 malhas, mas depois não entendo porque se diz (* 2 malhas meia, 2 malhas liga*), repetir de * a * por cima das 4-4 (4-4-8-8) malhas seguintes, A.1 (= 5 malhas). O que quer isto dizer? Penso que quando perceber isto, perceberei a maioria das instruções visto que há muitas do mesmo género. Muito obrigada pela ajuda, desde já.
16.01.2022 - 22:56DROPS Design answered:
Bom dia, Vamos tentar ajudar! Tricota o canelado de 2 malhas meia e 2 malhas liga nas primeiras 4 malhas da carreira, depois, tricota o torcido A.1 nas 5 malhas seguintes, depois, continua com o caneladonas 10 malhas seguintes, tricota novamente o torcido do esquema A.1, depois, 10 malhas em canelado para a frente, novamente o esquema A.1 do torcido, e assim sucessivamente, O canelado fica entre os quatro esquemas A.1 (os torcidos). Se descer até ao fundo das explicações, vai encontrar um vídeo que explica como se tricota uma camisola assim, de cima para baixo, entre muitos outros vídeos. Esperamos ter ajudado! Bom tricô!
18.01.2022 - 11:41Hello-I am working the pattern in the 12-18 month size and am confused about the increase, where exactly in the pattern to increase to get from 76 stitches to 156 over 11 row. Do I increase on the sides of the raglans only? Thank you! "Continue with A.3 and A.4 and stocking stitch over the remaining stitches and increase every other round 10-11 (12-12-13-14) times in total (including the first increase explained above)= 144-156 (168-176-184-200 ) stitches. "
15.01.2022 - 22:25DROPS Design answered:
Dear Cara, you have to increase a total of 11 times on every other round for the raglan, but when you have 76 sts you already increased the first time, this means you have to increase 10 more times = 76 + (8*10)= 156 sts. Happy knitting!
17.01.2022 - 08:45Hej! Jag får inte huvudet runt hur ökningarna ska gå till för oket, jag får inte matematiken att stämma... Jag stickar enligt minsta storleken, så det ska efter ökningar vara 144 maskor (144-72=72 maskor läggs upp på 10 varv) som skulle innebära att 7.2 maskor ska ökas på varje ökningsvarv?? Dessutom så vet jag inte vad denna mening syftar på som "ovan": "(inklusive den första ökningen som förklarat ovan)" Med vänliga hälsningar /Patrik
14.01.2022 - 06:52DROPS Design answered:
Hej Patrik. Efter första ökningen har du 72 m, sedan ska du öka till raglan (8 maskor per varv) ytterligare 9 gånger (10 gånger inklusive den du redan gjort), så du får då 72+(8x9)=144 m. Mvh DROPS Design
14.01.2022 - 14:05Minulla on heti alussa vaikeuksia: luon 52 silmukkaa (koko 12/18 kk), mutta kun alan tekemään pääntie reunusta, niin saan ohjeen mukaisesti 72 silmukkaa. Lisätäänkö silmukoita siis jo Pääntien reunuksessa vai miten neuleen alku etenee?
19.12.2021 - 21:28DROPS Design answered:
Hei, laskin mallineuleen silmukat ja sain lopputulokseksi 52 silmukkaa. Ota huomioon, että tähtien välinen osuus toistetaan esim. takakappaleen ensimmäisessä puolikkaassa vain 4 silmukan kohdalla (eli neulot 2 silmukkaa oikein, 2 silmukkaa nurin, 2 silmukkaa oikein, 2 silmukkaa nurin ja sitten piirroksen A.1 5 silmukkaa).
03.01.2022 - 17:00An der Passe: Raglanzunahmen, wie genau? In der Halsblende haben wir vor und nach A3/4 je einen Umschlag. Dieser wird in der Passe rechts gestrickt und ergibt ein Loch. In der nächsten Runde kommen die Raglanzunahmen. Was für Zunahmen sind das, sind es neue Umschläge oder doppeltgestrickte Maschen? Und wo genau kommen sie hin, vor oder nach den Umschlägen der vorrigen Runde?
31.10.2021 - 23:53DROPS Design answered:
Liebe Pola, die Umschläge beidseitig von A.3/A.4 sind die Raglanzunahmen, dh so stricken Sie immer weiter und nehmen Sie in jeder 2. Runde beidseitig von A.3/A.4 zu. Viel Spaß beim stricken!
03.11.2021 - 07:35Non capisco la seguente parte "* 2 maglie rovescio, 2 maglie diritto *, lavorare *-* sulle prime 12-16 (20-20-24-24) maglie, 1 maglia rovescio, A.3b su A.3a, 1 maglia rovescio, * maglie diritto, maglie rovescio *, lavorare *-* su 6 maglie, 1 maglia rovescio, A.4b su A.4a, 1 maglia rovescio, * maglie diritto, maglie rovescio *, lavorare *-* su 30-34 (38-42-42-50)"- ho 136 maglie ma ne lavoro 131!
08.10.2021 - 19:04DROPS Design answered:
Buongiorno Antonella, quale parte di queste spiegazioni non riesce a capire? Deve seguire quello indicato e lavorare i motivi che vengono riportati: se prima ha lavorato il motivo A.3a ora su quelle maglie deve lavorare il motivo A.3b e così via. Buon lavoro!
09.10.2021 - 12:12Devo iniziare il terzo giro e dice di aumentare come fatto sopra. Gli aumenti oltre i gettati sono sulle maniche e sono 4 ogni 10 giri?
28.09.2021 - 22:57DROPS Design answered:
Buonasera Laura, ci può indicare a quale parte del modello sta facendo riferimento? Buon lavoro!
28.12.2021 - 16:46Hej . Jeg oplever at der er uoverenstemmelser med hvordan man tager ud med raglanudtagninger og billedet/resultatet. Jeg har nu pillet det op 3 gange. Snoninger bliver ikke trykket ud langs ærmerne. Udtagningerne vil jo ske på yderligere af snoningerne. Kan der komme en video på med hvordan det skal gøres på denne opskrift.
25.09.2021 - 18:34DROPS Design answered:
Hei Emma. Takk for ditt innspill. Vi skal få laget en video på denne fletten (usikker når, da det er andre ønsker som ligger først på listen). mvh DROPS Design
28.09.2021 - 12:44L en R mouw: rij 1 = kleinste maat is 6 steken. Rij 2: 1 omslag, 4-recht en meerder 4- steken verdeeld. Klopt het dat ik dan 4 steken moet meerderen op de overgebleven 2 steken? Want ik neem aan dat dat de meerdering de raglan is? Die dan in de volgende naalden 9*8 keer moet herhaald worden om van 72 naar 144 naalden te gaan?
22.07.2021 - 12:24DROPS Design answered:
Dag Rebecca,
Nee, de 4 steken die je verdeeld moet meerderen meerder je over de de 4 steken. Dit is eenmalig en staat los van de raglan. Op de naalden daarna meerder je weer alleen voor de raglan door omslagen te maken en meerder je niet meer verdeeld.
20.08.2021 - 11:50