
Beliebte Kategorien
Suchen Sie nach einem Garn?


Kommentare / Fragen (102)
Carol hat geschrieben:
Why do you not have a video for the complete pattern.so we can look at the video like on youtube. Thank you.
26.07.2015 - 10:48DROPS Design hat geantwortet:
Dear Carol. It's not possible for us to publish videos of a complete pattern, we only make on techniques, stitches and pattern diagrams. If you need help with a specific part of the pattern, we will take a look at it.
27.07.2015 - 15:34
![]() Studer Brigitta hat geschrieben:
Studer Brigitta hat geschrieben:
Hallo, das Abnehmen auf der linken Seite ist nicht beschrieben! Wie muss das gemacht werden mit den Luftmaschen? Diese Anleitung ist recht spärlich beschrieben, könnte eine Auffrischung brauchen.
21.07.2015 - 06:54DROPS Design hat geantwortet:
Die Abnahmen werden beidseitig gemacht, d.h. immer am Anfang jeder R. Die Anleitung wurde neu übersetzt und ist nun hoffentlich etwas deutlicher, ansonsten fragen Sie gerne noch einmal nach. Gutes Gelingen!
28.07.2015 - 16:56
![]() Summer hat geschrieben:
Summer hat geschrieben:
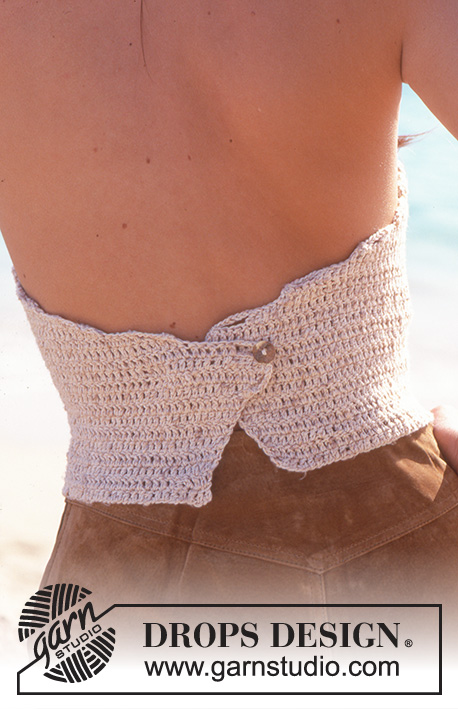
How would you instead of having a button connect it in the back?
04.07.2015 - 04:56DROPS Design hat geantwortet:
Dear Summer, you can make 2 twisted strings or a ch and sew them at each end of piece then cross them and tie them with a knot. A button may be a good idea to hold both pieces tog. Happy crocheting!
04.07.2015 - 09:27
![]() Tam hat geschrieben:
Tam hat geschrieben:
I don't understand the part that inc 1 dc on each side every row 8 times . That mean I'm do inc 8 times the hold row 1 from beginning 1 the end and another 6 during the row ????
24.06.2015 - 18:27DROPS Design hat geantwortet:
Dear Tam, you inc 1 st at the beg + 1 st at the end of row (= 2 sts inc per row) for 8 rows (1st size) = you have a total of 145 sts on row 9. Happy crocheting!
25.06.2015 - 10:24
![]() Stephanie hat geschrieben:
Stephanie hat geschrieben:
After reading pattern and looking at the diagram for drops 65-13 pattern I don't understand the instructions right above the chart
04.06.2015 - 16:46DROPS Design hat geantwortet:
Dear Stephanie, you will find above measurement chart all diagram text, 1 symbol represent 1 st / 1 group of st - read more about diagrams here. Happy crocheting!
05.06.2015 - 09:48
![]() Pam hat geschrieben:
Pam hat geschrieben:
I have just got rolling with no problem.Rows 2 through 9-10-11-12: 1 dc in each dc from the previous row--at the same time, inc 1 dc on each side every row 8-9-10-11 times. What does 8-9-10-11 times mean. It doesn't make sense to me. Does it mean to increase row 3 through row 12 ? Maybe if you clear up if I am understanding this part I will be able to get through the decreasing also.
09.04.2015 - 07:50DROPS Design hat geantwortet:
Dear Pam, this refers to the size, eg in 1st size, you work rows 2 through row 9, inc every row 8 times (in 2nd size through row 10, inc 9 times etc..). Happy crocheting!
09.04.2015 - 09:56
![]() Kathy hat geschrieben:
Kathy hat geschrieben:
Hi, this is a beautiful pattern, I've been trying to do the math of the pattern in my head after reading through the comments below. From my understanding, to dec on both sides takes 2 rows (so for example: dec 4 dc, size S = 6 rows in total). But with that, there would be a total of 38 rows of dec yet the chart only shows 25 rows. What am doing wrong?
03.04.2015 - 04:32DROPS Design hat geantwortet:
Dear Kathy, you decrease at the beg and at the end of every row, ie to dec 4dc, work as stated under crocheting tip, (skip first 4 dc at beg of row ...) and at the end of same row, turn when 4 dc remain before the end of row = you have decreased 4 dc each side on the same row. Happy crocheting!
03.04.2015 - 09:22
![]() Maria hat geschrieben:
Maria hat geschrieben:
Thanks for you reply but I need further clarification. I'm crocheting size small, have completed the 145 dc's. According to the instructions I'm supposed to start decreasing on both sides on every row, meaning that I have to start decreasing 4 dc's at the beginning of the row by chaining 6 and starting working on the 5th chain, how do I decrease the 4 dc's at the end of the same row? If I do what you suggest in your answer I'll be only decreasing 4 dc's at only one end of the row.
24.03.2015 - 21:38DROPS Design hat geantwortet:
Dear Maria, (answer edited) to dec 4 dc work 1 row as stated: turn at the end of row, ch 6, skip 4 dc and work in 5th dc on row and work remaining sts on row until 4 sts remain (= you have decreased 4 dc each side), turn and work next decrease. Repeat how many times required in pattern (and continue same way (see crocheting tip) when dec 3 dc and 2 dc each side. Happy crocheting!
25.03.2015 - 09:01
![]() Maria hat geschrieben:
Maria hat geschrieben:
Beautiful pattern but need help to continue working on it. Would you please clarify the decreasing (dec) instructions. The pattern calls for dec on both sides of every row, but the directions under Crocheting tip refer only to the end of the row. The same doesn't work for the beginning of the row. Thanking you in advance, María
23.03.2015 - 23:27DROPS Design hat geantwortet:
Dear Maria, (answer edited) when you have worked the row with dec at the end of the first row, turn work when the number of sts remain before end of row. Happy crocheting!
24.03.2015 - 09:31
![]() Rebecca hat geschrieben:
Rebecca hat geschrieben:
Hi! Question- do you design all of the patterns on your website? I look forward to hearing from you :)
22.03.2015 - 07:41DROPS Design hat geantwortet:
Dear Rebecca, you are correct, we do. Happy crocheting!
23.03.2015 - 09:53
|
|||||||||||||
Mediterranean Love |
|||||||||||||
 |
 |
||||||||||||
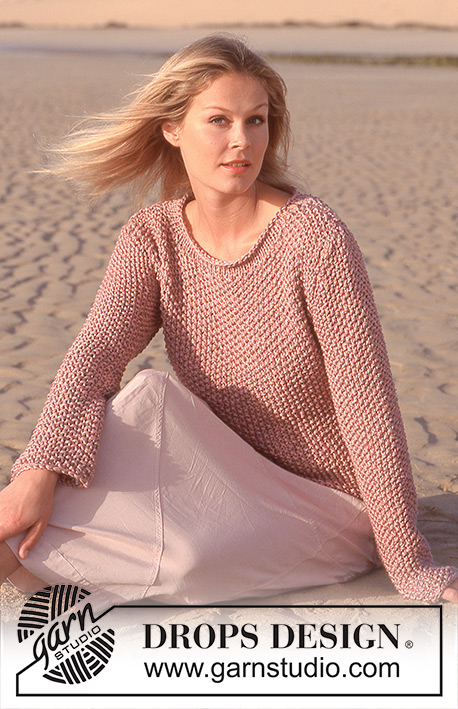
Gehäkeltes Top mit offenem Rücken in DROPS Safran
DROPS 65-13 |
|||||||||||||
|
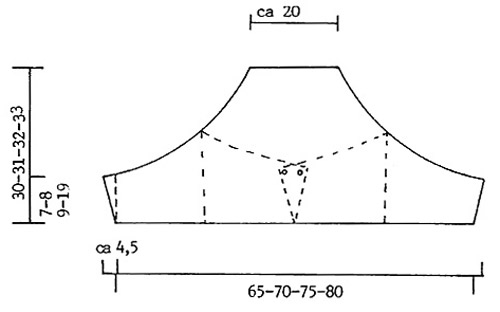
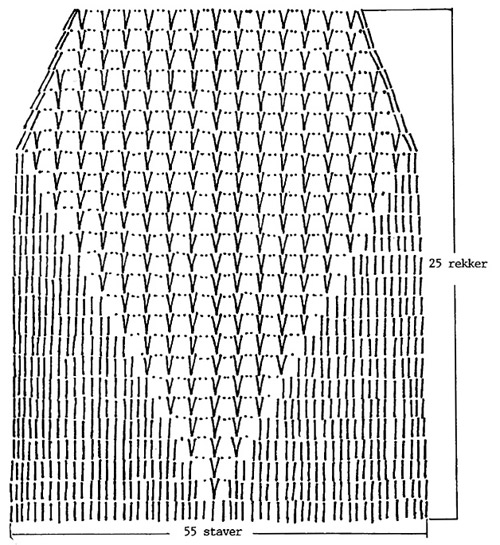
Maschenprobe: Achtung, die Nadelnummer (Ndl) ist nur ein Vorschlag! MUSTER: Siehe Diagramm. Das Diagramm wird für alle Größen komplett gehäkelt. HÄKELTIPP: Wenn 4 Stäbchen abgenommen werden: 6 Lm häkeln, die nächsten 4 Stb überspringen, 1 Stb in das 5. Stb häkeln und die Reihe häkeln, bis noch 4 Stb übrig sind, wenden. Wenn 3 Stäbchen abgenommen werden: 5 Lm häkeln, die nächsten 3 Stb überspringen, 1 Stb in das 4. Stb häkeln und die Reihe häkeln, bis noch 3 Stb übrig sind, wenden. Wenn 2 Stäbchen abgenommen werden: 4 Lm häkeln, die nächsten 2 Stb überspringen, 1 Stb in das 3. Stb häkeln und die Reihe häkeln, bis noch 32Stb übrig sind, wenden. ------------------------------------------------------ OBERTEIL: 170-183-196-210 Luft-M (Lm) mit Häkelnadel Nr. 3 anschlagen. In der nächsten Rd wie folgt Stb häkeln: 3 Stäbchen (Stb) (das 1. Stb wird dabei durch 3 Lm ersetzt), * 1 Lm überspringen, je 1 Stb in die nächsten 3 Lm *, von *-* wdh bis noch 0-1-2-0 Lm übrig sind, 1 Stb in jede Lm = 129-139-149-159 Stb. MASCHENPROBE BEACHTEN - es ist sehr wichtig, dass nicht zu locker gehäkelt wird, da dieses Oberteil eng anliegen soll. Weiter Stb häkeln und dabei GLEICHZEITIG beidseitig je 1 Stb in jeder R zunehmen, indem beidseitig je 2 Stb in 1 Stb gehäkelt werden. Diese Zunahmen beidseitig insgesamt 8-9-10-11 x arb = 145-157-169-181Stb. Die Arb hat nun eine Gesamtlänge von ca. 7-8-9-10 cm. Nun beidseitig in jeder R wie nachfolgend beschrieben abnehmen - HÄKELTIPP lesen - und GLEICHZEITIG mit dem MUSTER über die mittleren 55 Stb beginnen, dabei darauf achten, dass das Muster mittig zu liegen kommt. Beidseitig wie folgt abnehmen: 4 Stb je 2-3-6-8 x, 3 Stb je 3-7-7-7 x, 2 Stb je 14-9-6-5 x, ab hier wird die Arb nach Diagramm zu Ende gehäkelt. Danach hat die Arb eine Gesamtlänge von ca. 30-31-32-34 cm. FERTIGSTELLEN: Am Rücken beidseitig ganz oben mit Häkelnadel Nr. 3 je 1 Knopflochschlaufe wie folgt anbringen: 1 feste M, 2 Lm, ½ cm überspringen, 1 feste M. Das Oberteil anprobieren, um die beste Position der Knöpfe zu ermitteln. 1 Knopf wird auf der Rückseite des linken Rückenteils und 1 Knopf auf der Vorderseite des rechten Rückenteils festgenäht. 3 Lm-Ketten mit einer Länge von je ca. 100 cm häkeln. Diese 3 Schnüre zu einem Zopf flechten, in jedes Ende einen Knoten machen und durch die oberste Loch-R fädeln. |
|||||||||||||
Erklärungen zum Diagramm |
|||||||||||||
|
|||||||||||||
 |
|||||||||||||
 |
|||||||||||||
Haben Sie diese Anleitung nachgearbeitet?Dann taggen Sie Ihre Fotos mit #dropspattern oder schicken Sie sie an die #dropsfan Galerie Brauchen Sie Hilfe bei dieser Anleitung?Sie finden 4 Videotutorials, einen Kommentar/Fragen-Bereich und vieles mehr, wenn sie die Anleitung bei garnstudio.com aufrufen. © 1982-2026 DROPS Design A/S. Wir besitzen alle Rechte. Dieses Dokument, einschließlich aller Untersektionen, hat Urheberrechte. Mehr dazu, was Sie mit unseren Anleitungen machen können, finden Sie ganz unten auf der Seite zu jeder Anleitung. |
|||||||||||||


Mit über 40 Jahren Tätigkeit im Entwerfen von Strick- und Häkelmustern bietet Ihnen DROPS Design eine der umfangreichsten Sammlungen von kostenlosen Anleitungen im Internet - in 17 Sprachen übersetzt. Zum jetzigen Zeitpunkt haben wir insgesamt 324 Handarbeitshefte und 12272 Anleitungen auf Deutsch. 12184
Unser Ziel ist es, Ihnen die besten Angebote zum Stricken und Häkeln, Inspirationen und Ratschläge sowie qualitativ hochstehende Garne zu unglaublichen Preisen zu bieten! Möchten Sie unsere Anleitungen nicht nur für den persönlichen Gebrauch nutzen? Unsere Copyright Bedingungen finden Sie bei allen unseren Anleitungen ganz unten auf der jeweiligen Seite. Viel Spaß beim Handarbeiten!
Kommentieren Sie die Anleitung DROPS 65-13
Wir würden gerne Ihre Meinung zu diesem Modell erfahren!
Wenn Sie eine Frage stellen möchten, prüfen Sie bitte, dass Sie die richtige Kategorie im unten stehenden Formular gewählt haben - so bekommen Sie schneller eine Antwort. Die obligatorischen Felder sind mit einem * gekennzeichnet.