
Beliebte Kategorien
Suchen Sie nach einem Garn?


Kommentare / Fragen (171)
![]() EVEN hat geschrieben:
EVEN hat geschrieben:
Merci de ne plus tenir compte de mon message du 09/07, en poursuivant mon tricot j'ai résolu mon problème.
11.07.2016 - 14:29
![]() EVEN hat geschrieben:
EVEN hat geschrieben:
Bonjour, encore moi, les diminutions du diagramme 3 sont inversées par rapport a celui du 2, ça commence par un jeté puis une maille glissée, est-ce que j'aurai la même continuité de dessin qu'au début de ma manche? D'autre part me conseillez vous de finir ma manche en diagramme 2 ne Serait-ce pas plus logique?Merci encore bon week-end
09.07.2016 - 11:10DROPS Design hat geantwortet:
Bonjour Mme Even, il vous faut effectivement commencer A.3 en fonction de là où vous avez arrêté A.2 pour que le motif se suive à la transition empiècement/manche. A.3 est le même motif que A.2 mais sans les augmentations du raglan, ajustez simplement pour commencer A.3 sur le nbe de m indiqué pour votre taille tout en continuant le motif des manches de l'empiècement. Bon tricot!
11.07.2016 - 09:03
![]() EVEN hat geschrieben:
EVEN hat geschrieben:
Bonjour, les 8 Mailles reprise sous les manches doivent elles être tricotées en jersey ou Continuer les jours, diagramme 3 qui correspond aux nombres de mailles. Merci
08.07.2016 - 14:57DROPS Design hat geantwortet:
Bonjour Mme Even, en fonction de la taille, les 8 m sous la manche vont se tricoter soit en jersey, soit en point fantaisie (A.2), c'est-à-dire que l'on a, à partir du milieu sous la manche: 6-7-1-2-4-6 m jersey, A.3 et on termine par 7-8-2-3-5-7 m jersey. Soit 13-15-3-5-9-13 m jersey au milieu sous la manche, les autres mailles se tricotent en A.3. Bon tricot!
08.07.2016 - 15:07
![]() Toetie hat geschrieben:
Toetie hat geschrieben:
Ik heb dit truitje een maand geleden gemaakt en ben er enorm blij mee. Muscat is zalig om te breien, gemakkelijk om te wassen en het model is erg leuk om te dragen. Groetjes .
07.07.2016 - 22:09
![]() Hanna hat geschrieben:
Hanna hat geschrieben:
Hei! Ohjeessa on selitetty sanallisesti A2-kuvion ensimmäinen kerros. Lisääntyykö silmukoiden lukumäärä 8:lla vai 12:lla? Minä en saanut lisättyä kuin 8s ja raglan lisäys-ohjeessa sanotaan, että pitäisi lisätä 12s. Onko A2:n ensimmäisellä rivillä siis vain 11 oikeaa silmukkaa, vai pitääkö mallikuvion molemmin puolin tehdä langankierrot? Näin saisin silmukkamäärän täsmäämään. Kiitoksia avusta!!! Ihana malli :)
27.06.2016 - 10:14DROPS Design hat geantwortet:
Hei! Ohjeessa selitetään vain etu- ja takakappaleen raglanlisäykset. Lisäksi kumpaankin hihaan lisätään 2 s, eli juuri nämä 2 langankiertoa, joita näet piirroksen reunoissa. Kaikki hihojen lisäykset on merkitty piirrokseen.
29.06.2016 - 17:02
![]() Aud Berge hat geschrieben:
Aud Berge hat geschrieben:
Har strikket første omg.etter A1. Skal da neste omg strikkes rett.alle masker. Syns det var mye uklart i denneoppskriften
23.06.2016 - 20:05DROPS Design hat geantwortet:
Hei Aud. Der staar i opskriften: "Videre strikkes det slik – fra midt bak: Strikk 17-18-19-20-21-22 m rett, 1 kast, 1 m rett, 1 kast, 2 m rett (sett en merketråd mellom disse m), A.2 (= 11 m), 2 m rett (sett en merketråd mellom disse m), 1 kast, 1 m rett, 1 kast, 34-36-38-40-42-44 m rett, 1 kast, 1 m rett, 1 kast, 2 m rett (sett en merketråd mellom disse m), A.2, 2 m rett (sett en merketråd mellom disse m), 1 kast, 1 m rett, 1 kast, 17-18-19-20-21-22 m rett. Fortsett dette mønsteret, og øk til RAGLAN som forklart over..." Du kan se hvordan du strikker diagrammene i symbolforklaringen nederst. Og husk naar du strikker rett rundt som her = glatstrikk
24.06.2016 - 10:42
![]() Humbert hat geschrieben:
Humbert hat geschrieben:
Bonjour, Explications raglan compliquées. À chaque rang pair, tous les jetés sont tricotés à l'endroit quand on augmente pas les 4m dos et devant ou faut il faire avec torse Merci d'avance
08.06.2016 - 16:39DROPS Design hat geantwortet:
Bonjour Mme Humbert, quand on augmente 4 m pour le dos et le devant, on tricote ainsi: 1 jeté (à tricoter torse au tour suivant), 1 m end, 1 jeté (à tricoter à l'end au tour suivant = jour), 2 m end (le marqueur est entre ces m), A.2, 2 m end (marqueur), 1 jeté (à tricoter à l'end au tour suivant = jour), 1 m end, 1 jeté (= à tricoter torse au tour suivant). c'est-à-dire que les jetés les plus près des marqueurs vont se tricoter à l'endroit pour former des jours, les 2 autres se tricoteront torse à l'end pour éviter les trous. Pour les manches, on tricote les jetés à l'end = jours. Bon tricot!
08.06.2016 - 18:52
![]() Mariolina Motta hat geschrieben:
Mariolina Motta hat geschrieben:
Buongiorno, sono arrivata alle maniche, ma non riesco a capire come fare: una volta riprese le 8 maglie sotto la manica e rimesse sul ferro le maniche già lavorate, da dove comincio a lavorare? Io sto lavorando la taglia L e quindi dovrei cominciare a lavorare una maglia dritta (dopo ilsegnapunti?) e poi A3, ma così A3 comincia 3maglie prima di A2 (manicha già lavorata) e non è quindi dove comincia A2 (come è scritto nelle spiegazioni)... Non riesco proprio a capire....
04.06.2016 - 13:09DROPS Design hat geantwortet:
Buongiorno Mariolina. Posiziona il segnapunti al centro delle 8 m riprese e inizia il giro dalla m dopo il segnapunti. Lavora 1 m dir e poi inizia il diagramma A3. Deve sovrapporre il diagramma A3 con il diagramma A2 iniziando il diagramma A3 da dove ha finito il diag A2, in modo che il motivo prosegua correttamente in verticale. Buon lavoro!
04.06.2016 - 14:18
![]() Ginny Trueman hat geschrieben:
Ginny Trueman hat geschrieben:
The pattern states continue this pattern, and Inc for raglan as explained above, FIRST INC IS NOW DONE. Do I then start the bottom row of A2 or is the bottom row what I start after the first detailed increase row. Not sure if this first increase row is the first row of A2 or not?
29.05.2016 - 23:04DROPS Design hat geantwortet:
Dear Mrs Trueman, this row explains first row on raglan, ie inc on body + work 1st row in A.2, ie on next round, work row 2 in A.2 and repeat the inc every other round. Happy knitting!
30.05.2016 - 10:19
![]() Ginny Trueman hat geschrieben:
Ginny Trueman hat geschrieben:
Is the first and last YO on every other design row in A2 the increase mentioned in the pattern? The first row beginning the pattern shows a yo is the slipped knit (i.e. Split the first and last 2 k with marker) at the beginning and end of the yoke/body) the increase for this first row?or do I need to do a YO which ends this row with 15 stitches. Need more clarity as to whether I keep moving the marker every other row or not. Confused!
29.05.2016 - 22:52DROPS Design hat geantwortet:
Dear Mrs Trueman, the markers should be always at the beg of sleeve (before 1st YO in diagram) and after the last st in sleeve (last YO in diagram), the number of sts between markers will inc due to to these YOs worked every other round (= number of sts on sleeve will then inc every other round). Read more about diagrams here. Happy knitting!
30.05.2016 - 10:17
|
|||||||||||||||||||
Sea Nymph#seanymphsweater |
|||||||||||||||||||
 |
 |
||||||||||||||||||
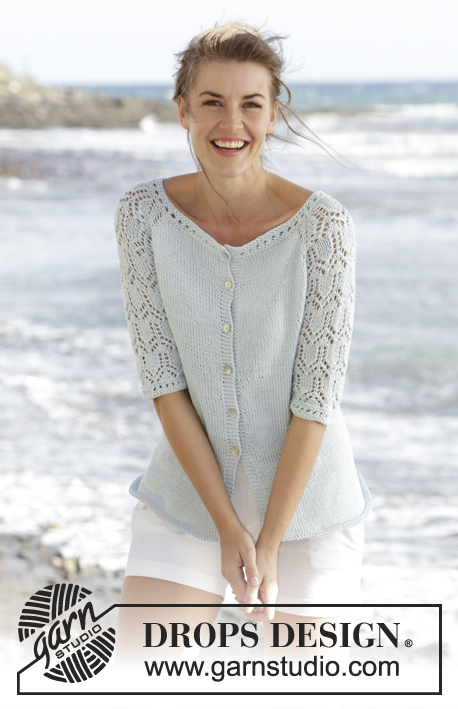
Von oben nach unten gestrickter DROPS Pullover in ”Muskat” mit Lochmuster und ¾ -langen Raglanärmeln. Größe S - XXXL.
DROPS 168-1 |
|||||||||||||||||||
|
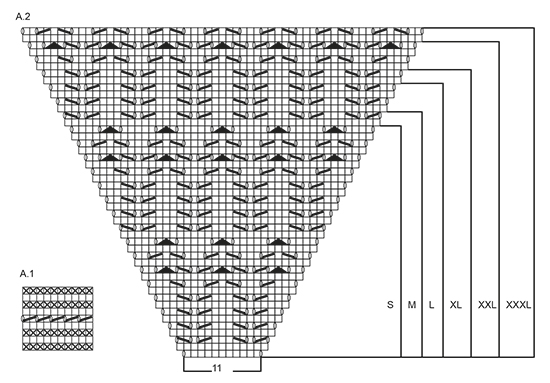
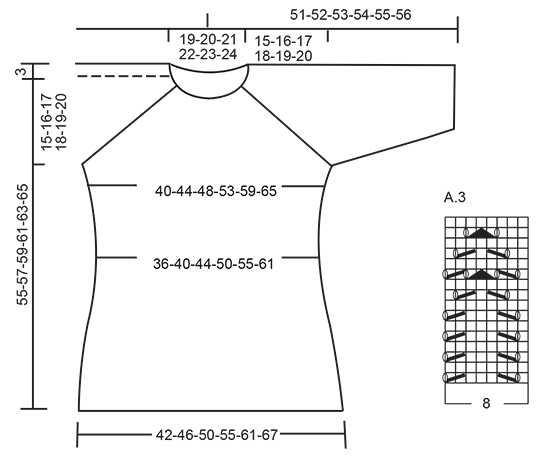
KRAUSRIPPEN (in Rd): 1 Krausrippe = 2 Rd kraus re = 1 Rd re und 1 Rd li. MUSTER: Siehe Diagramme A.1 bis A.3. Das Diagramm für die gewünschte Größe wählen! RAGLANZUNAHMEN: In jeder 2. Rd wie folgt zunehmen: 4 M am Rückenteil, 4 M am Vorderteil und je 2 M an jedem Ärmel (= insgesamt 12 M zugenommen, die Zunahmen am Ärmel sind im Diagramm eingezeichnet), dafür 3 M vor jedem A.2 beginnen und wie folgt str: 1 Umschlag, 1 M re, 1 Umschlag, 2 M re (der Markierer sitzt dazwischen), A.2, 2 M re (der Markierer sitzt dazwischen), 1 Umschlag, 1 M re, 1 Umschlag. Die Umschläge direkt neben den Markierern in der nächsten Rd re str, sodass sie Löcher bilden, die Umschläge in Richtung Vorderteil/Rückenteil re verschränkt str, um Löcher zu vermeiden. Auf diese Weise 12 M noch weitere 0-2-3-7-10-14 x zunehmen (= 1-3-4-8-11-15 x insgesamt, die erste Zunahme-Rd ist im Text erklärt). Dann in jeder 2. Rd wie folgt zunehmen: 2 M am Rückenteil, 2 M am Vorderteil und je 2 M an jedem Ärmel (= insgesamt 8 M zugenommen, die Zunahmen am Ärmel sind im Diagramm eingezeichnet), dafür 2 M vor jedem A.2 beginnen und wie folgt str: 1 Umschlag, 2 M re (der Markierer sitzt dazwischen), A.2, 2 M re (der Markierer sitzt dazwischen), 1 Umschlag. Die Umschläge in der nächsten Rd re str, sodass Löcher gebildet werden. Auf diese Weise 8 M insgesamt 16-15-16-13-12-9 x zunehmen. ---------------------------------------------------------- PULLOVER: Die Arb wird in Rd auf der Rundnadel gestr, von oben nach unten. PASSE: 87-91-95-99-103-107 M auf Rundnadel Nr. 4 mit Muskat anschlagen. 1 Rd re str, dann im Muster A.1 str, in der letzten Rd von A.1 15 M gleichmäßig verteilt zunehmen = 102-106-110-114-118-122 M. Wie folgt weiterstr – ab der hinteren Mitte: 17-18-19-20-21-22 M re, 1 Umschlag, 1 M re, 1 Umschlag, 2 M re (zwischen diesen 2 M 1 Markierer anbringen), A.2 (= 11 M), 2 M re (zwischen diesen 2 M 1 Markierer anbringen), 1 Umschlag, 1 M re, 1 Umschlag, 34-36-38-40-42-44 M re, 1 Umschlag, 1 M re, 1 Umschlag, 2 M re (zwischen diesen 2 M 1 Markierer anbringen), A.2, 2 M re (zwischen diesen 2 M 1 Markierer anbringen), 1 Umschlag, 1 M re, 1 Umschlag, 17-18-19-20-21-22 M re. In dieser Musterfolge weiterstr und dabei die RAGLANZUNAHMEN (siehe oben) weiterarb, die erste Zunahme ist bereits erfolgt. MASCHENPROBE BEACHTEN! Wenn A.2 in der Höhe zu Ende gestr wurde (siehe Markierung für die gewünschte Größe), sind 242-262-286-314-346-374 M auf der Nadel, die Zunahmen sind nun abgeschlossen. Die nächste Rd wie folgt str: 38-42-46-52-58-64 M str (= halbes Rückenteil), die nächsten 45-47-51-53-57-59 M stilllegen (= Ärmel), 8 neue M anschlagen (= unter dem Arm), die nächsten 76-84-92-104-116-128 M str (= Vorderteil), die nächsten 45-47-51-53-57-59 M stilllegen (= Ärmel), 8 neue M anschlagen (= unter dem Arm), die letzten 38-42-46-52-58-64 M str ( = halbes Rückenteil). RUMPFTEIL: Nun sind 168-184-200-224-248-272 M für das Rumpfteil vorhanden. Glatt re in Rd weiterstr. An beiden Seiten des Pullovers, d.h. jeweils in der Mitte der 8 neu angeschlagenen M, je 1 Markierer anbringen. DIE ARB WIRD NUN AB HIER GEMESSEN. Bei einer Länge von 4 cm je 1 M beidseitig jedes Markierers abnehmen (= 4 M abgenommen), diese Abnahmen alle 4-4-4-5-5-5 cm noch weitere 3 x wdh = 152-168-184-208-232-256 M. Bei einer Länge von 22-23-24-25-26-27 cm beidseitig jedes Markierers je 1 M zunehmen (= 4 M zugenommen), diese Zunahmen alle 2 cm noch weitere 5 x wdh = 176-192-208-232-256-280 M. Bei einer Länge von 36-37-38-39-40-41 cm 2 KRAUSRIPPEN (= 4 Rd kraus re, siehe oben) über alle M str. Mit 1 M re, 1 M li im Wechsel abketten (damit sich die Abkettkante nicht wellt), die Arb hat eine Gesamtlänge von ca. 55-57-59-61-63-65 cm ab dem Anschlagrand. ÄRMEL: Die Ärmel werden in Rd angestr. Die stillgelegten M des einen Ärmels zurück auf Nadelspiel Nr. 4 legen und je 1 M aus den 8 M unter dem Arm auffassen = 53-55-59-61-65-67 M. 1 Markierer an der unteren Ärmelmitte anbringen = die Rd beginnt nun hier. DIE ARB WIRD NUN AB HIER GEMESSEN! Wie folgt weiterstr: 6-7-1-2-4-5 M glatt re, A.3 über die nächsten 40-40-56-56-56-56 M (A.3 dort beginnen, wo A.2 in der gewünschten Größe geendet hat), 7-8-2-3-5-6 M glatt re. Bei einer Länge von 4 cm je 1 M beidseitig des Markierers abnehmen. Die M, die nicht im Muster aufgehen, glatt re str, darauf achten, dass die Anzahl an Abnahmen und Zunahmen im Muster richtig ist. Diese Abnahmen alle 7-7-5-5-3-3 cm noch weitere 2-2-3-3-4-4 x wdh = 47-49-51-53-55-57 M. Bei einer Länge von 24-23-23-22-22-21 cm A.1 über alle M str, dann abketten. Den zweiten Ärmel ebenso str. |
|||||||||||||||||||
Erklärungen zum Diagramm |
|||||||||||||||||||
|
|||||||||||||||||||
 |
|||||||||||||||||||
 |
|||||||||||||||||||
Haben Sie diese Anleitung nachgearbeitet?Dann taggen Sie Ihre Fotos mit #dropspattern #seanymphsweater oder schicken Sie sie an die #dropsfan Galerie Brauchen Sie Hilfe bei dieser Anleitung?Sie finden 25 Videotutorials, einen Kommentar/Fragen-Bereich und vieles mehr, wenn sie die Anleitung bei garnstudio.com aufrufen. © 1982-2026 DROPS Design A/S. Wir besitzen alle Rechte. Dieses Dokument, einschließlich aller Untersektionen, hat Urheberrechte. Mehr dazu, was Sie mit unseren Anleitungen machen können, finden Sie ganz unten auf der Seite zu jeder Anleitung. |
|||||||||||||||||||


Mit über 40 Jahren Tätigkeit im Entwerfen von Strick- und Häkelmustern bietet Ihnen DROPS Design eine der umfangreichsten Sammlungen von kostenlosen Anleitungen im Internet - in 17 Sprachen übersetzt. Zum jetzigen Zeitpunkt haben wir insgesamt 324 Handarbeitshefte und 12239 Anleitungen auf Deutsch. 12151
Unser Ziel ist es, Ihnen die besten Angebote zum Stricken und Häkeln, Inspirationen und Ratschläge sowie qualitativ hochstehende Garne zu unglaublichen Preisen zu bieten! Möchten Sie unsere Anleitungen nicht nur für den persönlichen Gebrauch nutzen? Unsere Copyright Bedingungen finden Sie bei allen unseren Anleitungen ganz unten auf der jeweiligen Seite. Viel Spaß beim Handarbeiten!
Kommentieren Sie die Anleitung DROPS 168-1
Wir würden gerne Ihre Meinung zu diesem Modell erfahren!
Wenn Sie eine Frage stellen möchten, prüfen Sie bitte, dass Sie die richtige Kategorie im unten stehenden Formular gewählt haben - so bekommen Sie schneller eine Antwort. Die obligatorischen Felder sind mit einem * gekennzeichnet.